
SPIKE beginner examples: Controller 2.4G Receiver (PS2)
Back to the Controller 2.4G Receiver (PS2) product page
Note
The Pybricks programs below are the same files as on the Chinese page, so the comments inside the code are in Chinese. The English explanation under each example tells you what every line does.
This page is written for people who have never written a program before. The 5 examples start with "see the button number on the screen" and build up, one step at a time, to "drive a tank with two joysticks". Every example comes in 3 versions. Just pick the one you have:
| Version | Who it is for | How to open the example file |
|---|---|---|
| 🟨 The official LEGO SPIKE App (blocks) | Schools, and anyone using SPIKE for the first time | Download the .llsp3 → open the SPIKE App → top-left "File" → "Open" → pick the file |
| 🟦 The MBC Blocks website (Chinese blocks) | People who want to pick "which button" directly from a block | Open the MBC SPIKE Blocks website → top menu "File → Open" (or press Ctrl+O) → pick the downloaded .abp |
| 🐍 Pybricks (Python text code) | People who want to learn to type real code | Open code.pybricks.com → "Import a file" in the file area on the left → import both the example file and MBC_gamepad_Lib.py → open the example → press ▶ to run |
Important
- The receiver must have the SPIKE firmware (each platform ships as a different factory version; an EV3-version receiver plugged into SPIKE will not be recognized).
- For the MBC Blocks website and Pybricks, you first have to switch the hub to the Pybricks firmware (on the MBC Blocks website, top menu "SPIKE Hub → Install/Update Pybricks firmware" flashes it in about 3 minutes; you can switch back to the original LEGO firmware with the SPIKE App any time). The official LEGO App does not need this.
- The official LEGO App used here is the Education version (SPIKE 3). The home version (Robot Inventor) reads the "color" block differently, so the official App examples on this page do not apply to it. Please see the Command Guide (PDF).
Note
Example 6 at the end is an advanced bonus, Pybricks version only: the values it uses live in a new mode that was added to the sensor firmware in 2026-10, and the blocks in the official LEGO App and the MBC Blocks website cannot read it.
Before you start: connect the gamepad to the receiver
The PS2 2.4G gamepad and its receiver dongle are paired at the factory. There is no pairing button to press.
- Plug the receiver into the hub's port C and turn the hub on.
- Turn on the gamepad. It connects by itself.
- Look at the green light on the receiver board: on = no gamepad connected yet; off = gamepad connected.
- The ANALOG (or MODE) light on the gamepad must be on, or the joysticks will not give values. The receiver switches to this mode automatically as soon as the gamepad connects; if the light is off, press the ANALOG button in the middle of the gamepad once.
How do I know it is connected? Run Example 2 below: with the joystick released, the hub display shows 5; push the left stick all the way up and it becomes 9.
The values used on this page
Joysticks: each stick has two numbers, "left-right (X)" and "up-down (Y)", both from 1 to 9.
| Stick position | Number |
|---|---|
| Released (centered) | 5 |
| Pushed all the way up / all the way right | 9 |
| Pulled all the way down / all the way left | 1 |
Tip
When you push only a little, left and down become 4 almost right away, while right and up need to be pushed about halfway before they become 6 (the two sides are not equally sensitive). That is why every example on this page treats 4 to 6 as "centered", and counts 7 or more as pushed up, 3 or less as pulled down, so both directions feel the same to control.
Buttons: the MBC Blocks website and Pybricks let you pick "which button" directly. Pybricks button names:
| Button | Pybricks name | Button | Pybricks name |
|---|---|---|---|
| Up, Right, Down, Left | 'UP', 'RIGHT', 'DOWN', 'LEFT' |
L1, R1, L2, R2 | 'L1', 'R1', 'L2', 'R2' |
| ▲, ●, ✕, ■ | 'TRIANGLE', 'CIRCLE', 'CROSS', 'SQUARE' |
SELECT, START | 'SELECT', 'START' |
| Left stick pressed in, right stick pressed in | 'L3', 'R3' |
Stick names: 'LX' left stick left-right, 'LY' left stick up-down, 'RX' right stick left-right, 'RY' right stick up-down.
In the official LEGO App, the receiver shows up as a "Color Sensor", so you read it with the Color Sensor blocks:
| Official block | What it reads | Number for each button (pressed together = added up) |
|---|---|---|
| reflected light | D-pad + shape buttons | Up 1, Right 2, Down 4, Left 8, ▲ 16, ● 32, ✕ 64, ■ 128 |
| color | Shoulder buttons + function buttons | L2 1, R2 2, L1 4, R1 8, SELECT 16, L3 32, R3 64, START -128 |
| raw red (under "More Sensors") | Left stick | X×10+Y, 55 when released. Up-down (Y) = remainder of dividing by 10; left-right (X) = whole part of dividing by 10 |
| raw green | Right stick | Same as above |
Tip
How does the official App tell whether one particular button is pressed? Use "take the whole part of (the number read ÷ that button's number), then check whether the remainder of dividing by 2 is 1". For example, ✕ is 64: with only ✕ pressed, reflected light is 64, 64 ÷ 64 = 1, 1 divided by 2 leaves remainder 1 → pressed. With Up (1) and ✕ pressed together it is 65 ÷ 64 → whole part 1 → remainder 1 → pressed too.
- Do not use comparison blocks like "is color red?" in the official App. Always use the number from "color".
- "raw blue" is all 16 keys combined into one number (PSX layout, the same on PS2 and PS4); the examples on this page only need reflected light and color.
Example 1: Button test
What this example does: the hub display keeps showing the "button number". Press different buttons and the number changes, so you can check that every button works.
What you need
- 1 SPIKE hub
- Controller PS2 receiver + 2.4G gamepad (already connected, see above)
How to wire it: plug the receiver into port C.
Download the program
| Official LEGO App | MBC Blocks website | Pybricks |
|---|---|---|
| ex01_button_number.llsp3 | ex01_button_number.abp | ex01_button_number.py + library |
🟨 Blocks in the official LEGO App
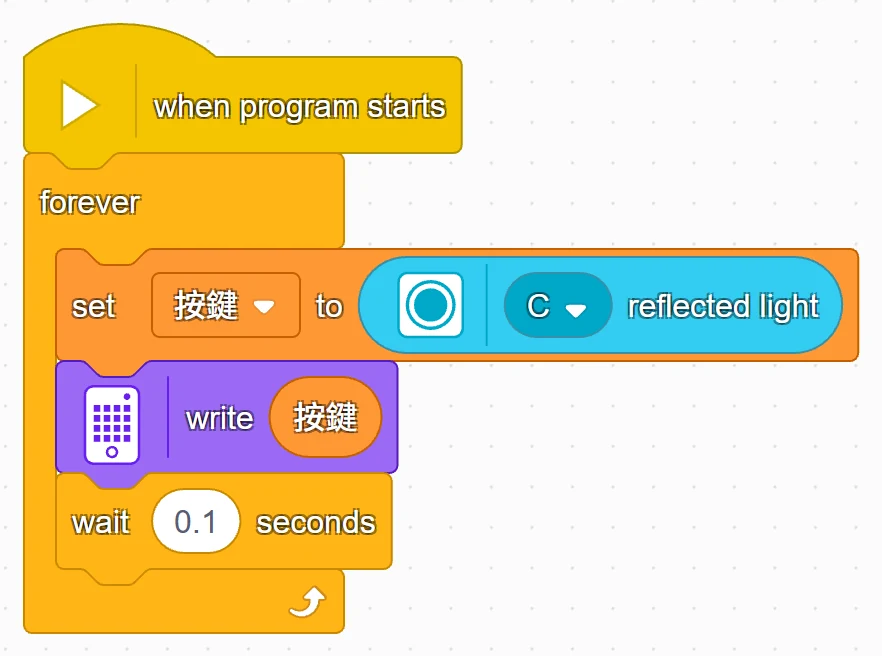
🟦 Blocks on the MBC Blocks website
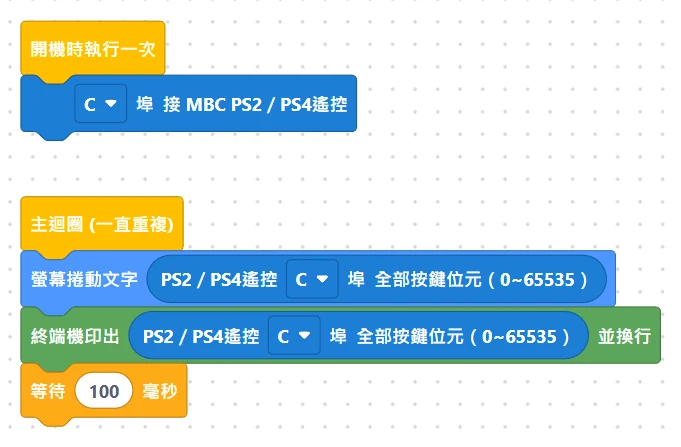
Pybricks code
# 掌控者PS2 範例 1:按鍵測試(螢幕顯示按鍵數字)
# 接線:掌控者PS2 接收器 → C 埠
from pybricks.hubs import PrimeHub
from pybricks.parameters import Port
from pybricks.tools import wait
from MBC_gamepad_Lib import MBC_GAMEPAD

hub = PrimeHub()
pad = MBC_GAMEPAD(Port.C)       # 接收器插在 C 埠

while True:
    pad.update()                # 先讀一次手把
    n = pad.buttons()           # 全部按鍵合成一個數字:沒按 = 0,上 = 1、右 = 2、下 = 4、左 = 8…
    hub.display.text(str(n))    # 主機螢幕捲動顯示這個數字
    print(n)                    # 電腦畫面也印出來
    wait(100)                   # 等 0.1 秒再讀下一次
Step by step, what the program does
- Repeat forever: the blocks below keep running until you press stop.
- Read the buttons: the official App uses "reflected light", which reads the D-pad and the shape buttons; the MBC Blocks website and Pybricks use "all buttons", which reads all 16.
- Show it on the hub display: the number scrolls across the display (hold the button and wait for it to finish scrolling).
- Wait 0.1 second before reading again.
What you should see when it runs
| Holding | All three versions show | MBC Blocks website and Pybricks only |
|---|---|---|
| Nothing | 0 | |
| Up | 1 | |
| Right / Down / Left | 2 / 4 / 8 | |
| ▲ / ● / ✕ / ■ | 16 / 32 / 64 / 128 | |
| Up + ▲ together | 17 (1 + 16, pressed together = added up) | |
| L2 / R2 / L1 / R1 | Official App still shows 0 (shoulder buttons need the "color" block, used in Example 3) | 256 / 512 / 1024 / 2048 |
| SELECT / L3 / R3 / START | Official App still shows 0 | 4096 / 8192 / 16384 / 32768 |
Common questions
- Always 0, nothing happens no matter what I press? → The gamepad is not connected yet: check whether the green light on the receiver is still on, turn on the gamepad or change its batteries.
- The hub says it cannot find the sensor, or the numbers look strange? → The receiver may have the EV3 firmware. You need the SPIKE version.
Example 2: Joystick value
What this example does: the hub display shows the up-down position of the left stick (1 to 9). Released is 5; pushing up makes it bigger, pulling down makes it smaller.
What you need: same as Example 1.
How to wire it: plug the receiver into port C.
Download the program
| Official LEGO App | MBC Blocks website | Pybricks |
|---|---|---|
| ex02_stick_value.llsp3 | ex02_stick_value.abp | ex02_stick_value.py + library |
🟨 Blocks in the official LEGO App
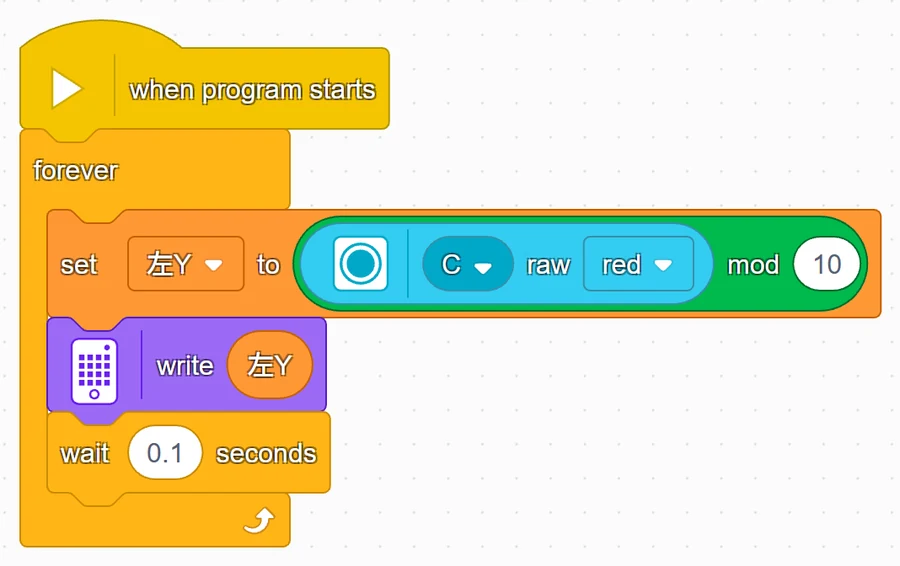
🟦 Blocks on the MBC Blocks website
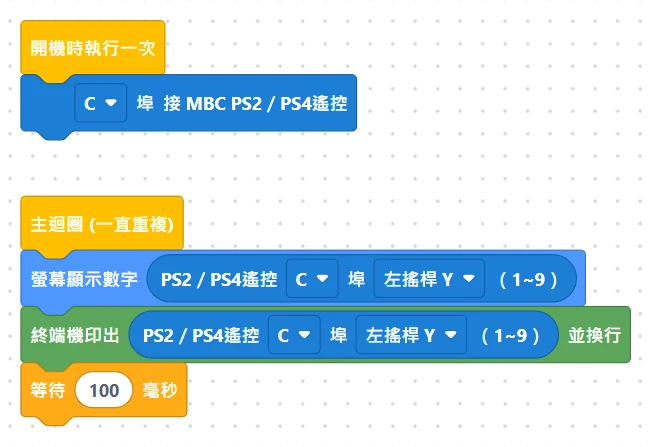
Pybricks code
# 掌控者PS2 範例 2:搖桿數值(螢幕顯示左搖桿上下的位置)
# 接線:掌控者PS2 接收器 → C 埠
from pybricks.hubs import PrimeHub
from pybricks.parameters import Port
from pybricks.tools import wait
from MBC_gamepad_Lib import MBC_GAMEPAD

hub = PrimeHub()
pad = MBC_GAMEPAD(Port.C)       # 接收器插在 C 埠

while True:
    pad.update()                # 先讀一次手把
    y = pad.stick('LY')         # 左搖桿上下:1(拉到最下)~ 5(中間)~ 9(推到最上)
    hub.display.number(y)       # 主機螢幕顯示這個數字
    print('LX', pad.stick('LX'), 'LY', y, 'RX', pad.stick('RX'), 'RY', pad.stick('RY'))   # 電腦畫面印出 4 個方向
    wait(100)
Step by step, what the program does
- Read the left stick up-down:
- Official App: "raw red" reads X×10+Y (for example 59 = left-right centered at 5, pushed all the way up to 9), so use "remainder of dividing by 10" to pull out the Y (59 → 9).
- MBC Blocks website: just pick "left stick Y (1~9)".
- Pybricks:
pad.stick('LY').
- Show it on the hub display. The MBC Blocks website and Pybricks also print the number on the computer screen (Pybricks prints all 4 directions).
- Wait 0.1 second before reading again.
What you should see when it runs
- Stick released: 5.
- Slowly push up: 6, 7, 8, 9.
- Slowly pull down: 4, 3, 2, 1.
Common questions
- Always 5, even when I push the stick? → The gamepad is in "digital mode": press the ANALOG button on the gamepad once so the ANALOG light comes on.
- Shows 1 before I even turn on the gamepad? → On older receiver firmware, the sticks read 1 (same as pulled all the way down) while no gamepad is connected. Turn on the gamepad and it goes back to 5. Example 5 has a safety check so the car does not reverse right at startup because of this.
- Want the right stick, or the left-right direction? → MBC Blocks website: change the dropdown to "right stick Y" or "left stick X"; official App: use "raw green" for the right stick, and "whole part of dividing by 10" for left-right; Pybricks: change
'LY'to'RY','LX'or'RX'.
Example 3: Buttons control the light and sound
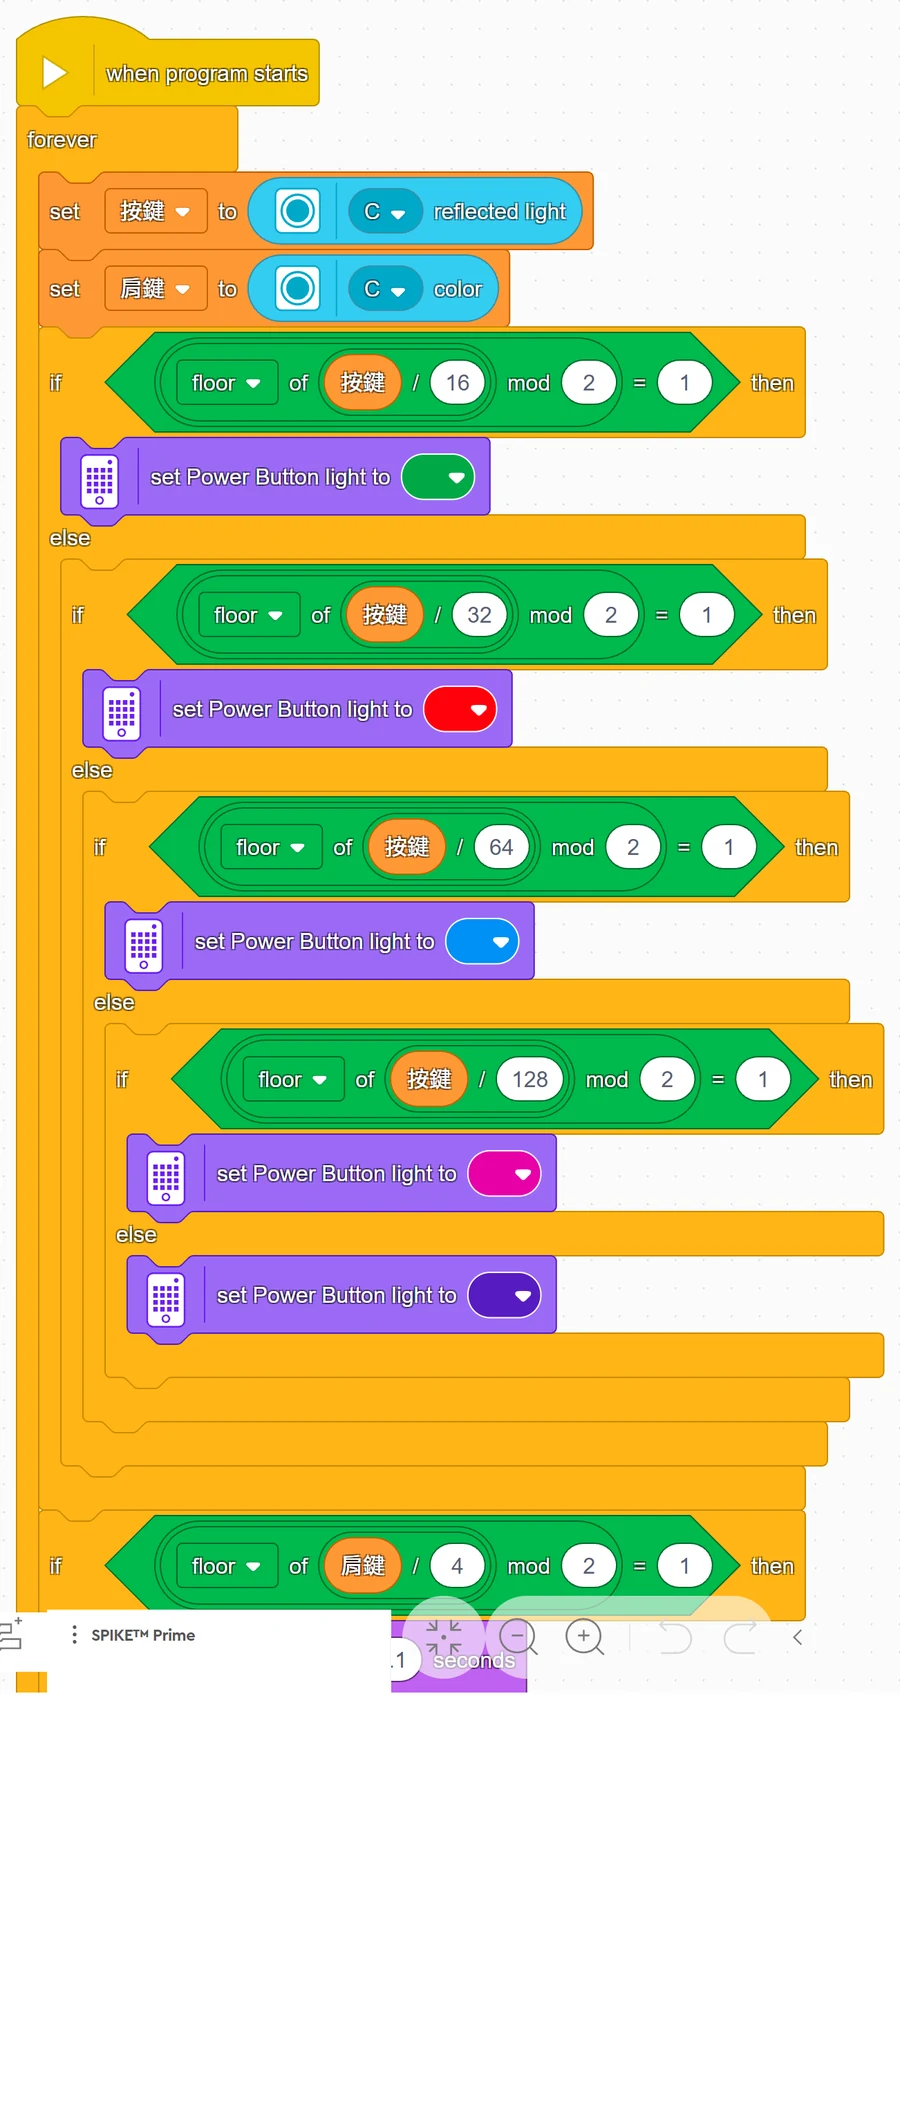
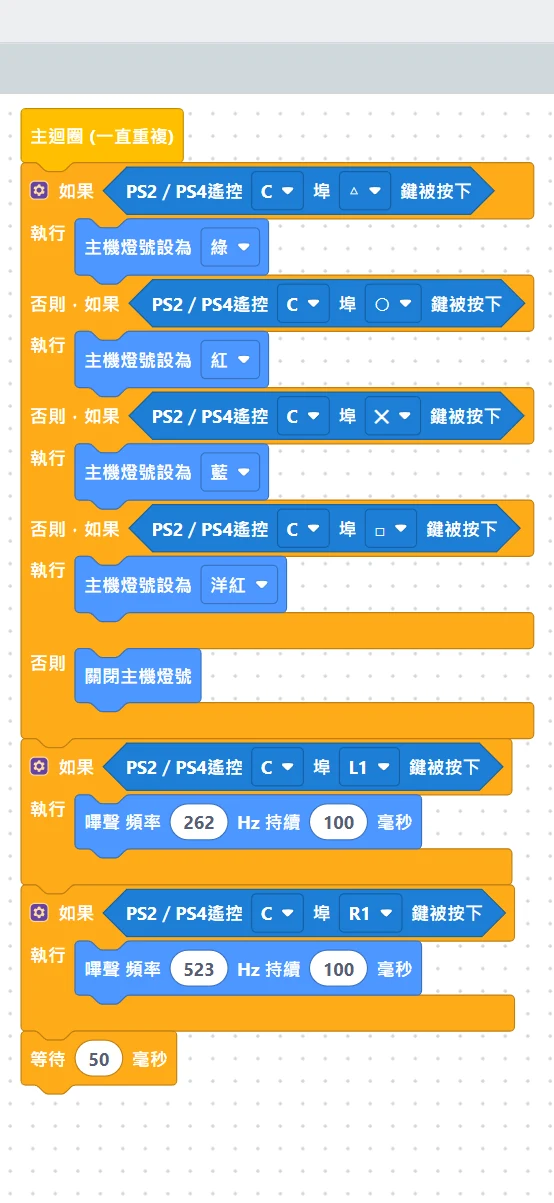
What this example does: press ▲ and the hub light turns green, ● red, ✕ blue, ■ pink (the same colors as on the gamepad); with nothing pressed the light turns off. Press L1 for a low beep, R1 for a high beep.
What you need: same as Example 1.
How to wire it: plug the receiver into port C.
Download the program
| Official LEGO App | MBC Blocks website | Pybricks |
|---|---|---|
| ex03_light_sound.llsp3 | ex03_light_sound.abp | ex03_light_sound.py + library |
🟨 Blocks in the official LEGO App
🟦 Blocks on the MBC Blocks website
Pybricks code
# 掌控者PS2 範例 3:按鍵控制燈和聲音
# 接線:掌控者PS2 接收器 → C 埠
# ▲ 綠燈、● 紅燈、✕ 藍燈、■ 粉紅燈(跟手把上的顏色一樣),都沒按就關燈;L1 低音嗶、R1 高音嗶
from pybricks.hubs import PrimeHub
from pybricks.parameters import Color, Port
from pybricks.tools import wait
from MBC_gamepad_Lib import MBC_GAMEPAD

hub = PrimeHub()
pad = MBC_GAMEPAD(Port.C)               # 接收器插在 C 埠

while True:
    pad.update()                        # 先讀一次手把
    if pad.pressed('TRIANGLE'):         # ▲
        hub.light.on(Color.GREEN)
    elif pad.pressed('CIRCLE'):         # ●
        hub.light.on(Color.RED)
    elif pad.pressed('CROSS'):          # ✕
        hub.light.on(Color.BLUE)
    elif pad.pressed('SQUARE'):         # ■
        hub.light.on(Color.MAGENTA)
    else:                               # 4 個都沒按
        hub.light.off()

    if pad.pressed('L1'):
        hub.speaker.beep(262, 100)      # 低音 Do(262 Hz),響 0.1 秒
    if pad.pressed('R1'):
        hub.speaker.beep(523, 100)      # 高音 Do(523 Hz)
    wait(50)
Step by step, what the program does
- First read the buttons into a "variable" (a variable = a box with a name that can hold one number): the official App uses two boxes, "buttons" holds reflected light (D-pad + shape buttons) and "shoulder" holds color (L1, R1, ...). The MBC Blocks website and Pybricks do not need to store anything; they just ask "is this button pressed?".
- If ▲ is pressed → green light.
- Else, if ● is pressed → red light; else if ✕ → blue light; else if ■ → pink light.
- None of them → light off.
- Two more "if"s: L1 pressed → low beep (note 60 in the official App, 262 Hz in the other two; both are a "Do"); R1 pressed → high beep (note 72 / 523 Hz, the Do one octave up).
- How the official App checks "▲ is pressed": whole part of (buttons ÷ 16), then remainder of dividing by 2 = 1. For ● use 32, ✕ 64, ■ 128; L1 is (shoulder ÷ 4), R1 is (shoulder ÷ 8).
What you should see when it runs
- Hold ▲: green light; release: light off.
- Press ▲ and ● together: green light (the first "if" that is true wins, the ones below are not checked).
- Hold L1: it keeps beeping the low note.
Common questions
- No sound for L1, R1 in the official App? → The shoulder buttons are read with the "color" block (this page was put together from the firmware and the official examples; it has not yet been checked one by one on real hardware). First run Example 1 to confirm the D-pad and shape buttons work; then change "reflected light" in Example 1 to "color", and pressing L1 should show 4, R1 should show 8.
- How do I change the light color? → Official App: click the color dot on the "set Power Button light to" block; MBC Blocks website: click the dropdown on the "set hub light to" block; Pybricks: change
Color.GREENto something likeColor.YELLOW.
Example 4: Drive with the D-pad
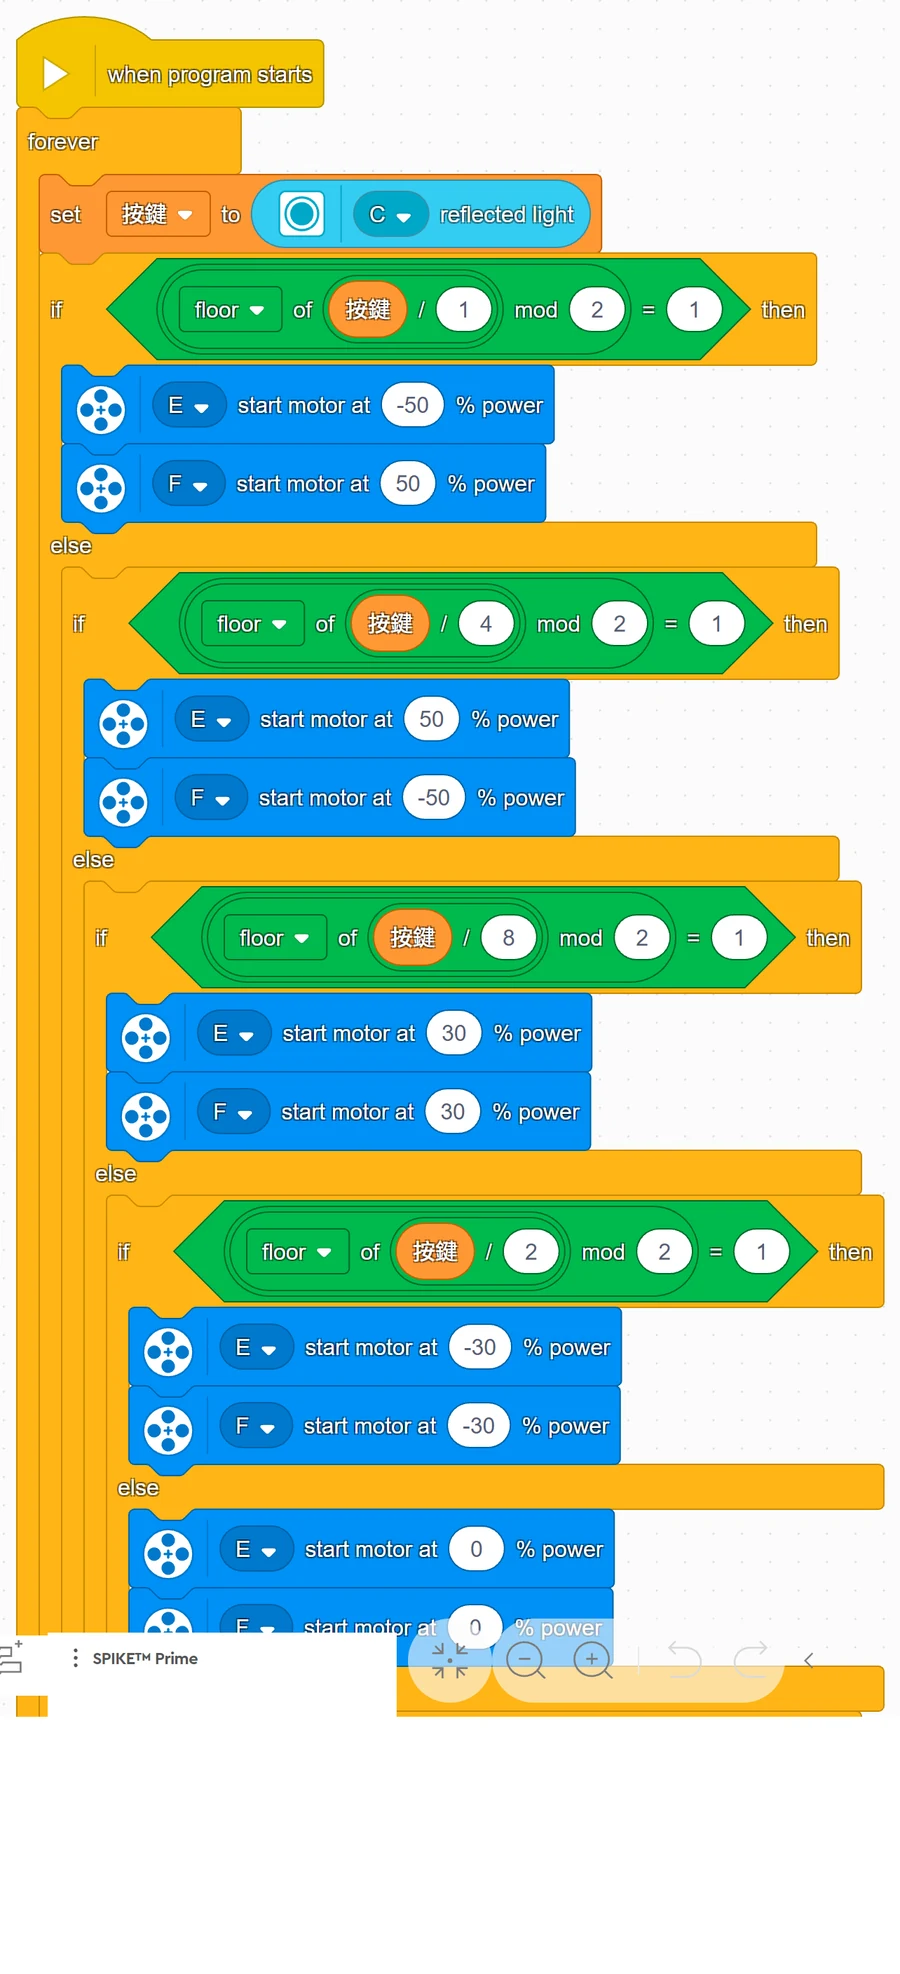
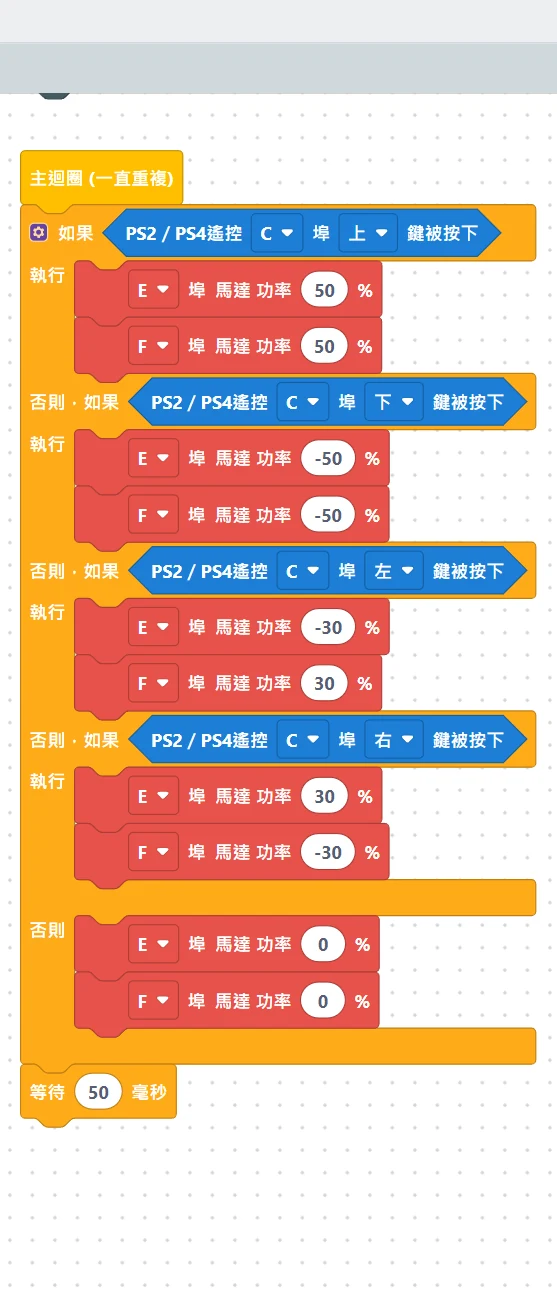
What this example does: hold a D-pad button and the car drives that way; release and it stops. Up = forward, Down = backward, Left = turn left in place, Right = turn right in place.
What you need
- Everything from Example 1, plus
- A two-wheel car (two motors as the wheels)
How to wire it
- Plug the receiver into port C
- Left wheel motor on E, right wheel motor on F
Download the program
| Official LEGO App | MBC Blocks website | Pybricks |
|---|---|---|
| ex04_dpad_drive.llsp3 | ex04_dpad_drive.abp | ex04_dpad_drive.py + library |
🟨 Blocks in the official LEGO App
🟦 Blocks on the MBC Blocks website
Pybricks code
# 掌控者PS2 範例 4:方向鍵開車(按住才走,放開就停)
# 接線:掌控者PS2 接收器 → C 埠;左輪馬達 → E 埠;右輪馬達 → F 埠
from pybricks.parameters import Direction, Port
from pybricks.pupdevices import Motor
from pybricks.tools import wait
from MBC_gamepad_Lib import MBC_GAMEPAD

pad = MBC_GAMEPAD(Port.C)                          # 接收器插在 C 埠
left = Motor(Port.E, Direction.COUNTERCLOCKWISE)   # 左輪:反過來裝,所以設成逆時針才是往前
right = Motor(Port.F)                              # 右輪

while True:
    pad.update()                    # 先讀一次手把
    if pad.pressed('UP'):           # 上 → 前進(功率 50%)
        left.dc(50)
        right.dc(50)
    elif pad.pressed('DOWN'):       # 下 → 後退
        left.dc(-50)
        right.dc(-50)
    elif pad.pressed('LEFT'):       # 左 → 原地左轉:左輪往後、右輪往前
        left.dc(-30)
        right.dc(30)
    elif pad.pressed('RIGHT'):      # 右 → 原地右轉
        left.dc(30)
        right.dc(-30)
    else:                           # 都沒按 → 停
        left.dc(0)
        right.dc(0)
    wait(50)
Step by step, what the program does
- Tell the hub how the wheels are mounted: the two motors face each other, so the left wheel has to "spin the other way" to go forward.
- MBC Blocks website: "E is a LEGO motor, forward = counterclockwise" (F is clockwise); Pybricks:
Direction.COUNTERCLOCKWISE. Once this is set, giving both wheels a positive number means forward. - The official App's motor blocks have no such setting, so the left wheel E gets a minus sign: forward is E -50, F 50.
- MBC Blocks website: "E is a LEGO motor, forward = counterclockwise" (F is clockwise); Pybricks:
- Repeat forever: read the buttons.
- If Up is pressed → both wheels forward (50% power).
- Else if Down → both wheels backward.
- Else if Left → left wheel backward, right wheel forward → turn left in place (30% power; turning slower is easier to control).
- Else if Right → turn right in place.
- Nothing pressed → both wheels power 0, stop.
| Holding | MBC Blocks website, Pybricks (E, F) | Official App (E, F) |
|---|---|---|
| Up | 50, 50 | -50, 50 |
| Down | -50, -50 | 50, -50 |
| Left | -30, 30 | 30, 30 |
| Right | 30, -30 | -30, -30 |
| Nothing | 0, 0 | 0, 0 |
What you should see when it runs: hold Up and the car drives forward; release and the car stops.
Common questions
- Pressing Up drives backward? → The motors are mounted the opposite way from the standard LEGO car: MBC Blocks website: swap the "forward" directions of E and F; Pybricks: change the left wheel to
Direction.CLOCKWISEand the right wheel toMotor(Port.F, Direction.COUNTERCLOCKWISE); official App: flip the sign of every number. - Pressing Up spins in place? → Only one side is reversed: flip the sign (or forward direction) of that one motor only.
- The gamepad was turned off or ran out of battery, and the car keeps driving? → Press the center button on the hub first to stop the program, then check the gamepad batteries.
Example 5: Tank drive with two joysticks
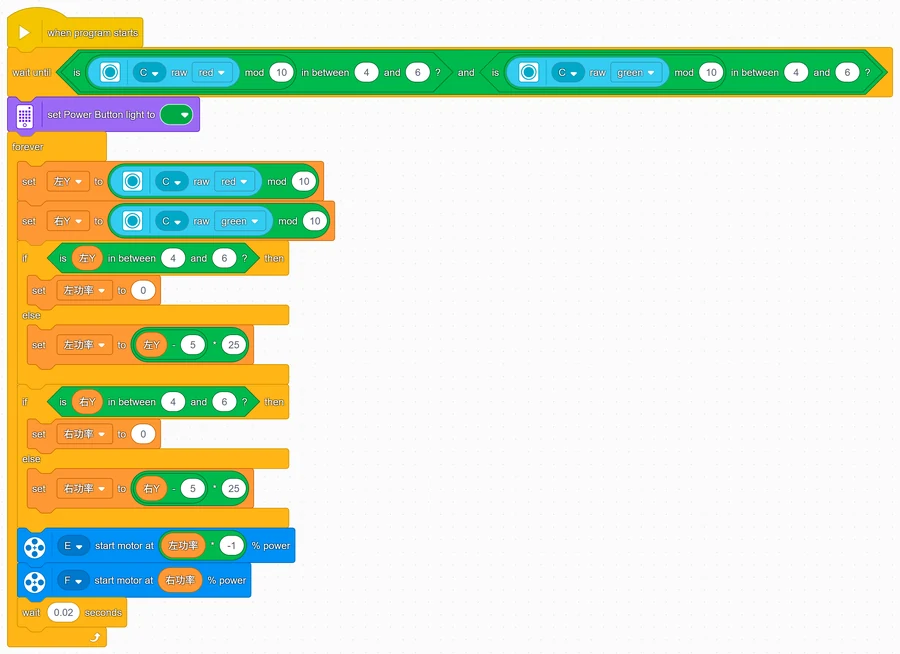
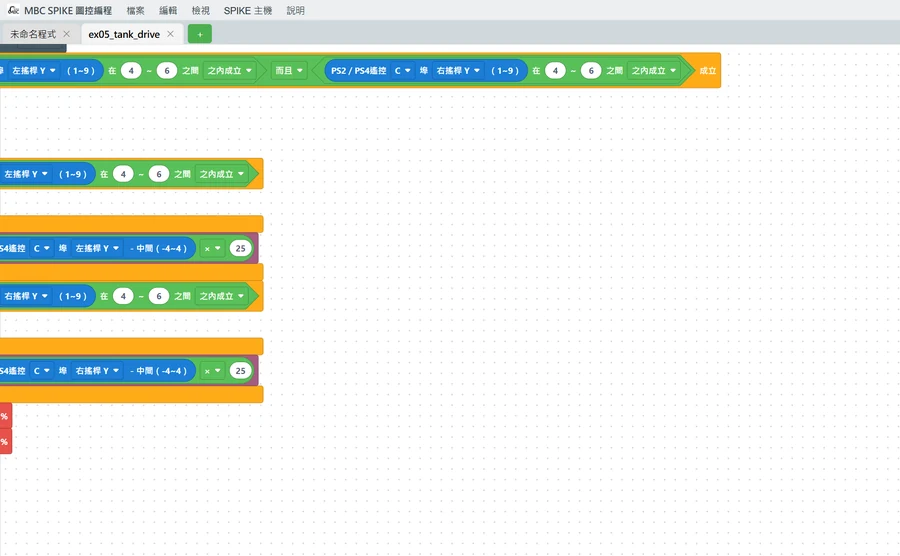
What this example does: drive it like a tank: the left stick controls the left wheel, the right stick controls the right wheel. Push both forward = forward, pull both back = backward, one forward and one back = turn in place. The further you push, the faster it goes; release and it stops.
What you need: same as Example 4.
How to wire it: plug the receiver into port C; left wheel motor on E, right wheel motor on F.
Download the program
| Official LEGO App | MBC Blocks website | Pybricks |
|---|---|---|
| ex05_tank_drive.llsp3 | ex05_tank_drive.abp | ex05_tank_drive.py + library |
🟨 Blocks in the official LEGO App
🟦 Blocks on the MBC Blocks website
Pybricks code
# 掌控者PS2 範例 5:雙搖桿坦克開車(左搖桿管左輪、右搖桿管右輪)
# 接線:掌控者PS2 接收器 → C 埠;左輪馬達 → E 埠;右輪馬達 → F 埠
from pybricks.hubs import PrimeHub
from pybricks.parameters import Color, Direction, Port
from pybricks.pupdevices import Motor
from pybricks.tools import wait
from MBC_gamepad_Lib import MBC_GAMEPAD

hub = PrimeHub()
pad = MBC_GAMEPAD(Port.C)                          # 接收器插在 C 埠
left = Motor(Port.E, Direction.COUNTERCLOCKWISE)   # 左輪:反過來裝,所以設成逆時針才是往前
right = Motor(Port.F)                              # 右輪

# 開始前的保護:等兩支搖桿都在中間(4~6)才開始,車子才不會一開機就衝出去
while True:
    pad.update()
    if 4 <= pad.stick('LY') <= 6 and 4 <= pad.stick('RY') <= 6:
        break
    wait(20)
hub.light.on(Color.GREEN)                          # 綠燈 = 可以開了

while True:
    pad.update()                                   # 先讀一次手把
    ly = pad.stick('LY')                           # 左搖桿上下 1~9
    ry = pad.stick('RY')                           # 右搖桿上下 1~9
    # 死區:搖桿在中間附近(4~6)就當成 0,放開手車子就停
    if 4 <= ly <= 6:
        left_power = 0
    else:
        left_power = (ly - 5) * 25                 # 7 → 50%、9 → 100%、3 → -50%、1 → -100%
    if 4 <= ry <= 6:
        right_power = 0
    else:
        right_power = (ry - 5) * 25
    left.dc(left_power)
    right.dc(right_power)
    wait(20)
Step by step, what the program does
- Safety check before starting: first "wait until" both sticks are centered (4 to 6), then turn the light green. This way the car will not suddenly shoot off if the gamepad is not connected yet, or a stick gets bumped right at startup.
- Repeat forever: read the left stick up-down (Y) and the right stick up-down (Y). In the official App that is "raw red" and "raw green", remainder of dividing by 10.
- Dead zone: if the stick is between 4 and 6, set the power to 0. When you let go, the stick does not always land exactly on 5; the dead zone is what makes the car stop properly.
- Else: power = (stick − 5) × 25. Pushed to 7 is 50%, all the way to 9 is 100%; pulled to 3 is -50%, all the way to 1 is -100%.
- Send the power to the motors: left wheel E uses the left stick's power, right wheel F uses the right stick's power. In the official App the left wheel is × -1 (same reason as Example 4).
What you should see when it runs
- Right after the program starts: release the sticks and the light turns green; the car does not move.
- Push both sticks forward together: it drives forward, faster the further you push.
- Left stick forward, right stick back: it turns right in place.
- Release: the car stops.
Common questions
- I pressed run but the green light never comes on? → The sticks are not centered, or the gamepad is not connected yet (on older receiver firmware the sticks read 1 while no gamepad is connected). Release the sticks and turn on the gamepad; the green light comes on and it starts.
- A small push does not move the car? → That is the dead zone; it only moves at 7 or more (or 3 or less). For more sensitivity you can change "4 to 6" to "5 to 5", but the car may creep slowly when you let go.
- Too fast to control? → Change "× 25" to "× 15" (full push becomes 60%).
- Forward and backward are swapped, or it spins in place? → See the common questions in Example 4.
Example 6 (advanced): Connection status and battery level
Note
This example has a Pybricks version only. The "connection status" and "battery level" it uses live in the receiver's mode 3, which the official LEGO App and the MBC Blocks website cannot read. The receiver firmware must be a version from 2026-10 or later; older firmware returns different numbers there. The code is the example itself, so there is no screenshot.
What this example does: the light turns red when the program starts, then it waits until the gamepad connects before turning green, beeping once, and printing the receiver type and firmware version; after that the display keeps showing the gamepad battery level (the PS2 2.4G gamepad has no battery information, so it is always 0). Turn the gamepad off and the light goes back to red and the display shows "--".
What you need: same as Example 1 (hub + receiver + gamepad).
How to wire it: plug the receiver into port C.
Download the program
| Pybricks |
|---|
| ex06_connected_battery.py + library |
Pybricks code
# 掌控者PS2 範例 6:連線狀態與電量(等手把連上才開始,螢幕顯示電量)
# 接線:掌控者PS2 接收器 → C 埠
# 只有 Pybricks 版:連線狀態和電量放在接收器的「模式 3」,官方 App 和積木網站讀不到;接收器韌體要 2026-10 以後
from pybricks.hubs import PrimeHub
from pybricks.parameters import Color, Port
from pybricks.tools import wait
from MBC_gamepad_Lib import MBC_GAMEPAD

hub = PrimeHub()
pad = MBC_GAMEPAD(Port.C)                    # 接收器插在 C 埠

hub.light.on(Color.RED)                      # 紅燈 = 手把還沒連上
while not pad.connected():                   # 等到手把連上(True)才往下
    wait(200)
hub.light.on(Color.GREEN)                    # 綠燈 = 連上了
hub.speaker.beep()
print('接收器種類', pad.kind(), ' 韌體', pad.firmware_version())   # 例如 PS4 (1, 0)

while True:
    if pad.connected():
        battery = pad.battery()              # PS2 手把沒有電量資訊,一直是 0
        hub.display.number(min(battery, 99)) # 螢幕最多只能顯示兩位數
        hub.light.on(Color.GREEN)
        print('已連線  電量', battery, '%')
    else:                                    # 手把關機或離太遠 → 斷線
        hub.display.text('--')
        hub.light.on(Color.RED)
        print('斷線了')
    wait(500)
Step by step, what the program does
pad.connected(): whether a gamepad is connected to the receiver (True / False). At the start, "wait until connected" replaces Example 5's "wait until the sticks are centered", which is more reliable.pad.kind(),pad.firmware_version(): whether the receiver is the PS2 or the PS4 model, and which firmware version it has (read from the sensor's mode 8).- Repeat forever: while connected, show
pad.battery()(always 0 for PS2) and a green light; when disconnected, red light and "--". - This example never calls
pad.update(), because it does not read any buttons. For a program that reads buttons, follow Examples 1 to 5, and callconnected()outside the loop or only now and then (each call makes the receiver switch modes, which costs a few tens of ms).
What you should see when it runs: gamepad still off: red light. Turn on the gamepad, and the moment it connects: green light + beep, display shows 0 (PS2 has no battery level). Turn the gamepad off: red light, "--".
Common questions
- Why is the battery level always 0? → The PS2 2.4G gamepad simply does not report its battery level; to see a battery level, use the Controller PS4/PS5 Bluetooth Receiver.
- Red light all the time? → The gamepad is not turned on, or the receiver firmware is too old (before 2026-10) and has no connection status. Please update the firmware.
- Can I combine this with Example 5? → Yes: replace "wait until the sticks are centered" at the start of Example 5 with "wait until
pad.connected()".
Next steps
- Full description of every button and stick: Command Guide (PDF)
- Want more buttons: the "PS2/PS4 remote" category on the MBC Blocks website has all 16 buttons; in Pybricks just change the name, like
pad.pressed('START').