
🟧 micro:bit Examples: Gamepad Receiver PS4/PS5
Back to Gamepad Receiver PS4/PS5 × micro:bit | Product page | Reference
This page is for people who have never written code. The 5 examples start with "show a value on the LEDs" and build up to "drive a car". Everything is written for the MakeCode web editor with the MBC extension pxt-mbc-sensors v2: switch to JavaScript, paste an example and it runs; switch back to Blocks to see which blocks it becomes.
Important
- Extension pxt-mbc-sensors v2 has not been verified on hardware yet. Every example on this page compiles with the MakeCode CLI (once for V1, once for V2); value directions, ready times and power are still to be confirmed on a real board, see "to be tested" in the hardware checklist below.
- Use the Universal I2C edition of the product. The SPIKE and EV3 editions have different firmware and cannot be read by a micro:bit.
Tip
Pair the gamepad with the receiver first (the receiver opens pairing for 30 s at first power-on; PS4 hold SHARE + PS, PS5 hold Create + PS); the receiver green LED goes off when connected. Full steps on the product page. The receiver must run the Universal I2C edition firmware.
Software
| Editor | micro:bit V1 | micro:bit V2 | How |
|---|---|---|---|
| MakeCode web editor (makecode.microbit.org, Blocks / JavaScript) | ✔ (less memory, but every example here fits) | ✔ | New Project → gear → Extensions → paste https://github.com/contactmbcrobot/pxt-mbc-sensors → switch to JavaScript (top) → paste the example → Download the .hex and drag it onto the MICROBIT drive |
| MakeCode offline app (Windows / Mac) | ✔ | ✔ | Same; adding the extension the first time needs internet |
| Python Editor (MicroPython) | — | — | no MBC module yet |
- Sound: V2 has a built-in speaker; a V1 needs a buzzer or headphones on P0.
- Servos / motors: the examples use
pins.servoWritePin: one 9 g servo (SG90) on P1; for driving, two continuous-rotation servos (e.g. FS90R), left wheel P1, right wheel P2. Always power servos from an external 4.8–6 V battery pack whose − is joined to the micro:bit GND (common ground); never drive servos from the micro:bit 3V pin. - Block names: with the editor language set to English the blocks read as in the tables below; the tables also give the JavaScript call.
Before you start: hardware checklist (to be tested)
The micro:bit is a 3.3 V board. Each check must pass before an MBC product is connected; "to be tested" marks items extension v2 has not yet confirmed on real hardware.
| Check | This product | Status |
|---|---|---|
| Voltage | MBC products use 3.3 V I2C levels: connect straight to P19 / P20, no level shifter | ✔ |
| Power | the receiver is an ESP32 (Bluetooth) drawing over 100 mA: external 5 V is required, never the micro:bit 3V pin | to be tested |
| I2C pull-ups | the micro:bit already has 4.7 kΩ; if the product also has pull-ups, check the low level stays ≤ 0.3×VDD | to be tested |
| Clock stretching | the ESP32 cannot stretch the clock: the extension waits 2 ms after writing the id before reading, nothing to do yourself | to be tested |
| Address clash | factory address 0x42, the same as the PS2 receiver; to use two receivers change one with the "change device address" block (Device group) | — |
| Ready time | the receiver is ready (F3 b0) about 1 s after power-on; F3 b1 = 1 once a gamepad is connected, the examples use "gamepad is connected" | to be tested |
If you read nothing: check the wiring (SDA = P20, SCL = P19) → the external power → whether the "device at … is ready" block (Device group, advanced) returns true.
Wiring (the same for every example)
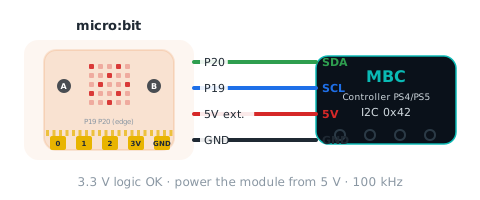
| Sensor | micro:bit |
|---|---|
| SDA | P20 |
| SCL | P19 |
| VCC | external 5 V (required) |
| GND | GND (the servo battery − goes here too) |
The values used on this page
Each stick axis is −100..+100, 0 when released, right and up are positive. Buttons are picked by name from a dropdown.
| Block | JavaScript | Range | Meaning | Used in |
|---|---|---|---|---|
| gamepad joystick left X / Y, right X / Y | mbc.padStick(MbcPadAxis.LeftY) |
−100~+100 | 0 = centre, right / up = positive | 1, 5 |
| gamepad button … is pressed | mbc.padButtonPressed(MbcPadButton.Up) |
true / false | any of the 16: d-pad, triangle / circle / cross / square, L1 R1 L2 R2, L3 R3, select / share, start / options | 4 |
| on gamepad button … pressed / released | mbc.onPadButton(MbcPadButton.Cross, MbcPadButtonEvent.Pressed, ...) |
事件 | runs once at the moment of pressing or releasing | 2 |
| gamepad trigger L2 / R2 analog | mbc.padTrigger(MbcPadTrigger.R2) |
0~255 | how far the trigger is squeezed (PS2 digital pads give only 0 or 255) | 3 |
| gamepad is connected | mbc.padConnected() |
true / false | while disconnected every button reads 0 and the sticks are centred | 1, 2, 4, 5 |
| gamepad battery percent | mbc.padBattery() |
0~100 | gamepad battery (PS2 pads always 0) | 5 |
| gamepad rumble strength … | mbc.padRumble(200) |
0~255(命令 E5) | rumble for 200 ms, 0 = stop (ignored by PS2) | 2 |
| gamepad light bar colour … | mbc.padLight(0xFF0000) |
RGB(命令 E6) | PS4 / PS5 light bar colour (ignored by PS2) | 2, 5 |
| wait for device at … ready | mbc.waitReady(mbc.ADDR_PAD, 3000) |
true / false | waits up to 3 s, true when the receiver answers (Advanced → Device) | 1 |
Example 1: Joystick dot
What this example does: Push the left stick and the lit dot follows; no gamepad connected → an X. Press A to show the left stick X number, B the Y. Use it to check the receiver wiring, the pairing and the directions.
What you need
- micro:bit V1 or V2 + USB cable
- Gamepad Receiver PS4/PS5 (Universal I2C edition) + 4-pin cable + a paired PS4 or PS5 gamepad
- an external 5 V supply (power bank or battery pack)
Wiring: As in the wiring table above: SDA → P20, SCL → P19, VCC → external 5 V, GND → GND (the external supply − must also go to micro:bit GND).
Download: ex01_stick_dot.ts (right-click, save) → MakeCode New Project → gear → Extensions → paste https://github.com/contactmbcrobot/pxt-mbc-sensors → switch to JavaScript (top) → select all, delete, paste the file → Download and drag the .hex onto the MICROBIT drive.
Code
// Gamepad receiver PS4/PS5 × micro:bit example 1: joystick dot (an LED dot follows the left stick)
// What it does: push the left stick and the lit dot follows; no gamepad connected → an X. Press A to show the left stick X number, B the Y.
// Wiring: receiver SDA → P20, SCL → P19, VCC → external 5 V (the ESP32 receiver draws too much for the micro:bit 3V pin), GND → GND (common ground).
// Setup: pair the gamepad with the receiver first (see the product page). MakeCode new project → Extensions → paste https://github.com/contactmbcrobot/pxt-mbc-sensors → switch to JavaScript, paste this whole file → download to the micro:bit.
// You see: a tick at power-on (receiver found); gamepad off → X; stick released → dot in the centre; pushed up-right → dot in the top-right corner.

let busy = false

if (mbc.waitReady(mbc.ADDR_PAD, 3000)) {
    basic.showIcon(IconNames.Yes)
} else {
    basic.showIcon(IconNames.No)                          // no answer: check P19 / P20 and the external power
}

basic.forever(function () {
    if (busy) {
        basic.pause(100)
        return
    }
    if (!mbc.padConnected()) {                            // no gamepad connected
        basic.showIcon(IconNames.No, 0)
        basic.pause(200)
        return
    }
    let sx = mbc.padStick(MbcPadAxis.LeftX)               // −100 (left) .. +100 (right), 0 = centre
    let sy = mbc.padStick(MbcPadAxis.LeftY)               // −100 (down) .. +100 (up)
    let x = Math.round(Math.map(sx, -100, 100, 0, 4))
    let y = Math.round(Math.map(sy, -100, 100, 4, 0))     // up = positive → row 0
    basic.clearScreen()
    led.plot(x, y)
    basic.pause(50)
})

input.onButtonPressed(Button.A, function () {
    busy = true
    basic.showNumber(mbc.padStick(MbcPadAxis.LeftX))
    busy = false
})
input.onButtonPressed(Button.B, function () {
    busy = true
    basic.showNumber(mbc.padStick(MbcPadAxis.LeftY))
    busy = false
})
Step by step
mbc.waitReady(mbc.ADDR_PAD, 3000): tick if the receiver answers, X if not.forever:!mbc.padConnected()no gamepad → X, check again after 0.2 s.sx = mbc.padStick(LeftX),sy = mbc.padStick(LeftY): −100..+100.x = Math.map(sx, −100, 100, 0, 4);y = Math.map(sy, −100, 100, 4, 0): up is positive, so Y is flipped (row 0 is at the top).basic.clearScreen()thenled.plot(x, y)draws one dot.- A / B:
basic.showNumbershows the number;busypauses the dot meanwhile.
What you should see
- Power-on: tick. Gamepad off: X.
- Press PS on the gamepad: dot in the centre.
- Left stick to the top-right: dot in the top-right corner; A shows 100, B shows 100.
- Half left: dot in the second column; A shows about −50.
FAQ
- Always an X? → The gamepad is not connected: receiver LED blinking fast = waiting to pair, steady = press PS on the gamepad, off = connected.
- The dot only moves near the centre? → Normal, it reaches the corners only with the stick pushed fully; to magnify use
Math.map(sx, −60, 60, 0, 4). - An X right at power-on (sensor not found)? → Check SDA = P20 and SCL = P19 are not swapped, that the external power is on, and with crocodile clips that no clip touches the neighbouring pad.
- All zeros in the simulator? → Normal. The MakeCode simulator has no real I2C, every read is 0; download to the micro:bit to see real values.
- No sound on a V1? → The V1 has no speaker; connect a buzzer or headphones between P0 and GND.
Example 2: Buttons make pictures and sounds (light bar, rumble)
What this example does: Triangle / circle / cross / square each show a picture and play a note, the d-pad shows arrows; cross rumbles the gamepad and the light bar changes colour with the button (the colours of the symbols on the pad). All written with "on gamepad button … pressed" event blocks.
What you need
- Everything from example 1
- On a V1 also a buzzer or headphones on P0
Wiring: Same as example 1.
Download: ex02_button_sound.ts (right-click, save) → MakeCode New Project → gear → Extensions → paste https://github.com/contactmbcrobot/pxt-mbc-sensors → switch to JavaScript (top) → select all, delete, paste the file → Download and drag the .hex onto the MICROBIT drive.
Code
// Gamepad receiver PS4/PS5 × micro:bit example 2: buttons make pictures and sounds (light bar, rumble)
// What it does: triangle / circle / cross / square each show a picture and play a note; the d-pad shows arrows; cross rumbles the gamepad and the light bar changes colour with the button.
// Wiring: receiver SDA → P20, SCL → P19, VCC → external 5 V, GND → GND (common ground). On a V1 connect a buzzer or headphones to P0 for sound (V2 has a speaker).
// Setup: gamepad paired; extension and paste steps as in example 1.
// You see: triangle → a triangle + C; circle → a target + E; cross → an X + G and a rumble; square → a square + high C; d-pad → arrows in four directions.

mbc.onPadButton(MbcPadButton.Triangle, MbcPadButtonEvent.Pressed, function () {
    basic.showIcon(IconNames.Triangle, 0)
    mbc.padLight(0x00FF00)                                // light bar green (like the triangle on the pad)
    music.playTone(Note.C, 200)
})
mbc.onPadButton(MbcPadButton.Circle, MbcPadButtonEvent.Pressed, function () {
    basic.showIcon(IconNames.Target, 0)
    mbc.padLight(0xFF0000)                                // red
    music.playTone(Note.E, 200)
})
mbc.onPadButton(MbcPadButton.Cross, MbcPadButtonEvent.Pressed, function () {
    basic.showIcon(IconNames.No, 0)
    mbc.padLight(0x0000FF)                                // blue
    mbc.padRumble(200)                                    // rumble (0..255)
    music.playTone(Note.G, 200)
})
mbc.onPadButton(MbcPadButton.Cross, MbcPadButtonEvent.Released, function () {
    mbc.padRumble(0)                                      // stop rumbling on release
    basic.clearScreen()
})
mbc.onPadButton(MbcPadButton.Square, MbcPadButtonEvent.Pressed, function () {
    basic.showIcon(IconNames.Square, 0)
    mbc.padLight(0xFF00FF)                                // pink
    music.playTone(Note.C5, 200)
})
mbc.onPadButton(MbcPadButton.Up, MbcPadButtonEvent.Pressed, function () {
    basic.showArrow(ArrowNames.North, 0)
})
mbc.onPadButton(MbcPadButton.Down, MbcPadButtonEvent.Pressed, function () {
    basic.showArrow(ArrowNames.South, 0)
})
mbc.onPadButton(MbcPadButton.Left, MbcPadButtonEvent.Pressed, function () {
    basic.showArrow(ArrowNames.West, 0)
})
mbc.onPadButton(MbcPadButton.Right, MbcPadButtonEvent.Pressed, function () {
    basic.showArrow(ArrowNames.East, 0)
})

basic.forever(function () {
    if (!mbc.padConnected()) {                            // no gamepad: show a small heart as a reminder
        basic.showIcon(IconNames.SmallHeart, 0)
    }
    basic.pause(500)
})
Step by step
mbc.onPadButton(MbcPadButton.Triangle, Pressed, ...): runs once the moment triangle is pressed → triangle icon, light bar green (padLight(0x00FF00)),Note.C.- Circle → target icon, red,
Note.E; square → square icon, pink,Note.C5. - Cross pressed → X icon, light bar blue,
padRumble(200),Note.G; a separate released event for cross →padRumble(0)stops the rumble and clears the screen. - One event each for up / down / left / right → four arrows.
forever: while no gamepad is connected a small heart is shown every 0.5 s as a reminder.
What you should see
- Press triangle: triangle, light bar green, C.
- Hold cross: X, light bar blue, the gamepad rumbles; release: rumble stops, screen clears.
- Press the d-pad: arrows.
FAQ
- Cross only rumbles briefly? → Each rumble command lasts 200 ms; for continuous rumble send it every 150 ms in a loop inside the Pressed handler until released.
- The light bar does not change? → Only PS4 / PS5 pads have one; PS2 pads do not. Make sure the pad is really connected (green LED off).
Example 3: Triggers control a servo
What this example does: The harder you squeeze R2, the further the servo turns right (to 180°); L2 turns it left (to 0°); release both and it centres at 90°. The LED bar shows the R2 pressure. Press A to show the angle.
What you need
- Everything from example 1
- one 9 g servo (SG90)
- a 4.8–6 V battery pack and jumper wires
Wiring: Receiver as in example 1. Servo orange (signal) → P1, red → external 4.8–6 V battery +, brown → battery −, and run a second wire from battery − to micro:bit GND (common ground).
Download: ex03_trigger_servo.ts (right-click, save) → MakeCode New Project → gear → Extensions → paste https://github.com/contactmbcrobot/pxt-mbc-sensors → switch to JavaScript (top) → select all, delete, paste the file → Download and drag the .hex onto the MICROBIT drive.
Code
// Gamepad receiver PS4/PS5 × micro:bit example 3: triggers control a servo
// What it does: the harder you squeeze R2, the further the servo turns right; L2 turns it left; release both and it centres. The LED bar shows the R2 pressure. Press A to show the angle.
// Wiring: receiver SDA → P20, SCL → P19, VCC → external 5 V, GND → GND. Servo orange (signal) → P1, red → external 4.8–6 V battery +, brown → battery − joined to micro:bit GND.
// Setup: a 9 g servo (SG90).
// You see: squeeze R2 slowly → the bar grows and the servo turns toward 180°; squeeze L2 → toward 0°; release → 90°.

let angle = 90

basic.forever(function () {
    let r2 = mbc.padTrigger(MbcPadTrigger.R2)             // 0 (released) .. 255 (fully squeezed)
    let l2 = mbc.padTrigger(MbcPadTrigger.L2)
    angle = Math.round(90 + (r2 - l2) * 90 / 255)         // R2 → 90..180, L2 → 90..0
    pins.servoWritePin(AnalogPin.P1, angle)
    led.plotBarGraph(r2, 255)
    basic.pause(30)
})

input.onButtonPressed(Button.A, function () {
    basic.showNumber(angle)
})
Step by step
forever:r2 = mbc.padTrigger(R2),l2 = mbc.padTrigger(L2), each 0..255.angle = 90 + (r2 − l2) × 90 / 255: R2 only → 90..180; L2 only → 90..0;Math.roundmakes it an integer.pins.servoWritePin(AnalogPin.P1, angle)every 30 ms.led.plotBarGraph(r2, 255): the bar shows the R2 pressure.
What you should see
- Squeeze R2 slowly: the bar grows and the servo turns toward 180°.
- Squeeze L2: toward 0°. Both fully: back to 90°.
- Release: 90°, bar dark.
FAQ
- On a PS2 pad it jumps straight to the end? → PS2 digital pads give only 0 or 255 on L2 / R2, no pressure; for a smooth sweep use the right stick:
angle = 90 + padStick(RightX) × 0.9. - Servo jitters? → Power the servo from the battery pack with a common ground.
Example 4: Drive with the d-pad
What this example does: Hold a d-pad button and the car moves that way, release to stop: up = forward, down = back, left = spin left, right = spin right. The car stops by itself if the gamepad disconnects.
What you need
- A two-wheel car: two continuous-rotation servos (e.g. FS90R) as wheels plus a caster
- the receiver fixed on the car
- a 4.8–6 V battery pack (servos) and external 5 V (receiver; the same power bank will do)
Wiring: Receiver as in example 1. Left continuous-rotation servo signal → P1, right → P2; both servo red wires to the 4.8–6 V battery pack +, brown to battery −, and battery − also to micro:bit GND.
Download: ex04_dpad_drive.ts (right-click, save) → MakeCode New Project → gear → Extensions → paste https://github.com/contactmbcrobot/pxt-mbc-sensors → switch to JavaScript (top) → select all, delete, paste the file → Download and drag the .hex onto the MICROBIT drive.
Code
// Gamepad receiver PS4/PS5 × micro:bit example 4: drive with the d-pad
// What it does: hold a d-pad button and the car moves that way, release to stop: up = forward, down = back, left = spin left, right = spin right. The car stops by itself if the gamepad disconnects.
// Wiring: receiver SDA → P20, SCL → P19, VCC → external 5 V, GND → GND. Left continuous-rotation servo signal → P1, right → P2; servos on a 4.8–6 V battery pack whose − is joined to micro:bit GND.
// Setup: a two-wheel car (two continuous-rotation servos as wheels).
// You see: hold up → the car drives forward with an up arrow; release → stop; switch the gamepad off → X, car stops.

// left servo P1, right servo P2 (continuous rotation); left / right = −100..100, positive = forward
function drive(left: number, right: number): void {
    left = Math.constrain(left, -100, 100)
    right = Math.constrain(right, -100, 100)
    pins.servoWritePin(AnalogPin.P1, Math.round(90 + left * 0.9))    // 90 = stop, 180 = full forward, 0 = full reverse
    pins.servoWritePin(AnalogPin.P2, Math.round(90 - right * 0.9))   // the right servo is mounted mirrored, so subtract
}

basic.forever(function () {
    if (!mbc.padConnected()) {                            // disconnected: stop
        drive(0, 0)
        basic.showIcon(IconNames.No, 0)
    } else if (mbc.padButtonPressed(MbcPadButton.Up)) {
        drive(50, 50)                                     // forward
        basic.showArrow(ArrowNames.North, 0)
    } else if (mbc.padButtonPressed(MbcPadButton.Down)) {
        drive(-50, -50)                                   // back
        basic.showArrow(ArrowNames.South, 0)
    } else if (mbc.padButtonPressed(MbcPadButton.Left)) {
        drive(-30, 30)                                    // left back, right forward = spin left
        basic.showArrow(ArrowNames.West, 0)
    } else if (mbc.padButtonPressed(MbcPadButton.Right)) {
        drive(30, -30)                                    // spin right
        basic.showArrow(ArrowNames.East, 0)
    } else {
        drive(0, 0)                                       // nothing pressed: stop
        basic.clearScreen()
    }
    basic.pause(50)
})
Step by step
function drive(left, right): left wheel P1, right wheel P2, −100..100, positive = forward; the right servo is mirrored so it subtracts.forever: first!mbc.padConnected()→ on disconnectdrive(0, 0)and X.mbc.padButtonPressed(Up)→drive(50, 50)forward, up arrow;Down→drive(−50, −50).Left→drive(−30, 30): left wheel back, right forward = spin left;Rightthe opposite.- Nothing pressed →
drive(0, 0)and clear the screen. One pass every 50 ms.
What you should see
- Hold up: forward, up arrow; release: stop.
- Hold left: spin left.
- Switch the gamepad off: X, car stops.
FAQ
- Up drives backwards? → Both servos are mounted the other way: in
drivechange+ leftto- leftand- rightto+ right. Only one wheel wrong → change only that line. - Up spins on the spot? → Only one side is reversed; flip the sign of that servo only.
- It creeps when released? → The stop point of a continuous servo is not always 90; adjust its trim screw or use 88..92 instead of 90.
Example 5: Two-stick tank drive + safe start (all together)
What this example does: Left stick drives the left wheel, right stick the right wheel, further = faster, one forward one back spins. Both sticks must be released (centred) once before the car is "armed", and it locks again on disconnect, so the car never shoots off at power-on. Press A to show the battery; below 20% the light bar turns red.
What you need
- The car from example 4
Wiring: Same as example 4.
Download: ex05_tank_drive.ts (right-click, save) → MakeCode New Project → gear → Extensions → paste https://github.com/contactmbcrobot/pxt-mbc-sensors → switch to JavaScript (top) → select all, delete, paste the file → Download and drag the .hex onto the MICROBIT drive.
Code
// Gamepad receiver PS4/PS5 × micro:bit example 5: two-stick tank drive + safe start (all together)
// What it does: left stick drives the left wheel, right stick the right wheel, further = faster. Both sticks must be released (centred) once before the car is 'armed'; it locks again on disconnect. Press A to show the battery; below 20% the light bar turns red.
// Wiring: as example 4 (receiver P19 / P20, external 5 V; left wheel P1, right wheel P2, servos on their own battery, common ground).
// Setup: the two-wheel car.
// You see: release both sticks → tick (armed), green light bar; push both forward → forward; one forward one back → spin; release → stop; gamepad off → X and locked.

const DEAD = 15                                           // dead zone: within ±15 counts as 0
let armed = false
let lowBattery = false

// left servo P1, right servo P2 (continuous rotation); left / right = −100..100, positive = forward
function drive(left: number, right: number): void {
    left = Math.constrain(left, -100, 100)
    right = Math.constrain(right, -100, 100)
    pins.servoWritePin(AnalogPin.P1, Math.round(90 + left * 0.9))    // 90 = stop, 180 = full forward, 0 = full reverse
    pins.servoWritePin(AnalogPin.P2, Math.round(90 - right * 0.9))   // the right servo is mounted mirrored, so subtract
}

function deadZone(v: number): number {                    // treat the stick near centre as 0 so the car really stops
    if (Math.abs(v) < DEAD) {
        return 0
    }
    return v
}

input.onButtonPressed(Button.A, function () {
    basic.showNumber(mbc.padBattery())                    // gamepad battery 0..100 (PS2 pads always 0)
})

basic.forever(function () {
    if (!mbc.padConnected()) {
        drive(0, 0)
        armed = false                                     // must re-arm after a disconnect
        basic.showIcon(IconNames.No, 0)
        basic.pause(200)
        return
    }
    let ly = deadZone(mbc.padStick(MbcPadAxis.LeftY))     // left stick up / down −100..+100
    let ry = deadZone(mbc.padStick(MbcPadAxis.RightY))    // right stick up / down
    if (!armed) {
        if (ly == 0 && ry == 0) {                         // arm only when both sticks are released
            armed = true
            basic.showIcon(IconNames.Yes, 0)
            mbc.padLight(0x00FF00)                        // green light bar = ready to drive
        }
        basic.pause(50)
        return
    }
    drive(ly, ry)                                         // left stick → left wheel, right stick → right wheel
    let low = mbc.padBattery() < 20
    if (low != lowBattery) {                              // change the light bar only when the battery state changes
        lowBattery = low
        mbc.padLight(low ? 0xFF0000 : 0x00FF00)           // red when low, green otherwise
    }
    basic.pause(20)
})
Step by step
DEAD = 15: the dead zone.deadZone(v)returns 0 while the stick is within ±15, so the car really stops when you let go.forever: disconnected → stop,armed = false, X.ly,ry= left / right stick up-down after the dead zone.!armed: only when both are 0 →armed = true, tick, light bar green; otherwise do nothing.- Once armed
drive(ly, ry): the left stick goes straight to the left wheel, the right stick to the right wheel (−100..100 is exactly the drive range). - When
padBattery() < 20changes state the light bar switches red / green; A shows the battery.
What you should see
- Power-on, gamepad connected: release both sticks → tick, light bar green.
- Both forward: forward, faster the further; left forward right back: spin right; release: stop.
- Press A: battery, e.g. 85. Gamepad off: X; after reconnecting release the sticks again to re-arm.
FAQ
- Never gets the tick? → A stick does not return to centre (offset). Change
DEADto 25. - Too fast to control? → Change
drive(ly, ry)todrive(ly / 2, ry / 2). - Drive with one stick? →
drive(ly + lx, ly − lx)withlxfrompadStick(LeftX).
Next steps
- Every block, value and hardware note: Gamepad Receiver PS4/PS5 × micro:bit
- What each value id means: Reference
- Extension source and issues: https://github.com/contactmbcrobot/pxt-mbc-sensors