
SPIKE beginner examples: SharpShot WRO edition (HUE12)
Back to the SharpShot product page | Have the school edition? See the school edition beginner examples
Note
The Pybricks programs below are the same files as on the Chinese page, so the comments inside the code are in Chinese. The English explanation under each example tells you what every line does.
The WRO edition (HUE12) watches the color at 12 points (12 color points) at once: you mark 12 spots on the picture and it tells you what color each spot is right now. This page is written for people who have never written a program before. The 5 examples start with "reading one number" and build up step by step to "look at the object's color and decide which side to go around". Every example comes in 3 versions:
| Version | Who it's for | How to open the example file |
|---|---|---|
| 🟨 The official LEGO SPIKE App (Python) | Schools, people who can only use the official App | Download the .llsp3 → open the SPIKE App → top-left "File" → "Open" → pick the file (it opens as a Python program) |
| 🟦 The MBC Blocks website (Chinese blocks) | People who want to program the HUE12 with blocks (best choice for beginners) | Open the MBC SPIKE Blocks website → top menu "File → Open" (or press Ctrl+O) → pick the downloaded .abp |
| 🐍 Pybricks (Python text code) | People who want to learn typed programming | Open code.pybricks.com → "Import a file" in the file panel on the left → import both the example file and MBC_hue12_Lib.py → open the example → press ▶ to run |
Important
- The official LEGO App has no blocks for the HUE12 (it is not a LEGO sensor), so the official App examples are Python programs (Python in the SPIKE 3 Education App). If you want blocks, use the MBC Blocks website.
- The MBC Blocks website and Pybricks need the hub flashed with Pybricks firmware v4.0.0b5 or newer first. The MBC Blocks website's top menu "SPIKE Hub → Install/Update Pybricks firmware" flashes v4.1.0, which works as is (about 3 minutes; you can switch back to the original LEGO firmware with the SPIKE App any time). The official App needs no change.
Before you start: set the positions of the 12 color points on the sensor
Each color point is one spot on the picture. You first use the buttons on the sensor body to tell it "point 1 looks here, point 2 looks here…". The settings are saved in the sensor and survive a reboot.
Do these 2 things first
- Plug the sensor into the hub and turn the hub on. You can only start setup once the sensor screen shows the camera picture with
RUN MODEat the top. - Buttons: the body has three buttons, Left, OK (middle), Right, plus one side button. Short-press the side button = enter the menu / go back one level.
Setting point 1 (the other points work the same way)
- On the
RUN MODEscreen, short-press the side button →SET MODE S1 [..]appears at the top ([ON]= this point is already set). Use Left/Right to switch to S2 through S12. - Press OK →
SET X: use Left/Right to move the red vertical line to the spot you want to watch (hold the button to move fast). - Press OK →
SET Y: use Left/Right to move the green horizontal line to the spot. - Press OK →
TOL [Live]: everything on screen with the same color as this spot turns green; use Left/Right until only your object is green. - Press OK to save and return to
RUN MODE. A small cross appears at that spot on the picture. - Points you do not need: select that point in the menu and hold the side button for 1 second to clear it.
Tip
- Examples 1, 2, 4 and 5 only use point 1: set point 1 straight ahead of the car, where the object will appear.
- Example 3 checks all 12 points; setting several (for example in a row) makes it more fun.
- While you are in the menu, all 12 points read 255 (not set) and the program thinks it sees nothing. Always return to
RUN MODEafter setup before running a program.- Picture upside down: go to the last menu entry
SET MODE CAM→ press OK → use Left/Right to findV-Flip, press OK to switch it to ON. The fill light isFlash LEDin the same menu; it is very bright and makes the bricks reflect, so leave it off for now.
Values used on this page
Each color point has 2 numbers:
| Name | Range | Meaning |
|---|---|---|
| Hue | 0 to 255 | 0 to 239 = a color (red near 0 and at 230 to 239, yellow about 40, green about 80, cyan about 120, blue about 160, magenta about 200); 240 to 245 = white; 246 to 250 = black; 255 = this point is not set |
| Saturation | 0 to 255 | How vivid the color is; bigger = more vivid |
Tip
Red sits at both ends of the hue scale (near 0, and 230 to 239 is red too), so a red check has to be written as "hue < 10 or hue between 230 and 239". 240 and above is not red; it is white, black or not set.
The Pybricks library also gives you a color name directly: Red, Org (orange), Yel (yellow), Lim (lime), Grn (green), Mnt (mint), Cyn (cyan), Azr (azure), Blu (blue), Prp (purple), Mag (magenta), Pnk (pink), Wht (white), Blk (black), NONE (not set).
Example 1: Read the hue at point 1
What this example does: The hub display keeps showing the hue seen at point 1; the computer screen also prints the hue and saturation.
What you need
- 1 SPIKE hub
- 1 HUE12 (with point 1 set)
- One red, one green, one blue, one white and one black brick
How to connect: HUE12 on port C.
Download the program
| Official LEGO App (Python) | MBC Blocks website | Pybricks |
|---|---|---|
| ex01_show_slot1.llsp3 | ex01_show_slot1.abp | ex01_show_slot1.py + library |
🟨 Official LEGO App Python program
# ===== 讀 HUE12 的小工具(跟官方範例 Hue12_demo_For_Spike_v3.4.3 的讀法一樣,照抄就好、不用改)=====
import device
import utime
from hub import port


class HUE12:
    def __init__(self, port_number):
        self.port = port_number
        self.slots = [(255, 0)] * 12          # 12 格的(色相, 飽和度);255 = 這一格沒設定

    def update(self):
        """讀一次最新資料;讀不到回傳 False"""
        raw = device.data(self.port)          # 感應器送來 8 個整數
        if not raw or len(raw) < 8:
            return False
        b = []
        for val in raw[:8]:
            if val < 0:
                val += 2 ** 32
            b += [val & 0xFF, (val >> 8) & 0xFF, (val >> 16) & 0xFF]   # 每個整數拆成 3 個數字
        for i in range(12):
            self.slots[i] = (b[i * 2], b[i * 2 + 1])
        return True

    def hue(self, slot):
        """第 slot 格(1~12)的色相:0~239 彩色、240~245 白、246~250 黑、255 沒設定"""
        return self.slots[slot - 1][0]

    def sat(self, slot):
        """第 slot 格的飽和度 0~255(越大顏色越鮮豔)"""
        return self.slots[slot - 1][1]
# ===== 小工具到這裡結束,下面才是範例 =====

from hub import light_matrix

cam = HUE12(port.C)                 # HUE12 插在 C 孔

while True:
    cam.update()                    # 讀一次最新資料
    hue = cam.hue(1)                # 第 1 格的色相
    print(hue, cam.sat(1))          # 電腦畫面印出 色相、飽和度
    light_matrix.write(str(hue))    # 主機螢幕顯示色相
    utime.sleep_ms(500)             # 等 0.5 秒
🟦 MBC Blocks website blocks
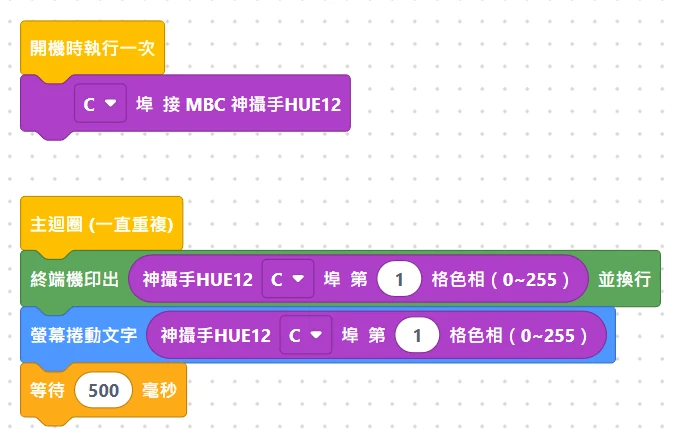
Pybricks code
# 神攝手 WRO 版(HUE12)範例 1:讀第 1 格的色相(顯示在主機螢幕)
# 接線:HUE12 → C 埠
from pybricks.hubs import PrimeHub
from pybricks.parameters import Port
from pybricks.tools import wait
from MBC_hue12_Lib import HUE12Sensor

hub = PrimeHub()
cam = HUE12Sensor(Port.C)               # HUE12 插在 C 孔

while True:
    cam.update()                        # 讀一次最新資料
    name, hue, sat = cam.get_slot(1)    # 第 1 格:顏色名稱、色相、飽和度
    print(name, hue, sat)               # 電腦畫面印出,例如 Red 5 200
    hub.display.text(str(hue))          # 主機螢幕一個字一個字顯示色相
    wait(500)
Step by step through the program
- Read the data: the official App and Pybricks call
cam.update()first (reads the latest values of all 12 points once), then take point 1; the MBC Blocks website uses the "SharpShot HUE12 C point 1 hue" block directly. - Show it: the hub display scrolls the hue one character at a time, and the computer screen prints it too.
- Wait 0.5 seconds before reading again.
- The big block at the top of the official App program is the "HUE12 reader helper" (the official App cannot import other files, so every program has to carry it). Copy it as is; nothing to change.
What you should see: Red brick 0 to 9 or 230 to 239; green about 80; white paper 240 to 245; black 246 to 250; 255 if the point is not set.
Common problems
- Always 255? → Point 1 is not set, or the sensor is still in the menu (go back to
RUN MODE). - Pybricks always shows 255 and the number after
Connected to ID:is not 95? → The hub's Pybricks firmware is too old; update to v4.0.0b5 or newer.
Example 2: Is point 1 red?
What this example does: Point 1 sees red → the light in the middle of the hub turns red and the hub beeps; any other color → light off.
What you need: Same as example 1. How to connect: HUE12 on port C.
Download the program
| Official LEGO App (Python) | MBC Blocks website | Pybricks |
|---|---|---|
| ex02_is_red.llsp3 | ex02_is_red.abp | ex02_is_red.py + library |
🟨 Official LEGO App Python program
# ===== 讀 HUE12 的小工具(跟官方範例 Hue12_demo_For_Spike_v3.4.3 的讀法一樣,照抄就好、不用改)=====
import device
import utime
from hub import port


class HUE12:
    def __init__(self, port_number):
        self.port = port_number
        self.slots = [(255, 0)] * 12          # 12 格的(色相, 飽和度);255 = 這一格沒設定

    def update(self):
        """讀一次最新資料;讀不到回傳 False"""
        raw = device.data(self.port)          # 感應器送來 8 個整數
        if not raw or len(raw) < 8:
            return False
        b = []
        for val in raw[:8]:
            if val < 0:
                val += 2 ** 32
            b += [val & 0xFF, (val >> 8) & 0xFF, (val >> 16) & 0xFF]   # 每個整數拆成 3 個數字
        for i in range(12):
            self.slots[i] = (b[i * 2], b[i * 2 + 1])
        return True

    def hue(self, slot):
        """第 slot 格(1~12)的色相:0~239 彩色、240~245 白、246~250 黑、255 沒設定"""
        return self.slots[slot - 1][0]

    def sat(self, slot):
        """第 slot 格的飽和度 0~255(越大顏色越鮮豔)"""
        return self.slots[slot - 1][1]
# ===== 小工具到這裡結束,下面才是範例 =====

import color
from hub import light, sound

cam = HUE12(port.C)

while True:
    cam.update()
    hue = cam.hue(1)
    if hue < 10 or (hue >= 230 and hue < 240):   # 紅色在色相的兩端:0~9 和 230~239
        light.color(light.POWER, color.RED)        # 中間按鈕燈變紅
        sound.beep(880, 100, 100)                  # 嗶一聲(880 Hz、0.1 秒、音量 100)
    else:
        light.color(light.POWER, color.BLACK)      # 黑色 = 關燈
    utime.sleep_ms(200)
🟦 MBC Blocks website blocks
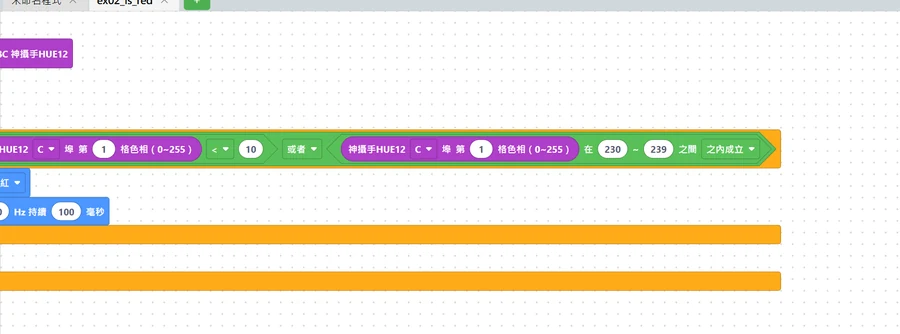
Pybricks code
# 神攝手 WRO 版(HUE12)範例 2:第 1 格是紅色就亮紅燈、嗶一聲
# 接線:HUE12 → C 埠
from pybricks.hubs import PrimeHub
from pybricks.parameters import Color, Port
from pybricks.tools import wait
from MBC_hue12_Lib import HUE12Sensor

hub = PrimeHub()
cam = HUE12Sensor(Port.C)

while True:
    cam.update()
    name, hue, sat = cam.get_slot(1)
    if hue < 10 or 230 <= hue < 240:      # 紅色在色相的兩端:0~9 和 230~239(240 以上是白、黑、沒設定)
        hub.light.on(Color.RED)
        hub.speaker.beep(880, 100)
    else:
        hub.light.off()
    wait(200)
Step by step through the program
- Read the hue at point 1.
- If hue < 10, or hue is between 230 and 239 → red: red light, beep.
- Else → light off.
- Wait 0.2 seconds and check again.
What you should see: Put the red brick at point 1 → red light + beep; swap in another color → light off.
Common problems
- Orange beeps too? → Orange is about 10 to 30; make the "10" smaller (for example 6).
- Is there a simpler way in Pybricks? → Yes:
if name == "Red":; the library does the check for you (same range as above).
Example 3: How many of the 12 points see a color?
What this example does: Checks the 12 points one by one, counts how many see a color (not white, black or unset), and shows the count on the hub display.
What you need: Same as example 1, with several points set (for example points 1 to 4 in a row), plus a few colored bricks.
How to connect: HUE12 on port C.
Download the program
| Official LEGO App (Python) | MBC Blocks website | Pybricks |
|---|---|---|
| ex03_count_colors.llsp3 | ex03_count_colors.abp | ex03_count_colors.py + library |
🟨 Official LEGO App Python program
# ===== 讀 HUE12 的小工具(跟官方範例 Hue12_demo_For_Spike_v3.4.3 的讀法一樣,照抄就好、不用改)=====
import device
import utime
from hub import port


class HUE12:
    def __init__(self, port_number):
        self.port = port_number
        self.slots = [(255, 0)] * 12          # 12 格的(色相, 飽和度);255 = 這一格沒設定

    def update(self):
        """讀一次最新資料;讀不到回傳 False"""
        raw = device.data(self.port)          # 感應器送來 8 個整數
        if not raw or len(raw) < 8:
            return False
        b = []
        for val in raw[:8]:
            if val < 0:
                val += 2 ** 32
            b += [val & 0xFF, (val >> 8) & 0xFF, (val >> 16) & 0xFF]   # 每個整數拆成 3 個數字
        for i in range(12):
            self.slots[i] = (b[i * 2], b[i * 2 + 1])
        return True

    def hue(self, slot):
        """第 slot 格(1~12)的色相:0~239 彩色、240~245 白、246~250 黑、255 沒設定"""
        return self.slots[slot - 1][0]

    def sat(self, slot):
        """第 slot 格的飽和度 0~255(越大顏色越鮮豔)"""
        return self.slots[slot - 1][1]
# ===== 小工具到這裡結束,下面才是範例 =====

from hub import light_matrix

cam = HUE12(port.C)

while True:
    cam.update()
    count = 0                           # 先歸零
    for slot in range(1, 13):           # 第 1 格到第 12 格,一格一格檢查
        if cam.hue(slot) < 240:         # 小於 240 = 彩色(240 以上是白、黑、沒設定)
            count = count + 1
    print(count)
    light_matrix.write(str(count))      # 主機螢幕顯示有幾格是彩色
    utime.sleep_ms(500)
🟦 MBC Blocks website blocks
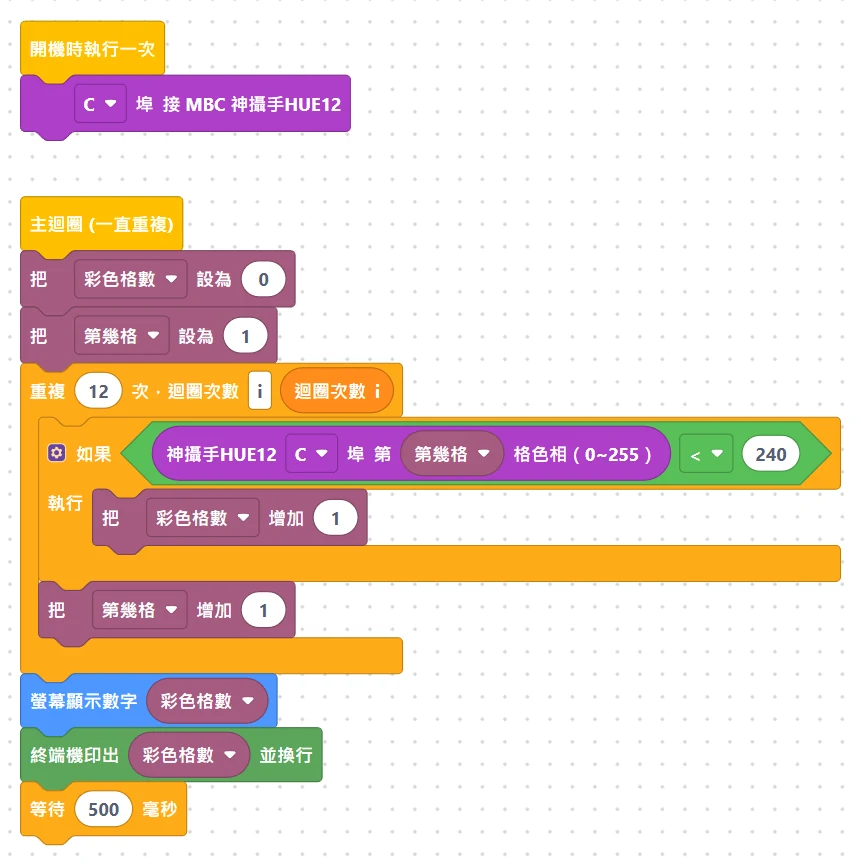
Pybricks code
# 神攝手 WRO 版(HUE12)範例 3:12 格裡有幾格看到顏色(彩色)
# 接線:HUE12 → C 埠
from pybricks.hubs import PrimeHub
from pybricks.parameters import Port
from pybricks.tools import wait
from MBC_hue12_Lib import HUE12Sensor

hub = PrimeHub()
cam = HUE12Sensor(Port.C)

while True:
    cam.update()
    count = 0                                   # 先歸零
    for slot in range(1, 13):                   # 第 1 格到第 12 格,一格一格檢查
        name, hue, sat = cam.get_slot(slot)
        if hue < 240:                           # 小於 240 = 彩色(240 以上是白、黑、沒設定)
            count = count + 1
    print(count)
    hub.display.number(count)                   # 主機螢幕顯示有幾格是彩色(0~12)
    wait(500)
Step by step through the program
- Set "color count" to 0 first.
- Repeat 12 times, checking one point each time: the official App and Pybricks use
for slot in range(1, 13)(slot goes 1, 2, … 12 in turn); the MBC Blocks website uses a variable "point number" that starts at 1 and adds 1 after each pass. - If this point's hue < 240 (a color) → add 1 to color count.
- After all 12 points → show color count on the display.
What you should see: 2 colored bricks on 4 points → shows 2; add one more → 3. White paper and black bricks do not count.
Common problems
- The count is higher than the number of bricks I placed? → Some points are seeing a colored background (for example a colored line on the field); clear those points (hold the side button for 1 second in the menu).
- Why 240 as the cutoff? → 240 and above is white (240 to 245), black (246 to 250) and not set (255), none of which is a color.
Example 4: Turn by color
What this example does: Point 1 sees red → turn right in place; sees green → turn left in place; anything else → stop.
What you need
- Everything from example 1, plus a two-wheel car (two motors as wheels) with the HUE12 mounted at the front, lens facing forward
- A red object and a green object
How to connect: HUE12 on port C; left wheel motor on E, right wheel motor on F.
Download the program
| Official LEGO App (Python) | MBC Blocks website | Pybricks |
|---|---|---|
| ex04_turn_by_color.llsp3 | ex04_turn_by_color.abp | ex04_turn_by_color.py + library |
🟨 Official LEGO App Python program
# ===== 讀 HUE12 的小工具(跟官方範例 Hue12_demo_For_Spike_v3.4.3 的讀法一樣,照抄就好、不用改)=====
import device
import utime
from hub import port


class HUE12:
    def __init__(self, port_number):
        self.port = port_number
        self.slots = [(255, 0)] * 12          # 12 格的(色相, 飽和度);255 = 這一格沒設定

    def update(self):
        """讀一次最新資料;讀不到回傳 False"""
        raw = device.data(self.port)          # 感應器送來 8 個整數
        if not raw or len(raw) < 8:
            return False
        b = []
        for val in raw[:8]:
            if val < 0:
                val += 2 ** 32
            b += [val & 0xFF, (val >> 8) & 0xFF, (val >> 16) & 0xFF]   # 每個整數拆成 3 個數字
        for i in range(12):
            self.slots[i] = (b[i * 2], b[i * 2 + 1])
        return True

    def hue(self, slot):
        """第 slot 格(1~12)的色相:0~239 彩色、240~245 白、246~250 黑、255 沒設定"""
        return self.slots[slot - 1][0]

    def sat(self, slot):
        """第 slot 格的飽和度 0~255(越大顏色越鮮豔)"""
        return self.slots[slot - 1][1]
# ===== 小工具到這裡結束,下面才是範例 =====

import motor_pair

cam = HUE12(port.C)
motor_pair.pair(motor_pair.PAIR_1, port.E, port.F)    # 左輪 E、右輪 F 配成一組

while True:
    cam.update()
    hue = cam.hue(1)
    if hue < 10 or (hue >= 230 and hue < 240):        # 紅色 → 原地右轉
        motor_pair.move(motor_pair.PAIR_1, 100, velocity=200)
    elif hue >= 60 and hue <= 110:                    # 綠色 → 原地左轉
        motor_pair.move(motor_pair.PAIR_1, -100, velocity=200)
    else:                                             # 其他 → 停
        motor_pair.stop(motor_pair.PAIR_1)
    utime.sleep_ms(50)
🟦 MBC Blocks website blocks
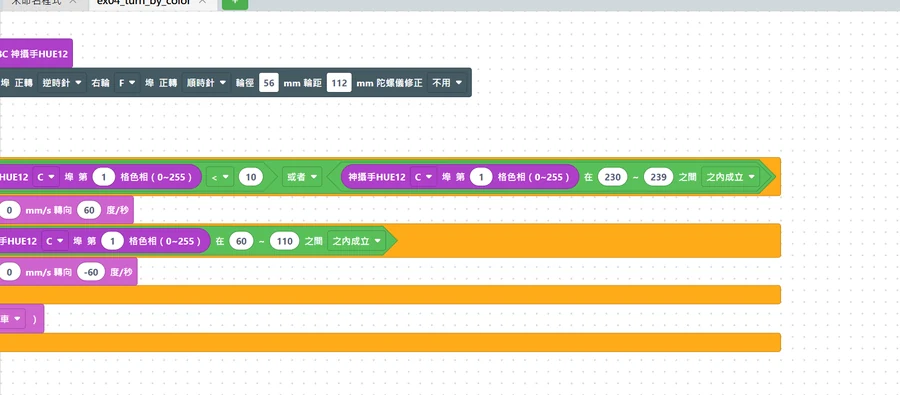
Pybricks code
# 神攝手 WRO 版(HUE12)範例 4:依顏色轉向(紅色右轉、綠色左轉、其他停)
# 接線:HUE12 → C 埠;左輪馬達 → E 埠;右輪馬達 → F 埠
from pybricks.parameters import Direction, Port
from pybricks.pupdevices import Motor
from pybricks.robotics import DriveBase
from pybricks.tools import wait
from MBC_hue12_Lib import HUE12Sensor

cam = HUE12Sensor(Port.C)
left = Motor(Port.E, Direction.COUNTERCLOCKWISE)       # 左輪:反過來裝,所以設成逆時針才是往前
right = Motor(Port.F)
robot = DriveBase(left, right, wheel_diameter=56, axle_track=112)

while True:
    cam.update()
    name, hue, sat = cam.get_slot(1)
    if hue < 10 or 230 <= hue < 240:      # 紅色 → 原地右轉(每秒 60 度)
        robot.drive(0, 60)
    elif 60 <= hue <= 110:                # 綠色 → 原地左轉
        robot.drive(0, -60)
    else:                                 # 其他顏色、白、黑、沒設定 → 停
        robot.stop()
    wait(50)
Step by step through the program
- Tell the hub where the wheels are: the official App uses
motor_pair.pair(…, port.E, port.F); the MBC Blocks website and Pybricks use "drive base: left wheel E, right wheel F". - Read the hue at point 1.
- If red → turn right in place (official App: steering 100, wheels at 200 degrees per second; the other two: the car body turns at 60 degrees per second).
- Else if green (hue 60 to 110) → turn left in place.
- Else → stop.
What you should see: Put the red object in front of the car → the car turns right until it no longer sees red, then stops; green object → turns left.
Common problems
- No reaction to green? → Use example 1 to see what your green reads, and change "60 to 110" to a range that includes it.
- It turns the wrong way? → The motors are mounted the opposite way from the standard LEGO car. Official App: swap 100 and -100; MBC Blocks website: in the "drive base" block switch the "forward" direction of both wheels to the other option; Pybricks: change the left wheel to
Direction.CLOCKWISEand the right wheel toMotor(Port.F, Direction.COUNTERCLOCKWISE).
Example 5: Look at the object's color and decide which side to go around (a common WRO pattern)
What this example does: The car drives forward slowly. A red object ahead → go around it on the right; a green object → go around it on the left; then keep going forward. Many WRO tasks use "look at the color to decide which side to take" (for example the red/green traffic-sign posts in the Future Engineers category); this is the most basic way to write it.
What you need: Same as example 4, with a few red and green objects on the field (at least 40 cm apart).
How to connect: HUE12 on port C (point 1 set straight ahead of the car, about 15 cm away, at floor height); left wheel motor on E, right wheel motor on F.
Download the program
| Official LEGO App (Python) | MBC Blocks website | Pybricks |
|---|---|---|
| ex05_wro_bypass.llsp3 | ex05_wro_bypass.abp | ex05_wro_bypass.py + library |
🟨 Official LEGO App Python program
# ===== 讀 HUE12 的小工具(跟官方範例 Hue12_demo_For_Spike_v3.4.3 的讀法一樣,照抄就好、不用改)=====
import device
import utime
from hub import port


class HUE12:
    def __init__(self, port_number):
        self.port = port_number
        self.slots = [(255, 0)] * 12          # 12 格的(色相, 飽和度);255 = 這一格沒設定

    def update(self):
        """讀一次最新資料;讀不到回傳 False"""
        raw = device.data(self.port)          # 感應器送來 8 個整數
        if not raw or len(raw) < 8:
            return False
        b = []
        for val in raw[:8]:
            if val < 0:
                val += 2 ** 32
            b += [val & 0xFF, (val >> 8) & 0xFF, (val >> 16) & 0xFF]   # 每個整數拆成 3 個數字
        for i in range(12):
            self.slots[i] = (b[i * 2], b[i * 2 + 1])
        return True

    def hue(self, slot):
        """第 slot 格(1~12)的色相:0~239 彩色、240~245 白、246~250 黑、255 沒設定"""
        return self.slots[slot - 1][0]

    def sat(self, slot):
        """第 slot 格的飽和度 0~255(越大顏色越鮮豔)"""
        return self.slots[slot - 1][1]
# ===== 小工具到這裡結束,下面才是範例 =====

import motor_pair
from hub import light_matrix

cam = HUE12(port.C)
motor_pair.pair(motor_pair.PAIR_1, port.E, port.F)


def go(steering, ms):
    """用 steering(-100 左轉 ~ 0 直走 ~ 100 右轉)走 ms 毫秒,然後停"""
    motor_pair.move(motor_pair.PAIR_1, steering, velocity=200)
    utime.sleep_ms(ms)
    motor_pair.stop(motor_pair.PAIR_1)


while True:
    cam.update()
    hue = cam.hue(1)
    if hue < 10 or (hue >= 230 and hue < 240):    # 紅色物塊 → 從右邊繞過
        light_matrix.write("R")
        go(100, 450)      # 右轉約 45 度
        go(0, 1500)       # 直走約 15 公分
        go(-100, 450)     # 左轉回來
    elif hue >= 60 and hue <= 110:                # 綠色物塊 → 從左邊繞過
        light_matrix.write("G")
        go(-100, 450)
        go(0, 1500)
        go(100, 450)
    else:                                         # 沒看到物塊 → 慢慢往前
        motor_pair.move(motor_pair.PAIR_1, 0, velocity=150)
    utime.sleep_ms(20)
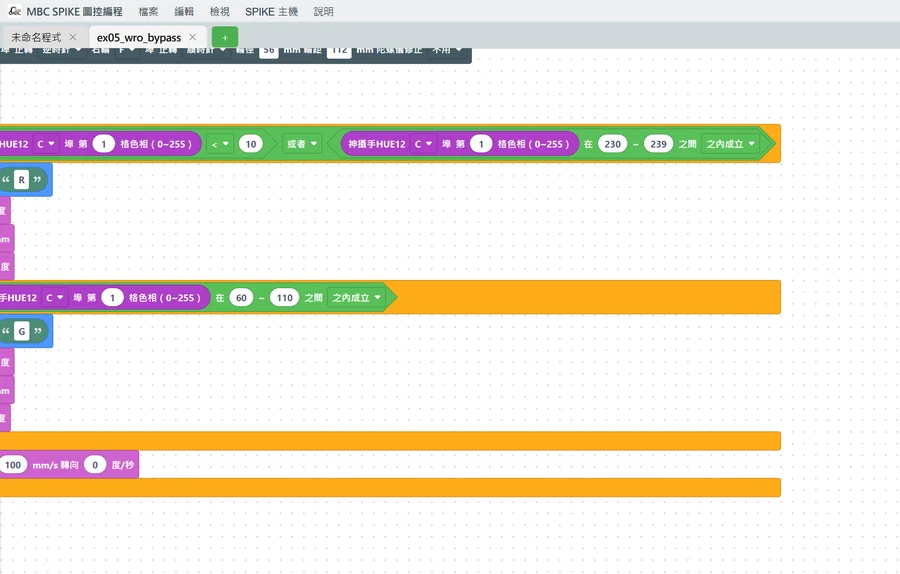
🟦 MBC Blocks website blocks
Pybricks code
# 神攝手 WRO 版(HUE12)範例 5:看前面物塊的顏色,決定從哪一邊繞過
#   紅色 → 從右邊繞、綠色 → 從左邊繞、沒看到 → 直走
# 接線:HUE12 → C 埠(第 1 格對準車子正前方);左輪馬達 → E 埠;右輪馬達 → F 埠
from pybricks.hubs import PrimeHub
from pybricks.parameters import Direction, Port
from pybricks.pupdevices import Motor
from pybricks.robotics import DriveBase
from pybricks.tools import wait
from MBC_hue12_Lib import HUE12Sensor

hub = PrimeHub()
cam = HUE12Sensor(Port.C)
left = Motor(Port.E, Direction.COUNTERCLOCKWISE)
right = Motor(Port.F)
robot = DriveBase(left, right, wheel_diameter=56, axle_track=112)

while True:
    cam.update()
    name, hue, sat = cam.get_slot(1)
    if hue < 10 or 230 <= hue < 240:      # 紅色物塊 → 從右邊繞過
        hub.display.char("R")
        robot.turn(45)                    # 右轉 45 度(正數右轉)
        robot.straight(150)               # 直走 150 mm
        robot.turn(-45)                   # 左轉 45 度,車頭轉回原來的方向
    elif 60 <= hue <= 110:                # 綠色物塊 → 從左邊繞過
        hub.display.char("G")
        robot.turn(-45)
        robot.straight(150)
        robot.turn(45)
    else:                                 # 沒看到物塊 → 每秒 100 mm 往前
        robot.drive(100, 0)
    wait(20)
Step by step through the program
- Read the hue at point 1.
- If red → show R on the display → turn right 45 degrees → drive straight 15 cm → turn left 45 degrees (the car faces its original direction again).
- Else if green → show G on the display → do the same with left and right swapped.
- Else (no object in view) → drive straight slowly.
- The MBC Blocks website and Pybricks use "turn N degrees" and "drive N mm" and work it out for you; the official App version here uses "drive for N milliseconds" (
go(100, 450)= turn right for 0.45 seconds), so you have to tune the angle by trial.
What you should see: The car drives forward, swerves right around a red object, swerves left around a green object, and keeps going once it is past.
Common problems
- It turns back before it is past the object and hits it? → Make the straight distance longer (150 → 200; official App 1500 → 2000).
- The official App turns the wrong angle? → Change the 450 in
go(100, 450)andgo(-100, 450): a bigger number turns farther. Battery level also makes a difference, so for competitions we recommend Pybricks or the MBC Blocks website. - It keeps going around the same object? → After going around, the camera sees the same object again. Set point 1 lower (closer to the front of the car), or make the turn angle bigger.
Things to watch out for (read this first)
- The official App Python programs have only been syntax-checked: we confirmed on a computer that there are no typos and ran the logic with simulated data, but we have not yet run each one on a real SPIKE App + hub. The sensor-reading method (
device.data) is the same as in the official exampleHue12_demo_For_Spike_v3.4.3provided by MBC; if the light, sound or motor calls throw an error in your App version, please tell us. - All 12 points read 255 while in the menu: do not press the sensor's side button while a program is running.
- Each point reports the average color of "the whole same-colored patch around that spot". If the spot lands right on the edge of an object, the color will be unstable; move the spot to the middle of the object.
- Colors change with a different field or lighting: recheck every point (and redo
TOLif needed).
Next steps
- To watch left, center and right at the same time: set points 1, 2 and 3 at the left, center and right of the picture and check them one by one as in example 3.
- Full SharpShot documentation: product page