
EV3 beginner examples: IMU gyro
Back to the IMU gyro product page
This page has 9 examples for people who have never written a program: every example comes with a ready-made program file you can download and run, plus a plain-language step-by-step explanation. Start with example 1 and work through in order.
Before you start
- Use the EV3 edition of the sensor (RJ12 plug), plugged into port 1 of the EV3.
- Turn the EV3 on first, then plug in the sensor. If the number never changes, unplug the sensor and plug it back in.
- Examples that drive use the LEGO Education base robot: left wheel motor on B, right wheel motor on C.
- The sensor shows up on the EV3 as a "Gyro Sensor": use the standard gyro blocks.
Every example comes in 5 software versions; pick the one you use: (examples marked "Pybricks / EV3 MicroPython / clev3r only" come in those 3 versions only, because the EV3-G and Classroom blocks cannot read that mode)
| Software | Who it suits | How to open the example file |
|---|---|---|
| EV3-G (official software) | School computer labs, WRO teams (the most common in Taiwan) | Download the .ev3 file, choose "File → Open Project" in the EV3 software, then "Download and Run" at the bottom right. |
| EV3 Classroom | First time with EV3, want the same blocks as SPIKE | Download the .lmsp file, choose "Open" on the EV3 Classroom home screen, connect the EV3 and press "Download and Run" at the bottom right. |
| Pybricks v4 | Want to learn typed code, works in the browser | Open code.pybricks.com in Chrome; the EV3 needs the Pybricks firmware first (currently Beta). Drag the .py file into the editor and press Run. |
| EV3 MicroPython v2.0 | Already using the official LEGO EV3 MicroPython | Use the official LEGO "EV3 MicroPython" microSD boot card + the VS Code extension; paste the program into main.py and press F5 to download and run. |
| clev3r | Already using clev3r (EV3 Basic) | Open the .bp file in clev3r, press "Compile and download", then run it from the MBC_ folder in the EV3 file browser. |
The 3 values used on this page
| Name | Range | Where it comes from |
|---|---|---|
| How many degrees the robot has turned | keeps adding up (one full turn = 360, can go past 360) | Gyro "angle" |
| Pitch angle (nose up or down, degrees) | -90 ~ +90 degrees, flat = 0 (board X axis) | Gyro mode 6 (Pybricks / EV3 MicroPython / clev3r only) |
| Turning rate (degrees per second × 10) | about ±3000, same sign as the angle; 100 = 10 degrees per second | Gyro mode 2 (Pybricks / EV3 MicroPython / clev3r only) |
Example list:
- See how far the robot has turned
- Turn right 90 degrees on the spot
- Drive a square
- Drive straight with automatic correction
- Compass that will not give up: turns itself back to the original heading
- Pitch angle: slow down on a slope (Pybricks / EV3 MicroPython / clev3r only)
- Warn when turning too fast (Pybricks / EV3 MicroPython / clev3r only)
- Turn to a set heading (absolute angle)
- Turn another 90 degrees from where you are (relative angle)
Example 1: See how far the robot has turned
What this example does: The angle is reset to 0 when the program starts; turn the robot by hand and the screen shows how many degrees it has turned.
What you need:
- IMU gyro (EV3 edition)
- EV3 brick
How to connect: IMU gyro in port 1, mounted flat and firmly on the robot (no wobble). The robot must be still when the program starts.
Download the program (pick your software):
⬇ EV3-G (official software) | ⬇ EV3 Classroom | ⬇ Pybricks v4 | ⬇ EV3 MicroPython v2.0 | ⬇ clev3r
EV3-G (official software) blocks
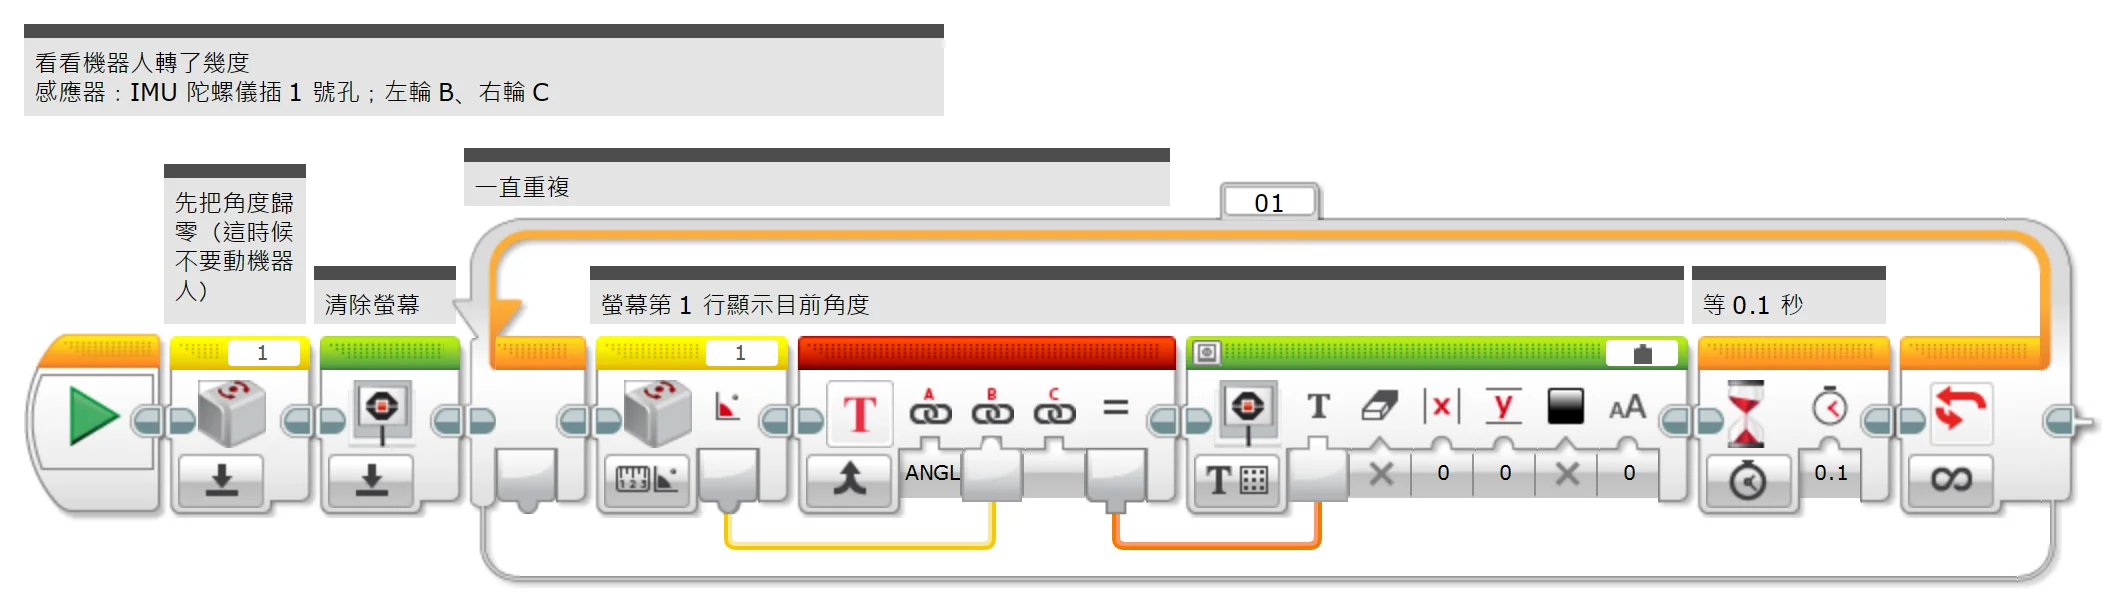
(Too small? Click the picture to open it full size.)
EV3 Classroom blocks
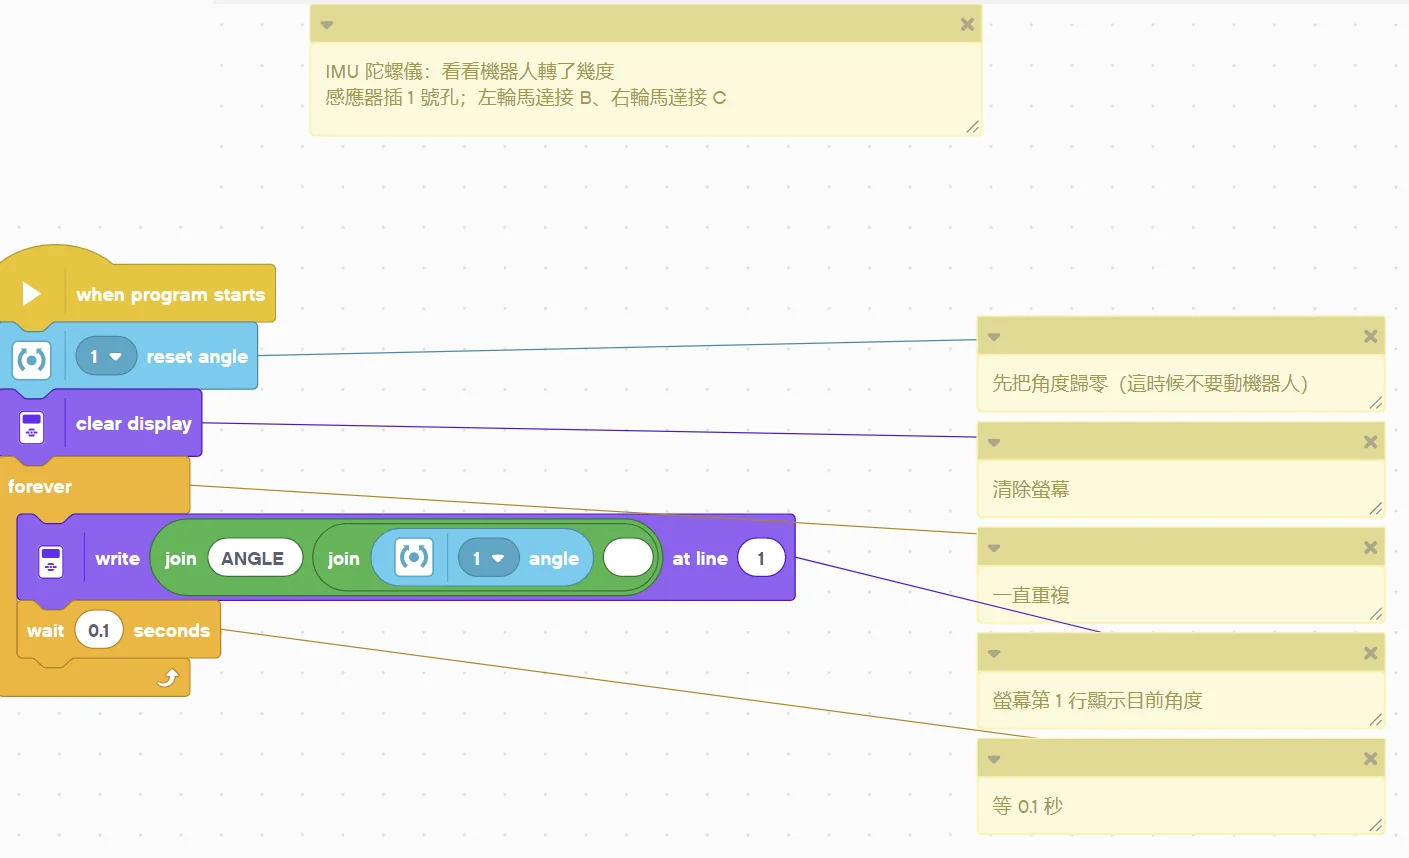
(Too small? Click the picture to open it full size.)
Pybricks v4 code
# ============================================================
# IMU 陀螺儀感應器 EV3 新手範例 01:看看機器人轉了幾度
# 軟體:Pybricks v4(用 Chrome 打開 https://code.pybricks.com ,EV3 版目前是 Beta)
# 接法:IMU 陀螺儀插 1 號孔
# 這個範例會做什麼:程式開始時角度歸零,然後用手轉動機器人,螢幕會顯示轉了幾度。
# ============================================================

from pybricks.hubs import EV3Brick
from pybricks.ev3devices import GyroSensor
from pybricks.parameters import Port, Color
from pybricks.tools import wait

ev3 = EV3Brick()
gyro = GyroSensor(Port.S1)        # IMU 陀螺儀插 1 號孔


def read_angle():
    # 機器人轉了幾度:連續累加(轉一圈=360,可超過 360)
    return gyro.angle()


# ---------- 程式從這裡開始 ----------
# 先把角度歸零(這時候不要動機器人)
gyro.reset_angle(0)
# 清除螢幕
ev3.screen.clear()
# 一直重複
while True:
    # 螢幕第 1 行顯示目前角度
    ev3.screen.draw_text(0, 0, "ANGLE " + str(read_angle()) + "      ", Color.BLACK, Color.WHITE)
    # 等 0.1 秒
    wait(100)
EV3 MicroPython v2.0 code
#!/usr/bin/env pybricks-micropython
# ============================================================
# IMU 陀螺儀感應器 EV3 新手範例 01:看看機器人轉了幾度
# 軟體:樂高官方 EV3 MicroPython v2.0(microSD 開機卡+VS Code「LEGO MINDSTORMS EV3 MicroPython」擴充套件)
# 接法:IMU 陀螺儀插 1 號孔
# 這個範例會做什麼:程式開始時角度歸零,然後用手轉動機器人,螢幕會顯示轉了幾度。
# ============================================================

from pybricks.hubs import EV3Brick
from pybricks.ev3devices import GyroSensor
from pybricks.parameters import Port, Color
from pybricks.tools import wait

ev3 = EV3Brick()
gyro = GyroSensor(Port.S1)        # IMU 陀螺儀插 1 號孔


def read_angle():
    # 機器人轉了幾度:連續累加(轉一圈=360,可超過 360)
    return gyro.angle()


# ---------- 程式從這裡開始 ----------
# 先把角度歸零(這時候不要動機器人)
gyro.reset_angle(0)
# 清除螢幕
ev3.screen.clear()
# 一直重複
while True:
    # 螢幕第 1 行顯示目前角度
    ev3.screen.draw_text(0, 0, "ANGLE " + str(read_angle()) + "      ", Color.BLACK, Color.WHITE)
    # 等 0.1 秒
    wait(100)
clev3r code
' ============================================================
' IMU 陀螺儀感應器 EV3 新手範例 01:看看機器人轉了幾度
' 軟體:clev3r
' 接法:IMU 陀螺儀插 1 號孔;左輪馬達接 B、右輪馬達接 C
' 這個範例會做什麼:程式開始時角度歸零,然後用手轉動機器人,螢幕會顯示轉了幾度。
' 讀值:angle=機器人轉了幾度(連續累加(轉一圈=360,可超過 360))
' ============================================================
folder "prjs" "MBC_imu_ex01"

' IMU 陀螺儀插 1 號孔,使用模式 0
Sensor.SetMode(1, 0)
' 陀螺儀歸零的指令(送 0x11 給感應器)
gyroReset[0] = 17
LCD.Clear()

' 先把角度歸零(這時候不要動機器人)
Sensor.SendUARTData(1, 1, gyroReset)
Program.Delay(100)
' 清除螢幕
LCD.Clear()
' 一直重複
While "True"
  ' 螢幕第 1 行顯示目前角度
  LCD.Text(1, 0, 0, 1, "ANGLE " + Sensor.ReadRawValue(1, 0) + "      ")
  ' 等 0.1 秒
  Program.Delay(100)
EndWhile
Step by step:
- Reset the angle to 0 first (do not move the robot now)
- Clear the screen
- Repeat forever
- Screen row 1 shows the current angle
- Wait 0.1 s
What you should see: One full turn is about 360; turning the other way goes negative. Turn back to where you started and the number returns to about 0.
FAQ:
- The robot is still but the angle slowly drifts? The robot must be completely still at power-on or reset. Put it down, unplug the sensor and plug it back in, then try again.
- The angle changes the opposite way to what the example says? The sensor may be mounted upside down. Examples 2 and 3 use the absolute value so they are not affected; for examples 4 and 5 swap "+" and "−" in the program.
Example 2: Turn right 90 degrees on the spot
What this example does: Turning with the gyro is much more accurate than "turn for N seconds": keep turning until the angle reaches 90, then stop.
What you need:
- EV3 brick + Education base robot (left wheel on B, right wheel on C)
- IMU gyro (EV3 edition)
How to connect: IMU gyro in port 1, mounted flat and firmly on the robot (no wobble). The robot must be still when the program starts.
Download the program (pick your software):
⬇ EV3-G (official software) | ⬇ EV3 Classroom | ⬇ Pybricks v4 | ⬇ EV3 MicroPython v2.0 | ⬇ clev3r
EV3-G (official software) blocks
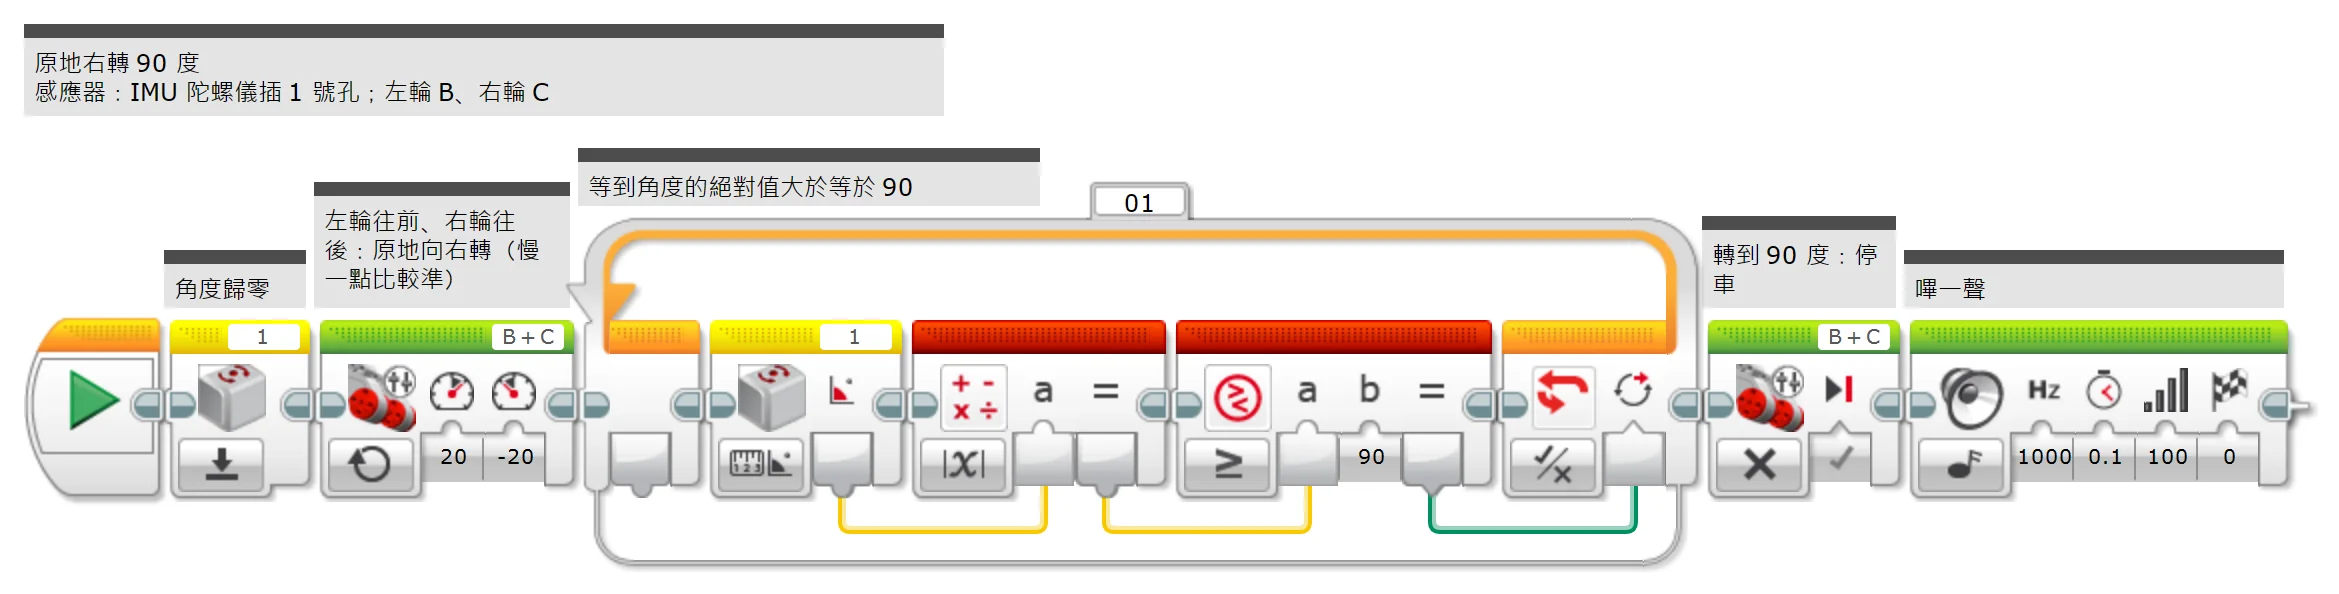
(Too small? Click the picture to open it full size.)
EV3 Classroom blocks
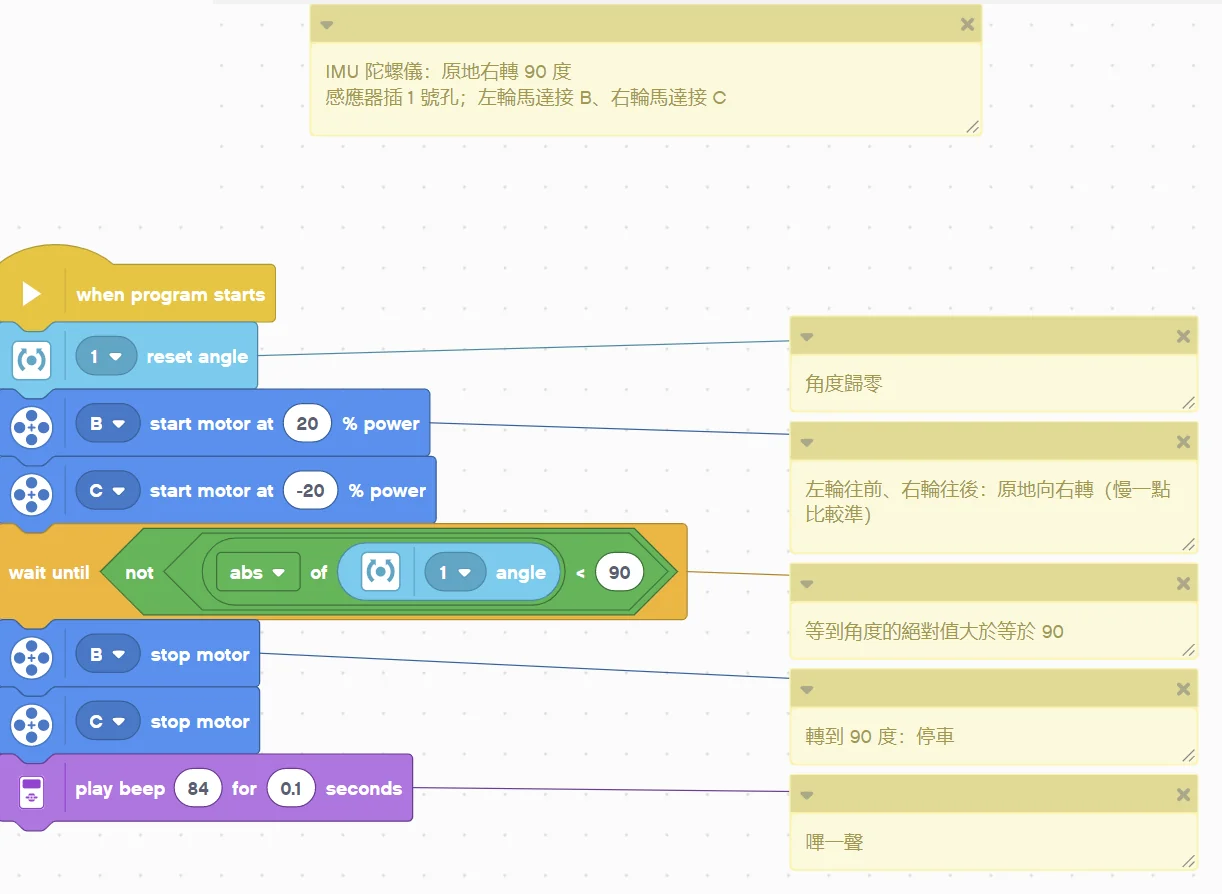
(Too small? Click the picture to open it full size.)
Pybricks v4 code
# ============================================================
# IMU 陀螺儀感應器 EV3 新手範例 02:原地右轉 90 度
# 軟體:Pybricks v4(用 Chrome 打開 https://code.pybricks.com ,EV3 版目前是 Beta)
# 接法:IMU 陀螺儀插 1 號孔;左輪馬達接 B、右輪馬達接 C
# 這個範例會做什麼:靠陀螺儀轉彎,比「轉幾秒」準很多:一直轉,直到角度到 90 度才停。
# ============================================================

from pybricks.hubs import EV3Brick
from pybricks.ev3devices import Motor, GyroSensor
from pybricks.parameters import Port
from pybricks.tools import wait

ev3 = EV3Brick()
gyro = GyroSensor(Port.S1)        # IMU 陀螺儀插 1 號孔
left_motor = Motor(Port.B)        # 左輪
right_motor = Motor(Port.C)       # 右輪


def read_angle():
    # 機器人轉了幾度:連續累加(轉一圈=360,可超過 360)
    return gyro.angle()


# ---------- 程式從這裡開始 ----------
# 角度歸零
gyro.reset_angle(0)
# 左輪往前、右輪往後:原地向右轉(慢一點比較準)
left_motor.dc(20)
right_motor.dc(-20)
# 等到角度的絕對值大於等於 90
while not (abs(read_angle()) >= 90):
    wait(10)
# 轉到 90 度:停車
left_motor.brake()
right_motor.brake()
# 嗶一聲
ev3.speaker.beep()
EV3 MicroPython v2.0 code
#!/usr/bin/env pybricks-micropython
# ============================================================
# IMU 陀螺儀感應器 EV3 新手範例 02:原地右轉 90 度
# 軟體:樂高官方 EV3 MicroPython v2.0(microSD 開機卡+VS Code「LEGO MINDSTORMS EV3 MicroPython」擴充套件)
# 接法:IMU 陀螺儀插 1 號孔;左輪馬達接 B、右輪馬達接 C
# 這個範例會做什麼:靠陀螺儀轉彎,比「轉幾秒」準很多:一直轉,直到角度到 90 度才停。
# ============================================================

from pybricks.hubs import EV3Brick
from pybricks.ev3devices import Motor, GyroSensor
from pybricks.parameters import Port
from pybricks.tools import wait

ev3 = EV3Brick()
gyro = GyroSensor(Port.S1)        # IMU 陀螺儀插 1 號孔
left_motor = Motor(Port.B)        # 左輪
right_motor = Motor(Port.C)       # 右輪


def read_angle():
    # 機器人轉了幾度:連續累加(轉一圈=360,可超過 360)
    return gyro.angle()


# ---------- 程式從這裡開始 ----------
# 角度歸零
gyro.reset_angle(0)
# 左輪往前、右輪往後:原地向右轉(慢一點比較準)
left_motor.dc(20)
right_motor.dc(-20)
# 等到角度的絕對值大於等於 90
while not (abs(read_angle()) >= 90):
    wait(10)
# 轉到 90 度:停車
left_motor.brake()
right_motor.brake()
# 嗶一聲
ev3.speaker.beep()
clev3r code
' ============================================================
' IMU 陀螺儀感應器 EV3 新手範例 02:原地右轉 90 度
' 軟體:clev3r
' 接法:IMU 陀螺儀插 1 號孔;左輪馬達接 B、右輪馬達接 C
' 這個範例會做什麼:靠陀螺儀轉彎,比「轉幾秒」準很多:一直轉,直到角度到 90 度才停。
' 讀值:angle=機器人轉了幾度(連續累加(轉一圈=360,可超過 360))
' ============================================================
folder "prjs" "MBC_imu_ex02"

' IMU 陀螺儀插 1 號孔,使用模式 0
Sensor.SetMode(1, 0)
' 陀螺儀歸零的指令(送 0x11 給感應器)
gyroReset[0] = 17
LCD.Clear()

' 角度歸零
Sensor.SendUARTData(1, 1, gyroReset)
Program.Delay(100)
' 左輪往前、右輪往後:原地向右轉(慢一點比較準)
Motor.StartPower("B", 20)
Motor.StartPower("C", -20)
' 等到角度的絕對值大於等於 90
While Math.Abs(Sensor.ReadRawValue(1, 0)) < 90
  Program.Delay(10)
EndWhile
' 轉到 90 度:停車
Motor.Stop("BC", "True")
' 嗶一聲
Speaker.Tone(50, 1000, 100)
Speaker.Wait()
Step by step:
- Reset the angle to 0
- Left wheel forward, right wheel backward: spin right on the spot (slower is more accurate)
- Wait until the absolute value of the angle is 90 or more
- Reached 90 degrees: stop
- Beep
What you should see: The robot spins right about 90 degrees, stops and beeps.
FAQ:
- It always overshoots by a few degrees? The robot needs a moment to stop. Try 85 instead of 90, or lower the turning speed 20.
- The robot is still but the angle slowly drifts? The robot must be completely still at power-on or reset. Put it down, unplug the sensor and plug it back in, then try again.
- The angle changes the opposite way to what the example says? The sensor may be mounted upside down. Examples 2 and 3 use the absolute value so they are not affected; for examples 4 and 5 swap "+" and "−" in the program.
Example 3: Drive a square
What this example does: Repeat "drive straight 2 s + turn right 90 degrees" 4 times and you get a square.
What you need:
- EV3 brick + Education base robot (left wheel on B, right wheel on C)
- IMU gyro (EV3 edition)
How to connect: IMU gyro in port 1, mounted flat and firmly on the robot (no wobble). The robot must be still when the program starts.
Download the program (pick your software):
⬇ EV3-G (official software) | ⬇ EV3 Classroom | ⬇ Pybricks v4 | ⬇ EV3 MicroPython v2.0 | ⬇ clev3r
EV3-G (official software) blocks
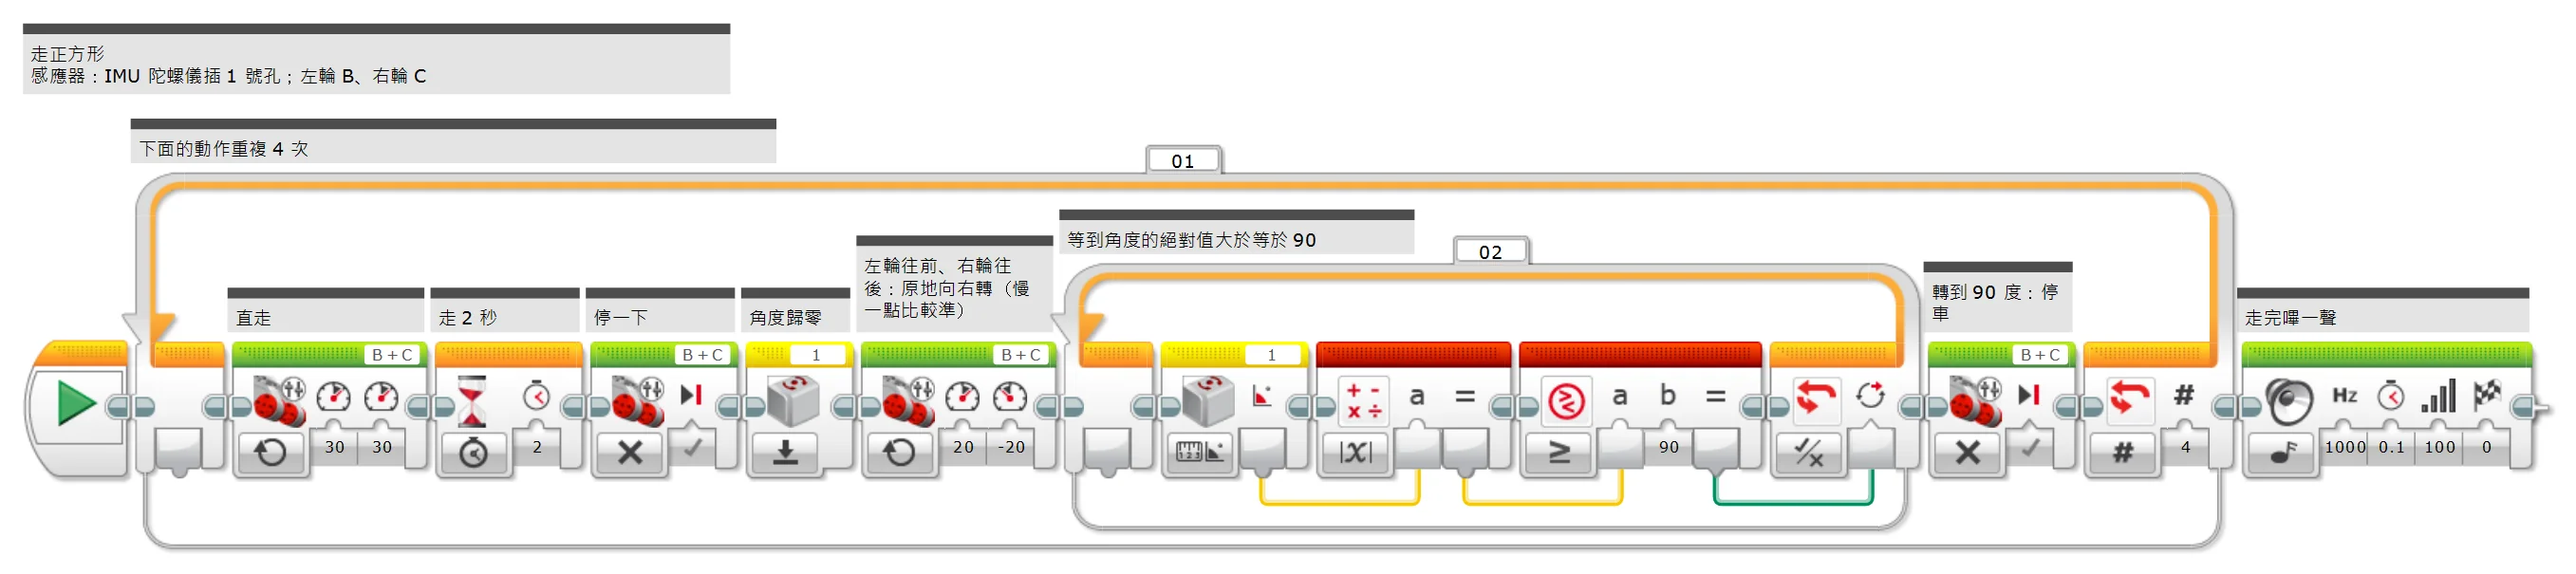
(Too small? Click the picture to open it full size.)
EV3 Classroom blocks
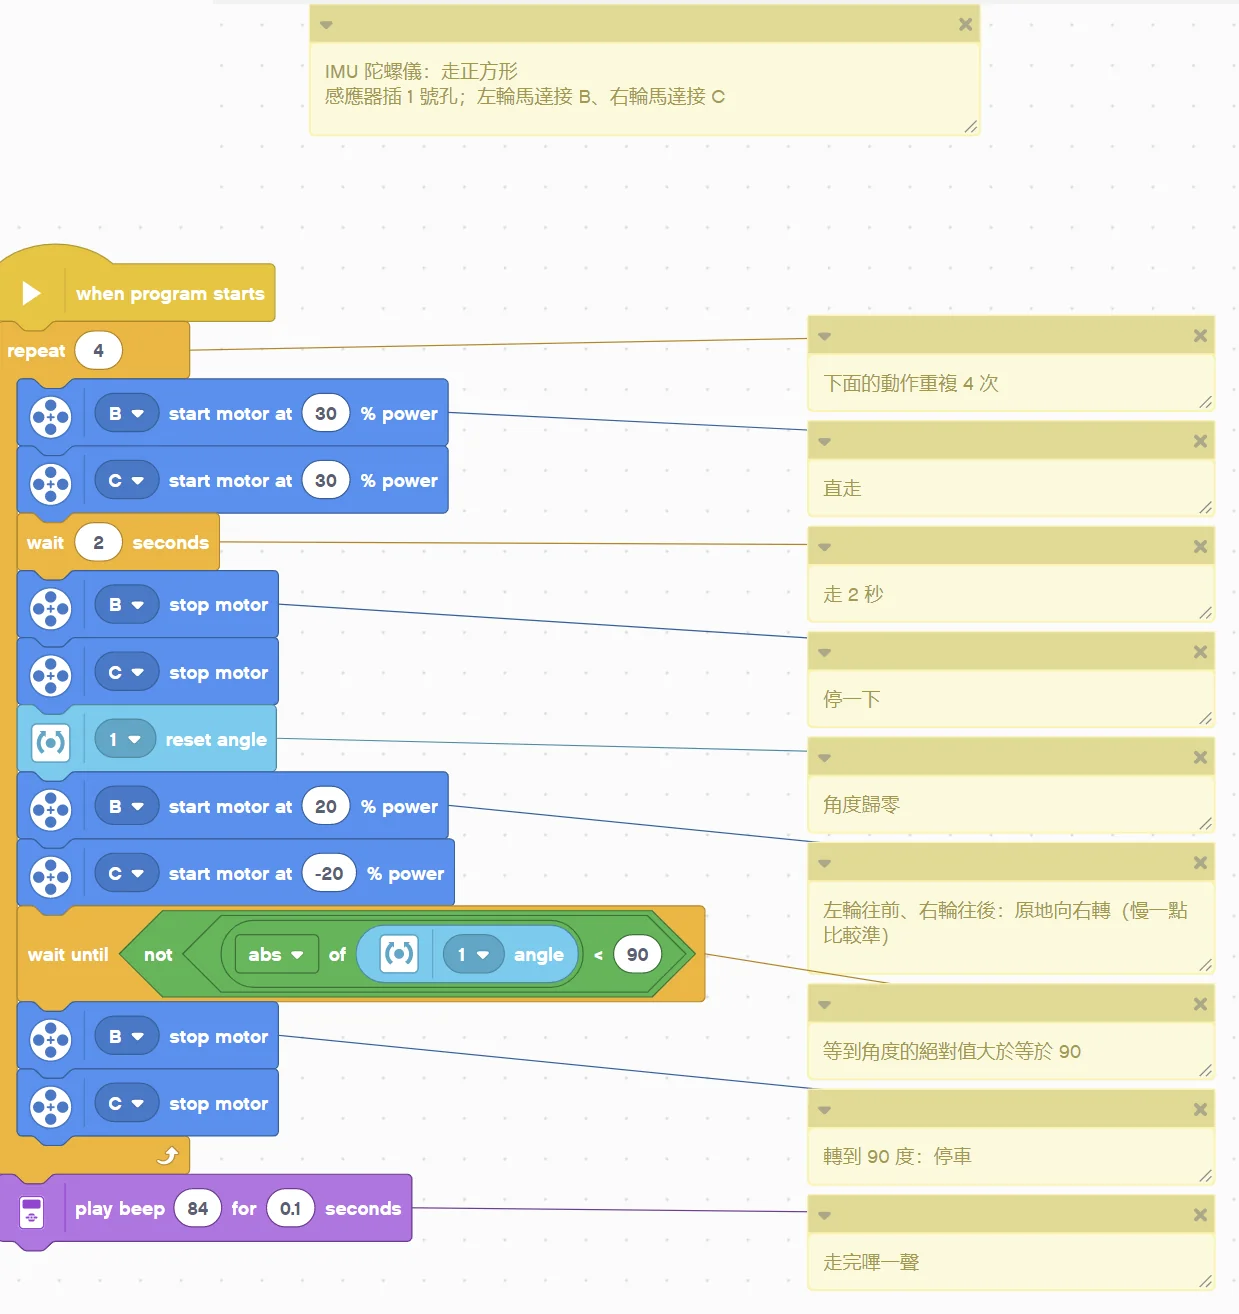
(Too small? Click the picture to open it full size.)
Pybricks v4 code
# ============================================================
# IMU 陀螺儀感應器 EV3 新手範例 03:走正方形
# 軟體:Pybricks v4(用 Chrome 打開 https://code.pybricks.com ,EV3 版目前是 Beta)
# 接法:IMU 陀螺儀插 1 號孔;左輪馬達接 B、右輪馬達接 C
# 這個範例會做什麼:把「直走 2 秒+右轉 90 度」重複 4 次,就是一個正方形。
# ============================================================

from pybricks.hubs import EV3Brick
from pybricks.ev3devices import Motor, GyroSensor
from pybricks.parameters import Port
from pybricks.tools import wait

ev3 = EV3Brick()
gyro = GyroSensor(Port.S1)        # IMU 陀螺儀插 1 號孔
left_motor = Motor(Port.B)        # 左輪
right_motor = Motor(Port.C)       # 右輪


def read_angle():
    # 機器人轉了幾度:連續累加(轉一圈=360,可超過 360)
    return gyro.angle()


# ---------- 程式從這裡開始 ----------
# 下面的動作重複 4 次
for i in range(4):
    # 直走
    left_motor.dc(30)
    right_motor.dc(30)
    # 走 2 秒
    wait(2000)
    # 停一下
    left_motor.brake()
    right_motor.brake()
    # 角度歸零
    gyro.reset_angle(0)
    # 左輪往前、右輪往後:原地向右轉(慢一點比較準)
    left_motor.dc(20)
    right_motor.dc(-20)
    # 等到角度的絕對值大於等於 90
    while not (abs(read_angle()) >= 90):
        wait(10)
    # 轉到 90 度:停車
    left_motor.brake()
    right_motor.brake()
# 走完嗶一聲
ev3.speaker.beep()
EV3 MicroPython v2.0 code
#!/usr/bin/env pybricks-micropython
# ============================================================
# IMU 陀螺儀感應器 EV3 新手範例 03:走正方形
# 軟體:樂高官方 EV3 MicroPython v2.0(microSD 開機卡+VS Code「LEGO MINDSTORMS EV3 MicroPython」擴充套件)
# 接法:IMU 陀螺儀插 1 號孔;左輪馬達接 B、右輪馬達接 C
# 這個範例會做什麼:把「直走 2 秒+右轉 90 度」重複 4 次,就是一個正方形。
# ============================================================

from pybricks.hubs import EV3Brick
from pybricks.ev3devices import Motor, GyroSensor
from pybricks.parameters import Port
from pybricks.tools import wait

ev3 = EV3Brick()
gyro = GyroSensor(Port.S1)        # IMU 陀螺儀插 1 號孔
left_motor = Motor(Port.B)        # 左輪
right_motor = Motor(Port.C)       # 右輪


def read_angle():
    # 機器人轉了幾度:連續累加(轉一圈=360,可超過 360)
    return gyro.angle()


# ---------- 程式從這裡開始 ----------
# 下面的動作重複 4 次
for i in range(4):
    # 直走
    left_motor.dc(30)
    right_motor.dc(30)
    # 走 2 秒
    wait(2000)
    # 停一下
    left_motor.brake()
    right_motor.brake()
    # 角度歸零
    gyro.reset_angle(0)
    # 左輪往前、右輪往後:原地向右轉(慢一點比較準)
    left_motor.dc(20)
    right_motor.dc(-20)
    # 等到角度的絕對值大於等於 90
    while not (abs(read_angle()) >= 90):
        wait(10)
    # 轉到 90 度:停車
    left_motor.brake()
    right_motor.brake()
# 走完嗶一聲
ev3.speaker.beep()
clev3r code
' ============================================================
' IMU 陀螺儀感應器 EV3 新手範例 03:走正方形
' 軟體:clev3r
' 接法:IMU 陀螺儀插 1 號孔;左輪馬達接 B、右輪馬達接 C
' 這個範例會做什麼:把「直走 2 秒+右轉 90 度」重複 4 次,就是一個正方形。
' 讀值:angle=機器人轉了幾度(連續累加(轉一圈=360,可超過 360))
' ============================================================
folder "prjs" "MBC_imu_ex03"

' IMU 陀螺儀插 1 號孔,使用模式 0
Sensor.SetMode(1, 0)
' 陀螺儀歸零的指令(送 0x11 給感應器)
gyroReset[0] = 17
LCD.Clear()

' 下面的動作重複 4 次
For i = 1 To 4
  ' 直走
  Motor.StartPower("B", 30)
  Motor.StartPower("C", 30)
  ' 走 2 秒
  Program.Delay(2000)
  ' 停一下
  Motor.Stop("BC", "True")
  ' 角度歸零
  Sensor.SendUARTData(1, 1, gyroReset)
  Program.Delay(100)
  ' 左輪往前、右輪往後:原地向右轉(慢一點比較準)
  Motor.StartPower("B", 20)
  Motor.StartPower("C", -20)
  ' 等到角度的絕對值大於等於 90
  While Math.Abs(Sensor.ReadRawValue(1, 0)) < 90
    Program.Delay(10)
  EndWhile
  ' 轉到 90 度:停車
  Motor.Stop("BC", "True")
EndFor
' 走完嗶一聲
Speaker.Tone(50, 1000, 100)
Speaker.Wait()
Step by step:
- Repeat the steps below 4 times
- Go straight
- Drive for 2 s
- Stop for a moment
- Reset the angle to 0
- Left wheel forward, right wheel backward: spin right on the spot (slower is more accurate)
- Wait until the absolute value of the angle is 90 or more
- Reached 90 degrees: stop
- Beep when done
What you should see: The robot drives a square and ends up near where it started.
FAQ:
- The robot is still but the angle slowly drifts? The robot must be completely still at power-on or reset. Put it down, unplug the sensor and plug it back in, then try again.
- The angle changes the opposite way to what the example says? The sensor may be mounted upside down. Examples 2 and 3 use the absolute value so they are not affected; for examples 4 and 5 swap "+" and "−" in the program.
Example 4: Drive straight with automatic correction
What this example does: Two wheels are never exactly the same speed, so a robot drifts when driving straight. Use the gyro to see how many degrees it drifted and steer back the other way, and the robot drives really straight.
What you need:
- EV3 brick + Education base robot (left wheel on B, right wheel on C)
- IMU gyro (EV3 edition)
How to connect: IMU gyro in port 1, mounted flat and firmly on the robot (no wobble). The robot must be still when the program starts.
Download the program (pick your software):
⬇ EV3-G (official software) | ⬇ EV3 Classroom | ⬇ Pybricks v4 | ⬇ EV3 MicroPython v2.0 | ⬇ clev3r
EV3-G (official software) blocks
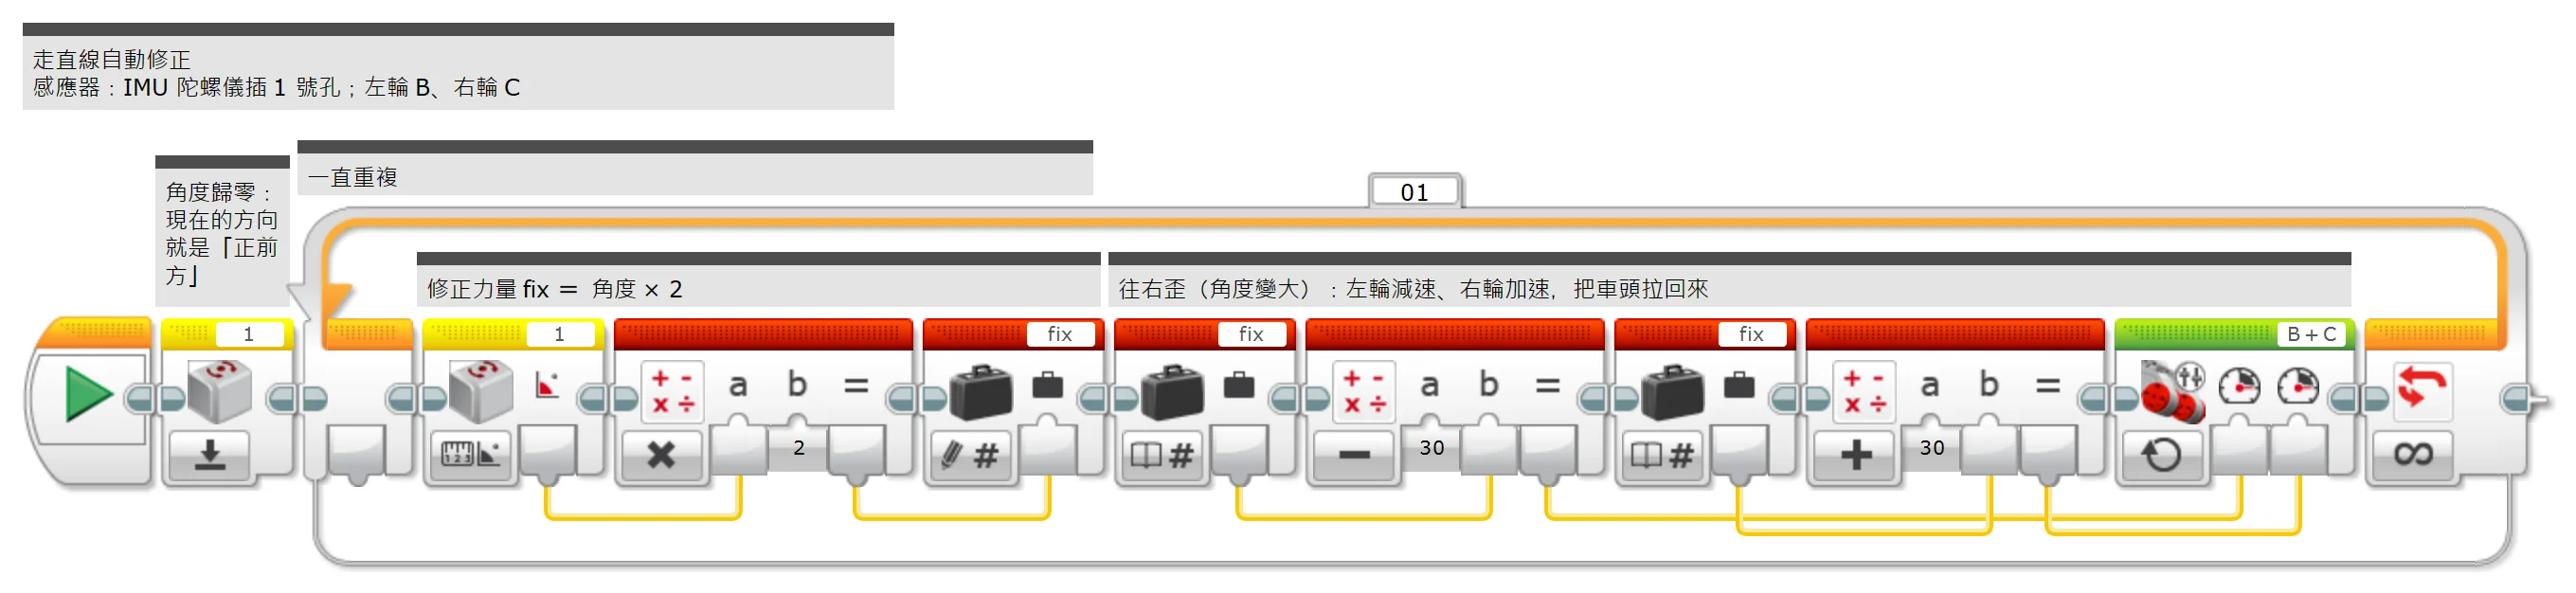
(Too small? Click the picture to open it full size.)
EV3 Classroom blocks
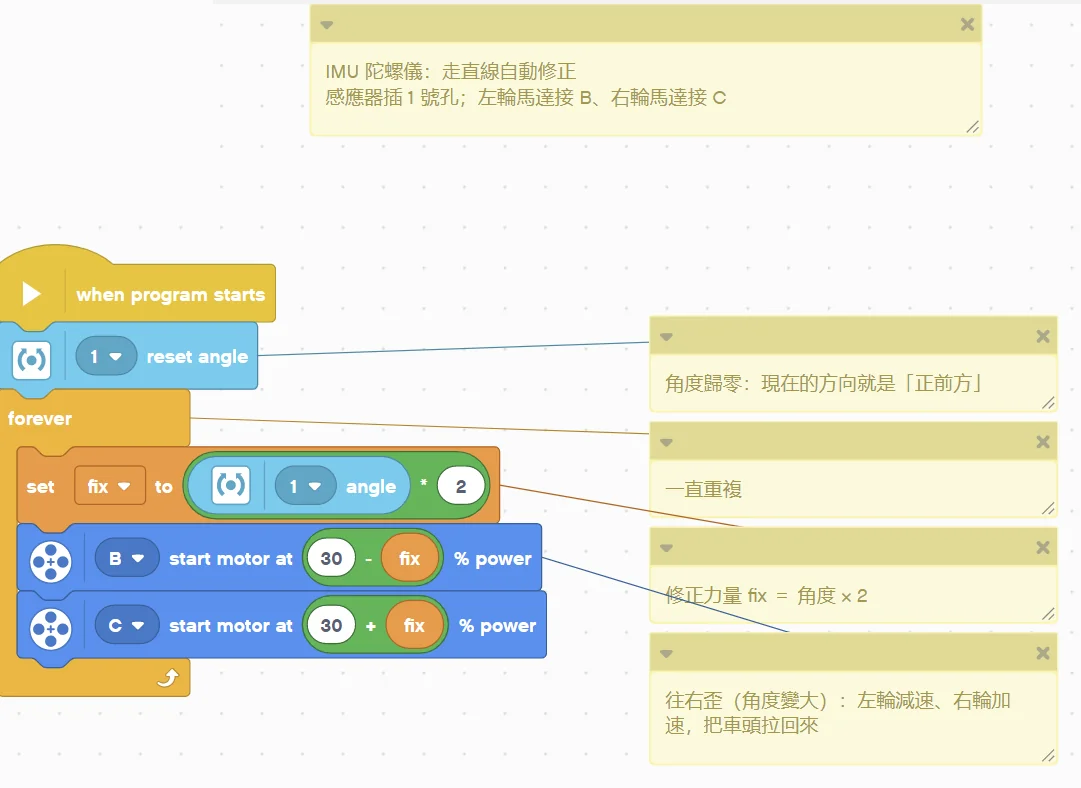
(Too small? Click the picture to open it full size.)
Pybricks v4 code
# ============================================================
# IMU 陀螺儀感應器 EV3 新手範例 04:走直線自動修正
# 軟體:Pybricks v4(用 Chrome 打開 https://code.pybricks.com ,EV3 版目前是 Beta)
# 接法:IMU 陀螺儀插 1 號孔;左輪馬達接 B、右輪馬達接 C
# 這個範例會做什麼:兩個輪子不可能完全一樣快,車子直走久了會歪。用陀螺儀看歪了幾度,就往反方向補回來,車子就能走得很直。
# ============================================================

from pybricks.hubs import EV3Brick
from pybricks.ev3devices import Motor, GyroSensor
from pybricks.parameters import Port
from pybricks.tools import wait

ev3 = EV3Brick()
gyro = GyroSensor(Port.S1)        # IMU 陀螺儀插 1 號孔
left_motor = Motor(Port.B)        # 左輪
right_motor = Motor(Port.C)       # 右輪


def read_angle():
    # 機器人轉了幾度:連續累加(轉一圈=360,可超過 360)
    return gyro.angle()


# ---------- 程式從這裡開始 ----------
# 角度歸零:現在的方向就是「正前方」
gyro.reset_angle(0)
# 一直重複
while True:
    # 修正力量 fix = 角度 × 2
    fix = read_angle() * 2
    # 往右歪(角度變大):左輪減速、右輪加速,把車頭拉回來
    left_motor.dc(30 - fix)
    right_motor.dc(30 + fix)
EV3 MicroPython v2.0 code
#!/usr/bin/env pybricks-micropython
# ============================================================
# IMU 陀螺儀感應器 EV3 新手範例 04:走直線自動修正
# 軟體:樂高官方 EV3 MicroPython v2.0(microSD 開機卡+VS Code「LEGO MINDSTORMS EV3 MicroPython」擴充套件)
# 接法:IMU 陀螺儀插 1 號孔;左輪馬達接 B、右輪馬達接 C
# 這個範例會做什麼:兩個輪子不可能完全一樣快,車子直走久了會歪。用陀螺儀看歪了幾度,就往反方向補回來,車子就能走得很直。
# ============================================================

from pybricks.hubs import EV3Brick
from pybricks.ev3devices import Motor, GyroSensor
from pybricks.parameters import Port
from pybricks.tools import wait

ev3 = EV3Brick()
gyro = GyroSensor(Port.S1)        # IMU 陀螺儀插 1 號孔
left_motor = Motor(Port.B)        # 左輪
right_motor = Motor(Port.C)       # 右輪


def read_angle():
    # 機器人轉了幾度:連續累加(轉一圈=360,可超過 360)
    return gyro.angle()


# ---------- 程式從這裡開始 ----------
# 角度歸零:現在的方向就是「正前方」
gyro.reset_angle(0)
# 一直重複
while True:
    # 修正力量 fix = 角度 × 2
    fix = read_angle() * 2
    # 往右歪(角度變大):左輪減速、右輪加速,把車頭拉回來
    left_motor.dc(30 - fix)
    right_motor.dc(30 + fix)
clev3r code
' ============================================================
' IMU 陀螺儀感應器 EV3 新手範例 04:走直線自動修正
' 軟體:clev3r
' 接法:IMU 陀螺儀插 1 號孔;左輪馬達接 B、右輪馬達接 C
' 這個範例會做什麼:兩個輪子不可能完全一樣快,車子直走久了會歪。用陀螺儀看歪了幾度,就往反方向補回來,車子就能走得很直。
' 讀值:angle=機器人轉了幾度(連續累加(轉一圈=360,可超過 360))
' ============================================================
folder "prjs" "MBC_imu_ex04"

' IMU 陀螺儀插 1 號孔,使用模式 0
Sensor.SetMode(1, 0)
' 陀螺儀歸零的指令(送 0x11 給感應器)
gyroReset[0] = 17
LCD.Clear()

' 角度歸零:現在的方向就是「正前方」
Sensor.SendUARTData(1, 1, gyroReset)
Program.Delay(100)
' 一直重複
While "True"
  ' 修正力量 fix = 角度 × 2
  fix = Sensor.ReadRawValue(1, 0) * 2
  ' 往右歪(角度變大):左輪減速、右輪加速,把車頭拉回來
  Motor.StartPower("B", 30 - fix)
  Motor.StartPower("C", 30 + fix)
EndWhile
Step by step:
- Reset the angle: the current heading is "straight ahead"
- Repeat forever
- Correction fix = angle × 2
- Drifting right (angle grows): slow the left wheel, speed up the right wheel to pull the nose back
What you should see: The robot drives straight; push its nose off course by hand and it turns back to the original heading and carries on.
FAQ:
- It drifts more and more, or even spins? The correction is the wrong way round: swap "30 − fix" and "30 + fix".
- The robot is still but the angle slowly drifts? The robot must be completely still at power-on or reset. Put it down, unplug the sensor and plug it back in, then try again.
- The angle changes the opposite way to what the example says? The sensor may be mounted upside down. Examples 2 and 3 use the absolute value so they are not affected; for examples 4 and 5 swap "+" and "−" in the program.
Example 5: Compass that will not give up: turns itself back to the original heading
What this example does: The robot sits still. Turn it away by hand and it turns itself back to the original heading. This is the basic "turn back to straight ahead" used in competitions.
What you need:
- EV3 brick + Education base robot (left wheel on B, right wheel on C)
- IMU gyro (EV3 edition)
How to connect: IMU gyro in port 1, mounted flat and firmly on the robot (no wobble). The robot must be still when the program starts.
Download the program (pick your software):
⬇ EV3-G (official software) | ⬇ EV3 Classroom | ⬇ Pybricks v4 | ⬇ EV3 MicroPython v2.0 | ⬇ clev3r
EV3-G (official software) blocks
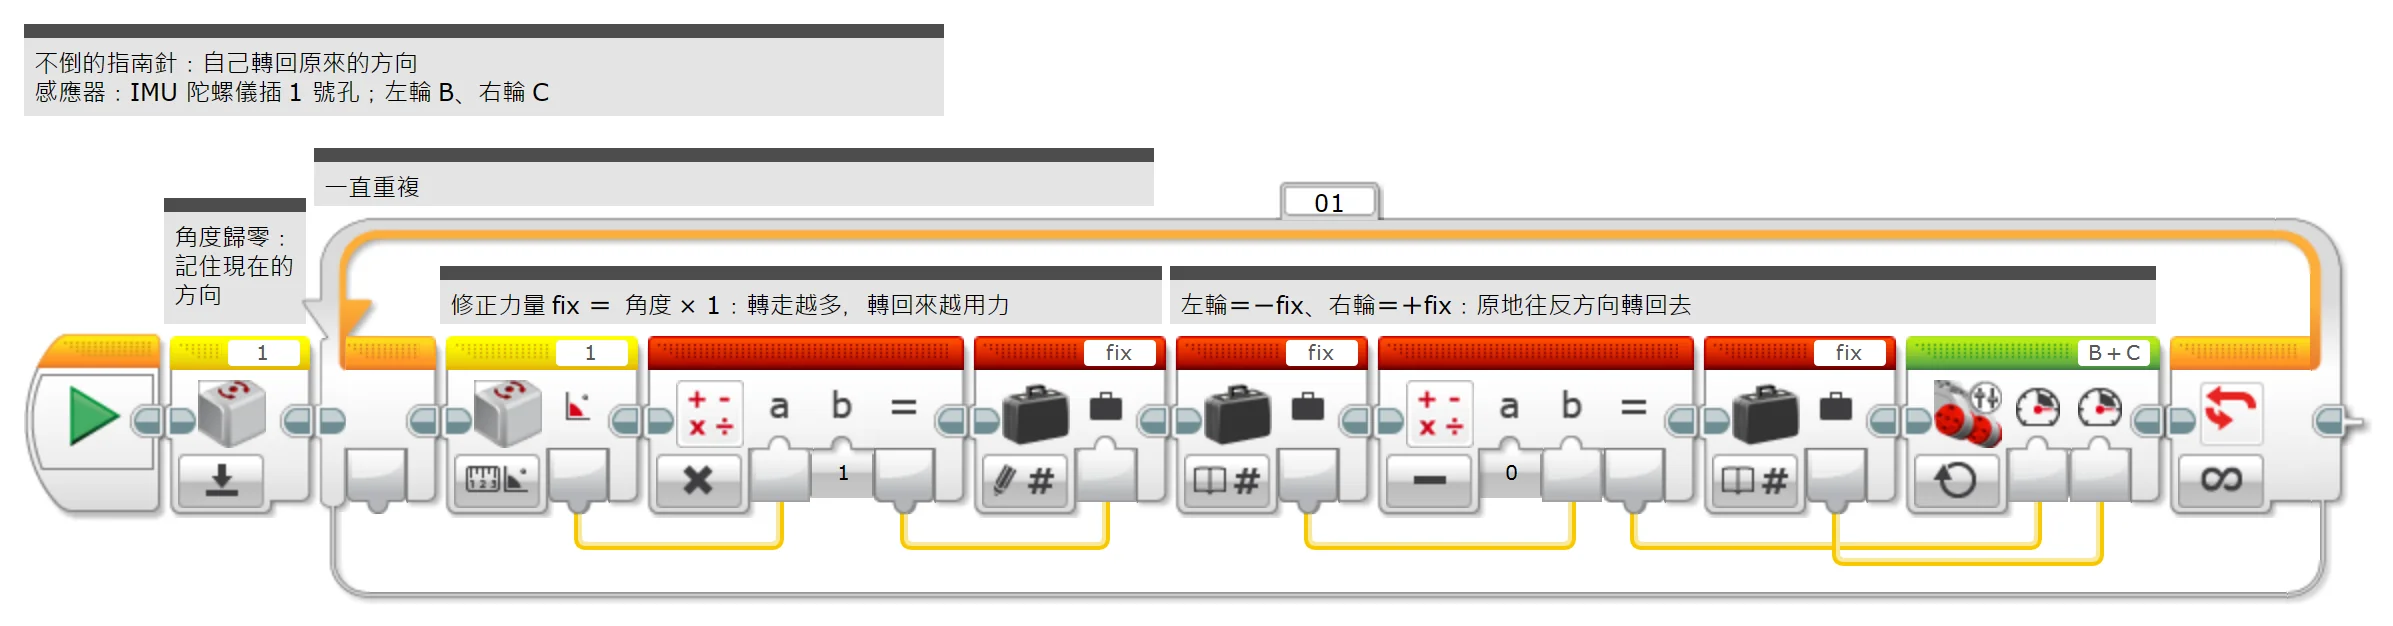
(Too small? Click the picture to open it full size.)
EV3 Classroom blocks
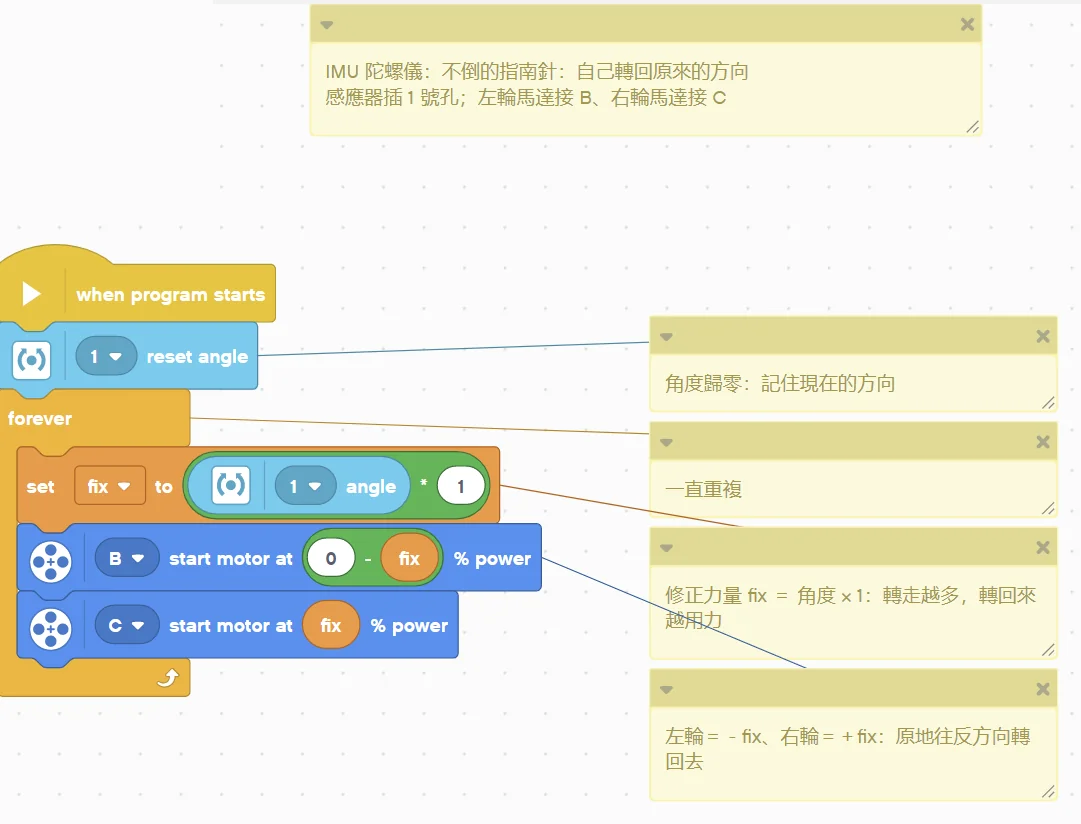
(Too small? Click the picture to open it full size.)
Pybricks v4 code
# ============================================================
# IMU 陀螺儀感應器 EV3 新手範例 05:不倒的指南針:自己轉回原來的方向
# 軟體:Pybricks v4(用 Chrome 打開 https://code.pybricks.com ,EV3 版目前是 Beta)
# 接法:IMU 陀螺儀插 1 號孔;左輪馬達接 B、右輪馬達接 C
# 這個範例會做什麼:車子停在原地。你用手把它轉走,它會自己原地轉回原來的方向。這就是比賽中「轉回正前方」的基本做法。
# ============================================================

from pybricks.hubs import EV3Brick
from pybricks.ev3devices import Motor, GyroSensor
from pybricks.parameters import Port
from pybricks.tools import wait

ev3 = EV3Brick()
gyro = GyroSensor(Port.S1)        # IMU 陀螺儀插 1 號孔
left_motor = Motor(Port.B)        # 左輪
right_motor = Motor(Port.C)       # 右輪


def read_angle():
    # 機器人轉了幾度:連續累加(轉一圈=360,可超過 360)
    return gyro.angle()


# ---------- 程式從這裡開始 ----------
# 角度歸零:記住現在的方向
gyro.reset_angle(0)
# 一直重複
while True:
    # 修正力量 fix = 角度 × 1:轉走越多,轉回來越用力
    fix = read_angle() * 1
    # 左輪=-fix、右輪=+fix:原地往反方向轉回去
    left_motor.dc(0 - fix)
    right_motor.dc(fix)
EV3 MicroPython v2.0 code
#!/usr/bin/env pybricks-micropython
# ============================================================
# IMU 陀螺儀感應器 EV3 新手範例 05:不倒的指南針:自己轉回原來的方向
# 軟體:樂高官方 EV3 MicroPython v2.0(microSD 開機卡+VS Code「LEGO MINDSTORMS EV3 MicroPython」擴充套件)
# 接法:IMU 陀螺儀插 1 號孔;左輪馬達接 B、右輪馬達接 C
# 這個範例會做什麼:車子停在原地。你用手把它轉走,它會自己原地轉回原來的方向。這就是比賽中「轉回正前方」的基本做法。
# ============================================================

from pybricks.hubs import EV3Brick
from pybricks.ev3devices import Motor, GyroSensor
from pybricks.parameters import Port
from pybricks.tools import wait

ev3 = EV3Brick()
gyro = GyroSensor(Port.S1)        # IMU 陀螺儀插 1 號孔
left_motor = Motor(Port.B)        # 左輪
right_motor = Motor(Port.C)       # 右輪


def read_angle():
    # 機器人轉了幾度:連續累加(轉一圈=360,可超過 360)
    return gyro.angle()


# ---------- 程式從這裡開始 ----------
# 角度歸零:記住現在的方向
gyro.reset_angle(0)
# 一直重複
while True:
    # 修正力量 fix = 角度 × 1:轉走越多,轉回來越用力
    fix = read_angle() * 1
    # 左輪=-fix、右輪=+fix:原地往反方向轉回去
    left_motor.dc(0 - fix)
    right_motor.dc(fix)
clev3r code
' ============================================================
' IMU 陀螺儀感應器 EV3 新手範例 05:不倒的指南針:自己轉回原來的方向
' 軟體:clev3r
' 接法:IMU 陀螺儀插 1 號孔;左輪馬達接 B、右輪馬達接 C
' 這個範例會做什麼:車子停在原地。你用手把它轉走,它會自己原地轉回原來的方向。這就是比賽中「轉回正前方」的基本做法。
' 讀值:angle=機器人轉了幾度(連續累加(轉一圈=360,可超過 360))
' ============================================================
folder "prjs" "MBC_imu_ex05"

' IMU 陀螺儀插 1 號孔,使用模式 0
Sensor.SetMode(1, 0)
' 陀螺儀歸零的指令(送 0x11 給感應器)
gyroReset[0] = 17
LCD.Clear()

' 角度歸零:記住現在的方向
Sensor.SendUARTData(1, 1, gyroReset)
Program.Delay(100)
' 一直重複
While "True"
  ' 修正力量 fix = 角度 × 1:轉走越多,轉回來越用力
  fix = Sensor.ReadRawValue(1, 0) * 1
  ' 左輪=-fix、右輪=+fix:原地往反方向轉回去
  Motor.StartPower("B", 0 - fix)
  Motor.StartPower("C", fix)
EndWhile
Step by step:
- Reset the angle: remember the current heading
- Repeat forever
- Correction fix = angle × 1: the further it is turned away, the harder it turns back
- Left wheel = −fix, right wheel = +fix: spin back the other way on the spot
What you should see: Turn the robot away by hand; let go and it turns back to the original heading and stops.
FAQ:
- It keeps spinning and never stops? The direction is reversed: swap "−fix" and "+fix".
- It shakes around the target? Lower × 1 (for example × 0.6).
- The robot is still but the angle slowly drifts? The robot must be completely still at power-on or reset. Put it down, unplug the sensor and plug it back in, then try again.
- The angle changes the opposite way to what the example says? The sensor may be mounted upside down. Examples 2 and 3 use the absolute value so they are not affected; for examples 4 and 5 swap "+" and "−" in the program.
Example 6: Pitch angle: slow down on a slope
Pybricks v4 / EV3 MicroPython v2.0 / clev3r only (the EV3-G and Classroom blocks cannot read this mode)
What this example does: Mode 6 is the "pitch angle": how many degrees the nose is up or down, 0 when flat. The robot drives at speed 50 on flat ground and slows to 20 as soon as the pitch angle passes 8 degrees on a slope (up or down), so it is less likely to tip or run away.
What you need:
- EV3 brick + Education base robot (left wheel on B, right wheel on C)
- IMU gyro (EV3 edition, firmware v4.0 or later)
- A ramp or a small slope made from books
How to connect: IMU gyro in port 1, mounted flat on the robot with the board's printed X axis parallel to the robot's forward direction.
Download the program (pick your software):
⬇ Pybricks v4 | ⬇ EV3 MicroPython v2.0 | ⬇ clev3r
(The code is the example; no screenshot needed.)
Pybricks v4 code
# ============================================================
# IMU 陀螺儀感應器 EV3 新手範例 06:俯仰角:上坡就減速
# 軟體:Pybricks v4(用 Chrome 打開 https://code.pybricks.com ,EV3 版目前是 Beta)
# 接法:IMU 陀螺儀插 1 號孔;左輪馬達接 B、右輪馬達接 C
# 這個範例會做什麼:模式 6 是「俯仰角」:車頭上抬或下壓幾度,平放是 0。車子在平地用 50 的速度跑,一上坡(或下坡)俯仰角超過 8 度就放慢到 20,比較不會翻車或衝太快。
# ============================================================

from pybricks.hubs import EV3Brick
from pybricks.ev3devices import Motor
from pybricks.iodevices import LUMPDevice
from pybricks.parameters import Port, Color
from pybricks.tools import wait

ev3 = EV3Brick()
sensor = LUMPDevice(Port.S1)       # IMU 陀螺儀插 1 號孔(當一般 UART 裝置讀原始值)
left_motor = Motor(Port.B)        # 左輪
right_motor = Motor(Port.C)       # 右輪


def read_tilt():
    # 俯仰角(車頭上抬或下壓幾度):-90 ~ +90 度,平放=0(板子絲印 X 軸)
    return sensor.read(6)[0]


# ---------- 程式從這裡開始 ----------
# 清除螢幕
ev3.screen.clear()
# 一直重複
while True:
    # 第 1 行顯示俯仰角(度)
    ev3.screen.draw_text(0, 0, "TILT " + str(read_tilt()) + "      ", Color.BLACK, Color.WHITE)
    # 如果俯仰角的絕對值大於 8 度
    if abs(read_tilt()) > 8:
        # 在坡上(俯仰角超過 8 度):放慢到 20
        left_motor.dc(20)
        right_motor.dc(20)
        # 第 2 行顯示 SLOPE
        ev3.screen.draw_text(0, 16, "SLOPE      ", Color.BLACK, Color.WHITE)
    else:
        # 平地:用 50 往前開
        left_motor.dc(50)
        right_motor.dc(50)
        # 第 2 行顯示 FLAT
        ev3.screen.draw_text(0, 16, "FLAT      ", Color.BLACK, Color.WHITE)
EV3 MicroPython v2.0 code
#!/usr/bin/env pybricks-micropython
# ============================================================
# IMU 陀螺儀感應器 EV3 新手範例 06:俯仰角:上坡就減速
# 軟體:樂高官方 EV3 MicroPython v2.0(microSD 開機卡+VS Code「LEGO MINDSTORMS EV3 MicroPython」擴充套件)
# 接法:IMU 陀螺儀插 1 號孔;左輪馬達接 B、右輪馬達接 C
# 這個範例會做什麼:模式 6 是「俯仰角」:車頭上抬或下壓幾度,平放是 0。車子在平地用 50 的速度跑,一上坡(或下坡)俯仰角超過 8 度就放慢到 20,比較不會翻車或衝太快。
# ============================================================

from pybricks.hubs import EV3Brick
from pybricks.ev3devices import Motor
from pybricks.iodevices import Ev3devSensor
from pybricks.parameters import Port, Color
from pybricks.tools import wait

ev3 = EV3Brick()
sensor = Ev3devSensor(Port.S1)     # IMU 陀螺儀插 1 號孔(當一般 UART 裝置讀原始值)
left_motor = Motor(Port.B)        # 左輪
right_motor = Motor(Port.C)       # 右輪


def read_tilt():
    # 俯仰角(車頭上抬或下壓幾度):-90 ~ +90 度,平放=0(板子絲印 X 軸)
    return sensor.read('TILT-ANG')[0]


# ---------- 程式從這裡開始 ----------
# 清除螢幕
ev3.screen.clear()
# 一直重複
while True:
    # 第 1 行顯示俯仰角(度)
    ev3.screen.draw_text(0, 0, "TILT " + str(read_tilt()) + "      ", Color.BLACK, Color.WHITE)
    # 如果俯仰角的絕對值大於 8 度
    if abs(read_tilt()) > 8:
        # 在坡上(俯仰角超過 8 度):放慢到 20
        left_motor.dc(20)
        right_motor.dc(20)
        # 第 2 行顯示 SLOPE
        ev3.screen.draw_text(0, 16, "SLOPE      ", Color.BLACK, Color.WHITE)
    else:
        # 平地:用 50 往前開
        left_motor.dc(50)
        right_motor.dc(50)
        # 第 2 行顯示 FLAT
        ev3.screen.draw_text(0, 16, "FLAT      ", Color.BLACK, Color.WHITE)
clev3r code
' ============================================================
' IMU 陀螺儀感應器 EV3 新手範例 06:俯仰角:上坡就減速
' 軟體:clev3r
' 接法:IMU 陀螺儀插 1 號孔;左輪馬達接 B、右輪馬達接 C
' 這個範例會做什麼:模式 6 是「俯仰角」:車頭上抬或下壓幾度,平放是 0。車子在平地用 50 的速度跑,一上坡(或下坡)俯仰角超過 8 度就放慢到 20,比較不會翻車或衝太快。
' 讀值:tilt=俯仰角(車頭上抬或下壓幾度)(-90 ~ +90 度,平放=0(板子絲印 X 軸))
' ============================================================
folder "prjs" "MBC_imu_ex06"

' IMU 陀螺儀插 1 號孔,使用模式 6
Sensor.SetMode(1, 6)
LCD.Clear()

' 清除螢幕
LCD.Clear()
' 一直重複
While "True"
  ' 第 1 行顯示俯仰角(度)
  LCD.Text(1, 0, 0, 1, "TILT " + Sensor.ReadRawValue(1, 0) + "      ")
  ' 如果俯仰角的絕對值大於 8 度
  If Math.Abs(Sensor.ReadRawValue(1, 0)) > 8 Then
    ' 在坡上(俯仰角超過 8 度):放慢到 20
    Motor.StartPower("B", 20)
    Motor.StartPower("C", 20)
    ' 第 2 行顯示 SLOPE
    LCD.Text(1, 0, 16, 1, "SLOPE      ")
  Else
    ' 平地:用 50 往前開
    Motor.StartPower("B", 50)
    Motor.StartPower("C", 50)
    ' 第 2 行顯示 FLAT
    LCD.Text(1, 0, 16, 1, "FLAT      ")
  EndIf
EndWhile
Step by step:
- Clear the screen
- Repeat forever
- Row 1 shows the pitch angle (degrees)
- If the absolute value of the pitch angle is greater than 8 degrees
- On a slope (pitch over 8 degrees): slow down to 20
- Row 2 shows SLOPE
- Otherwise:
- Flat ground: drive forward at 50
- Row 2 shows FLAT
What you should see: On flat ground the robot drives fast and the screen shows FLAT with an angle near 0; on the ramp the angle grows, SLOPE appears and the robot clearly slows down; back on flat ground it speeds up again.
FAQ:
- The angle is not 0 on flat ground? The sensor is not flat, or is mounted turned by 90 degrees (pitch uses the printed X axis of the board).
- Going uphill the angle is negative? Normal: the sign depends on how it is mounted. This example uses the absolute value, so it slows down both uphill and downhill.
- The robot is still but the angle slowly drifts? The robot must be completely still at power-on or reset. Put it down, unplug the sensor and plug it back in, then try again.
- The number stays at 0 or never changes? This mode needs sensor firmware v4.0 (2026-10) or later; update older firmware first.
- Why is there no EV3-G / Classroom version? This example uses a new mode (firmware v4, 2026-10). The EV3-G and Classroom gyro blocks cannot read it; only Pybricks, EV3 MicroPython and clev3r can.
Example 7: Warn when turning too fast
Pybricks v4 / EV3 MicroPython v2.0 / clev3r only (the EV3-G and Classroom blocks cannot read this mode)
What this example does: Mode 2 is the "turning rate": how many degrees per second the robot is turning right now (× 10). The angle tells you how far it turned; the rate tells you how fast. This example shows the rate and beeps when it is too high (over 90 degrees per second, i.e. 900), handy for checking whether the robot skids in turns.
What you need:
- IMU gyro (EV3 edition, firmware v4.0 or later)
- EV3 brick
How to connect: IMU gyro in port 1, mounted flat on the robot.
Download the program (pick your software):
⬇ Pybricks v4 | ⬇ EV3 MicroPython v2.0 | ⬇ clev3r
(The code is the example; no screenshot needed.)
Pybricks v4 code
# ============================================================
# IMU 陀螺儀感應器 EV3 新手範例 07:轉太快就警告
# 軟體:Pybricks v4(用 Chrome 打開 https://code.pybricks.com ,EV3 版目前是 Beta)
# 接法:IMU 陀螺儀插 1 號孔
# 這個範例會做什麼:模式 2 是「轉向角速度」:現在每秒轉幾度(×10)。角度告訴你轉了多少,角速度告訴你轉得多快。這個範例把角速度顯示出來,轉太快(超過每秒 90 度,也就是 900)就嗶一聲,可以拿來檢查機器人轉彎會不會甩尾。
# ============================================================

from pybricks.hubs import EV3Brick
from pybricks.iodevices import LUMPDevice
from pybricks.parameters import Port, Color
from pybricks.tools import wait

ev3 = EV3Brick()
sensor = LUMPDevice(Port.S1)       # IMU 陀螺儀插 1 號孔(當一般 UART 裝置讀原始值)


def read_rate():
    # 轉向的角速度(每秒幾度 × 10):±3000 左右,正負跟角度同方向;100=每秒 10 度
    return sensor.read(2)[0]


# ---------- 程式從這裡開始 ----------
# 清除螢幕
ev3.screen.clear()
# 一直重複
while True:
    # 第 1 行顯示角速度(每秒幾度 × 10)
    ev3.screen.draw_text(0, 0, "RATE " + str(read_rate()) + "      ", Color.BLACK, Color.WHITE)
    # 如果角速度的絕對值大於 900(每秒 90 度)
    if abs(read_rate()) > 900:
        # 轉太快(超過每秒 90 度):嗶一聲
        ev3.speaker.beep()
    # 等 0.1 秒
    wait(100)
EV3 MicroPython v2.0 code
#!/usr/bin/env pybricks-micropython
# ============================================================
# IMU 陀螺儀感應器 EV3 新手範例 07:轉太快就警告
# 軟體:樂高官方 EV3 MicroPython v2.0(microSD 開機卡+VS Code「LEGO MINDSTORMS EV3 MicroPython」擴充套件)
# 接法:IMU 陀螺儀插 1 號孔
# 這個範例會做什麼:模式 2 是「轉向角速度」:現在每秒轉幾度(×10)。角度告訴你轉了多少,角速度告訴你轉得多快。這個範例把角速度顯示出來,轉太快(超過每秒 90 度,也就是 900)就嗶一聲,可以拿來檢查機器人轉彎會不會甩尾。
# ============================================================

from pybricks.hubs import EV3Brick
from pybricks.iodevices import Ev3devSensor
from pybricks.parameters import Port, Color
from pybricks.tools import wait

ev3 = EV3Brick()
sensor = Ev3devSensor(Port.S1)     # IMU 陀螺儀插 1 號孔(當一般 UART 裝置讀原始值)


def read_rate():
    # 轉向的角速度(每秒幾度 × 10):±3000 左右,正負跟角度同方向;100=每秒 10 度
    return sensor.read('GYRO-FAS')[0]


# ---------- 程式從這裡開始 ----------
# 清除螢幕
ev3.screen.clear()
# 一直重複
while True:
    # 第 1 行顯示角速度(每秒幾度 × 10)
    ev3.screen.draw_text(0, 0, "RATE " + str(read_rate()) + "      ", Color.BLACK, Color.WHITE)
    # 如果角速度的絕對值大於 900(每秒 90 度)
    if abs(read_rate()) > 900:
        # 轉太快(超過每秒 90 度):嗶一聲
        ev3.speaker.beep()
    # 等 0.1 秒
    wait(100)
clev3r code
' ============================================================
' IMU 陀螺儀感應器 EV3 新手範例 07:轉太快就警告
' 軟體:clev3r
' 接法:IMU 陀螺儀插 1 號孔;左輪馬達接 B、右輪馬達接 C
' 這個範例會做什麼:模式 2 是「轉向角速度」:現在每秒轉幾度(×10)。角度告訴你轉了多少,角速度告訴你轉得多快。這個範例把角速度顯示出來,轉太快(超過每秒 90 度,也就是 900)就嗶一聲,可以拿來檢查機器人轉彎會不會甩尾。
' 讀值:rate=轉向的角速度(每秒幾度 × 10)(±3000 左右,正負跟角度同方向;100=每秒 10 度)
' ============================================================
folder "prjs" "MBC_imu_ex07"

' IMU 陀螺儀插 1 號孔,使用模式 2
Sensor.SetMode(1, 2)
LCD.Clear()

' 清除螢幕
LCD.Clear()
' 一直重複
While "True"
  ' 第 1 行顯示角速度(每秒幾度 × 10)
  LCD.Text(1, 0, 0, 1, "RATE " + Sensor.ReadRawValue(1, 0) + "      ")
  ' 如果角速度的絕對值大於 900(每秒 90 度)
  If Math.Abs(Sensor.ReadRawValue(1, 0)) > 900 Then
    ' 轉太快(超過每秒 90 度):嗶一聲
    Speaker.Tone(50, 1000, 100)
    Speaker.Wait()
  EndIf
  ' 等 0.1 秒
  Program.Delay(100)
EndWhile
Step by step:
- Clear the screen
- Repeat forever
- Row 1 shows the turning rate (degrees per second × 10)
- If the absolute value of the rate is greater than 900 (90 degrees per second)
- Turning too fast (over 90 degrees per second): beep
- Wait 0.1 s
What you should see: With the robot still the number is near 0; turn it slowly by hand and it reads a few hundred; flick it quickly and it passes 900 with a beep. Turning the other way gives negative numbers.
FAQ:
- It beeps even when the robot is still? Raise 900, or check that the sensor is firmly mounted and not shaking.
- The number stays at 0 or never changes? This mode needs sensor firmware v4.0 (2026-10) or later; update older firmware first.
- Why is there no EV3-G / Classroom version? This example uses a new mode (firmware v4, 2026-10). The EV3-G and Classroom gyro blocks cannot read it; only Pybricks, EV3 MicroPython and clev3r can.
Example 8: Turn to a set heading (absolute angle)
What this example does: Reset once when the program starts so "straight ahead" is 0 degrees, then never reset again: turn to 90, then 180, then back to 0. Every heading is measured from the starting direction, so the small overshoot of each turn does not add up turn after turn. This is the way most competition programs turn.
What you need:
- EV3 brick + Education base robot (left wheel on B, right wheel on C)
- IMU gyro (EV3 edition)
How to connect: IMU gyro in port 1, mounted flat and firmly on the robot (no wobble). The robot must be still when the program starts.
Download the program (pick your software):
⬇ EV3-G (official software) | ⬇ EV3 Classroom | ⬇ Pybricks v4 | ⬇ EV3 MicroPython v2.0 | ⬇ clev3r
Pybricks v4 code
# ============================================================
# IMU 陀螺儀感應器 EV3 新手範例 08:轉到指定方向(絕對角度)
# 軟體:Pybricks v4(用 Chrome 打開 https://code.pybricks.com ,EV3 版目前是 Beta)
# 接法:IMU 陀螺儀插 1 號孔;左輪馬達接 B、右輪馬達接 C
# 這個範例會做什麼:程式開始時歸零一次,記住「正前方」是 0 度,之後中間都不再歸零,依序轉到 90 度、180 度、再轉回 0 度。所有方向都以「開始時的正前方」為準,每次轉過頭的一點點誤差不會一次一次累加,比賽最常用這種寫法。
# ============================================================

from pybricks.hubs import EV3Brick
from pybricks.ev3devices import Motor, GyroSensor
from pybricks.parameters import Port
from pybricks.tools import wait

ev3 = EV3Brick()
gyro = GyroSensor(Port.S1)        # IMU 陀螺儀插 1 號孔
left_motor = Motor(Port.B)        # 左輪
right_motor = Motor(Port.C)       # 右輪


def read_angle():
    # 機器人轉了幾度:連續累加(轉一圈=360,可超過 360)
    return gyro.angle()


# ---------- 程式從這裡開始 ----------
# 角度歸零:記住現在的方向是「正前方」0 度(只歸零這一次)
gyro.reset_angle(0)
# 如果現在的角度小於 90
if read_angle() < 90:
    # 還沒到 90 度:原地向右轉(左輪往前、右輪往後)
    left_motor.dc(20)
    right_motor.dc(-20)
    # 等到角度大於等於 90
    while not (read_angle() >= 90):
        wait(10)
else:
    # 超過 90 度:原地向左轉(左輪往後、右輪往前)
    left_motor.dc(-20)
    right_motor.dc(20)
    # 等到角度小於等於 90
    while not (read_angle() <= 90):
        wait(10)
# 到 90 度:停車
left_motor.brake()
right_motor.brake()
# 停 1 秒
wait(1000)
# 如果現在的角度小於 180
if read_angle() < 180:
    # 還沒到 180 度:原地向右轉(左輪往前、右輪往後)
    left_motor.dc(20)
    right_motor.dc(-20)
    # 等到角度大於等於 180
    while not (read_angle() >= 180):
        wait(10)
else:
    # 超過 180 度:原地向左轉(左輪往後、右輪往前)
    left_motor.dc(-20)
    right_motor.dc(20)
    # 等到角度小於等於 180
    while not (read_angle() <= 180):
        wait(10)
# 到 180 度:停車
left_motor.brake()
right_motor.brake()
# 停 1 秒
wait(1000)
# 如果現在的角度小於 0
if read_angle() < 0:
    # 還沒到 0 度:原地向右轉(左輪往前、右輪往後)
    left_motor.dc(20)
    right_motor.dc(-20)
    # 等到角度大於等於 0
    while not (read_angle() >= 0):
        wait(10)
else:
    # 超過 0 度:原地向左轉(左輪往後、右輪往前)
    left_motor.dc(-20)
    right_motor.dc(20)
    # 等到角度小於等於 0
    while not (read_angle() <= 0):
        wait(10)
# 到 0 度:停車
left_motor.brake()
right_motor.brake()
# 停 1 秒
wait(1000)
# 轉完嗶一聲
ev3.speaker.beep()
EV3 MicroPython v2.0 code
#!/usr/bin/env pybricks-micropython
# ============================================================
# IMU 陀螺儀感應器 EV3 新手範例 08:轉到指定方向(絕對角度)
# 軟體:樂高官方 EV3 MicroPython v2.0(microSD 開機卡+VS Code「LEGO MINDSTORMS EV3 MicroPython」擴充套件)
# 接法:IMU 陀螺儀插 1 號孔;左輪馬達接 B、右輪馬達接 C
# 這個範例會做什麼:程式開始時歸零一次,記住「正前方」是 0 度,之後中間都不再歸零,依序轉到 90 度、180 度、再轉回 0 度。所有方向都以「開始時的正前方」為準,每次轉過頭的一點點誤差不會一次一次累加,比賽最常用這種寫法。
# ============================================================

from pybricks.hubs import EV3Brick
from pybricks.ev3devices import Motor, GyroSensor
from pybricks.parameters import Port
from pybricks.tools import wait

ev3 = EV3Brick()
gyro = GyroSensor(Port.S1)        # IMU 陀螺儀插 1 號孔
left_motor = Motor(Port.B)        # 左輪
right_motor = Motor(Port.C)       # 右輪


def read_angle():
    # 機器人轉了幾度:連續累加(轉一圈=360,可超過 360)
    return gyro.angle()


# ---------- 程式從這裡開始 ----------
# 角度歸零:記住現在的方向是「正前方」0 度(只歸零這一次)
gyro.reset_angle(0)
# 如果現在的角度小於 90
if read_angle() < 90:
    # 還沒到 90 度:原地向右轉(左輪往前、右輪往後)
    left_motor.dc(20)
    right_motor.dc(-20)
    # 等到角度大於等於 90
    while not (read_angle() >= 90):
        wait(10)
else:
    # 超過 90 度:原地向左轉(左輪往後、右輪往前)
    left_motor.dc(-20)
    right_motor.dc(20)
    # 等到角度小於等於 90
    while not (read_angle() <= 90):
        wait(10)
# 到 90 度:停車
left_motor.brake()
right_motor.brake()
# 停 1 秒
wait(1000)
# 如果現在的角度小於 180
if read_angle() < 180:
    # 還沒到 180 度:原地向右轉(左輪往前、右輪往後)
    left_motor.dc(20)
    right_motor.dc(-20)
    # 等到角度大於等於 180
    while not (read_angle() >= 180):
        wait(10)
else:
    # 超過 180 度:原地向左轉(左輪往後、右輪往前)
    left_motor.dc(-20)
    right_motor.dc(20)
    # 等到角度小於等於 180
    while not (read_angle() <= 180):
        wait(10)
# 到 180 度:停車
left_motor.brake()
right_motor.brake()
# 停 1 秒
wait(1000)
# 如果現在的角度小於 0
if read_angle() < 0:
    # 還沒到 0 度:原地向右轉(左輪往前、右輪往後)
    left_motor.dc(20)
    right_motor.dc(-20)
    # 等到角度大於等於 0
    while not (read_angle() >= 0):
        wait(10)
else:
    # 超過 0 度:原地向左轉(左輪往後、右輪往前)
    left_motor.dc(-20)
    right_motor.dc(20)
    # 等到角度小於等於 0
    while not (read_angle() <= 0):
        wait(10)
# 到 0 度:停車
left_motor.brake()
right_motor.brake()
# 停 1 秒
wait(1000)
# 轉完嗶一聲
ev3.speaker.beep()
clev3r code
' ============================================================
' IMU 陀螺儀感應器 EV3 新手範例 08:轉到指定方向(絕對角度)
' 軟體:clev3r
' 接法:IMU 陀螺儀插 1 號孔;左輪馬達接 B、右輪馬達接 C
' 這個範例會做什麼:程式開始時歸零一次,記住「正前方」是 0 度,之後中間都不再歸零,依序轉到 90 度、180 度、再轉回 0 度。所有方向都以「開始時的正前方」為準,每次轉過頭的一點點誤差不會一次一次累加,比賽最常用這種寫法。
' 讀值:angle=機器人轉了幾度(連續累加(轉一圈=360,可超過 360))
' ============================================================
folder "prjs" "MBC_imu_ex08"

' IMU 陀螺儀插 1 號孔,使用模式 0
Sensor.SetMode(1, 0)
' 陀螺儀歸零的指令(送 0x11 給感應器)
gyroReset[0] = 17
LCD.Clear()

' 角度歸零:記住現在的方向是「正前方」0 度(只歸零這一次)
Sensor.SendUARTData(1, 1, gyroReset)
Program.Delay(100)
' 如果現在的角度小於 90
If Sensor.ReadRawValue(1, 0) < 90 Then
  ' 還沒到 90 度:原地向右轉(左輪往前、右輪往後)
  Motor.StartPower("B", 20)
  Motor.StartPower("C", -20)
  ' 等到角度大於等於 90
  While Sensor.ReadRawValue(1, 0) < 90
    Program.Delay(10)
  EndWhile
Else
  ' 超過 90 度:原地向左轉(左輪往後、右輪往前)
  Motor.StartPower("B", -20)
  Motor.StartPower("C", 20)
  ' 等到角度小於等於 90
  While Sensor.ReadRawValue(1, 0) > 90
    Program.Delay(10)
  EndWhile
EndIf
' 到 90 度:停車
Motor.Stop("BC", "True")
' 停 1 秒
Program.Delay(1000)
' 如果現在的角度小於 180
If Sensor.ReadRawValue(1, 0) < 180 Then
  ' 還沒到 180 度:原地向右轉(左輪往前、右輪往後)
  Motor.StartPower("B", 20)
  Motor.StartPower("C", -20)
  ' 等到角度大於等於 180
  While Sensor.ReadRawValue(1, 0) < 180
    Program.Delay(10)
  EndWhile
Else
  ' 超過 180 度:原地向左轉(左輪往後、右輪往前)
  Motor.StartPower("B", -20)
  Motor.StartPower("C", 20)
  ' 等到角度小於等於 180
  While Sensor.ReadRawValue(1, 0) > 180
    Program.Delay(10)
  EndWhile
EndIf
' 到 180 度:停車
Motor.Stop("BC", "True")
' 停 1 秒
Program.Delay(1000)
' 如果現在的角度小於 0
If Sensor.ReadRawValue(1, 0) < 0 Then
  ' 還沒到 0 度:原地向右轉(左輪往前、右輪往後)
  Motor.StartPower("B", 20)
  Motor.StartPower("C", -20)
  ' 等到角度大於等於 0
  While Sensor.ReadRawValue(1, 0) < 0
    Program.Delay(10)
  EndWhile
Else
  ' 超過 0 度:原地向左轉(左輪往後、右輪往前)
  Motor.StartPower("B", -20)
  Motor.StartPower("C", 20)
  ' 等到角度小於等於 0
  While Sensor.ReadRawValue(1, 0) > 0
    Program.Delay(10)
  EndWhile
EndIf
' 到 0 度:停車
Motor.Stop("BC", "True")
' 停 1 秒
Program.Delay(1000)
' 轉完嗶一聲
Speaker.Tone(50, 1000, 100)
Speaker.Wait()
Step by step:
- Reset the angle: the current direction is "straight ahead", 0 degrees (the only reset)
- If the angle is less than 90
- Not yet at 90 degrees: spin right on the spot (left wheel forward, right wheel back)
- Wait until the angle is 90 or more
- Otherwise:
- Past 90 degrees: spin left on the spot (left wheel back, right wheel forward)
- Wait until the angle is 90 or less
- At 90 degrees: stop
- Pause 1 s
- If the angle is less than 180
- Not yet at 180 degrees: spin right on the spot (left wheel forward, right wheel back)
- Wait until the angle is 180 or more
- Otherwise:
- Past 180 degrees: spin left on the spot (left wheel back, right wheel forward)
- Wait until the angle is 180 or less
- At 180 degrees: stop
- Pause 1 s
- If the angle is less than 0
- Not yet at 0 degrees: spin right on the spot (left wheel forward, right wheel back)
- Wait until the angle is 0 or more
- Otherwise:
- Past 0 degrees: spin left on the spot (left wheel back, right wheel forward)
- Wait until the angle is 0 or less
- At 0 degrees: stop
- Pause 1 s
- Beep when done
What you should see: The robot turns right to 90 degrees (facing right) and pauses 1 s, turns right again to 180 degrees (facing backwards) and pauses 1 s, then turns left back to 0 degrees, facing the starting direction again, and beeps. In tests it ends up within about ±3 degrees of the start.
FAQ:
- It always overshoots by a few degrees? The robot needs a moment to stop. Lower the turning speed 20 (for example to 15), or take a few degrees off the right-turn targets (for example 87 instead of 90, 177 instead of 180).
- It keeps spinning, or turns the wrong way? The sensor may be mounted upside down. Mount the IMU flat with its top side up, so that turning clockwise as seen from above (turning right) makes the angle bigger.
- Why not reset before every turn? Each reset turns the last overshoot into the new "straight ahead", so the error adds up turn after turn. Resetting only once at the start measures every heading from the starting direction, so the error does not build up.
- The robot is still but the angle slowly drifts? The robot must be completely still at power-on or reset. Put it down, unplug the sensor and plug it back in, then try again.
Example 9: Turn another 90 degrees from where you are (relative angle)
What this example does: Reset once when the program starts, then repeat 4 times: read the angle "now", set the target to now + 90 degrees, and turn right until it is reached. Every turn starts from the current direction, which is easy to understand; but the overshoot of each turn carries over to the next. Compare it with the "absolute angle" of example 8 to see the difference.
What you need:
- EV3 brick + Education base robot (left wheel on B, right wheel on C)
- IMU gyro (EV3 edition)
How to connect: IMU gyro in port 1, mounted flat and firmly on the robot (no wobble). The robot must be still when the program starts.
Download the program (pick your software):
⬇ EV3-G (official software) | ⬇ EV3 Classroom | ⬇ Pybricks v4 | ⬇ EV3 MicroPython v2.0 | ⬇ clev3r
Pybricks v4 code
# ============================================================
# IMU 陀螺儀感應器 EV3 新手範例 09:從現在的方向再轉 90 度(相對角度)
# 軟體:Pybricks v4(用 Chrome 打開 https://code.pybricks.com ,EV3 版目前是 Beta)
# 接法:IMU 陀螺儀插 1 號孔;左輪馬達接 B、右輪馬達接 C
# 這個範例會做什麼:程式開始時歸零一次,然後重複 4 次:先看「現在」的角度,目標就是現在再加 90 度,右轉到目標就停。每次都以「現在的方向」為準,寫法很直覺;但每次轉過頭的幾度會留到下一次,跟範例 8 的「絕對角度」比一比就知道差在哪。
# ============================================================

from pybricks.hubs import EV3Brick
from pybricks.ev3devices import Motor, GyroSensor
from pybricks.parameters import Port
from pybricks.tools import wait

ev3 = EV3Brick()
gyro = GyroSensor(Port.S1)        # IMU 陀螺儀插 1 號孔
left_motor = Motor(Port.B)        # 左輪
right_motor = Motor(Port.C)       # 右輪


def read_angle():
    # 機器人轉了幾度:連續累加(轉一圈=360,可超過 360)
    return gyro.angle()


# ---------- 程式從這裡開始 ----------
# 角度歸零(這時候不要動機器人)
gyro.reset_angle(0)
# 下面的動作重複 4 次
for i in range(4):
    # 目標 target = 現在的角度 + 90:以「現在」為準再轉 90 度
    target = read_angle() + 90
    # 左輪往前、右輪往後:原地向右轉
    left_motor.dc(20)
    right_motor.dc(-20)
    # 等到角度大於等於 target
    while not (read_angle() >= target):
        wait(10)
    # 轉到了:停車
    left_motor.brake()
    right_motor.brake()
    # 停 0.5 秒
    wait(500)
# 轉完 4 次嗶一聲
ev3.speaker.beep()
EV3 MicroPython v2.0 code
#!/usr/bin/env pybricks-micropython
# ============================================================
# IMU 陀螺儀感應器 EV3 新手範例 09:從現在的方向再轉 90 度(相對角度)
# 軟體:樂高官方 EV3 MicroPython v2.0(microSD 開機卡+VS Code「LEGO MINDSTORMS EV3 MicroPython」擴充套件)
# 接法:IMU 陀螺儀插 1 號孔;左輪馬達接 B、右輪馬達接 C
# 這個範例會做什麼:程式開始時歸零一次,然後重複 4 次:先看「現在」的角度,目標就是現在再加 90 度,右轉到目標就停。每次都以「現在的方向」為準,寫法很直覺;但每次轉過頭的幾度會留到下一次,跟範例 8 的「絕對角度」比一比就知道差在哪。
# ============================================================

from pybricks.hubs import EV3Brick
from pybricks.ev3devices import Motor, GyroSensor
from pybricks.parameters import Port
from pybricks.tools import wait

ev3 = EV3Brick()
gyro = GyroSensor(Port.S1)        # IMU 陀螺儀插 1 號孔
left_motor = Motor(Port.B)        # 左輪
right_motor = Motor(Port.C)       # 右輪


def read_angle():
    # 機器人轉了幾度:連續累加(轉一圈=360,可超過 360)
    return gyro.angle()


# ---------- 程式從這裡開始 ----------
# 角度歸零(這時候不要動機器人)
gyro.reset_angle(0)
# 下面的動作重複 4 次
for i in range(4):
    # 目標 target = 現在的角度 + 90:以「現在」為準再轉 90 度
    target = read_angle() + 90
    # 左輪往前、右輪往後:原地向右轉
    left_motor.dc(20)
    right_motor.dc(-20)
    # 等到角度大於等於 target
    while not (read_angle() >= target):
        wait(10)
    # 轉到了:停車
    left_motor.brake()
    right_motor.brake()
    # 停 0.5 秒
    wait(500)
# 轉完 4 次嗶一聲
ev3.speaker.beep()
clev3r code
' ============================================================
' IMU 陀螺儀感應器 EV3 新手範例 09:從現在的方向再轉 90 度(相對角度)
' 軟體:clev3r
' 接法:IMU 陀螺儀插 1 號孔;左輪馬達接 B、右輪馬達接 C
' 這個範例會做什麼:程式開始時歸零一次,然後重複 4 次:先看「現在」的角度,目標就是現在再加 90 度,右轉到目標就停。每次都以「現在的方向」為準,寫法很直覺;但每次轉過頭的幾度會留到下一次,跟範例 8 的「絕對角度」比一比就知道差在哪。
' 讀值:angle=機器人轉了幾度(連續累加(轉一圈=360,可超過 360))
' ============================================================
folder "prjs" "MBC_imu_ex09"

' IMU 陀螺儀插 1 號孔,使用模式 0
Sensor.SetMode(1, 0)
' 陀螺儀歸零的指令(送 0x11 給感應器)
gyroReset[0] = 17
LCD.Clear()

' 角度歸零(這時候不要動機器人)
Sensor.SendUARTData(1, 1, gyroReset)
Program.Delay(100)
' 下面的動作重複 4 次
For i = 1 To 4
  ' 目標 target = 現在的角度 + 90:以「現在」為準再轉 90 度
  target = Sensor.ReadRawValue(1, 0) + 90
  ' 左輪往前、右輪往後:原地向右轉
  Motor.StartPower("B", 20)
  Motor.StartPower("C", -20)
  ' 等到角度大於等於 target
  While Sensor.ReadRawValue(1, 0) < target
    Program.Delay(10)
  EndWhile
  ' 轉到了:停車
  Motor.Stop("BC", "True")
  ' 停 0.5 秒
  Program.Delay(500)
EndFor
' 轉完 4 次嗶一聲
Speaker.Tone(50, 1000, 100)
Speaker.Wait()
Step by step:
- Reset the angle (keep the robot still)
- Repeat the steps below 4 times
- Target = current angle + 90: turn another 90 degrees from where you are now
- Left wheel forward, right wheel back: spin right on the spot
- Wait until the angle is target or more
- Reached it: stop
- Pause 0.5 s
- Beep after 4 turns
What you should see: The robot spins right 4 times, about 90 degrees each, and beeps after one full turn. Look closely at the final direction: it may be a few degrees off the starting direction.
FAQ:
- After 4 turns it is not exactly back to the starting direction? That is normal. The overshoot of each turn carries over to the next (the next turn adds 90 to the overshot direction), so after 4 turns it may be a few degrees off. To stop the error building up, use the "absolute angle" way of example 8: reset only at the start and use fixed targets 90, 180, 270, 360.
- It always overshoots by a few degrees? The robot needs a moment to stop. Lower the turning speed 20, or try + 87 instead of + 90.
- It keeps spinning and never stops? The sensor may be mounted upside down (the angle gets smaller when turning right). Mount the IMU flat with its top side up.
- The robot is still but the angle slowly drifts? The robot must be completely still at power-on or reset. Put it down, unplug the sensor and plug it back in, then try again.
Still stuck? Leave a message on Contact us with the software you use and a screenshot of your program, and we will help.