
EV3 beginner examples: Controller PS4
Back to the Controller PS4 product page
This page has 6 examples for people who have never written a program: every example comes with a ready-made program file you can download and run, plus a plain-language step-by-step explanation. Start with example 1 and work through in order.
Before you start
- Use the EV3 edition of the sensor (RJ12 plug), plugged into port 1 of the EV3.
- Turn the EV3 on first, then plug in the sensor. If the number never changes, unplug the sensor and plug it back in.
- Examples that drive use the LEGO Education base robot: left wheel motor on B, right wheel motor on C.
- The sensor shows up on the EV3 as an "Infrared Sensor". That is normal: read its values with the infrared sensor blocks.
Every example comes in 5 software versions; pick the one you use: (examples marked "Pybricks / EV3 MicroPython / clev3r only" come in those 3 versions only, because the EV3-G and Classroom blocks cannot read that mode)
| Software | Who it suits | How to open the example file |
|---|---|---|
| EV3-G (official software) | School computer labs, WRO teams (the most common in Taiwan) | Download the .ev3 file, choose "File → Open Project" in the EV3 software, then "Download and Run" at the bottom right. |
| EV3 Classroom | First time with EV3, want the same blocks as SPIKE | Download the .lmsp file, choose "Open" on the EV3 Classroom home screen, connect the EV3 and press "Download and Run" at the bottom right. |
| Pybricks v4 | Want to learn typed code, works in the browser | Open code.pybricks.com in Chrome; the EV3 needs the Pybricks firmware first (currently Beta). Drag the .py file into the editor and press Run. |
| EV3 MicroPython v2.0 | Already using the official LEGO EV3 MicroPython | Use the official LEGO "EV3 MicroPython" microSD boot card + the VS Code extension; paste the program into main.py and press F5 to download and run. |
| clev3r | Already using clev3r (EV3 Basic) | Open the .bp file in clev3r, press "Compile and download", then run it from the MBC_ folder in the EV3 file browser. |
The 10 values used on this page
| Name | Range | Where it comes from |
|---|---|---|
| D-pad (up 1, right 2, down 4, left 8) | 0 ~ 15 | Mode 1, value 1 |
| Shape buttons (▲1, ●2, ✕4, ■8) | 0 ~ 15 | Mode 1, value 3 |
| Shoulder buttons (L2 1, R2 2, L1 4, R1 8) | 0 ~ 15 | Mode 1, value 5 |
| Function buttons (SELECT 1, L3 2, R3 4, START 8) | 0 ~ 15 | Mode 1, value 7 |
| Left stick left/right | 0 ~ 99, 50 = centre, bigger to the right | Mode 1, value 2 |
| Left stick up/down | 0 ~ 99, 50 = centre, bigger upwards | Mode 1, value 4 |
| Right stick left/right | 0 ~ 99, 50 = centre, bigger to the right | Mode 1, value 6 |
| Right stick up/down | 0 ~ 99, 50 = centre, bigger upwards | Mode 1, value 8 |
| D-pad (up 1, right 2, down 4, left 8; pressing two adds up) | 0 ~ 15 | Mode 0 |
| D-pad + shape buttons + connection | 0 ~ 511: D-pad (0~15) + shape × 16 + connected × 256; 256 or more = gamepad connected | Mode 3, value 1 (Pybricks / EV3 MicroPython / clev3r only) |
Example list:
- Button tester: see the number of every button
- Drive with the D-pad
- Left stick controls one motor speed
- Two-stick tank drive
- ✕ to grab, ● to release: control a gripper
- Start only when the gamepad is connected (Pybricks / EV3 MicroPython / clev3r only)
Example 1: Button tester: see the number of every button
What this example does: Mode 1 sends 8 numbers at once: 4 button groups and 4 stick values. This example shows them all on the screen; press and push everything and you will know each value.
What you need:
- Controller PS4 Bluetooth receiver (EV3 edition) + gamepad
- EV3 brick
How to connect: Bluetooth receiver in port 1. The first time, pair the PS4/PS5 gamepad as described on the product page; afterwards pressing the PS button connects automatically.
Download the program (pick your software):
⬇ EV3-G (official software) | ⬇ EV3 Classroom | ⬇ Pybricks v4 | ⬇ EV3 MicroPython v2.0 | ⬇ clev3r
EV3-G (official software) blocks
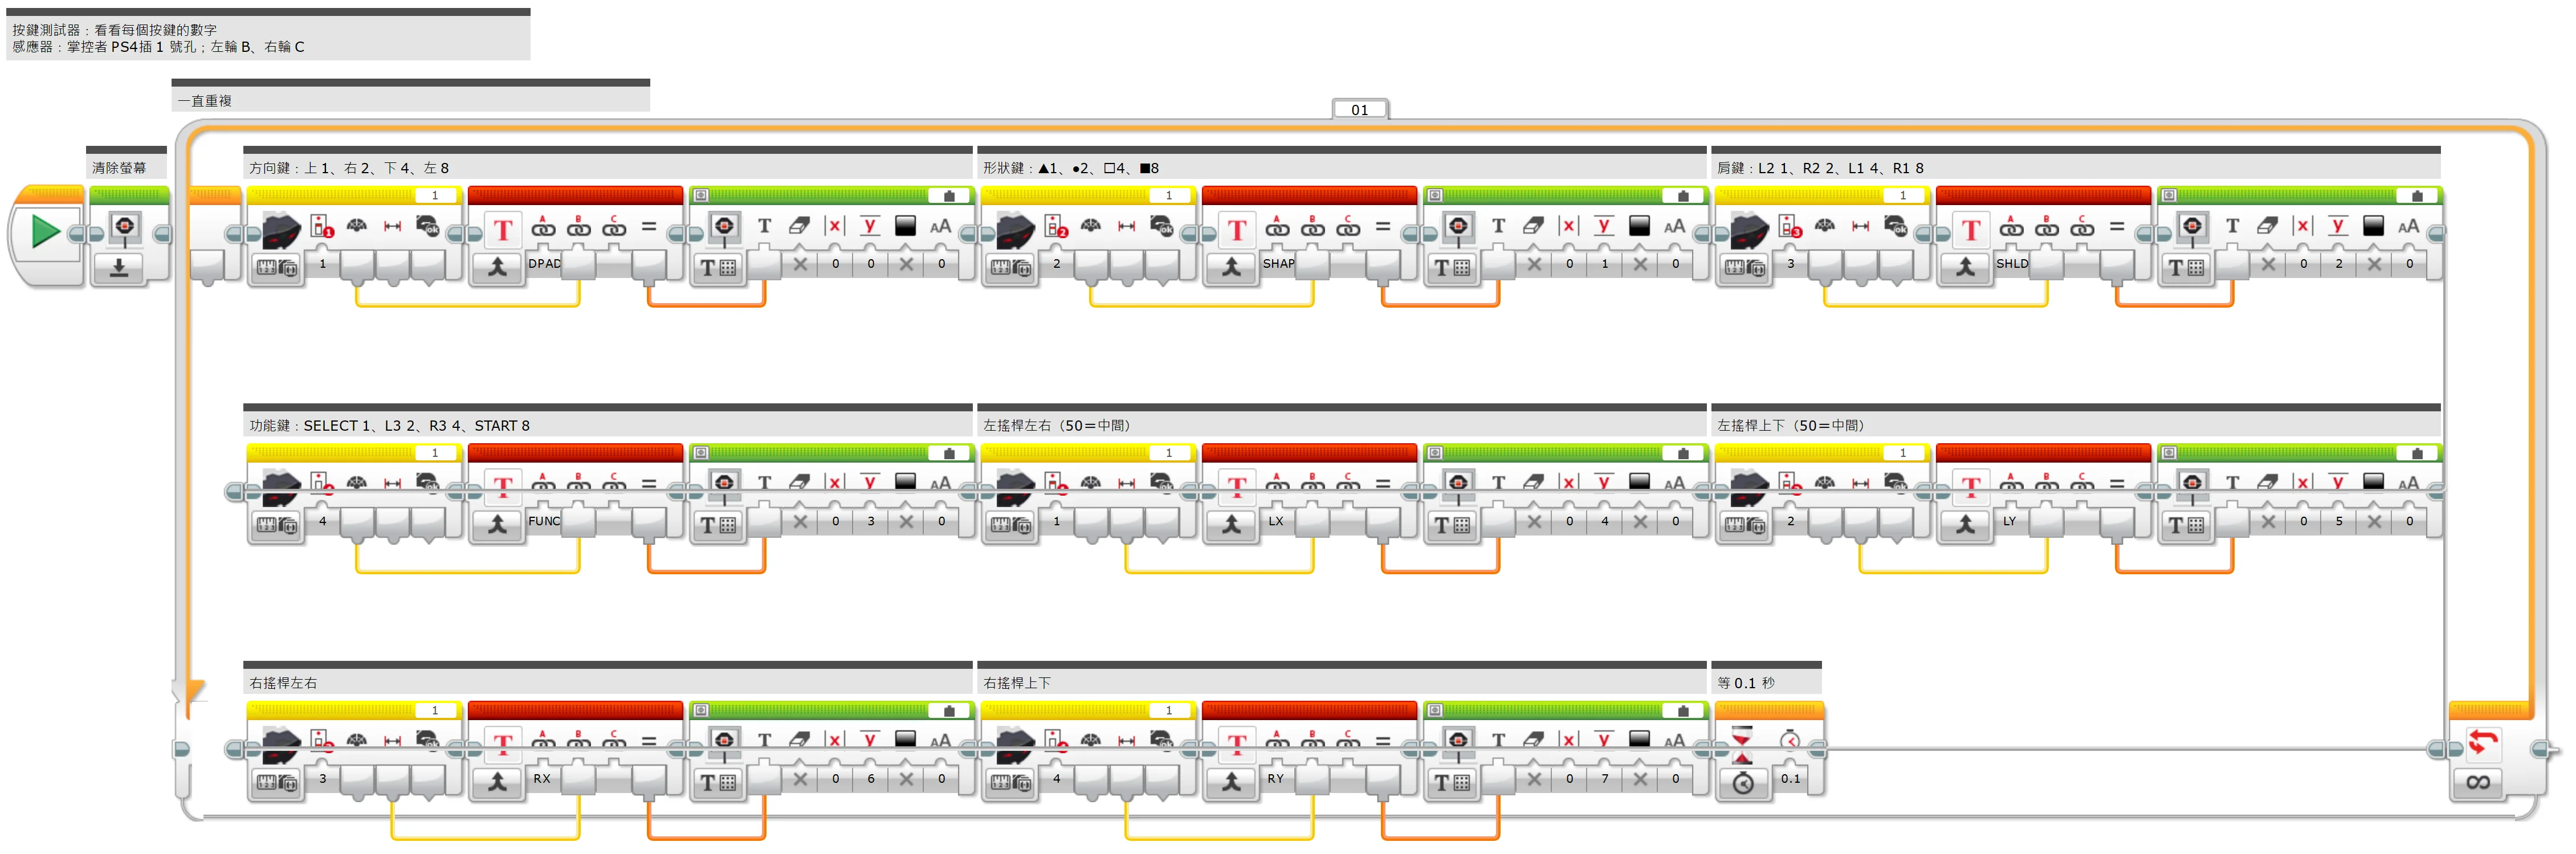
(Too small? Click the picture to open it full size.)
EV3 Classroom blocks
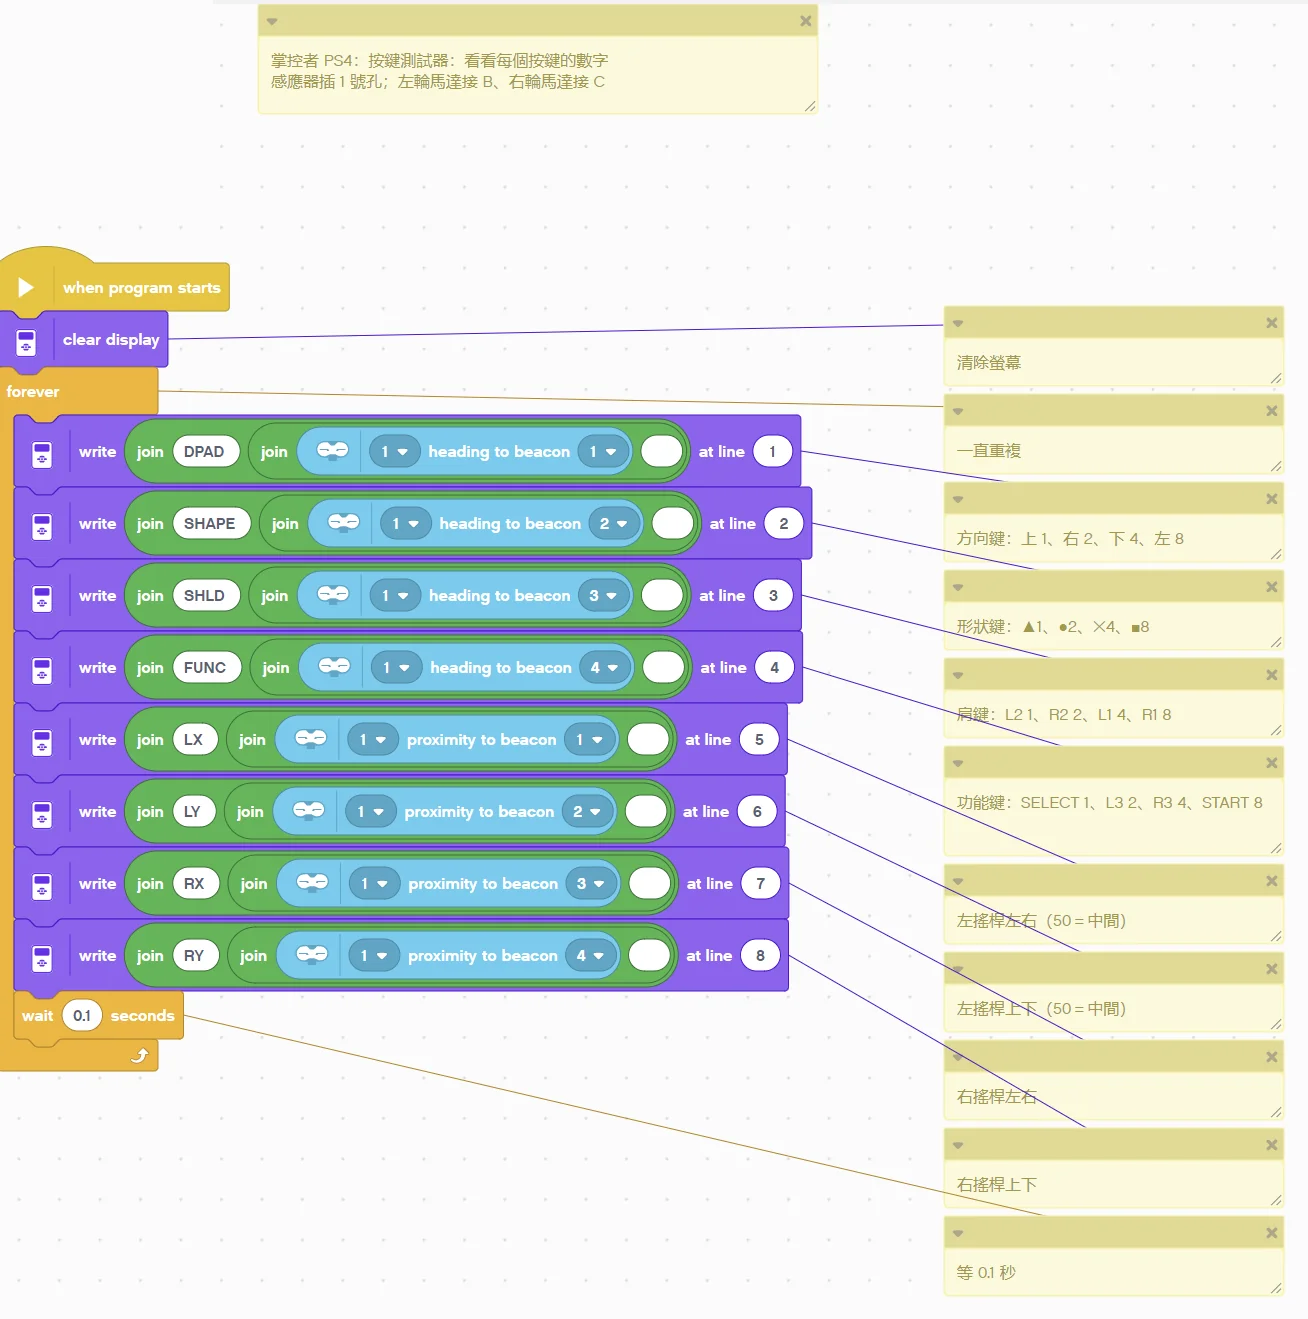
(Too small? Click the picture to open it full size.)
Pybricks v4 code
# ============================================================
# 掌控者 PS4/PS5 藍牙遙控接收器 EV3 新手範例 01:按鍵測試器:看看每個按鍵的數字
# 軟體:Pybricks v4(用 Chrome 打開 https://code.pybricks.com ,EV3 版目前是 Beta)
# 接法:掌控者 PS4插 1 號孔
# 這個範例會做什麼:模式 1 一次送出 8 個數字:4 組按鍵和 4 個搖桿值。這個範例把它們全部顯示在螢幕上,按按看、推推看,就知道每個按鍵是多少。
# ============================================================

from pybricks.hubs import EV3Brick
from pybricks.iodevices import LUMPDevice
from pybricks.parameters import Port, Color
from pybricks.tools import wait

ev3 = EV3Brick()
sensor = LUMPDevice(Port.S1)       # 掌控者 PS4插 1 號孔


def read_dpad1():
    # 方向鍵(上 1、右 2、下 4、左 8):0 ~ 15
    return sensor.read(1)[0]


def read_shape():
    # 形狀鍵(▲1、●2、✕4、■8):0 ~ 15
    return sensor.read(1)[2]


def read_shoulder():
    # 肩鍵(L2 1、R2 2、L1 4、R1 8):0 ~ 15
    return sensor.read(1)[4]


def read_func():
    # 功能鍵(SELECT 1、L3 2、R3 4、START 8):0 ~ 15
    return sensor.read(1)[6]


def read_lx():
    # 左搖桿左右:0 ~ 99,50=中間,往右變大
    return sensor.read(1)[1]


def read_ly():
    # 左搖桿上下:0 ~ 99,50=中間,往上變大
    return sensor.read(1)[3]


def read_rx():
    # 右搖桿左右:0 ~ 99,50=中間,往右變大
    return sensor.read(1)[5]


def read_ry():
    # 右搖桿上下:0 ~ 99,50=中間,往上變大
    return sensor.read(1)[7]


# ---------- 程式從這裡開始 ----------
# 清除螢幕
ev3.screen.clear()
# 一直重複
while True:
    # 方向鍵:上 1、右 2、下 4、左 8
    ev3.screen.draw_text(0, 0, "DPAD " + str(read_dpad1()) + "      ", Color.BLACK, Color.WHITE)
    # 形狀鍵:▲1、●2、✕4、■8
    ev3.screen.draw_text(0, 16, "SHAPE " + str(read_shape()) + "      ", Color.BLACK, Color.WHITE)
    # 肩鍵:L2 1、R2 2、L1 4、R1 8
    ev3.screen.draw_text(0, 32, "SHLD " + str(read_shoulder()) + "      ", Color.BLACK, Color.WHITE)
    # 功能鍵:SELECT 1、L3 2、R3 4、START 8
    ev3.screen.draw_text(0, 48, "FUNC " + str(read_func()) + "      ", Color.BLACK, Color.WHITE)
    # 左搖桿左右(50=中間)
    ev3.screen.draw_text(0, 64, "LX " + str(read_lx()) + "      ", Color.BLACK, Color.WHITE)
    # 左搖桿上下(50=中間)
    ev3.screen.draw_text(0, 80, "LY " + str(read_ly()) + "      ", Color.BLACK, Color.WHITE)
    # 右搖桿左右
    ev3.screen.draw_text(0, 96, "RX " + str(read_rx()) + "      ", Color.BLACK, Color.WHITE)
    # 右搖桿上下
    ev3.screen.draw_text(0, 112, "RY " + str(read_ry()) + "      ", Color.BLACK, Color.WHITE)
    # 等 0.1 秒
    wait(100)
EV3 MicroPython v2.0 code
#!/usr/bin/env pybricks-micropython
# ============================================================
# 掌控者 PS4/PS5 藍牙遙控接收器 EV3 新手範例 01:按鍵測試器:看看每個按鍵的數字
# 軟體:樂高官方 EV3 MicroPython v2.0(microSD 開機卡+VS Code「LEGO MINDSTORMS EV3 MicroPython」擴充套件)
# 接法:掌控者 PS4插 1 號孔
# 這個範例會做什麼:模式 1 一次送出 8 個數字:4 組按鍵和 4 個搖桿值。這個範例把它們全部顯示在螢幕上,按按看、推推看,就知道每個按鍵是多少。
# ============================================================

from pybricks.hubs import EV3Brick
from pybricks.iodevices import Ev3devSensor
from pybricks.parameters import Port, Color
from pybricks.tools import wait

ev3 = EV3Brick()
sensor = Ev3devSensor(Port.S1)     # 掌控者 PS4插 1 號孔


def read_dpad1():
    # 方向鍵(上 1、右 2、下 4、左 8):0 ~ 15
    return sensor.read('IR-SEEK')[0]


def read_shape():
    # 形狀鍵(▲1、●2、✕4、■8):0 ~ 15
    return sensor.read('IR-SEEK')[2]


def read_shoulder():
    # 肩鍵(L2 1、R2 2、L1 4、R1 8):0 ~ 15
    return sensor.read('IR-SEEK')[4]


def read_func():
    # 功能鍵(SELECT 1、L3 2、R3 4、START 8):0 ~ 15
    return sensor.read('IR-SEEK')[6]


def read_lx():
    # 左搖桿左右:0 ~ 99,50=中間,往右變大
    return sensor.read('IR-SEEK')[1]


def read_ly():
    # 左搖桿上下:0 ~ 99,50=中間,往上變大
    return sensor.read('IR-SEEK')[3]


def read_rx():
    # 右搖桿左右:0 ~ 99,50=中間,往右變大
    return sensor.read('IR-SEEK')[5]


def read_ry():
    # 右搖桿上下:0 ~ 99,50=中間,往上變大
    return sensor.read('IR-SEEK')[7]


# ---------- 程式從這裡開始 ----------
# 清除螢幕
ev3.screen.clear()
# 一直重複
while True:
    # 方向鍵:上 1、右 2、下 4、左 8
    ev3.screen.draw_text(0, 0, "DPAD " + str(read_dpad1()) + "      ", Color.BLACK, Color.WHITE)
    # 形狀鍵:▲1、●2、✕4、■8
    ev3.screen.draw_text(0, 16, "SHAPE " + str(read_shape()) + "      ", Color.BLACK, Color.WHITE)
    # 肩鍵:L2 1、R2 2、L1 4、R1 8
    ev3.screen.draw_text(0, 32, "SHLD " + str(read_shoulder()) + "      ", Color.BLACK, Color.WHITE)
    # 功能鍵:SELECT 1、L3 2、R3 4、START 8
    ev3.screen.draw_text(0, 48, "FUNC " + str(read_func()) + "      ", Color.BLACK, Color.WHITE)
    # 左搖桿左右(50=中間)
    ev3.screen.draw_text(0, 64, "LX " + str(read_lx()) + "      ", Color.BLACK, Color.WHITE)
    # 左搖桿上下(50=中間)
    ev3.screen.draw_text(0, 80, "LY " + str(read_ly()) + "      ", Color.BLACK, Color.WHITE)
    # 右搖桿左右
    ev3.screen.draw_text(0, 96, "RX " + str(read_rx()) + "      ", Color.BLACK, Color.WHITE)
    # 右搖桿上下
    ev3.screen.draw_text(0, 112, "RY " + str(read_ry()) + "      ", Color.BLACK, Color.WHITE)
    # 等 0.1 秒
    wait(100)
clev3r code
' ============================================================
' 掌控者 PS4/PS5 藍牙遙控接收器 EV3 新手範例 01:按鍵測試器:看看每個按鍵的數字
' 軟體:clev3r
' 接法:掌控者 PS4插 1 號孔;左輪馬達接 B、右輪馬達接 C
' 這個範例會做什麼:模式 1 一次送出 8 個數字:4 組按鍵和 4 個搖桿值。這個範例把它們全部顯示在螢幕上,按按看、推推看,就知道每個按鍵是多少。
' 讀值:dpad1=方向鍵(上 1、右 2、下 4、左 8)(0 ~ 15);shape=形狀鍵(▲1、●2、✕4、■8)(0 ~ 15);shoulder=肩鍵(L2 1、R2 2、L1 4、R1 8)(0 ~ 15);func=功能鍵(SELECT 1、L3 2、R3 4、START 8)(0 ~ 15);lx=左搖桿左右(0 ~ 99,50=中間,往右變大);ly=左搖桿上下(0 ~ 99,50=中間,往上變大);rx=右搖桿左右(0 ~ 99,50=中間,往右變大);ry=右搖桿上下(0 ~ 99,50=中間,往上變大)
' ============================================================
folder "prjs" "MBC_ps4_ex01"

' 掌控者 PS4插 1 號孔,使用模式 1
Sensor.SetMode(1, 1)
LCD.Clear()

' 清除螢幕
LCD.Clear()
' 一直重複
While "True"
  ' 方向鍵:上 1、右 2、下 4、左 8
  LCD.Text(1, 0, 0, 1, "DPAD " + Sensor.ReadRawValue(1, 0) + "      ")
  ' 形狀鍵:▲1、●2、✕4、■8
  LCD.Text(1, 0, 16, 1, "SHAPE " + Sensor.ReadRawValue(1, 2) + "      ")
  ' 肩鍵:L2 1、R2 2、L1 4、R1 8
  LCD.Text(1, 0, 32, 1, "SHLD " + Sensor.ReadRawValue(1, 4) + "      ")
  ' 功能鍵:SELECT 1、L3 2、R3 4、START 8
  LCD.Text(1, 0, 48, 1, "FUNC " + Sensor.ReadRawValue(1, 6) + "      ")
  ' 左搖桿左右(50=中間)
  LCD.Text(1, 0, 64, 1, "LX " + Sensor.ReadRawValue(1, 1) + "      ")
  ' 左搖桿上下(50=中間)
  LCD.Text(1, 0, 80, 1, "LY " + Sensor.ReadRawValue(1, 3) + "      ")
  ' 右搖桿左右
  LCD.Text(1, 0, 96, 1, "RX " + Sensor.ReadRawValue(1, 5) + "      ")
  ' 右搖桿上下
  LCD.Text(1, 0, 112, 1, "RY " + Sensor.ReadRawValue(1, 7) + "      ")
  ' 等 0.1 秒
  Program.Delay(100)
EndWhile
Step by step:
- Clear the screen
- Repeat forever
- D-pad: up 1, right 2, down 4, left 8
- Shape buttons: ▲1, ●2, ✕4, ■8
- Shoulder buttons: L2 1, R2 2, L1 4, R1 8
- Function buttons: SELECT 1, L3 2, R3 4, START 8
- Left stick left/right (50 = centre)
- Left stick up/down (50 = centre)
- Right stick left/right
- Right stick up/down
- Wait 0.1 s
What you should see: With nothing pressed the buttons read 0 and the sticks 50. Pressing two buttons adds the numbers, for example up + right = 3.
FAQ:
- The buttons do nothing? Run example 1 first to see if the numbers change. If not, the gamepad is not connected: power-cycle the gamepad, or turn the EV3 on before plugging in the receiver.
- The robot keeps creeping after you release the stick? The stick centre is not always exactly 50: lower the × 2 in the program, or add a rule "treat 45~55 as 50".
Example 2: Drive with the D-pad
What this example does: Mode 0 reads only the D-pad: up = forward, down = backward, left/right = spin on the spot, release = stop.
What you need:
- EV3 brick + Education base robot (left wheel on B, right wheel on C)
- Controller PS4 Bluetooth receiver (EV3 edition) + gamepad
How to connect: Bluetooth receiver in port 1. The first time, pair the PS4/PS5 gamepad as described on the product page; afterwards pressing the PS button connects automatically.
Download the program (pick your software):
⬇ EV3-G (official software) | ⬇ EV3 Classroom | ⬇ Pybricks v4 | ⬇ EV3 MicroPython v2.0 | ⬇ clev3r
EV3-G (official software) blocks
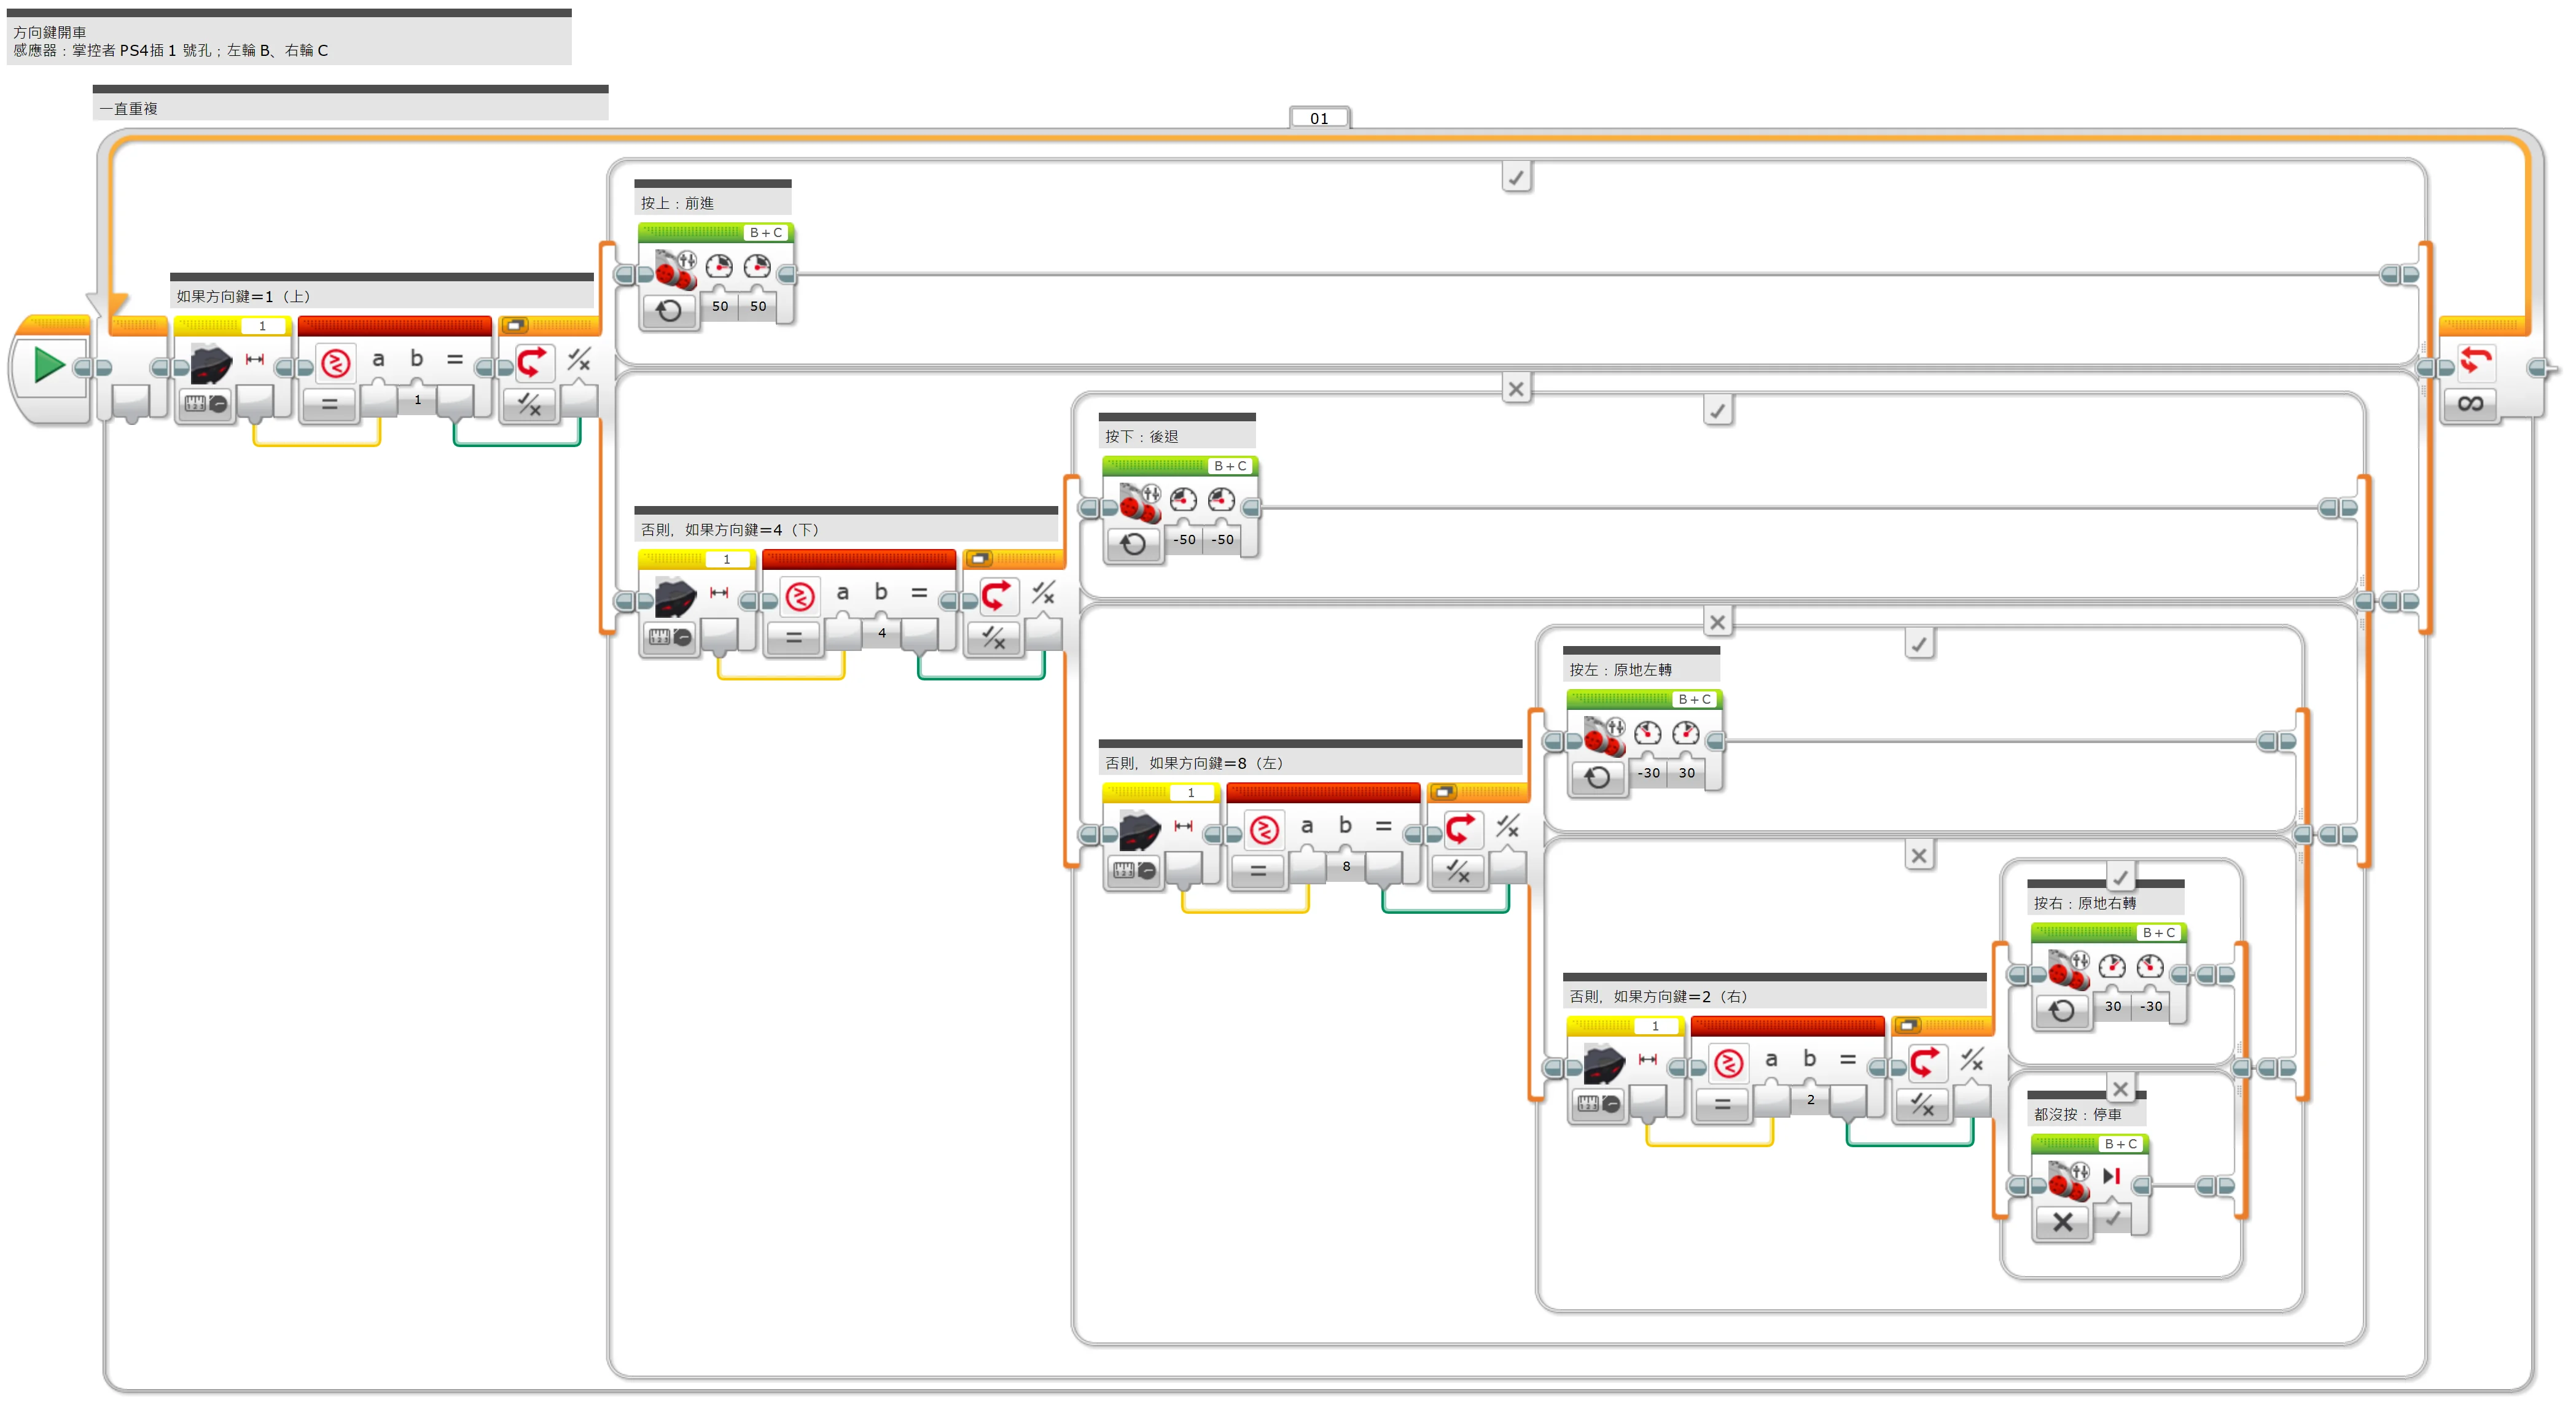
(Too small? Click the picture to open it full size.)
EV3 Classroom blocks
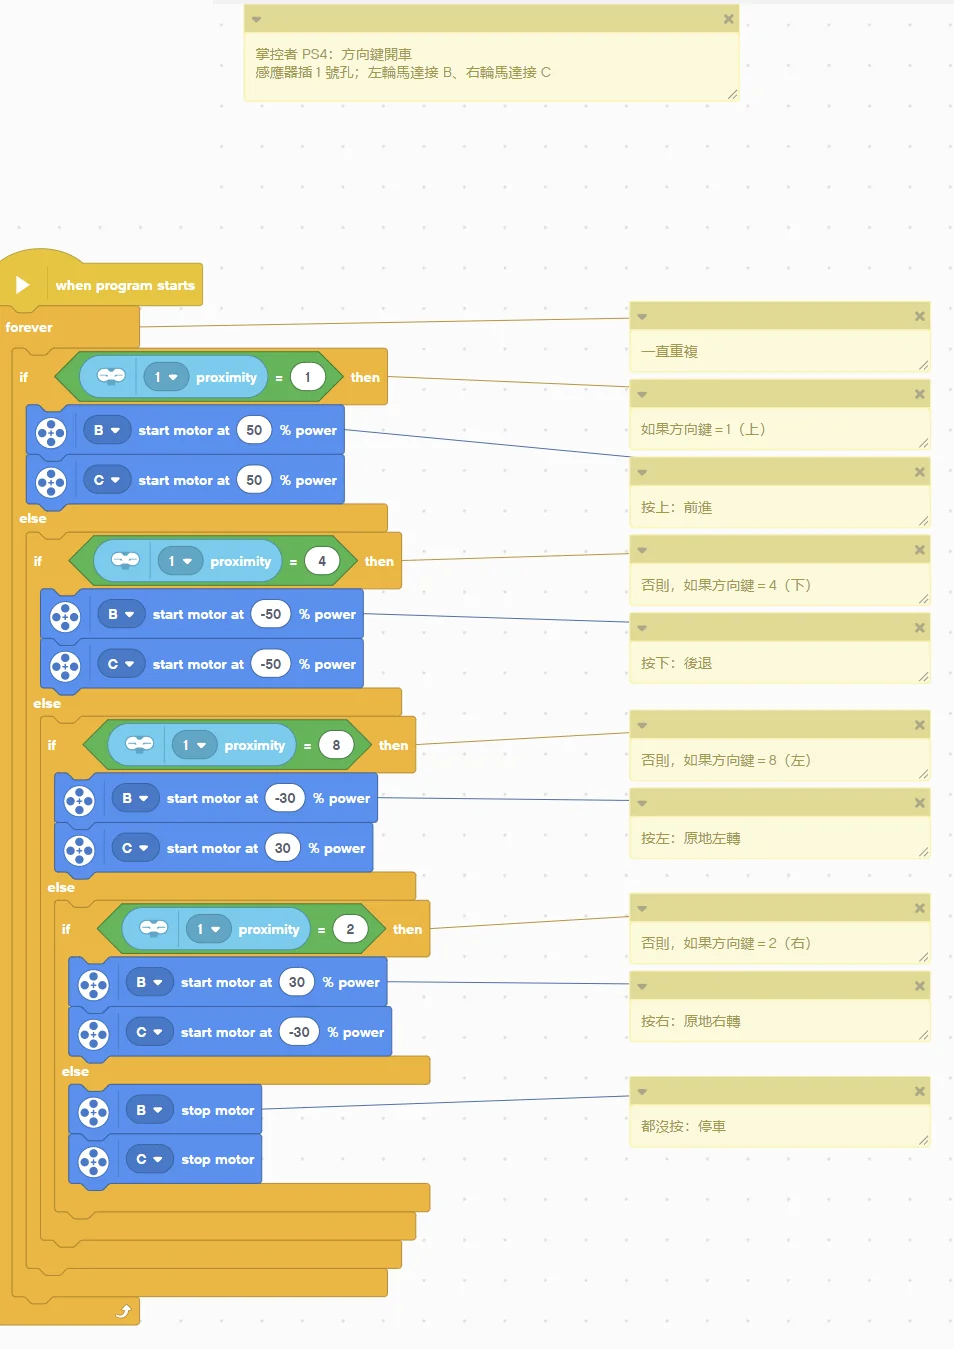
(Too small? Click the picture to open it full size.)
Pybricks v4 code
# ============================================================
# 掌控者 PS4/PS5 藍牙遙控接收器 EV3 新手範例 02:方向鍵開車
# 軟體:Pybricks v4(用 Chrome 打開 https://code.pybricks.com ,EV3 版目前是 Beta)
# 接法:掌控者 PS4插 1 號孔;左輪馬達接 B、右輪馬達接 C
# 這個範例會做什麼:用模式 0 只讀方向鍵,上前進、下後退、左右原地轉,放開就停。
# ============================================================

from pybricks.hubs import EV3Brick
from pybricks.ev3devices import Motor
from pybricks.iodevices import LUMPDevice
from pybricks.parameters import Port
from pybricks.tools import wait

ev3 = EV3Brick()
sensor = LUMPDevice(Port.S1)       # 掌控者 PS4插 1 號孔
left_motor = Motor(Port.B)        # 左輪
right_motor = Motor(Port.C)       # 右輪


def read_dpad():
    # 方向鍵(上 1、右 2、下 4、左 8,同時按會相加):0 ~ 15
    return sensor.read(0)[0]


# ---------- 程式從這裡開始 ----------
# 一直重複
while True:
    # 如果方向鍵=1(上)
    if read_dpad() == 1:
        # 按上:前進
        left_motor.dc(50)
        right_motor.dc(50)
    # 否則,如果方向鍵=4(下)
    elif read_dpad() == 4:
        # 按下:後退
        left_motor.dc(-50)
        right_motor.dc(-50)
    # 否則,如果方向鍵=8(左)
    elif read_dpad() == 8:
        # 按左:原地左轉
        left_motor.dc(-30)
        right_motor.dc(30)
    # 否則,如果方向鍵=2(右)
    elif read_dpad() == 2:
        # 按右:原地右轉
        left_motor.dc(30)
        right_motor.dc(-30)
    else:
        # 都沒按:停車
        left_motor.brake()
        right_motor.brake()
EV3 MicroPython v2.0 code
#!/usr/bin/env pybricks-micropython
# ============================================================
# 掌控者 PS4/PS5 藍牙遙控接收器 EV3 新手範例 02:方向鍵開車
# 軟體:樂高官方 EV3 MicroPython v2.0(microSD 開機卡+VS Code「LEGO MINDSTORMS EV3 MicroPython」擴充套件)
# 接法:掌控者 PS4插 1 號孔;左輪馬達接 B、右輪馬達接 C
# 這個範例會做什麼:用模式 0 只讀方向鍵,上前進、下後退、左右原地轉,放開就停。
# ============================================================

from pybricks.hubs import EV3Brick
from pybricks.ev3devices import Motor
from pybricks.iodevices import Ev3devSensor
from pybricks.parameters import Port
from pybricks.tools import wait

ev3 = EV3Brick()
sensor = Ev3devSensor(Port.S1)     # 掌控者 PS4插 1 號孔
left_motor = Motor(Port.B)        # 左輪
right_motor = Motor(Port.C)       # 右輪


def read_dpad():
    # 方向鍵(上 1、右 2、下 4、左 8,同時按會相加):0 ~ 15
    return sensor.read('IR-PROX')[0]


# ---------- 程式從這裡開始 ----------
# 一直重複
while True:
    # 如果方向鍵=1(上)
    if read_dpad() == 1:
        # 按上:前進
        left_motor.dc(50)
        right_motor.dc(50)
    # 否則,如果方向鍵=4(下)
    elif read_dpad() == 4:
        # 按下:後退
        left_motor.dc(-50)
        right_motor.dc(-50)
    # 否則,如果方向鍵=8(左)
    elif read_dpad() == 8:
        # 按左:原地左轉
        left_motor.dc(-30)
        right_motor.dc(30)
    # 否則,如果方向鍵=2(右)
    elif read_dpad() == 2:
        # 按右:原地右轉
        left_motor.dc(30)
        right_motor.dc(-30)
    else:
        # 都沒按:停車
        left_motor.brake()
        right_motor.brake()
clev3r code
' ============================================================
' 掌控者 PS4/PS5 藍牙遙控接收器 EV3 新手範例 02:方向鍵開車
' 軟體:clev3r
' 接法:掌控者 PS4插 1 號孔;左輪馬達接 B、右輪馬達接 C
' 這個範例會做什麼:用模式 0 只讀方向鍵,上前進、下後退、左右原地轉,放開就停。
' 讀值:dpad=方向鍵(上 1、右 2、下 4、左 8,同時按會相加)(0 ~ 15)
' ============================================================
folder "prjs" "MBC_ps4_ex02"

' 掌控者 PS4插 1 號孔,使用模式 0
Sensor.SetMode(1, 0)
LCD.Clear()

' 一直重複
While "True"
  ' 如果方向鍵=1(上)
  If Sensor.ReadRawValue(1, 0) = 1 Then
    ' 按上:前進
    Motor.StartPower("B", 50)
    Motor.StartPower("C", 50)
  ' 否則,如果方向鍵=4(下)
  ElseIf Sensor.ReadRawValue(1, 0) = 4 Then
    ' 按下:後退
    Motor.StartPower("B", -50)
    Motor.StartPower("C", -50)
  ' 否則,如果方向鍵=8(左)
  ElseIf Sensor.ReadRawValue(1, 0) = 8 Then
    ' 按左:原地左轉
    Motor.StartPower("B", -30)
    Motor.StartPower("C", 30)
  ' 否則,如果方向鍵=2(右)
  ElseIf Sensor.ReadRawValue(1, 0) = 2 Then
    ' 按右:原地右轉
    Motor.StartPower("B", 30)
    Motor.StartPower("C", -30)
  Else
    ' 都沒按:停車
    Motor.Stop("BC", "True")
  EndIf
EndWhile
Step by step:
- Repeat forever
- If D-pad = 1 (up)
- Up pressed: forward
- Otherwise:
- Otherwise, if D-pad = 4 (down)
- Down pressed: backward
- Otherwise:
- Otherwise, if D-pad = 8 (left)
- Left pressed: spin left
- Otherwise:
- Otherwise, if D-pad = 2 (right)
- Right pressed: spin right
- Otherwise:
- Nothing pressed: stop
- Otherwise, if D-pad = 2 (right)
- Otherwise, if D-pad = 8 (left)
- Otherwise, if D-pad = 4 (down)
- If D-pad = 1 (up)
What you should see: Hold a D-pad button and the robot moves; release it and the robot stops.
FAQ:
- The buttons do nothing? Run example 1 first to see if the numbers change. If not, the gamepad is not connected: power-cycle the gamepad, or turn the EV3 on before plugging in the receiver.
- The robot keeps creeping after you release the stick? The stick centre is not always exactly 50: lower the × 2 in the program, or add a rule "treat 45~55 as 50".
Example 3: Left stick controls one motor speed
What this example does: A stick reads 099 with 50 in the middle. Subtract 50 and multiply by 2 to get the -100+100 a motor wants: push further to go faster, push down to reverse.
What you need:
- EV3 brick
- One large motor on B
- Controller PS4 Bluetooth receiver (EV3 edition) + gamepad
How to connect: Bluetooth receiver in port 1. The first time, pair the PS4/PS5 gamepad as described on the product page; afterwards pressing the PS button connects automatically.
Download the program (pick your software):
⬇ EV3-G (official software) | ⬇ EV3 Classroom | ⬇ Pybricks v4 | ⬇ EV3 MicroPython v2.0 | ⬇ clev3r
EV3-G (official software) blocks

(Too small? Click the picture to open it full size.)
EV3 Classroom blocks
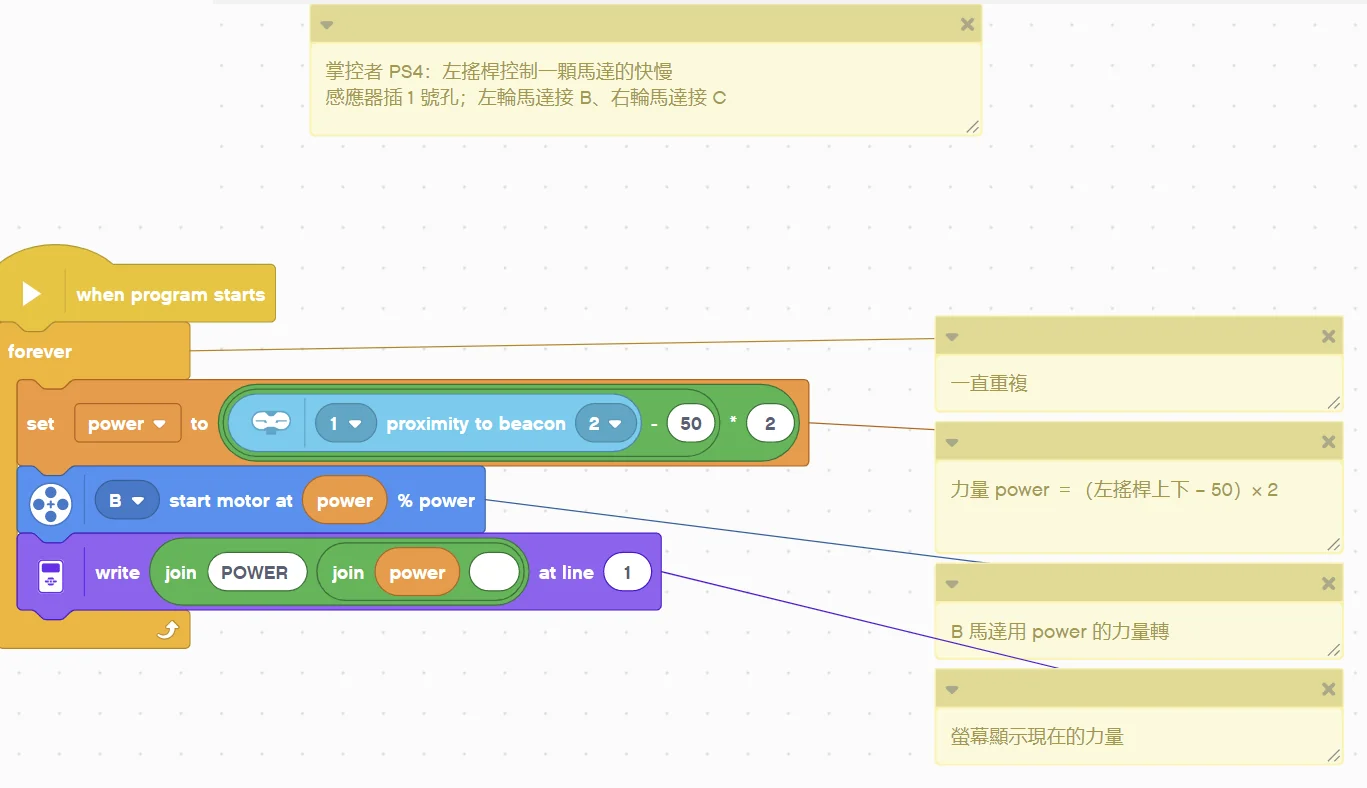
(Too small? Click the picture to open it full size.)
Pybricks v4 code
# ============================================================
# 掌控者 PS4/PS5 藍牙遙控接收器 EV3 新手範例 03:左搖桿控制一顆馬達的快慢
# 軟體:Pybricks v4(用 Chrome 打開 https://code.pybricks.com ,EV3 版目前是 Beta)
# 接法:掌控者 PS4插 1 號孔;馬達接 B
# 這個範例會做什麼:搖桿的數字是 0~99、中間 50。把它減 50 再乘 2,就變成馬達要的 -100~+100:推越多轉越快,往下推就倒轉。
# ============================================================

from pybricks.hubs import EV3Brick
from pybricks.ev3devices import Motor
from pybricks.iodevices import LUMPDevice
from pybricks.parameters import Port, Color
from pybricks.tools import wait

ev3 = EV3Brick()
sensor = LUMPDevice(Port.S1)       # 掌控者 PS4插 1 號孔
motor_b = Motor(Port.B)             # B 埠馬達


def read_ly():
    # 左搖桿上下:0 ~ 99,50=中間,往上變大
    return sensor.read(1)[3]


# ---------- 程式從這裡開始 ----------
# 一直重複
while True:
    # 力量 power =(左搖桿上下 − 50)× 2
    power = (read_ly() - 50) * 2
    # B 馬達用 power 的力量轉
    motor_b.dc(power)
    # 螢幕顯示現在的力量
    ev3.screen.draw_text(0, 0, "POWER " + str(power) + "      ", Color.BLACK, Color.WHITE)
EV3 MicroPython v2.0 code
#!/usr/bin/env pybricks-micropython
# ============================================================
# 掌控者 PS4/PS5 藍牙遙控接收器 EV3 新手範例 03:左搖桿控制一顆馬達的快慢
# 軟體:樂高官方 EV3 MicroPython v2.0(microSD 開機卡+VS Code「LEGO MINDSTORMS EV3 MicroPython」擴充套件)
# 接法:掌控者 PS4插 1 號孔;馬達接 B
# 這個範例會做什麼:搖桿的數字是 0~99、中間 50。把它減 50 再乘 2,就變成馬達要的 -100~+100:推越多轉越快,往下推就倒轉。
# ============================================================

from pybricks.hubs import EV3Brick
from pybricks.ev3devices import Motor
from pybricks.iodevices import Ev3devSensor
from pybricks.parameters import Port, Color
from pybricks.tools import wait

ev3 = EV3Brick()
sensor = Ev3devSensor(Port.S1)     # 掌控者 PS4插 1 號孔
motor_b = Motor(Port.B)             # B 埠馬達


def read_ly():
    # 左搖桿上下:0 ~ 99,50=中間,往上變大
    return sensor.read('IR-SEEK')[3]


# ---------- 程式從這裡開始 ----------
# 一直重複
while True:
    # 力量 power =(左搖桿上下 − 50)× 2
    power = (read_ly() - 50) * 2
    # B 馬達用 power 的力量轉
    motor_b.dc(power)
    # 螢幕顯示現在的力量
    ev3.screen.draw_text(0, 0, "POWER " + str(power) + "      ", Color.BLACK, Color.WHITE)
clev3r code
' ============================================================
' 掌控者 PS4/PS5 藍牙遙控接收器 EV3 新手範例 03:左搖桿控制一顆馬達的快慢
' 軟體:clev3r
' 接法:掌控者 PS4插 1 號孔;左輪馬達接 B、右輪馬達接 C
' 這個範例會做什麼:搖桿的數字是 0~99、中間 50。把它減 50 再乘 2,就變成馬達要的 -100~+100:推越多轉越快,往下推就倒轉。
' 讀值:ly=左搖桿上下(0 ~ 99,50=中間,往上變大)
' ============================================================
folder "prjs" "MBC_ps4_ex03"

' 掌控者 PS4插 1 號孔,使用模式 1
Sensor.SetMode(1, 1)
LCD.Clear()

' 一直重複
While "True"
  ' 力量 power =(左搖桿上下 − 50)× 2
  power = (Sensor.ReadRawValue(1, 3) - 50) * 2
  ' B 馬達用 power 的力量轉
  Motor.StartPower("B", power)
  ' 螢幕顯示現在的力量
  LCD.Text(1, 0, 0, 1, "POWER " + power + "      ")
EndWhile
Step by step:
- Repeat forever
- Power = (left stick up/down − 50) × 2
- Motor B runs with power
- Show the current power on screen
What you should see: Push the left stick up and motor B runs forward, faster the further you push; push down to reverse; release to stop, the screen shows about 0.
FAQ:
- The buttons do nothing? Run example 1 first to see if the numbers change. If not, the gamepad is not connected: power-cycle the gamepad, or turn the EV3 on before plugging in the receiver.
- The robot keeps creeping after you release the stick? The stick centre is not always exactly 50: lower the × 2 in the program, or add a rule "treat 45~55 as 50".
Example 4: Two-stick tank drive
What this example does: Left stick drives the left wheel, right stick drives the right wheel, like a tank: push both forward to go forward, one forward and one back to spin.
What you need:
- EV3 brick + Education base robot (left wheel on B, right wheel on C)
- Controller PS4 Bluetooth receiver (EV3 edition) + gamepad
How to connect: Bluetooth receiver in port 1. The first time, pair the PS4/PS5 gamepad as described on the product page; afterwards pressing the PS button connects automatically.
Download the program (pick your software):
⬇ EV3-G (official software) | ⬇ EV3 Classroom | ⬇ Pybricks v4 | ⬇ EV3 MicroPython v2.0 | ⬇ clev3r
EV3-G (official software) blocks

(Too small? Click the picture to open it full size.)
EV3 Classroom blocks
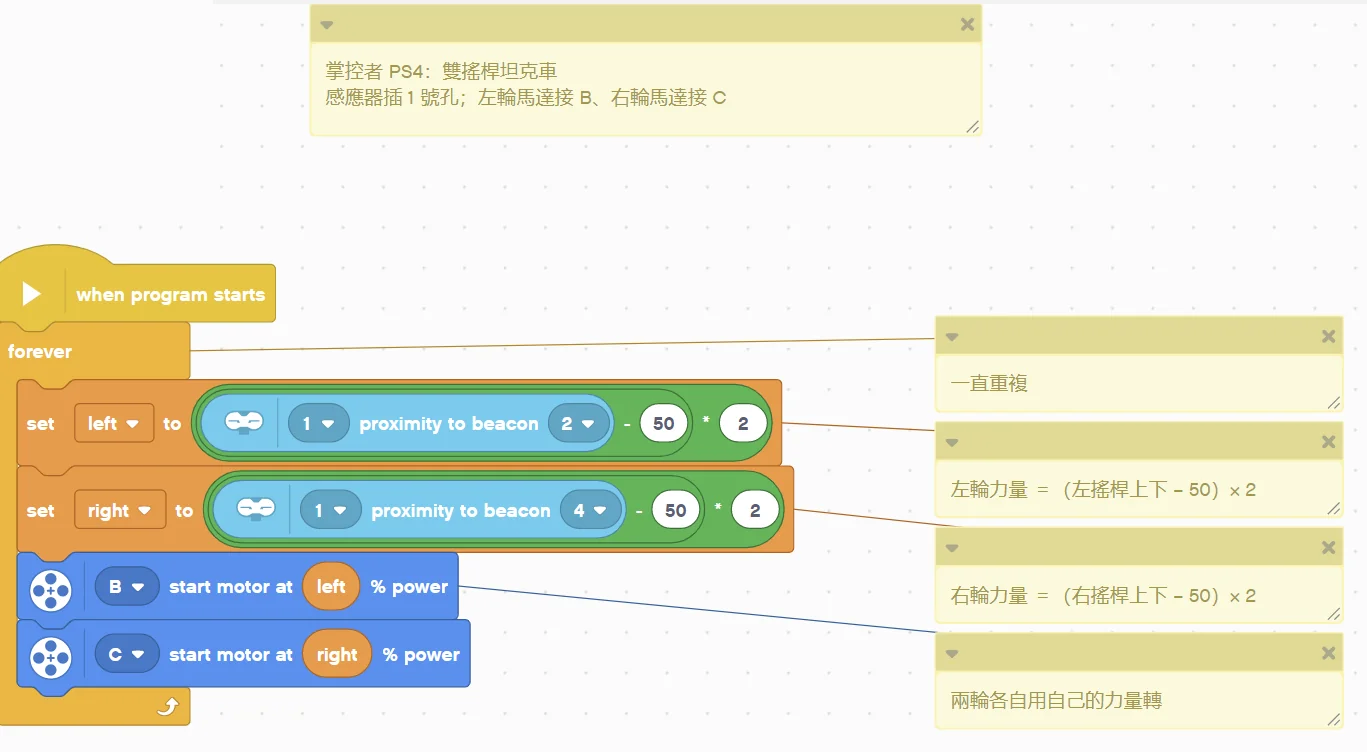
(Too small? Click the picture to open it full size.)
Pybricks v4 code
# ============================================================
# 掌控者 PS4/PS5 藍牙遙控接收器 EV3 新手範例 04:雙搖桿坦克車
# 軟體:Pybricks v4(用 Chrome 打開 https://code.pybricks.com ,EV3 版目前是 Beta)
# 接法:掌控者 PS4插 1 號孔;左輪馬達接 B、右輪馬達接 C
# 這個範例會做什麼:左搖桿管左輪、右搖桿管右輪,跟開坦克一樣:兩個都往前推就前進,一前一後就原地轉。
# ============================================================

from pybricks.hubs import EV3Brick
from pybricks.ev3devices import Motor
from pybricks.iodevices import LUMPDevice
from pybricks.parameters import Port
from pybricks.tools import wait

ev3 = EV3Brick()
sensor = LUMPDevice(Port.S1)       # 掌控者 PS4插 1 號孔
left_motor = Motor(Port.B)        # 左輪
right_motor = Motor(Port.C)       # 右輪


def read_ly():
    # 左搖桿上下:0 ~ 99,50=中間,往上變大
    return sensor.read(1)[3]


def read_ry():
    # 右搖桿上下:0 ~ 99,50=中間,往上變大
    return sensor.read(1)[7]


# ---------- 程式從這裡開始 ----------
# 一直重複
while True:
    # 左輪力量 =(左搖桿上下 − 50)× 2
    left = (read_ly() - 50) * 2
    # 右輪力量 =(右搖桿上下 − 50)× 2
    right = (read_ry() - 50) * 2
    # 兩輪各自用自己的力量轉
    left_motor.dc(left)
    right_motor.dc(right)
EV3 MicroPython v2.0 code
#!/usr/bin/env pybricks-micropython
# ============================================================
# 掌控者 PS4/PS5 藍牙遙控接收器 EV3 新手範例 04:雙搖桿坦克車
# 軟體:樂高官方 EV3 MicroPython v2.0(microSD 開機卡+VS Code「LEGO MINDSTORMS EV3 MicroPython」擴充套件)
# 接法:掌控者 PS4插 1 號孔;左輪馬達接 B、右輪馬達接 C
# 這個範例會做什麼:左搖桿管左輪、右搖桿管右輪,跟開坦克一樣:兩個都往前推就前進,一前一後就原地轉。
# ============================================================

from pybricks.hubs import EV3Brick
from pybricks.ev3devices import Motor
from pybricks.iodevices import Ev3devSensor
from pybricks.parameters import Port
from pybricks.tools import wait

ev3 = EV3Brick()
sensor = Ev3devSensor(Port.S1)     # 掌控者 PS4插 1 號孔
left_motor = Motor(Port.B)        # 左輪
right_motor = Motor(Port.C)       # 右輪


def read_ly():
    # 左搖桿上下:0 ~ 99,50=中間,往上變大
    return sensor.read('IR-SEEK')[3]


def read_ry():
    # 右搖桿上下:0 ~ 99,50=中間,往上變大
    return sensor.read('IR-SEEK')[7]


# ---------- 程式從這裡開始 ----------
# 一直重複
while True:
    # 左輪力量 =(左搖桿上下 − 50)× 2
    left = (read_ly() - 50) * 2
    # 右輪力量 =(右搖桿上下 − 50)× 2
    right = (read_ry() - 50) * 2
    # 兩輪各自用自己的力量轉
    left_motor.dc(left)
    right_motor.dc(right)
clev3r code
' ============================================================
' 掌控者 PS4/PS5 藍牙遙控接收器 EV3 新手範例 04:雙搖桿坦克車
' 軟體:clev3r
' 接法:掌控者 PS4插 1 號孔;左輪馬達接 B、右輪馬達接 C
' 這個範例會做什麼:左搖桿管左輪、右搖桿管右輪,跟開坦克一樣:兩個都往前推就前進,一前一後就原地轉。
' 讀值:ly=左搖桿上下(0 ~ 99,50=中間,往上變大);ry=右搖桿上下(0 ~ 99,50=中間,往上變大)
' ============================================================
folder "prjs" "MBC_ps4_ex04"

' 掌控者 PS4插 1 號孔,使用模式 1
Sensor.SetMode(1, 1)
LCD.Clear()

' 一直重複
While "True"
  ' 左輪力量 =(左搖桿上下 − 50)× 2
  left = (Sensor.ReadRawValue(1, 3) - 50) * 2
  ' 右輪力量 =(右搖桿上下 − 50)× 2
  right = (Sensor.ReadRawValue(1, 7) - 50) * 2
  ' 兩輪各自用自己的力量轉
  Motor.StartPower("B", left)
  Motor.StartPower("C", right)
EndWhile
Step by step:
- Repeat forever
- Left wheel power = (left stick up/down − 50) × 2
- Right wheel power = (right stick up/down − 50) × 2
- Each wheel runs with its own power
What you should see: Push both sticks forward and the robot drives forward; left forward and right back and it spins right.
FAQ:
- The buttons do nothing? Run example 1 first to see if the numbers change. If not, the gamepad is not connected: power-cycle the gamepad, or turn the EV3 on before plugging in the receiver.
- The robot keeps creeping after you release the stick? The stick centre is not always exactly 50: lower the × 2 in the program, or add a rule "treat 45~55 as 50".
Example 5: ✕ to grab, ● to release: control a gripper
What this example does: Use the shape buttons to control a medium motor (gripper) on port A: ✕ closes, ● opens, nothing pressed stops.
What you need:
- EV3 brick
- Medium motor on A (built as a gripper)
- Controller PS4 Bluetooth receiver (EV3 edition) + gamepad
How to connect: Bluetooth receiver in port 1. The first time, pair the PS4/PS5 gamepad as described on the product page; afterwards pressing the PS button connects automatically.
Download the program (pick your software):
⬇ EV3-G (official software) | ⬇ EV3 Classroom | ⬇ Pybricks v4 | ⬇ EV3 MicroPython v2.0 | ⬇ clev3r
EV3-G (official software) blocks
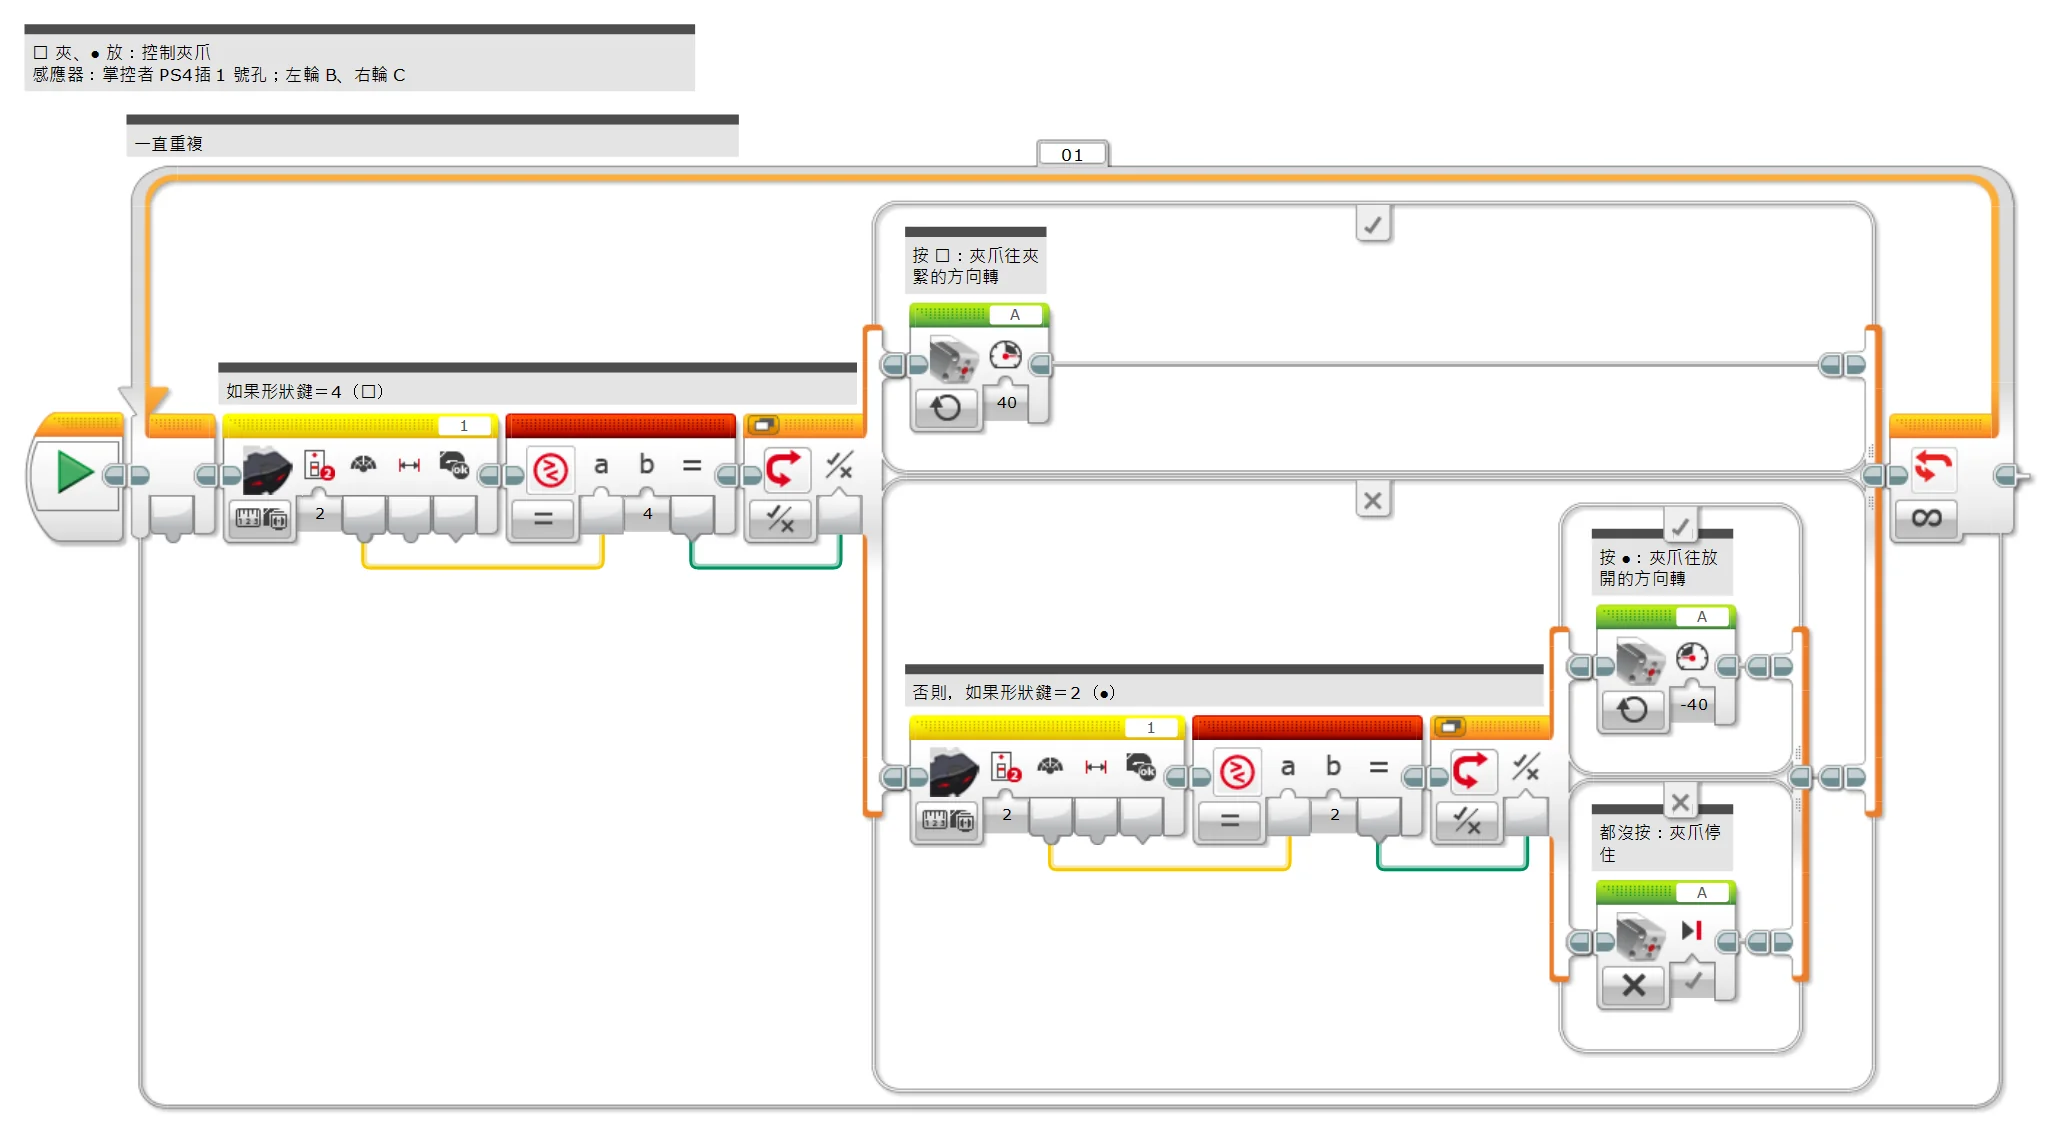
(Too small? Click the picture to open it full size.)
EV3 Classroom blocks
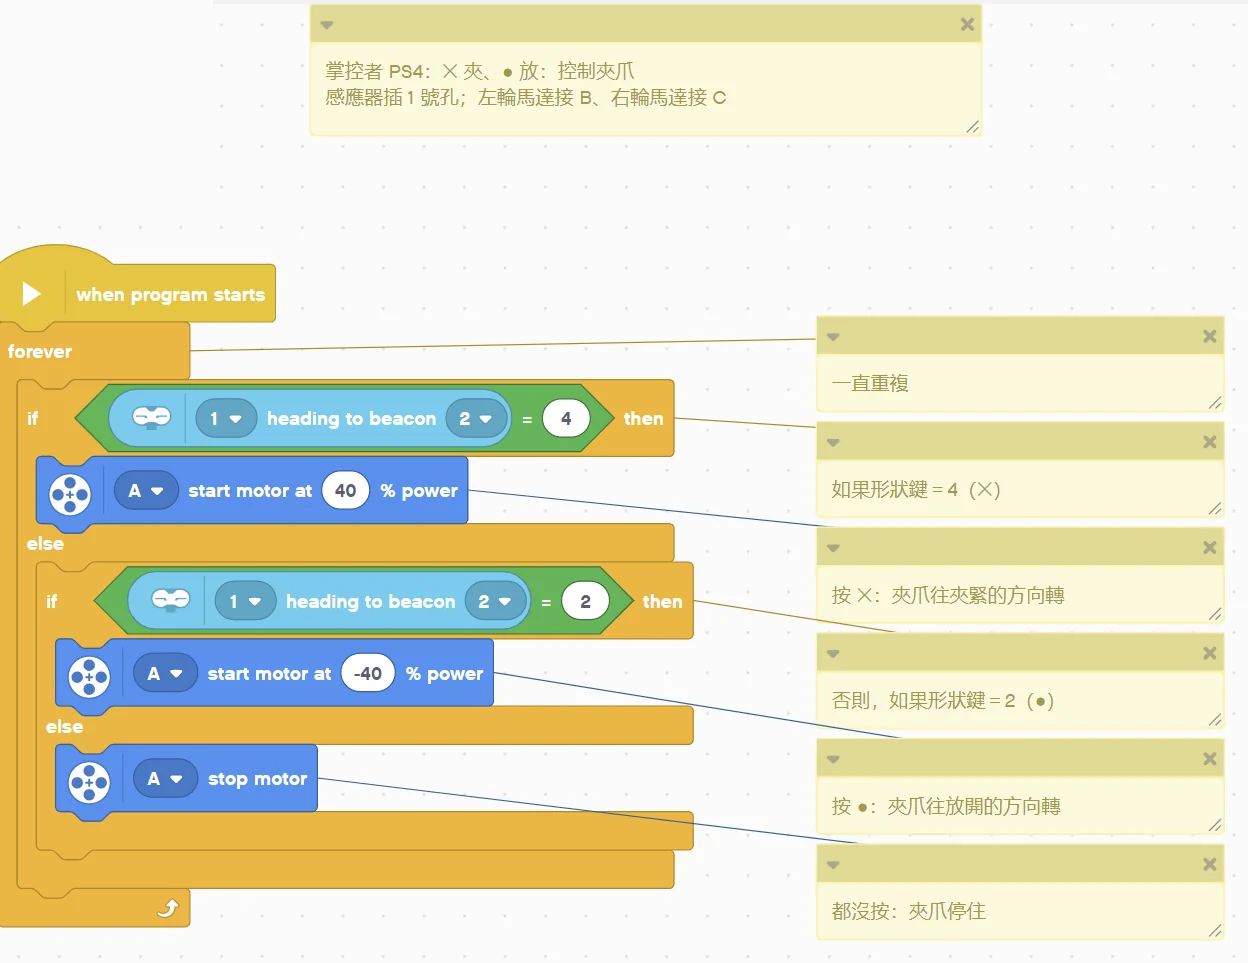
(Too small? Click the picture to open it full size.)
Pybricks v4 code
# ============================================================
# 掌控者 PS4/PS5 藍牙遙控接收器 EV3 新手範例 05:✕ 夾、● 放:控制夾爪
# 軟體:Pybricks v4(用 Chrome 打開 https://code.pybricks.com ,EV3 版目前是 Beta)
# 接法:掌控者 PS4插 1 號孔;馬達接 A
# 這個範例會做什麼:用形狀鍵控制接在 A 埠的中馬達(夾爪):按 ✕ 夾緊、按 ● 放開,都不按就停。
# ============================================================

from pybricks.hubs import EV3Brick
from pybricks.ev3devices import Motor
from pybricks.iodevices import LUMPDevice
from pybricks.parameters import Port
from pybricks.tools import wait

ev3 = EV3Brick()
sensor = LUMPDevice(Port.S1)       # 掌控者 PS4插 1 號孔
motor_a = Motor(Port.A)             # A 埠馬達


def read_shape():
    # 形狀鍵(▲1、●2、✕4、■8):0 ~ 15
    return sensor.read(1)[2]


# ---------- 程式從這裡開始 ----------
# 一直重複
while True:
    # 如果形狀鍵=4(✕)
    if read_shape() == 4:
        # 按 ✕:夾爪往夾緊的方向轉
        motor_a.dc(40)
    # 否則,如果形狀鍵=2(●)
    elif read_shape() == 2:
        # 按 ●:夾爪往放開的方向轉
        motor_a.dc(-40)
    else:
        # 都沒按:夾爪停住
        motor_a.brake()
EV3 MicroPython v2.0 code
#!/usr/bin/env pybricks-micropython
# ============================================================
# 掌控者 PS4/PS5 藍牙遙控接收器 EV3 新手範例 05:✕ 夾、● 放:控制夾爪
# 軟體:樂高官方 EV3 MicroPython v2.0(microSD 開機卡+VS Code「LEGO MINDSTORMS EV3 MicroPython」擴充套件)
# 接法:掌控者 PS4插 1 號孔;馬達接 A
# 這個範例會做什麼:用形狀鍵控制接在 A 埠的中馬達(夾爪):按 ✕ 夾緊、按 ● 放開,都不按就停。
# ============================================================

from pybricks.hubs import EV3Brick
from pybricks.ev3devices import Motor
from pybricks.iodevices import Ev3devSensor
from pybricks.parameters import Port
from pybricks.tools import wait

ev3 = EV3Brick()
sensor = Ev3devSensor(Port.S1)     # 掌控者 PS4插 1 號孔
motor_a = Motor(Port.A)             # A 埠馬達


def read_shape():
    # 形狀鍵(▲1、●2、✕4、■8):0 ~ 15
    return sensor.read('IR-SEEK')[2]


# ---------- 程式從這裡開始 ----------
# 一直重複
while True:
    # 如果形狀鍵=4(✕)
    if read_shape() == 4:
        # 按 ✕:夾爪往夾緊的方向轉
        motor_a.dc(40)
    # 否則,如果形狀鍵=2(●)
    elif read_shape() == 2:
        # 按 ●:夾爪往放開的方向轉
        motor_a.dc(-40)
    else:
        # 都沒按:夾爪停住
        motor_a.brake()
clev3r code
' ============================================================
' 掌控者 PS4/PS5 藍牙遙控接收器 EV3 新手範例 05:✕ 夾、● 放:控制夾爪
' 軟體:clev3r
' 接法:掌控者 PS4插 1 號孔;左輪馬達接 B、右輪馬達接 C
' 這個範例會做什麼:用形狀鍵控制接在 A 埠的中馬達(夾爪):按 ✕ 夾緊、按 ● 放開,都不按就停。
' 讀值:shape=形狀鍵(▲1、●2、✕4、■8)(0 ~ 15)
' ============================================================
folder "prjs" "MBC_ps4_ex05"

' 掌控者 PS4插 1 號孔,使用模式 1
Sensor.SetMode(1, 1)
LCD.Clear()

' 一直重複
While "True"
  ' 如果形狀鍵=4(✕)
  If Sensor.ReadRawValue(1, 2) = 4 Then
    ' 按 ✕:夾爪往夾緊的方向轉
    Motor.StartPower("A", 40)
  ' 否則,如果形狀鍵=2(●)
  ElseIf Sensor.ReadRawValue(1, 2) = 2 Then
    ' 按 ●:夾爪往放開的方向轉
    Motor.StartPower("A", -40)
  Else
    ' 都沒按:夾爪停住
    Motor.Stop("A", "True")
  EndIf
EndWhile
Step by step:
- Repeat forever
- If shape buttons = 4 (✕)
- ✕ pressed: gripper turns to close
- Otherwise:
- Otherwise, if shape buttons = 2 (●)
- ● pressed: gripper turns to open
- Otherwise:
- Nothing pressed: gripper stops
- Otherwise, if shape buttons = 2 (●)
- If shape buttons = 4 (✕)
What you should see: Hold ✕ and the gripper closes, hold ● and it opens, release and it stops.
FAQ:
- Close and open are swapped? Swap 40 and -40.
- The buttons do nothing? Run example 1 first to see if the numbers change. If not, the gamepad is not connected: power-cycle the gamepad, or turn the EV3 on before plugging in the receiver.
- The robot keeps creeping after you release the stick? The stick centre is not always exactly 50: lower the × 2 in the program, or add a rule "treat 45~55 as 50".
Example 6: Start only when the gamepad is connected
Pybricks v4 / EV3 MicroPython v2.0 / clev3r only (the EV3-G and Classroom blocks cannot read this mode)
What this example does: Before the gamepad connects, the sticks read centre and the buttons 0, so a program cannot tell "nothing pressed" from "not connected". The mode 3 value includes "connected": 256 or more means the gamepad is connected. This example waits for the connection, beeps and starts; then D-pad up (256 + 1) drives forward, down (256 + 4) backward, and it stops at once if the gamepad disconnects.
What you need:
- EV3 brick + Education base robot (left wheel on B, right wheel on C)
- Controller PS4 Bluetooth receiver (EV3 edition, firmware v4.0 or later) + gamepad
How to connect: Bluetooth receiver in port 1. Leave the gamepad off until the program is running, so you can watch "waiting → connected".
Download the program (pick your software):
⬇ Pybricks v4 | ⬇ EV3 MicroPython v2.0 | ⬇ clev3r
(The code is the example; no screenshot needed.)
Pybricks v4 code
# ============================================================
# 掌控者 PS4/PS5 藍牙遙控接收器 EV3 新手範例 06:手把連上才出發
# 軟體:Pybricks v4(用 Chrome 打開 https://code.pybricks.com ,EV3 版目前是 Beta)
# 接法:掌控者 PS4插 1 號孔;左輪馬達接 B、右輪馬達接 C
# 這個範例會做什麼:手把還沒連上時搖桿是中間、按鍵是 0,程式分不出「沒按」和「沒連上」。模式 3 的數字加了「已連線」:大於等於 256 就是手把連上了。這個範例等手把連上才嗶一聲出發,之後用方向鍵上(256+1)前進、下(256+4)後退,手把斷線就馬上停車。
# ============================================================

from pybricks.hubs import EV3Brick
from pybricks.ev3devices import Motor
from pybricks.iodevices import LUMPDevice
from pybricks.parameters import Port, Color
from pybricks.tools import wait

ev3 = EV3Brick()
sensor = LUMPDevice(Port.S1)       # 掌控者 PS4插 1 號孔
left_motor = Motor(Port.B)        # 左輪
right_motor = Motor(Port.C)       # 右輪


def read_status3():
    # 方向鍵+形狀鍵+連線狀態:0 ~ 511:方向鍵(0~15)+ 形狀鍵 × 16 + 已連線 × 256,大於等於 256=手把已連上
    return sensor.read(3)[0]


# ---------- 程式從這裡開始 ----------
# 清除螢幕
ev3.screen.clear()
# 螢幕顯示 WAIT PAD:等手把
ev3.screen.draw_text(0, 0, "WAIT PAD      ", Color.BLACK, Color.WHITE)
# 等到狀態值大於等於 256(手把已連上)
while not (read_status3() >= 256):
    wait(10)
# 連上了:嗶一聲
ev3.speaker.beep()
# 一直重複
while True:
    # 第 2 行顯示狀態值
    ev3.screen.draw_text(0, 16, "STATUS " + str(read_status3()) + "      ", Color.BLACK, Color.WHITE)
    # 如果狀態值小於 256(手把斷線了)
    if read_status3() < 256:
        # 手把斷線:馬上停車
        left_motor.brake()
        right_motor.brake()
        # 螢幕顯示 PAD LOST
        ev3.screen.draw_text(0, 0, "PAD LOST      ", Color.BLACK, Color.WHITE)
    else:
        # 螢幕顯示 PAD OK
        ev3.screen.draw_text(0, 0, "PAD OK      ", Color.BLACK, Color.WHITE)
        # 如果狀態值=257(已連上+方向鍵上)
        if read_status3() == 257:
            # 已連上+方向鍵上(256+1):前進
            left_motor.dc(40)
            right_motor.dc(40)
        # 否則,如果狀態值=260(已連上+方向鍵下)
        elif read_status3() == 260:
            # 已連上+方向鍵下(256+4):後退
            left_motor.dc(-40)
            right_motor.dc(-40)
        else:
            # 連上但沒按:停車
            left_motor.brake()
            right_motor.brake()
EV3 MicroPython v2.0 code
#!/usr/bin/env pybricks-micropython
# ============================================================
# 掌控者 PS4/PS5 藍牙遙控接收器 EV3 新手範例 06:手把連上才出發
# 軟體:樂高官方 EV3 MicroPython v2.0(microSD 開機卡+VS Code「LEGO MINDSTORMS EV3 MicroPython」擴充套件)
# 接法:掌控者 PS4插 1 號孔;左輪馬達接 B、右輪馬達接 C
# 這個範例會做什麼:手把還沒連上時搖桿是中間、按鍵是 0,程式分不出「沒按」和「沒連上」。模式 3 的數字加了「已連線」:大於等於 256 就是手把連上了。這個範例等手把連上才嗶一聲出發,之後用方向鍵上(256+1)前進、下(256+4)後退,手把斷線就馬上停車。
# ============================================================

from pybricks.hubs import EV3Brick
from pybricks.ev3devices import Motor
from pybricks.iodevices import Ev3devSensor
from pybricks.parameters import Port, Color
from pybricks.tools import wait

ev3 = EV3Brick()
sensor = Ev3devSensor(Port.S1)     # 掌控者 PS4插 1 號孔
left_motor = Motor(Port.B)        # 左輪
right_motor = Motor(Port.C)       # 右輪


def read_status3():
    # 方向鍵+形狀鍵+連線狀態:0 ~ 511:方向鍵(0~15)+ 形狀鍵 × 16 + 已連線 × 256,大於等於 256=手把已連上
    return sensor.read('IR-REM-A')[0]


# ---------- 程式從這裡開始 ----------
# 清除螢幕
ev3.screen.clear()
# 螢幕顯示 WAIT PAD:等手把
ev3.screen.draw_text(0, 0, "WAIT PAD      ", Color.BLACK, Color.WHITE)
# 等到狀態值大於等於 256(手把已連上)
while not (read_status3() >= 256):
    wait(10)
# 連上了:嗶一聲
ev3.speaker.beep()
# 一直重複
while True:
    # 第 2 行顯示狀態值
    ev3.screen.draw_text(0, 16, "STATUS " + str(read_status3()) + "      ", Color.BLACK, Color.WHITE)
    # 如果狀態值小於 256(手把斷線了)
    if read_status3() < 256:
        # 手把斷線:馬上停車
        left_motor.brake()
        right_motor.brake()
        # 螢幕顯示 PAD LOST
        ev3.screen.draw_text(0, 0, "PAD LOST      ", Color.BLACK, Color.WHITE)
    else:
        # 螢幕顯示 PAD OK
        ev3.screen.draw_text(0, 0, "PAD OK      ", Color.BLACK, Color.WHITE)
        # 如果狀態值=257(已連上+方向鍵上)
        if read_status3() == 257:
            # 已連上+方向鍵上(256+1):前進
            left_motor.dc(40)
            right_motor.dc(40)
        # 否則,如果狀態值=260(已連上+方向鍵下)
        elif read_status3() == 260:
            # 已連上+方向鍵下(256+4):後退
            left_motor.dc(-40)
            right_motor.dc(-40)
        else:
            # 連上但沒按:停車
            left_motor.brake()
            right_motor.brake()
clev3r code
' ============================================================
' 掌控者 PS4/PS5 藍牙遙控接收器 EV3 新手範例 06:手把連上才出發
' 軟體:clev3r
' 接法:掌控者 PS4插 1 號孔;左輪馬達接 B、右輪馬達接 C
' 這個範例會做什麼:手把還沒連上時搖桿是中間、按鍵是 0,程式分不出「沒按」和「沒連上」。模式 3 的數字加了「已連線」:大於等於 256 就是手把連上了。這個範例等手把連上才嗶一聲出發,之後用方向鍵上(256+1)前進、下(256+4)後退,手把斷線就馬上停車。
' 讀值:status3=方向鍵+形狀鍵+連線狀態(0 ~ 511:方向鍵(0~15)+ 形狀鍵 × 16 + 已連線 × 256,大於等於 256=手把已連上)
' ============================================================
folder "prjs" "MBC_ps4_ex06"

' 掌控者 PS4插 1 號孔,使用模式 3
Sensor.SetMode(1, 3)
LCD.Clear()

' 清除螢幕
LCD.Clear()
' 螢幕顯示 WAIT PAD:等手把
LCD.Text(1, 0, 0, 1, "WAIT PAD      ")
' 等到狀態值大於等於 256(手把已連上)
While Sensor.ReadRawValue(1, 0) < 256
  Program.Delay(10)
EndWhile
' 連上了:嗶一聲
Speaker.Tone(50, 1000, 100)
Speaker.Wait()
' 一直重複
While "True"
  ' 第 2 行顯示狀態值
  LCD.Text(1, 0, 16, 1, "STATUS " + Sensor.ReadRawValue(1, 0) + "      ")
  ' 如果狀態值小於 256(手把斷線了)
  If Sensor.ReadRawValue(1, 0) < 256 Then
    ' 手把斷線:馬上停車
    Motor.Stop("BC", "True")
    ' 螢幕顯示 PAD LOST
    LCD.Text(1, 0, 0, 1, "PAD LOST      ")
  Else
    ' 螢幕顯示 PAD OK
    LCD.Text(1, 0, 0, 1, "PAD OK      ")
    ' 如果狀態值=257(已連上+方向鍵上)
    If Sensor.ReadRawValue(1, 0) = 257 Then
      ' 已連上+方向鍵上(256+1):前進
      Motor.StartPower("B", 40)
      Motor.StartPower("C", 40)
    ' 否則,如果狀態值=260(已連上+方向鍵下)
    ElseIf Sensor.ReadRawValue(1, 0) = 260 Then
      ' 已連上+方向鍵下(256+4):後退
      Motor.StartPower("B", -40)
      Motor.StartPower("C", -40)
    Else
      ' 連上但沒按:停車
      Motor.Stop("BC", "True")
    EndIf
  EndIf
EndWhile
Step by step:
- Clear the screen
- Show WAIT PAD: waiting for the gamepad
- Wait until the status value is 256 or more (gamepad connected)
- Connected: beep
- Repeat forever
- Row 2 shows the status value
- If the status value is less than 256 (gamepad disconnected)
- Gamepad lost: stop at once
- Show PAD LOST
- Otherwise:
- Show PAD OK
- If the status value = 257 (connected + D-pad up)
- Connected + D-pad up (256 + 1): forward
- Otherwise:
- Otherwise, if the status value = 260 (connected + D-pad down)
- Connected + D-pad down (256 + 4): backward
- Otherwise:
- Connected but nothing pressed: stop
- Otherwise, if the status value = 260 (connected + D-pad down)
What you should see: The program first shows WAIT PAD with a value below 256; turn the gamepad on and the EV3 beeps, shows PAD OK and the value becomes 256. Hold D-pad up to drive forward (257), down to reverse (260); switch the gamepad off and the robot stops at once and shows PAD LOST.
FAQ:
- Pressing up does not give 257? A shape button pressed at the same time adds more (shape × 16), for example up + ✕ = 256 + 1 + 64 = 321. Release the other buttons first.
- The buttons do nothing? Run example 1 first to see if the numbers change. If not, the gamepad is not connected: power-cycle the gamepad, or turn the EV3 on before plugging in the receiver.
- The number stays at 0 or never changes? This mode needs sensor firmware v4.0 (2026-10) or later; update older firmware first.
- Why is there no EV3-G / Classroom version? This example uses a new mode (firmware v4, 2026-10). The EV3-G and Classroom infrared blocks cannot read it; only Pybricks, EV3 MicroPython and clev3r can.
Still stuck? Leave a message on Contact us with the software you use and a screenshot of your program, and we will help.