
mBlock beginner examples: SharpShot Vision
Back to the SharpShot Vision product page
This page is for people who have never written a program: read the SharpShot Vision on an mBot with mBlock 5 blocks. The 6 examples start with "turn the number into a sound" and work up to a robot that drives itself. Every example has a block picture, a downloadable project file and an Arduino sketch that does the same thing.
| Software | Who it suits | How to open the example file |
|---|---|---|
| 🟧 mBlock 5 desktop (blocks, Upload mode) + MBC Pro Sensors extension v2.2.0 | Schools, first time with an mBot | Download the .mblock → open mBlock 5 → "File → Open from your computer" → switch to "Upload" at the bottom right → "Upload" |
| 🔧 Arduino IDE (text code) | People who want to see what is behind the blocks, or write their own code | Download the .ino → install the Makeblock and MBC_Sensors libraries (see SharpShot Vision mBlock guide) → board Arduino Uno → upload |
Warning
v1 not yet hardware-verified: the value layout is final and passes desktop tests; real-world numbers (fps, line thresholds) may change after hardware testing; the mBlock edition has not been tried on an mBot yet.
Important
- Flash the mBlock edition of the SharpShot Vision firmware and connect through the mBot socket board to an RJ25 port; use MBC Pro Sensors v2.2.0 (the new extension is in development; before it is officially listed you can download the import file to try it, not yet hardware-verified; see the mBlock guide).
- The board is the mBot (mCore). mBot Ranger, Orion and MegaPi work too: swap "when mBot starts up" for that board's hat block and use a port that board allows (see the mBlock guide); the mBot2 (CyberPi) has no RJ25 port and is not supported.
- mBlock 5 is shown here with its English block text; your copy may show the same blocks in another language.
Before you start
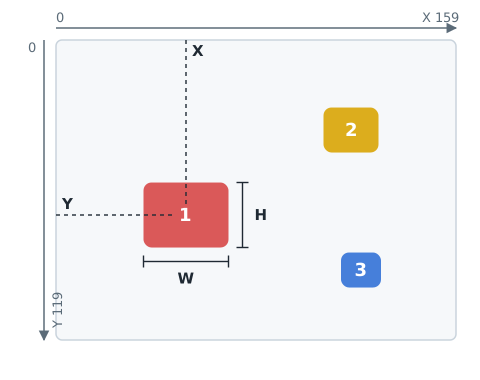
Sensor → mBot socket board → RJ25 port on the board (UART 38400; camera RX = IO3, TX = IO1, crossed to the host). Picture coordinates: X 0-159 left → right, Y 0-119 top → bottom, 0 = no target.
- Install the extension: load MBC Pro Sensors v2.2.0 as described in the SharpShot Vision mBlock guide; add mBot under "Devices" (bottom left) and switch to "Upload" (bottom right).
- Wiring: SharpShot Vision → mBot socket board → mBot port 1 (every example on this page uses this port; to use another, change the port number on the blocks).
- Let it boot first: every example starts with "wait 2 seconds" so the camera can boot; reading too early gives -32768 (nothing received yet).
- The program switches the camera mode itself: the second block of every example is "set mode" (e.g. colour tracking 3 standard), stored in the camera. Reporter blocks first ask the camera which mode it is in, then pick the value to read; in the wrong mode they return -32768.
- Teach the colour on the camera first (for colour tracking and object detection; programs cannot do it): on the live screen use left/right to stop on "target 1" → OK → move the cross onto the brick with left/right (X first, then Y, OK after each) → OK to take the colour (holding OK for 0.8 s finishes at once). Examples 2-4 follow target 1; for example 6 teach target 1 as red (object detection only uses target colours 1-8).
Blocks used on this page
Each reporter first reads the camera "mode number" (value 0x01), then the value id for that mode (the same value table as the Arduino I2C edition); the full block list and value ids are in the SharpShot Vision mBlock guide.
| Block | Returns | Meaning |
|---|---|---|
| SharpShot Vision port [1] sample point [1~16] hue | 0~255 | hue code: 0 |
| SharpShot Vision port [1] set mode [colour tracking 1 max colours / colour tracking 2 multi / colour tracking 3 standard / colour tracking 4 fine / colour pick 1 hue / colour pick 2 hue + saturation / colour pick 3 hue + sat + brightness / colour order / line follow 1 black line / line follow 2 white line / line follow 3 colour line / object detection 1 object list / object detection 2 object details] | — | switches camera mode and sub-option (E0 [mode, sub], stored in the camera); waits 50 ms afterwards |
| SharpShot Vision port [1] colour [1~16] found? | true / false | X of colour n is above 0 |
| SharpShot Vision port [1] colour [1~16] x | 0~159 | blob centre X in pixels (left → right); 0 = not found |
| SharpShot Vision port [1] colour [1~16] area % | 0~100 | blob share of the picture in % (found but under 1% = 1); 3, 4 |
| SharpShot Vision port [1] line [near offset / middle offset / far offset / line angle / near line width % / line flags / junction type / junction distance % / near line left edge / near line right edge / far line width % / marker colour / marker count / last lost side] | one of the 14 line values (values 1 |
|
| SharpShot Vision port [1] line seen? | true / false | line flags (near 1 + middle 2 + far 4) is not 0 |
| SharpShot Vision port [1] [colour 1 / colour 2 / colour 3 / colour 4 / colour 5 / colour 6 / colour 7 / colour 8 / any colour] [circle / ellipse / triangle / square / rectangle / pentagon / hexagon / star / trapezoid / other / any shape] object number | 0~8 | number of the first (largest) matching object, to plug into "object (n) x"; 0 = none |
| SharpShot Vision port [1] object [1~8] x | 0~159 | centroid X in pixels (left → right); 0 = no such object |
| SharpShot Vision port [1] [colour 1 / colour 2 / colour 3 / colour 4 / colour 5 / colour 6 / colour 7 / colour 8 / any colour] [circle / ellipse / triangle / square / rectangle / pentagon / hexagon / star / trapezoid / other / any shape] object seen? | true / false | whether an object with this colour and shape is in view ("any colour" / "any shape" allowed) |
Examples on this page
- Hear the colour
- Green when the colour is found
- One wheel turns toward the blob
- Follow, stop when close, with lights
- Follow a black line
- Chase the red triangle
Note
The
.mblockfiles are generated in the mBlock 5 save format and have not yet been opened in mBlock 5 for verification (extension v2.2.0 is still in development; to be verified before it is listed). If one will not open or shows blank blocks, check that extension v2.2.0 is loaded and the device is mBot, or rebuild it from the block picture below (under 5 minutes); you can also tell us on LINE.
Example 1: Hear the colour
What this example does: The mBot has no screen, so this example turns the hue code seen at "sample point 1" (0 to 255: red 0, yellow 40, green 80, blue 160; white/grey/black are 241 and up) into a buzzer pitch. Learn to "switch the mode and read the number" first.
What you need
- mBot (mCore board) + mBlock 5 desktop
- SharpShot Vision (Makeblock edition) + mBot socket board
- A brightly coloured brick (red, green or blue)
Wiring: SharpShot Vision → mBot socket board → mBot port 1. Camera facing forward on the front. No colour teaching needed; sample point 1 is the cross marked "1" on the camera screen.
Download
| mBlock 5 project | Equivalent Arduino sketch |
|---|---|
| ex01_hear_hue.mblock | ex01_hear_hue.ino |
mBlock blocks (just rebuild them like this)
when mBot starts up :: events hat
wait (2) seconds
SharpShot Vision port [1 v] set mode [colour pick 1 hue v] :: #E8590C
forever
  play tone ((200) + ((SharpShot Vision port [1 v] sample point [1 v] hue :: #E8590C) * (2))) Hz for (0.1) seconds :: sound
end
🔧 Equivalent Arduino sketch (mBot)
// SharpShot Vision × mBlock 5  Example 1: Hear the colour  (equivalent Arduino sketch for mBot)
// Wiring: SharpShot Vision → mBot socket board → mBot port 1. Camera facing forward on the front. No colour teaching needed; sample point 1 is the cross marked "1" on the camera screen.
// Does exactly what the mBlock block example does, for people who want to see "what is behind the blocks" or use the Arduino IDE.
// Libraries needed:
//   1. Makeblock (Arduino IDE Library Manager, search "Makeblock", or the copy inside the mBlock 5 install folder)
//   2. MBC_Sensors v2: the four files in src/ of the extension .mext (MBC_Sensors.h/.cpp, mbc_proto.h, mbc_ids.h),
//      put them in Documents/Arduino/libraries/MBC_Sensors/ and #include <MBC_Sensors.h> (https://mbc-pro-sensors.github.io/en/makeblock.html)
// Board: Arduino Uno (the mBot mCore is an Uno). After uploading, unplug USB and run on battery.

#include <MeMCore.h>            // mBot (mCore): motors, LED, buzzer
#include <SoftwareSerial.h>
#include <MBC_Sensors.h>        // MBC sensors v2 (the same library the mBlock extension uses)

MBCPort mbc_port1(1);           // sensor on mBot port 1
MeDCMotor motorL(9);           // left wheel (M1)
MeDCMotor motorR(10);          // right wheel (M2)
MeRGBLed rgbled(7, 2);         // on-board RGB LED (2 pixels)
MeBuzzer buzzer;               // on-board buzzer

// left / right wheel power -100~100 (positive = forward): the mBot left wheel is mounted mirrored, so M1 gets the negative value; % becomes PWM 0~255
void wheels(int l, int r) {
  l = constrain(l, -100, 100); r = constrain(r, -100, 100);
  motorL.run(-l * 255 / 100);
  motorR.run(r * 255 / 100);
}

void setup() {   // everything runs inside setup(), just like the program mBlock generates
  mbc_port1.begin();
  delay(2000);   // Wait 2 s for the camera to boot
  ucSetMode(mbc_port1, 21);   // Switch the camera to "colour pick 1 hue"
  while (1) {   // Repeat forever
    buzzer.tone((200 + (ucSpot(mbc_port1, 1, 0) * 2)), 100);   // Pitch = 200 + sample point 1 hue × 2 Hz, for 0.1 s
  }
}

void loop() {}   // nothing here: the blocks above never return
Step by step
- Wait 2 s for the camera to boot
- Switch the camera to "colour pick 1 hue"
- Repeat forever
- Pitch = 200 + sample point 1 hue × 2 Hz, for 0.1 s
What you should see: Red brick on cross 1: a low ≈200 Hz; green ≈360 Hz; blue ≈520 Hz; white paper or black gives the highest notes (680 Hz and up).
FAQ
- No sound? → The buzzer is on the board and is not loud; listen closely, or change 0.1 s to 0.3 s.
- The colour changes but the note does not? → The brick is not on sample point 1 (the cross marked "1" on the camera screen); move it onto the cross.
- Nothing happens, or the value stays at -32768? → Wrong port (every example on this page uses port 1), socket board not seated, the camera is not running the mBlock firmware, or the mode is wrong (reporters only have values in their own mode). Check the link with "SharpShot Vision sensor OK?", then the mode with "mode number" (colour tracking 3 = 13, black line = 41, object list = 51).
- Upload fails, or the blocks are blank? → Make sure the switch at the bottom right is in "Upload" mode, extension v2 has been dropped into mBlock, and the USB cable goes to the mBot board.
Example 2: Green when the colour is found
What this example does: With the "colour 1 found?" boolean and "if… then… else…": target 1 in view → green LED, not in view → red. The first decision of every blob-tracking program.
What you need
- mBot (mCore board) + mBlock 5 desktop
- SharpShot Vision (Makeblock edition) + mBot socket board
- A brightly coloured brick (red, green or blue)
Wiring: SharpShot Vision → mBot socket board → mBot port 1. Camera facing forward on the front. First teach target 1 on the camera (see "Before you start").
Download
| mBlock 5 project | Equivalent Arduino sketch |
|---|---|
| ex02_found_led.mblock | ex02_found_led.ino |
mBlock blocks (just rebuild them like this)
when mBot starts up :: events hat
wait (2) seconds
SharpShot Vision port [1 v] set mode [colour tracking 3 standard v] :: #E8590C
forever
  if <SharpShot Vision port [1 v] colour [1 v] found? :: #E8590C> then
    LED [all v] colour red (0) green (255) blue (0) :: looks
  else
    LED [all v] colour red (255) green (0) blue (0) :: looks
  end
end
🔧 Equivalent Arduino sketch (mBot)
// SharpShot Vision × mBlock 5  Example 2: Green when the colour is found  (equivalent Arduino sketch for mBot)
// Wiring: SharpShot Vision → mBot socket board → mBot port 1. Camera facing forward on the front. First teach target 1 on the camera (see "Before you start").
// Does exactly what the mBlock block example does, for people who want to see "what is behind the blocks" or use the Arduino IDE.
// Libraries needed:
//   1. Makeblock (Arduino IDE Library Manager, search "Makeblock", or the copy inside the mBlock 5 install folder)
//   2. MBC_Sensors v2: the four files in src/ of the extension .mext (MBC_Sensors.h/.cpp, mbc_proto.h, mbc_ids.h),
//      put them in Documents/Arduino/libraries/MBC_Sensors/ and #include <MBC_Sensors.h> (https://mbc-pro-sensors.github.io/en/makeblock.html)
// Board: Arduino Uno (the mBot mCore is an Uno). After uploading, unplug USB and run on battery.

#include <MeMCore.h>            // mBot (mCore): motors, LED, buzzer
#include <SoftwareSerial.h>
#include <MBC_Sensors.h>        // MBC sensors v2 (the same library the mBlock extension uses)

MBCPort mbc_port1(1);           // sensor on mBot port 1
MeDCMotor motorL(9);           // left wheel (M1)
MeDCMotor motorR(10);          // right wheel (M2)
MeRGBLed rgbled(7, 2);         // on-board RGB LED (2 pixels)
MeBuzzer buzzer;               // on-board buzzer

// left / right wheel power -100~100 (positive = forward): the mBot left wheel is mounted mirrored, so M1 gets the negative value; % becomes PWM 0~255
void wheels(int l, int r) {
  l = constrain(l, -100, 100); r = constrain(r, -100, 100);
  motorL.run(-l * 255 / 100);
  motorR.run(r * 255 / 100);
}

void setup() {   // everything runs inside setup(), just like the program mBlock generates
  mbc_port1.begin();
  delay(2000);   // Wait 2 s for the camera to boot
  ucSetMode(mbc_port1, 13);   // Switch the camera to "colour tracking 3 standard" (X, Y, area, count per colour)
  while (1) {   // Repeat forever
    if (ucFound(mbc_port1, 1)) {   // If colour 1 is found
      rgbled.setColor(0, 0, 255, 0); rgbled.show();   // Found: green
    } else {
      rgbled.setColor(0, 255, 0, 0); rgbled.show();   // Not found: red
    }
  }
}

void loop() {}   // nothing here: the blocks above never return
Step by step
- Wait 2 s for the camera to boot
- Switch the camera to "colour tracking 3 standard" (X, Y, area, count per colour)
- Repeat forever
- If colour 1 is found
- Found: green
- otherwise:
- Not found: red
- If colour 1 is found
What you should see: Hold the brick in front of the camera: green (the camera screen also boxes the brick); take it away: red.
FAQ
- Always "not found"? → Target 1 is not taught on the camera yet, or the cross was off the brick when teaching. Check the camera screen: a box around the brick means found; re-teach under very different lighting.
- Nothing happens, or the value stays at -32768? → Wrong port (every example on this page uses port 1), socket board not seated, the camera is not running the mBlock firmware, or the mode is wrong (reporters only have values in their own mode). Check the link with "SharpShot Vision sensor OK?", then the mode with "mode number" (colour tracking 3 = 13, black line = 41, object list = 51).
- Upload fails, or the blocks are blank? → Make sure the switch at the bottom right is in "Upload" mode, extension v2 has been dropped into mBlock, and the USB cable goes to the mBot board.
Example 3: One wheel turns toward the blob
What this example does: "Colour 1 x" is where the blob centre is across the picture (pixel 1 far left, 80 centre, 159 far right; 0 = not found). Left wheel only: power = (x − 80) × 0.5; blob on the right → wheel forward, nose turns right; on the left → reverse, nose turns left; centre → still. Not found → stop.
What you need
- mBot (mCore board) + mBlock 5 desktop
- mBot two-wheel robot (left wheel on M1, right wheel on M2, as shipped)
- SharpShot Vision (Makeblock edition) + mBot socket board
- A brightly coloured brick (red, green or blue)
Wiring: SharpShot Vision → mBot socket board → mBot port 1. Camera facing forward on the front. First teach target 1 on the camera (see "Before you start").
Download
| mBlock 5 project | Equivalent Arduino sketch |
|---|---|
| ex03_one_wheel.mblock | ex03_one_wheel.ino |
mBlock blocks (just rebuild them like this)
when mBot starts up :: events hat
wait (2) seconds
SharpShot Vision port [1 v] set mode [colour tracking 3 standard v] :: #E8590C
forever
  if <SharpShot Vision port [1 v] colour [1 v] found? :: #E8590C> then
    left wheel power (((SharpShot Vision port [1 v] colour [1 v] x :: #E8590C) - (80)) * (0.5)) %, right wheel power (0) % :: motion
  else
    stop moving :: motion
  end
end
🔧 Equivalent Arduino sketch (mBot)
// SharpShot Vision × mBlock 5  Example 3: One wheel turns toward the blob  (equivalent Arduino sketch for mBot)
// Wiring: SharpShot Vision → mBot socket board → mBot port 1. Camera facing forward on the front. First teach target 1 on the camera (see "Before you start").
// Does exactly what the mBlock block example does, for people who want to see "what is behind the blocks" or use the Arduino IDE.
// Libraries needed:
//   1. Makeblock (Arduino IDE Library Manager, search "Makeblock", or the copy inside the mBlock 5 install folder)
//   2. MBC_Sensors v2: the four files in src/ of the extension .mext (MBC_Sensors.h/.cpp, mbc_proto.h, mbc_ids.h),
//      put them in Documents/Arduino/libraries/MBC_Sensors/ and #include <MBC_Sensors.h> (https://mbc-pro-sensors.github.io/en/makeblock.html)
// Board: Arduino Uno (the mBot mCore is an Uno). After uploading, unplug USB and run on battery.

#include <MeMCore.h>            // mBot (mCore): motors, LED, buzzer
#include <SoftwareSerial.h>
#include <MBC_Sensors.h>        // MBC sensors v2 (the same library the mBlock extension uses)

MBCPort mbc_port1(1);           // sensor on mBot port 1
MeDCMotor motorL(9);           // left wheel (M1)
MeDCMotor motorR(10);          // right wheel (M2)
MeRGBLed rgbled(7, 2);         // on-board RGB LED (2 pixels)
MeBuzzer buzzer;               // on-board buzzer

// left / right wheel power -100~100 (positive = forward): the mBot left wheel is mounted mirrored, so M1 gets the negative value; % becomes PWM 0~255
void wheels(int l, int r) {
  l = constrain(l, -100, 100); r = constrain(r, -100, 100);
  motorL.run(-l * 255 / 100);
  motorR.run(r * 255 / 100);
}

void setup() {   // everything runs inside setup(), just like the program mBlock generates
  mbc_port1.begin();
  delay(2000);   // Wait 2 s for the camera to boot
  ucSetMode(mbc_port1, 13);   // Switch the camera to "colour tracking 3 standard" (X, Y, area, count per colour)
  while (1) {   // Repeat forever
    if (ucFound(mbc_port1, 1)) {   // If colour 1 is found
      wheels(((ucBlob(mbc_port1, 1, 0) - 80) * 0.5), 0);   // Left wheel power = (colour 1 x − 80) × 0.5 (−40 to +40), right wheel 0
    } else {
      wheels(0, 0);   // Not found: stop
    }
  }
}

void loop() {}   // nothing here: the blocks above never return
Step by step
- Wait 2 s for the camera to boot
- Switch the camera to "colour tracking 3 standard" (X, Y, area, count per colour)
- Repeat forever
- If colour 1 is found
- Left wheel power = (colour 1 x − 80) × 0.5 (−40 to +40), right wheel 0
- otherwise:
- Not found: stop
- If colour 1 is found
What you should see: Hold the brick at the front right: the left wheel turns forward and the nose swings toward it, stopping when centred; move it left and the wheel reverses.
FAQ
- The robot turns the wrong way and gets worse? → Swap the "+" and "−" (or swap the left and right wheel powers). The mBot ships with the left wheel on M1 and the right on M2; check your own wiring.
- Left and right are mirrored? → Mirroring is on in the camera lens settings; turn it off, or change 0.5 to -0.5.
- Always "not found"? → Target 1 is not taught on the camera yet, or the cross was off the brick when teaching. Check the camera screen: a box around the brick means found; re-teach under very different lighting.
- Nothing happens, or the value stays at -32768? → Wrong port (every example on this page uses port 1), socket board not seated, the camera is not running the mBlock firmware, or the mode is wrong (reporters only have values in their own mode). Check the link with "SharpShot Vision sensor OK?", then the mode with "mode number" (colour tracking 3 = 13, black line = 41, object list = 51).
- Upload fails, or the blocks are blank? → Make sure the switch at the bottom right is in "Upload" mode, extension v2 has been dropped into mBlock, and the USB cable goes to the mBot board.
Example 4: Follow, stop when close, with lights
What this example does: Both wheels follow the blob: turn = (colour 1 x − 80) × 0.4, left wheel 35 + turn, right wheel 35 − turn. Plus "colour 1 area %": not found → stop with red; area over 15 % (the brick is close) → stop with blue and a beep; otherwise follow with green.
What you need
- mBot (mCore board) + mBlock 5 desktop
- mBot two-wheel robot (left wheel on M1, right wheel on M2, as shipped)
- SharpShot Vision (Makeblock edition) + mBot socket board
- A brightly coloured brick (red, green or blue)
Wiring: SharpShot Vision → mBot socket board → mBot port 1. Camera facing forward on the front. First teach target 1 on the camera (see "Before you start").
Download
| mBlock 5 project | Equivalent Arduino sketch |
|---|---|
| ex04_follow_stop.mblock | ex04_follow_stop.ino |
mBlock blocks (just rebuild them like this)
when mBot starts up :: events hat
wait (2) seconds
SharpShot Vision port [1 v] set mode [colour tracking 3 standard v] :: #E8590C
forever
  if <SharpShot Vision port [1 v] colour [1 v] found? :: #E8590C> then
    if <(SharpShot Vision port [1 v] colour [1 v] area % :: #E8590C) > (15)> then
      stop moving :: motion
      LED [all v] colour red (0) green (0) blue (255) :: looks
      play tone (880) Hz for (0.3) seconds :: sound
    else
      LED [all v] colour red (0) green (255) blue (0) :: looks
      set [turn v] to (((SharpShot Vision port [1 v] colour [1 v] x :: #E8590C) - (80)) * (0.4))
      left wheel power ((35) + (turn)) %, right wheel power ((35) - (turn)) % :: motion
    end
  else
    stop moving :: motion
    LED [all v] colour red (255) green (0) blue (0) :: looks
  end
end
🔧 Equivalent Arduino sketch (mBot)
// SharpShot Vision × mBlock 5  Example 4: Follow, stop when close, with lights  (equivalent Arduino sketch for mBot)
// Wiring: SharpShot Vision → mBot socket board → mBot port 1. Camera facing forward on the front. First teach target 1 on the camera (see "Before you start").
// Does exactly what the mBlock block example does, for people who want to see "what is behind the blocks" or use the Arduino IDE.
// Libraries needed:
//   1. Makeblock (Arduino IDE Library Manager, search "Makeblock", or the copy inside the mBlock 5 install folder)
//   2. MBC_Sensors v2: the four files in src/ of the extension .mext (MBC_Sensors.h/.cpp, mbc_proto.h, mbc_ids.h),
//      put them in Documents/Arduino/libraries/MBC_Sensors/ and #include <MBC_Sensors.h> (https://mbc-pro-sensors.github.io/en/makeblock.html)
// Board: Arduino Uno (the mBot mCore is an Uno). After uploading, unplug USB and run on battery.

#include <MeMCore.h>            // mBot (mCore): motors, LED, buzzer
#include <SoftwareSerial.h>
#include <MBC_Sensors.h>        // MBC sensors v2 (the same library the mBlock extension uses)

MBCPort mbc_port1(1);           // sensor on mBot port 1
MeDCMotor motorL(9);           // left wheel (M1)
MeDCMotor motorR(10);          // right wheel (M2)
MeRGBLed rgbled(7, 2);         // on-board RGB LED (2 pixels)
MeBuzzer buzzer;               // on-board buzzer
float turn = 0;               // variable:turn

// left / right wheel power -100~100 (positive = forward): the mBot left wheel is mounted mirrored, so M1 gets the negative value; % becomes PWM 0~255
void wheels(int l, int r) {
  l = constrain(l, -100, 100); r = constrain(r, -100, 100);
  motorL.run(-l * 255 / 100);
  motorR.run(r * 255 / 100);
}

void setup() {   // everything runs inside setup(), just like the program mBlock generates
  mbc_port1.begin();
  delay(2000);   // Wait 2 s for the camera to boot
  ucSetMode(mbc_port1, 13);   // Switch the camera to "colour tracking 3 standard" (X, Y, area, count per colour)
  while (1) {   // Repeat forever
    if (ucFound(mbc_port1, 1)) {   // If colour 1 is found
      if ((ucBlob(mbc_port1, 1, 5) > 15)) {   // If colour 1 area is over 15 %
        wheels(0, 0);   // Blob is large (close): stop
        rgbled.setColor(0, 0, 0, 255); rgbled.show();   // Blue LED
        buzzer.tone(880, 300);   // Beep
      } else {
        rgbled.setColor(0, 0, 255, 0); rgbled.show();   // Green LED
        turn = ((ucBlob(mbc_port1, 1, 0) - 80) * 0.4);   // turn = (colour 1 x − 80) × 0.4 (−32 to +32)
        wheels((35 + turn), (35 - turn));   // Left = 35 + turn, right = 35 − turn: blob on the right (positive) → left wheel fast, turn right
      }
    } else {
      wheels(0, 0);   // Not found: stop
      rgbled.setColor(0, 255, 0, 0); rgbled.show();   // Red LED
    }
  }
}

void loop() {}   // nothing here: the blocks above never return
Step by step
- Wait 2 s for the camera to boot
- Switch the camera to "colour tracking 3 standard" (X, Y, area, count per colour)
- Repeat forever
- If colour 1 is found
- If colour 1 area is over 15 %
- Blob is large (close): stop
- Blue LED
- Beep
- otherwise:
- Green LED
- turn = (colour 1 x − 80) × 0.4 (−32 to +32)
- Left = 35 + turn, right = 35 − turn: blob on the right (positive) → left wheel fast, turn right
- otherwise:
- Not found: stop
- Red LED
- If colour 1 area is over 15 %
- If colour 1 is found
What you should see: Brick 1 m ahead: the robot drives to it with a green LED, turns blue and beeps as it stops in front; remove the brick and it goes red.
FAQ
- It stops too early, or only after bumping the brick? → Area depends on the brick size: put the brick where you want to stop, read the area on the camera (or with the "colour 1 area %" block), then change 15.
- The robot turns the wrong way and gets worse? → Swap the "+" and "−" (or swap the left and right wheel powers). The mBot ships with the left wheel on M1 and the right on M2; check your own wiring.
- Always "not found"? → Target 1 is not taught on the camera yet, or the cross was off the brick when teaching. Check the camera screen: a box around the brick means found; re-teach under very different lighting.
- Nothing happens, or the value stays at -32768? → Wrong port (every example on this page uses port 1), socket board not seated, the camera is not running the mBlock firmware, or the mode is wrong (reporters only have values in their own mode). Check the link with "SharpShot Vision sensor OK?", then the mode with "mode number" (colour tracking 3 = 13, black line = 41, object list = 51).
- Upload fails, or the blocks are blank? → Make sure the switch at the bottom right is in "Upload" mode, extension v2 has been dropped into mBlock, and the USB cable goes to the mBot board.
Example 5: Follow a black line
What this example does: Switch the camera to "line follow 1 black line" and read "near offset" (−100 to 100: line on the left = negative, right = positive, centred = 0). turn = near offset × 0.3, left wheel 30 + turn, right wheel 30 − turn; no line in view → stop with red.
What you need
- mBot (mCore board) + mBlock 5 desktop
- mBot two-wheel robot (left wheel on M1, right wheel on M2, as shipped)
- SharpShot Vision (Makeblock edition) + mBot socket board
- A black tape line (2-3 cm wide) on a white floor
Wiring: SharpShot Vision → mBot socket board → mBot port 1. Camera on the front, tilted down to see the floor 10-30 cm ahead.
Download
| mBlock 5 project | Equivalent Arduino sketch |
|---|---|
| ex05_line_follow.mblock | ex05_line_follow.ino |
mBlock blocks (just rebuild them like this)
when mBot starts up :: events hat
wait (2) seconds
SharpShot Vision port [1 v] set mode [line follow 1 black line v] :: #E8590C
forever
  if <SharpShot Vision port [1 v] line seen? :: #E8590C> then
    LED [all v] colour red (0) green (255) blue (0) :: looks
    set [turn v] to ((SharpShot Vision port [1 v] line [near offset v] :: #E8590C) * (0.3))
    left wheel power ((30) + (turn)) %, right wheel power ((30) - (turn)) % :: motion
  else
    stop moving :: motion
    LED [all v] colour red (255) green (0) blue (0) :: looks
  end
end
🔧 Equivalent Arduino sketch (mBot)
// SharpShot Vision × mBlock 5  Example 5: Follow a black line  (equivalent Arduino sketch for mBot)
// Wiring: SharpShot Vision → mBot socket board → mBot port 1. Camera on the front, tilted down to see the floor 10-30 cm ahead.
// Does exactly what the mBlock block example does, for people who want to see "what is behind the blocks" or use the Arduino IDE.
// Libraries needed:
//   1. Makeblock (Arduino IDE Library Manager, search "Makeblock", or the copy inside the mBlock 5 install folder)
//   2. MBC_Sensors v2: the four files in src/ of the extension .mext (MBC_Sensors.h/.cpp, mbc_proto.h, mbc_ids.h),
//      put them in Documents/Arduino/libraries/MBC_Sensors/ and #include <MBC_Sensors.h> (https://mbc-pro-sensors.github.io/en/makeblock.html)
// Board: Arduino Uno (the mBot mCore is an Uno). After uploading, unplug USB and run on battery.

#include <MeMCore.h>            // mBot (mCore): motors, LED, buzzer
#include <SoftwareSerial.h>
#include <MBC_Sensors.h>        // MBC sensors v2 (the same library the mBlock extension uses)

MBCPort mbc_port1(1);           // sensor on mBot port 1
MeDCMotor motorL(9);           // left wheel (M1)
MeDCMotor motorR(10);          // right wheel (M2)
MeRGBLed rgbled(7, 2);         // on-board RGB LED (2 pixels)
MeBuzzer buzzer;               // on-board buzzer
float turn = 0;               // variable:turn

// left / right wheel power -100~100 (positive = forward): the mBot left wheel is mounted mirrored, so M1 gets the negative value; % becomes PWM 0~255
void wheels(int l, int r) {
  l = constrain(l, -100, 100); r = constrain(r, -100, 100);
  motorL.run(-l * 255 / 100);
  motorR.run(r * 255 / 100);
}

void setup() {   // everything runs inside setup(), just like the program mBlock generates
  mbc_port1.begin();
  delay(2000);   // Wait 2 s for the camera to boot
  ucSetMode(mbc_port1, 41);   // Switch the camera to "line follow 1 black line"
  while (1) {   // Repeat forever
    if (ucLineSeen(mbc_port1)) {   // If a line is seen
      rgbled.setColor(0, 0, 255, 0); rgbled.show();   // Line seen: green
      turn = (ucLine(mbc_port1, 0) * 0.3);   // turn = near offset × 0.3 (−30 to +30)
      wheels((30 + turn), (30 - turn));   // Left = 30 + turn, right = 30 − turn: line on the right (positive) → turn right
    } else {
      wheels(0, 0);   // No line: stop
      rgbled.setColor(0, 255, 0, 0); rgbled.show();   // Red LED
    }
  }
}

void loop() {}   // nothing here: the blocks above never return
Step by step
- Wait 2 s for the camera to boot
- Switch the camera to "line follow 1 black line"
- Repeat forever
- If a line is seen
- Line seen: green
- turn = near offset × 0.3 (−30 to +30)
- Left = 30 + turn, right = 30 − turn: line on the right (positive) → turn right
- otherwise:
- No line: stop
- Red LED
- If a line is seen
What you should see: Put the robot on the black line: green LED and it drives along the line, following the bends; lift it off or reach the end of the line and it stops with red.
FAQ
- The robot snakes left and right? → Lower 0.3 (e.g. 0.2), or lower 30 so it drives slower.
- Always red, no line? → The camera cannot see the floor (too level or too high) or it is too dark; check that the camera screen draws the line it found. For a white line choose "line follow 2 white line".
- The robot turns the wrong way and gets worse? → Swap the "+" and "−" (or swap the left and right wheel powers). The mBot ships with the left wheel on M1 and the right on M2; check your own wiring.
- Nothing happens, or the value stays at -32768? → Wrong port (every example on this page uses port 1), socket board not seated, the camera is not running the mBlock firmware, or the mode is wrong (reporters only have values in their own mode). Check the link with "SharpShot Vision sensor OK?", then the mode with "mode number" (colour tracking 3 = 13, black line = 41, object list = 51).
- Upload fails, or the blocks are blank? → Make sure the switch at the bottom right is in "Upload" mode, extension v2 has been dropped into mBlock, and the USB cable goes to the mBot board.
Example 6: Chase the red triangle
What this example does: Switch the camera to "object detection 1 object list"; the camera sorts every blob into a shape (circle, triangle, square…). "[colour 1] [triangle] object seen?" tells whether a red triangle is in view; if so, "object number" finds which object it is, "object (which) x" steers toward it, with a green LED while driving; a red circle only, or nothing at all, → stop with red.
What you need
- mBot (mCore board) + mBlock 5 desktop
- mBot two-wheel robot (left wheel on M1, right wheel on M2, as shipped)
- SharpShot Vision (Makeblock edition) + mBot socket board
- A brightly coloured brick (red, green or blue)
- A triangle cut from red card (6-10 cm sides), plus a red circle of the same size to compare
Wiring: SharpShot Vision → mBot socket board → mBot port 1. Camera facing forward on the front. First teach target 1 as red on the camera (cross on the red triangle; see "Before you start").
Download
| mBlock 5 project | Equivalent Arduino sketch |
|---|---|
| ex06_red_triangle.mblock | ex06_red_triangle.ino |
mBlock blocks (just rebuild them like this)
when mBot starts up :: events hat
wait (2) seconds
SharpShot Vision port [1 v] set mode [object detection 1 object list v] :: #E8590C
forever
  if <SharpShot Vision port [1 v] [colour 1 v] [triangle v] object seen? :: #E8590C> then
    LED [all v] colour red (0) green (255) blue (0) :: looks
    set [which v] to (SharpShot Vision port [1 v] [colour 1 v] [triangle v] object number :: #E8590C)
    set [turn v] to (((SharpShot Vision port [1 v] object (which) x :: #E8590C) - (80)) * (0.4))
    left wheel power ((25) + (turn)) %, right wheel power ((25) - (turn)) % :: motion
  else
    stop moving :: motion
    LED [all v] colour red (255) green (0) blue (0) :: looks
  end
end
🔧 Equivalent Arduino sketch (mBot)
// SharpShot Vision × mBlock 5  Example 6: Chase the red triangle  (equivalent Arduino sketch for mBot)
// Wiring: SharpShot Vision → mBot socket board → mBot port 1. Camera facing forward on the front. First teach target 1 as red on the camera (cross on the red triangle; see "Before you start").
// Does exactly what the mBlock block example does, for people who want to see "what is behind the blocks" or use the Arduino IDE.
// Libraries needed:
//   1. Makeblock (Arduino IDE Library Manager, search "Makeblock", or the copy inside the mBlock 5 install folder)
//   2. MBC_Sensors v2: the four files in src/ of the extension .mext (MBC_Sensors.h/.cpp, mbc_proto.h, mbc_ids.h),
//      put them in Documents/Arduino/libraries/MBC_Sensors/ and #include <MBC_Sensors.h> (https://mbc-pro-sensors.github.io/en/makeblock.html)
// Board: Arduino Uno (the mBot mCore is an Uno). After uploading, unplug USB and run on battery.

#include <MeMCore.h>            // mBot (mCore): motors, LED, buzzer
#include <SoftwareSerial.h>
#include <MBC_Sensors.h>        // MBC sensors v2 (the same library the mBlock extension uses)

MBCPort mbc_port1(1);           // sensor on mBot port 1
MeDCMotor motorL(9);           // left wheel (M1)
MeDCMotor motorR(10);          // right wheel (M2)
MeRGBLed rgbled(7, 2);         // on-board RGB LED (2 pixels)
MeBuzzer buzzer;               // on-board buzzer
float which = 0;              // variable:which
float turn = 0;               // variable:turn

// left / right wheel power -100~100 (positive = forward): the mBot left wheel is mounted mirrored, so M1 gets the negative value; % becomes PWM 0~255
void wheels(int l, int r) {
  l = constrain(l, -100, 100); r = constrain(r, -100, 100);
  motorL.run(-l * 255 / 100);
  motorR.run(r * 255 / 100);
}

void setup() {   // everything runs inside setup(), just like the program mBlock generates
  mbc_port1.begin();
  delay(2000);   // Wait 2 s for the camera to boot
  ucSetMode(mbc_port1, 51);   // Switch the camera to "object detection 1 object list" (colour, shape, X, Y per object)
  while (1) {   // Repeat forever
    if (ucHasObj(mbc_port1, 1, 3)) {   // If a colour 1 triangle object is seen
      rgbled.setColor(0, 0, 255, 0); rgbled.show();   // Seen: green
      which = ucObjFind(mbc_port1, 1, 3);   // which = which object the colour 1 triangle is (object 1 is the largest; 1 to 8)
      turn = ((ucObj(mbc_port1, which, 3) - 80) * 0.4);   // turn = (object "which" x − 80) × 0.4 (−32 to +32)
      wheels((25 + turn), (25 - turn));   // Left = 25 + turn, right = 25 − turn: triangle on the right (positive) → turn right
    } else {
      wheels(0, 0);   // No red triangle: stop
      rgbled.setColor(0, 255, 0, 0); rgbled.show();   // Red LED
    }
  }
}

void loop() {}   // nothing here: the blocks above never return
Step by step
- Wait 2 s for the camera to boot
- Switch the camera to "object detection 1 object list" (colour, shape, X, Y per object)
- Repeat forever
- If a colour 1 triangle object is seen
- Seen: green
- which = which object the colour 1 triangle is (object 1 is the largest; 1 to 8)
- turn = (object "which" x − 80) × 0.4 (−32 to +32)
- Left = 25 + turn, right = 25 − turn: triangle on the right (positive) → turn right
- otherwise:
- No red triangle: stop
- Red LED
- If a colour 1 triangle object is seen
What you should see: Hold the red triangle in front of the robot: green LED, the nose turns toward it and drives slowly; swap in the red circle: red and stop; with both in view the robot follows the triangle.
FAQ
- Red even with the triangle? → The camera judges the shape from the outline: a triangle that is too small, tilted, ragged or partly covered by your hand becomes another shape. Bring it closer and square it up, and check which shape the camera screen labels it; "[colour 1] [any shape] object seen?" confirms the colour was taught right.
- Only colours 1-8? → Yes, object detection only uses target colours 1-8 (colours 9-16 still work for colour tracking, just not as objects).
- The robot turns the wrong way and gets worse? → Swap the "+" and "−" (or swap the left and right wheel powers). The mBot ships with the left wheel on M1 and the right on M2; check your own wiring.
- Always "not found"? → Target 1 is not taught on the camera yet, or the cross was off the brick when teaching. Check the camera screen: a box around the brick means found; re-teach under very different lighting.
- Nothing happens, or the value stays at -32768? → Wrong port (every example on this page uses port 1), socket board not seated, the camera is not running the mBlock firmware, or the mode is wrong (reporters only have values in their own mode). Check the link with "SharpShot Vision sensor OK?", then the mode with "mode number" (colour tracking 3 = 13, black line = 41, object list = 51).
- Upload fails, or the blocks are blank? → Make sure the switch at the bottom right is in "Upload" mode, extension v2 has been dropped into mBlock, and the USB cable goes to the mBot board.
Next steps
- All blocks, value ids and usable ports per board: SharpShot Vision mBlock guide
- The same camera modes on LEGO: SPIKE examples, EV3 examples
- Arduino straight to the sensor (I2C edition, no mBot): Arduino examples