
SPIKE beginner examples: Pathfinder 16-Way (LineSensor16)
Back to the Pathfinder 16-Way product page
Note
The Pybricks programs below are the same files as on the Chinese page, so the comments inside the code are in Chinese. The English explanation under each example tells you what every line does.
This page is written for people who have never written a program before. The 5 examples start with "seeing a number" and build up step by step to "telling which side the junction is on" and "the robot follows the black line on its own and stops at the crossroads". Every example comes in 3 versions; just pick the one you have:
| Version | Who it's for | How to open the example file |
|---|---|---|
| 🟨 The official LEGO SPIKE App (blocks) | Schools, first-time SPIKE users | Download the .llsp3 → open the SPIKE App → top-left "File" → "Open" → pick the file |
| 🟦 The MBC Blocks website (blocks, Chinese interface) | Anyone who wants to use the Chinese-language blocks or needs to read more sensor data | Open the MBC SPIKE Blocks website → top menu "File → Open" (or press Ctrl+O) → pick the downloaded .abp |
| 🐍 Pybricks (Python text code) | Anyone who wants to learn to write code by typing | Open code.pybricks.com → "Import a file" in the file panel on the left → import both the example file and MBC_line16_obj_Lib.py → open the example → press ▶ to run |
Important
- For the MBC Blocks website and Pybricks, the hub must be switched to Pybricks firmware first (on the MBC Blocks website, top menu "SPIKE Hub → Install/Update Pybricks firmware" flashes it, about 3 minutes; you can switch back to the original LEGO firmware with the SPIKE App later). The official LEGO App does not need this.
- The official LEGO App used here is the Education edition (SPIKE 3). The home edition (Robot Inventor) reads the values differently (line width only goes up to 10); see the home edition notes.
Before you start: calibrate (only once)
The Pathfinder has to "get to know" the black and white on your mat first, or the numbers will be off. Calibration is saved inside the sensor and survives a restart.
- Plug in the sensor and turn on the hub (the sensor's light comes on).
- Press and release the calibration button on the sensor once (don't hold it down; holding it makes the sensor keep re-calibrating).
- Once the green calibration light comes on, within 5 seconds sweep the sensor back and forth between the black line and the white floor a few times, so all 16 sensor points see both black and white.
- Green light goes off = calibration done.
How do I know it worked? Run example 2 below: on the white floor the light is red (line width 0), and on the black line it is green.
The 3 values used on this page
| Name | Range | Meaning |
|---|---|---|
| Line position (coarse) | -16 to 16 | 0 = line dead center; negative = line on the left, positive = line on the right |
| Line position (fine) | -100 to 100 | Same as above, just in finer steps, so line following is smoother |
| Line width | 0 to 16 | How many sensor points are on the black line. 0 = no line found; a normal black line covers only a few points; at a junction it gets much wider, and at a crossroads the whole row is on black, so it reaches 11 or more |
Tip
When the line disappears, "line position" stays at the last value it saw; it does not go back to 0. So to check "is there a line?", always look at whether line width is 0.
In the official LEGO App the Pathfinder shows up as a "Color Sensor", so you read it with the Color Sensor blocks:
| Official block | What you get | Conversion |
|---|---|---|
| reflected light | line position (coarse) + 16 | subtract 16 from the reading |
| color | line width | use as is |
| raw red (under "More Sensors") | line position (fine) + 100 | subtract 100 from the reading |
Example 1: See the black line
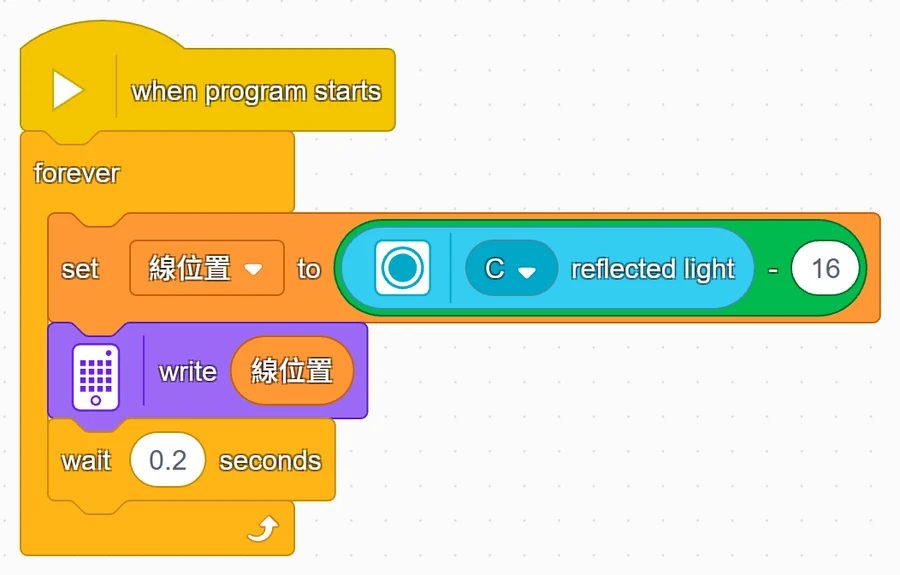
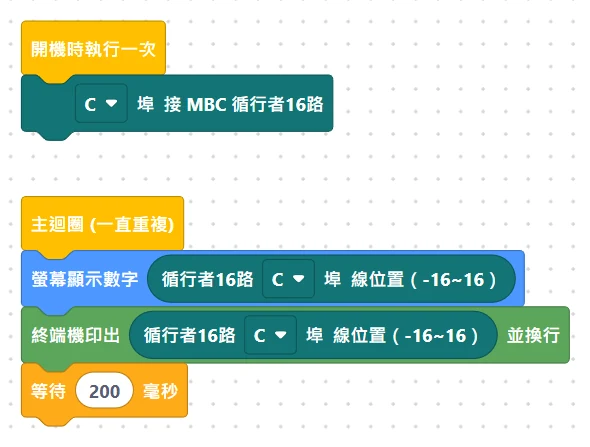
What this example does: the hub display keeps showing the line position (-16 to 16). Slowly move the black line from left to right and the number goes from negative to positive.
What you need
- 1 SPIKE hub
- 1 Pathfinder 16-Way (calibrated)
- A sheet of white paper with a black line drawn on it (or a competition mat)
How to connect: Pathfinder on port C.
Download the program
| Official LEGO App | MBC Blocks website | Pybricks |
|---|---|---|
| ex01_show_position.llsp3 | ex01_show_position.abp | ex01_show_position.py + library |
🟨 Blocks in the official LEGO App
🟦 Blocks on the MBC Blocks website
Pybricks code
# 循行者 16 路 範例 1:看見黑線(顯示線位置)
# 接線:循行者 16 路 → C 埠
from pybricks.hubs import PrimeHub
from pybricks.tools import wait
from MBC_line16_obj_Lib import MBC_LINE16

hub = PrimeHub()
line16 = MBC_LINE16(3)        # 3 = C 埠(1=A、2=B、3=C、4=D、5=E、6=F)

while True:
    pos = line16.pos16()      # 線位置:-16(線在左)~ 0(中間)~ 16(線在右)
    hub.display.number(pos)   # 主機螢幕顯示這個數字
    print(pos)                # 電腦畫面也印出來
    wait(200)                 # 等 0.2 秒再讀下一次
Step by step through the program
- Repeat forever: the blocks inside keep running until you press stop.
- Read the line position: in the official App it is "reflected light minus 16"; the MBC Blocks website and Pybricks have "line position (-16~16)" directly.
- Show it on the display: the official App uses the "write" block, the MBC Blocks website uses "show number on display", and Pybricks uses
hub.display.number(). - Wait 0.2 seconds: lets the number sit still long enough for your eyes to read it.
What you should see
- Line right under the sensor: the display shows around 0 (-2 to 2 all count as center).
- Move the black line to the left: the number goes negative, closer to -16 the farther left you go.
- Move it to the right: it goes positive, closer to 16 the farther right you go.
Common problems
- The number is stuck at 0 and never changes? → Run example 2 first: if the light is still green on white paper, every point thinks it sees black, meaning the sensor is not calibrated yet; go back to "calibrate" above.
- Left and right are swapped? → First make sure the sensor is not mounted upside down (the side with the components must face down, toward the floor). If it is mounted correctly and still reversed, swap the sign of the "turn left" and "turn right" numbers in the later examples.
- The official App shows 16 instead of 0? → You forgot to "subtract 16".
Example 2: Black line alarm
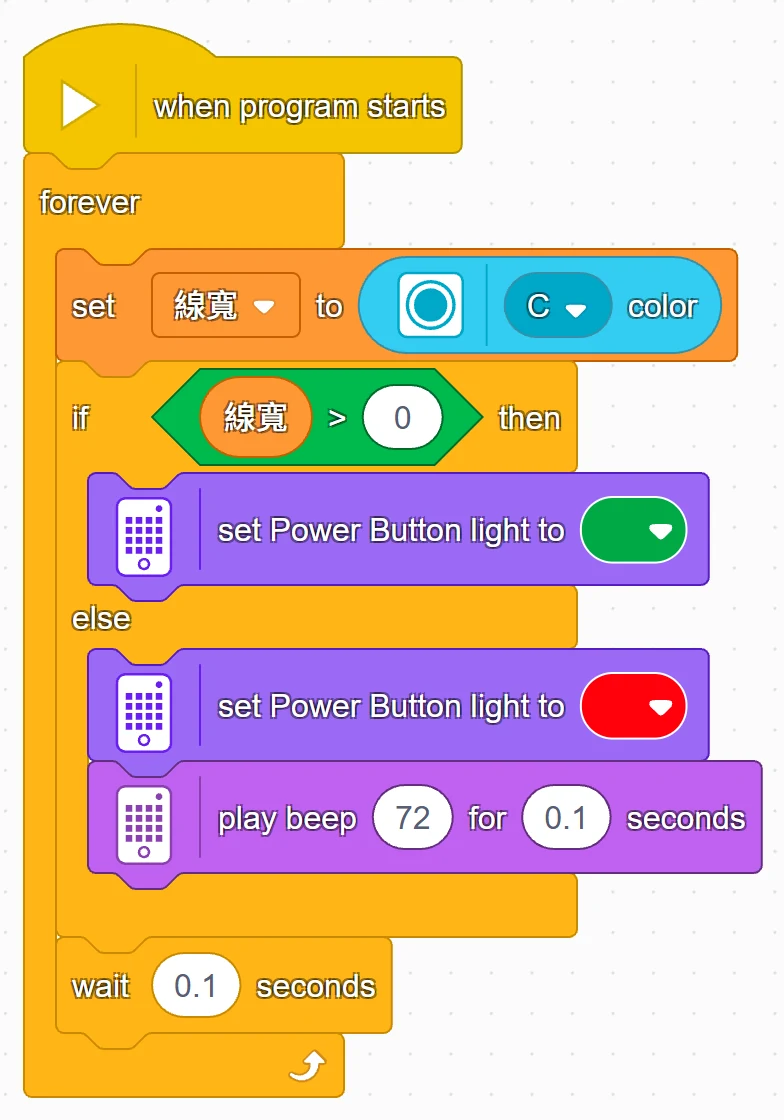
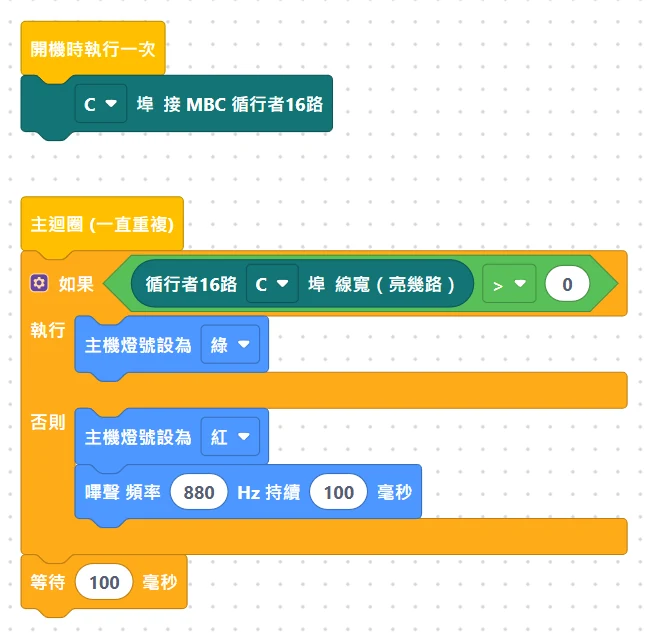
What this example does: when it sees the black line, the hub's center light turns green; when it can't find the line, the light turns red and the hub keeps beeping.
What you need: same as example 1.
How to connect: Pathfinder on port C.
Download the program
| Official LEGO App | MBC Blocks website | Pybricks |
|---|---|---|
| ex02_line_alarm.llsp3 | ex02_line_alarm.abp | ex02_line_alarm.py + library |
🟨 Blocks in the official LEGO App
🟦 Blocks on the MBC Blocks website
Pybricks code
# 循行者 16 路 範例 2:黑線警報(壓到線亮綠燈;找不到線亮紅燈並嗶一聲)
# 接線:循行者 16 路 → C 埠
from pybricks.hubs import PrimeHub
from pybricks.parameters import Color
from pybricks.tools import wait
from MBC_line16_obj_Lib import MBC_LINE16

hub = PrimeHub()
line16 = MBC_LINE16(3)                # 3 = C 埠

while True:
    if line16.width() > 0:            # 線寬 = 有幾路踩在黑線上;大於 0 就是有看到線
        hub.light.on(Color.GREEN)
    else:                             # 線寬 = 0:16 路都沒踩到 → 找不到線
        hub.light.on(Color.RED)
        hub.speaker.beep(880, 100)    # 頻率 880 Hz,響 0.1 秒
    wait(100)
Step by step through the program
- Read the line width: in the official App use the "color" block; what it returns is the line width.
- If line width > 0 then…: any of the 16 sensor points is on the black line → green light.
- Else…: line width is 0, meaning not a single point is on the line → red light and a beep.
- Wait 0.1 seconds, then check again.
What you should see
- Sensor on the black line: green light.
- Move it onto the white floor: red light + nonstop beeping.
Common problems
- Always green, even on white paper? → Not calibrated yet (every point is being read as black).
- How do I pick the light color in the official App? → Click the color dot on the "set Power Button light to" block to change it.
Example 3: Which side is the junction on (16-Way only)
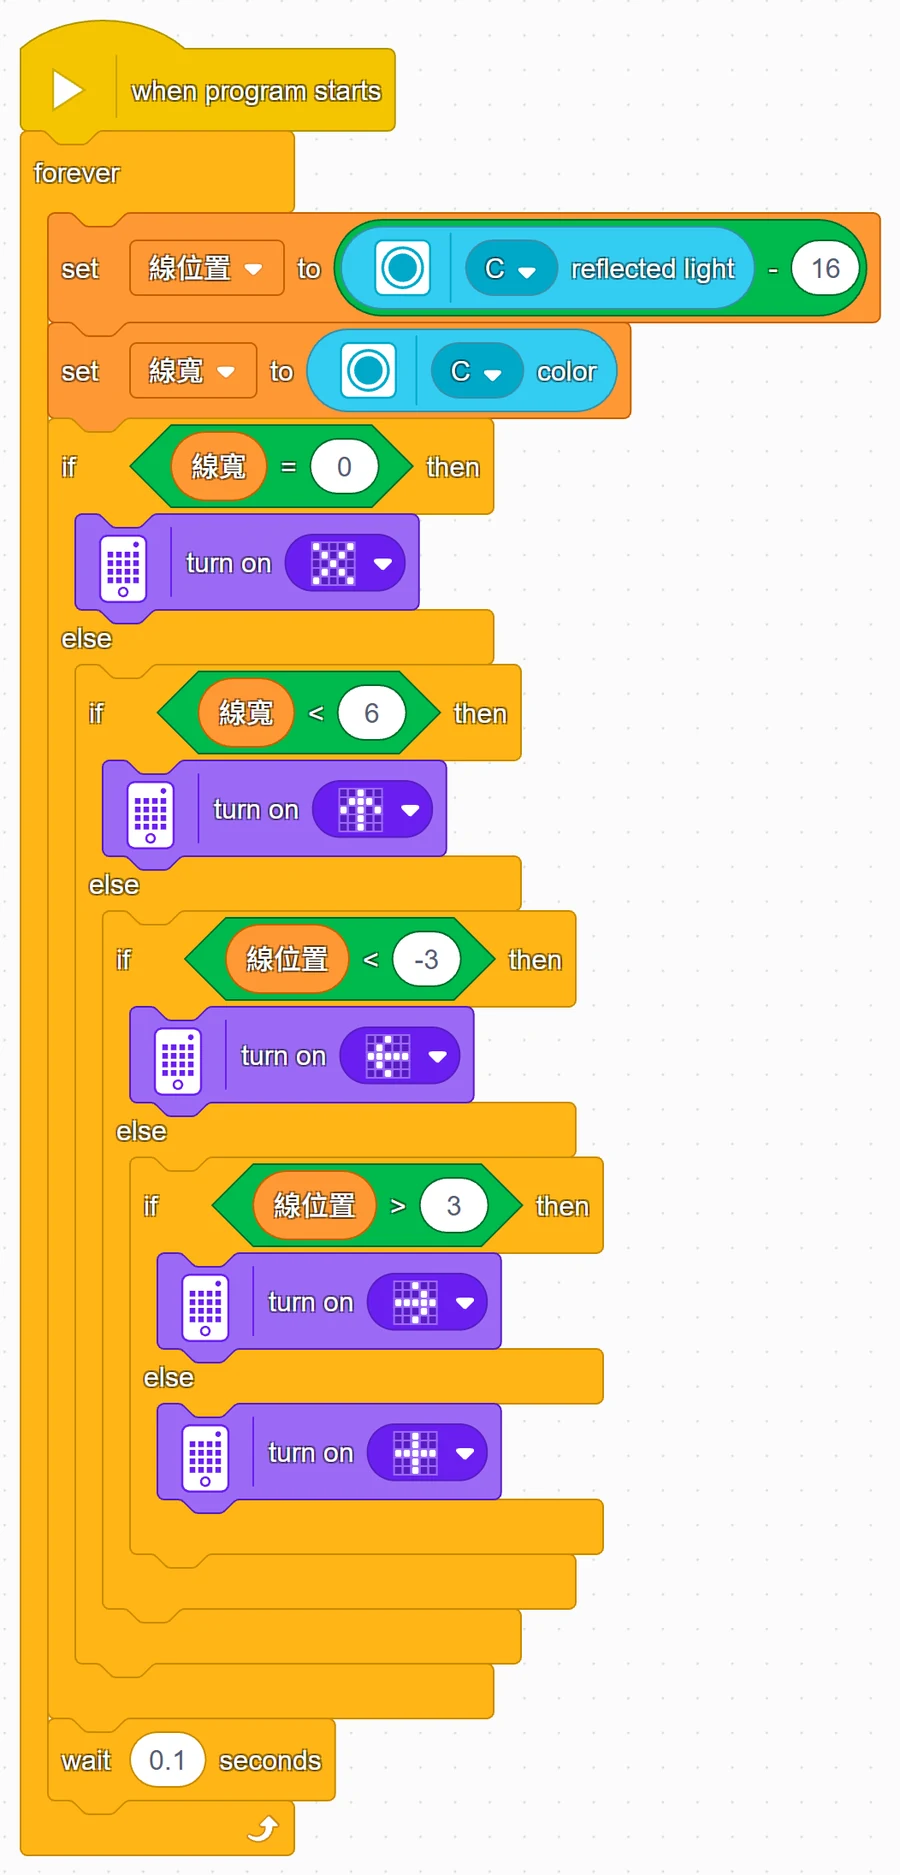
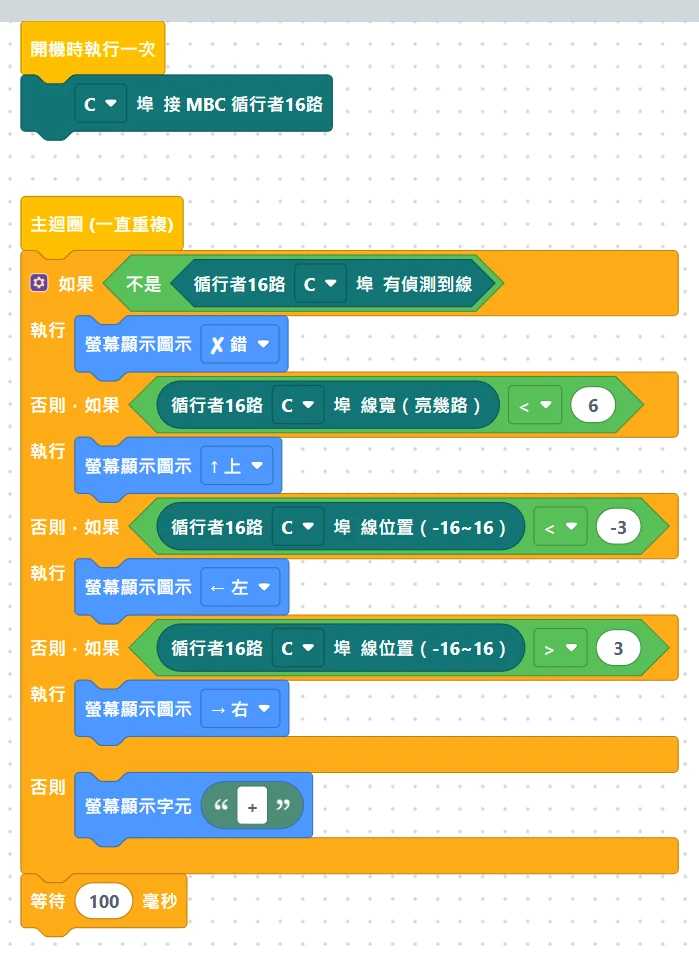
What this example does: the 16-Way's sensor points are spread wide and packed densely, so at a junction it can tell "where the big black patch is". The hub display tells you:
- A normal line → ⬆
- A branch on the left (T-junction going left) → ⬅
- A branch on the right (T-junction going right) → ➡
- A crossroads → +
- No line found → ✕
What you need: same as example 1, plus three kinds of junction drawn with black tape or a marker: a "T going left", a "T going right", and a "crossroads".
How to connect: Pathfinder on port C.
Download the program
| Official LEGO App | MBC Blocks website | Pybricks |
|---|---|---|
| ex03_junction_side.llsp3 | ex03_junction_side.abp | ex03_junction_side.py + library |
🟨 Blocks in the official LEGO App
🟦 Blocks on the MBC Blocks website
Pybricks code
# 循行者 16 路 範例 3:路口在哪一邊(左邊有岔路、右邊有岔路,還是十字路口)
# 接線:循行者 16 路 → C 埠
# 想法:一般的線只有幾路踩到;碰到路口時黑色會變很寬(線寬變大),
#       再看這一大塊黑色偏左、偏右還是在中間,就知道岔路在哪一邊。
from pybricks.hubs import PrimeHub
from pybricks.parameters import Icon
from pybricks.tools import wait
from MBC_line16_obj_Lib import MBC_LINE16

hub = PrimeHub()
line16 = MBC_LINE16(3)                    # 3 = C 埠

while True:
    pos = line16.pos16()                  # 黑色那一塊的中心:負 = 偏左,正 = 偏右
    width = line16.width()                # 有幾路踩到黑色(0 ~ 16)
    if width == 0:                        # 沒看到線(這時位置會停在最後一次的值,不能拿來判斷)
        hub.display.icon(Icon.FALSE)      # 顯示 ✕
    elif width < 6:                       # 窄窄的一條 → 一般的線
        hub.display.icon(Icon.ARROW_UP)
    elif pos < -3:                        # 很寬而且偏左 → 左邊有岔路
        hub.display.icon(Icon.ARROW_LEFT)
    elif pos > 3:                         # 很寬而且偏右 → 右邊有岔路
        hub.display.icon(Icon.ARROW_RIGHT)
    else:                                 # 很寬又在中間 → 十字路口
        hub.display.char('+')
    wait(100)
Step by step through the program
- First read the line position and line width and store them in two "variables" (a variable = a box with a name that can hold one number).
- If line width = 0 → show ✕ (no line found; the line position is not reliable right now, so this check comes first).
- Else, if line width < 6 → just a narrow strip, a normal line → show ⬆.
- Else (line width 6 or more = the black got much wider, so you are at a junction), look at the "line position", which is the center of that black patch:
- line position < -3: the black is off to the left → branch on the left → ⬅
- line position > 3: the black is off to the right → branch on the right → ➡
- Neither: the black is dead center, equally wide on both sides → crossroads → +
What you should see: slowly push the sensor across the three junctions. Passing a T going left flashes ⬅ for a moment, a T going right flashes ➡, a crossroads flashes +, and the rest of the time it shows ⬆.
Common problems
- Always ⬆, junctions are never recognized? → Push it more slowly; or the branch line is too thin, so change "6" to 5.
- Normal curves get treated as junctions? → The line is too wide; change "6" to 7.
- Why is there no "+" symbol in the official App? → The official App uses a hand-drawn 5×5 picture (one horizontal and one vertical bar through the middle); the MBC Blocks website and Pybricks show the "+" character directly.
- How do I change the picture in the official App? → Click the little grid image on the "turn on" block and light up whichever pixels you want.
Example 4: The simplest line following
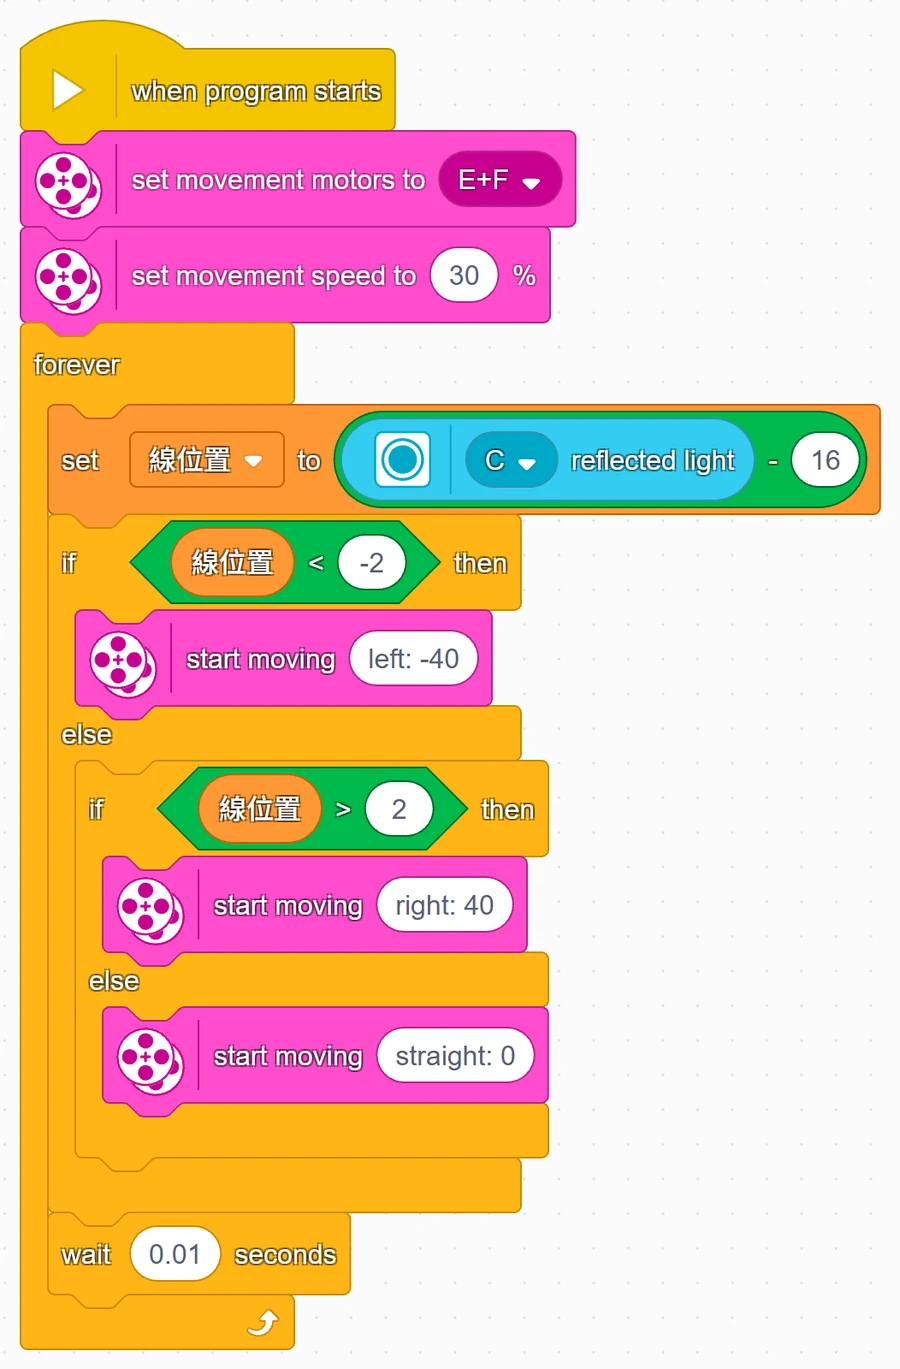
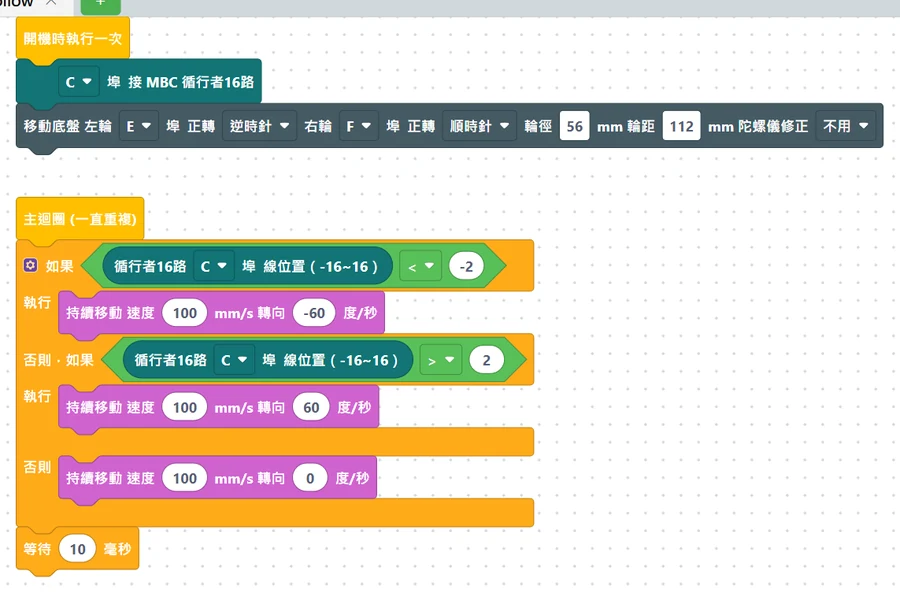
What this example does: the robot follows the black line on its own. Line on the left → turn left; line on the right → turn right; line in the center → go straight.
What you need
- Everything from example 1, plus
- A two-wheel robot car (two motors as wheels)
- A closed loop of black line (about 2 cm wide, no sharp turns)
How to connect
- Pathfinder on port C, mounted at the front of the car, about 0.5 to 1 cm above the floor
- Left wheel motor on E, right wheel motor on F
Download the program
| Official LEGO App | MBC Blocks website | Pybricks |
|---|---|---|
| ex04_simple_follow.llsp3 | ex04_simple_follow.abp | ex04_simple_follow.py + library |
🟨 Blocks in the official LEGO App
🟦 Blocks on the MBC Blocks website
Pybricks code
# 循行者 16 路 範例 4:最簡單的循線(線在左就左轉、線在右就右轉、中間就直走)
# 接線:循行者 16 路 → C 埠;左輪馬達 → E 埠;右輪馬達 → F 埠
from pybricks.parameters import Direction, Port
from pybricks.pupdevices import Motor
from pybricks.robotics import DriveBase
from pybricks.tools import wait
from MBC_line16_obj_Lib import MBC_LINE16

line16 = MBC_LINE16(3)                                 # 3 = C 埠
left = Motor(Port.E, Direction.COUNTERCLOCKWISE)       # 左輪:反過來裝,所以設成逆時針才是往前
right = Motor(Port.F)                                  # 右輪
robot = DriveBase(left, right, wheel_diameter=56, axle_track=112)   # 輪子直徑 56 mm、兩輪距離 112 mm

while True:
    pos = line16.pos16()
    if pos < -2:                  # 線在左邊 → 一邊前進一邊左轉
        robot.drive(100, -60)     # 速度 100 mm/秒,每秒左轉 60 度
    elif pos > 2:                 # 線在右邊 → 右轉
        robot.drive(100, 60)
    else:                         # 線在中間(-2 ~ 2)→ 直走
        robot.drive(100, 0)
    wait(10)
Step by step through the program
- Tell the hub where the wheels are: in the official App it is "set movement motors to E+F"; on the MBC Blocks website and in Pybricks it is "drive base: left wheel E, right wheel F".
- Set the speed: 30% in the official App; 100 mm per second in the other two. Start slow, and speed up once it works.
- Repeat forever: read the line position.
- If line position < -2 (line on the left) → turn left while driving.
- Else if line position > 2 (line on the right) → turn right.
- Else (-2 to 2) → go straight.
What you should see: the car follows the line, wobbling left and right as it goes (that is normal; example 5 improves it).
Common problems
- It shoots off right away and gets farther and farther from the line? → The turn directions are reversed: swap the sign of the two turn numbers (official App: swap -40 and 40; the other two: swap -60 and 60).
- The car drives backward? → The motors are mounted the opposite way from LEGO's standard car. Official App: mount the motors the same way as LEGO's "Driving Base" model; MBC Blocks website: in the "drive base" block, flip the "forward" direction of both the left and right wheels; Pybricks: change the left wheel to
Direction.CLOCKWISEand the right wheel toMotor(Port.F, Direction.COUNTERCLOCKWISE). - It overshoots and runs off on sharp turns? → Lower the speed.
- Why is the center -2 to 2? → The 16-Way has finer steps, so the number moves as soon as the line is slightly off; leaving a little margin keeps the car from twitching back and forth all the time.
Example 5: Smooth line following + stop at the crossroads
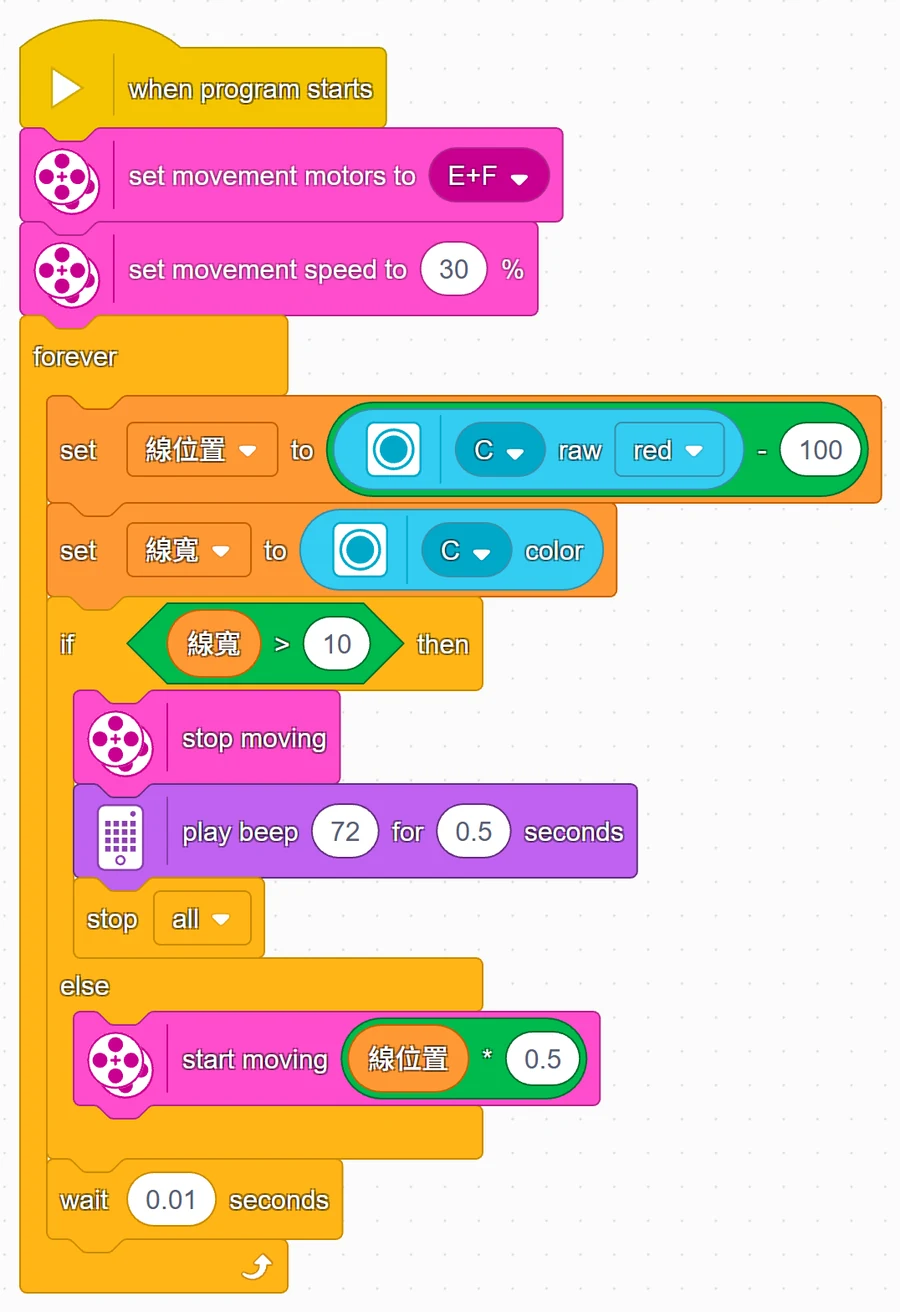
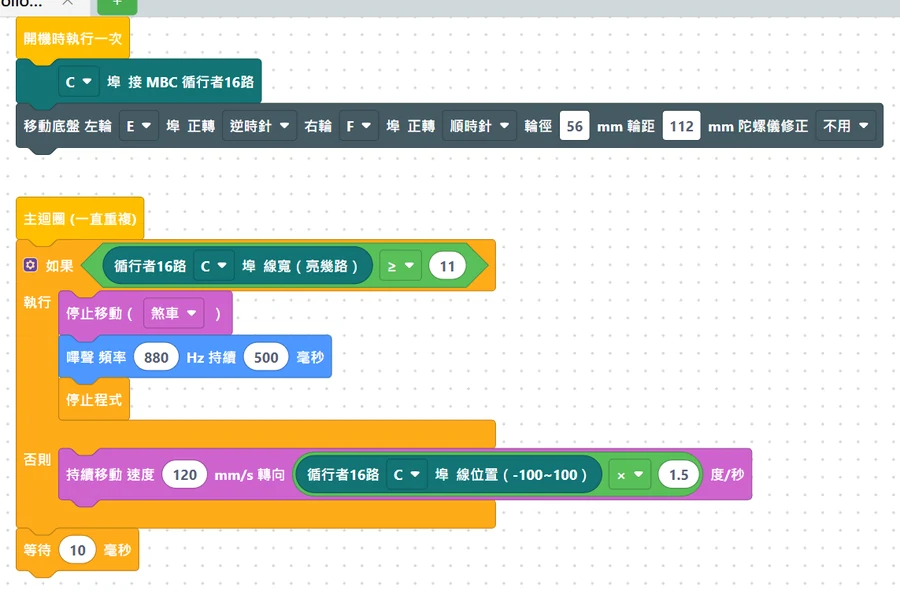
What this example does: follows the line using "turn as much as you are off the line", which is smoother than example 4; when it reaches a crossroads (nearly the whole row of sensor points is on black), it stops and beeps. It does not stop at T-junctions; it keeps driving straight through.
What you need: same as example 4, and the black line needs one crossroads.
How to connect: Pathfinder on port C; left wheel motor on E, right wheel motor on F.
Download the program
| Official LEGO App | MBC Blocks website | Pybricks |
|---|---|---|
| ex05_smooth_follow_stop.llsp3 | ex05_smooth_follow_stop.abp | ex05_smooth_follow_stop.py + library |
🟨 Blocks in the official LEGO App
🟦 Blocks on the MBC Blocks website
Pybricks code
# 循行者 16 路 範例 5:平順循線,遇到十字路口就停車
# 接線:循行者 16 路 → C 埠;左輪馬達 → E 埠;右輪馬達 → F 埠
from pybricks.hubs import PrimeHub
from pybricks.parameters import Direction, Port
from pybricks.pupdevices import Motor
from pybricks.robotics import DriveBase
from pybricks.tools import wait
from MBC_line16_obj_Lib import MBC_LINE16

hub = PrimeHub()
line16 = MBC_LINE16(3)                                 # 3 = C 埠
left = Motor(Port.E, Direction.COUNTERCLOCKWISE)
right = Motor(Port.F)
robot = DriveBase(left, right, wheel_diameter=56, axle_track=112)

while True:
    if line16.width() >= 11:      # 11 路以上同時踩到黑線 → 十字路口(整排 16 路幾乎全黑)
        robot.stop()
        hub.speaker.beep(880, 500)
        break                     # 跳出迴圈,程式結束
    pos = line16.pos100()         # 更精細的位置:-100 ~ 100
    robot.drive(120, pos * 1.5)   # 偏多少就轉多少:偏越多轉越快
    wait(10)
Step by step through the program
- Read the fine line position (-100 to 100): in the official App it is "raw red minus 100".
- Read the line width.
- If line width ≥ 11 (the official App writes it as "line width > 10", same meaning) → crossroads: stop → beep → end the program.
- Else → turn amount = line position × a number (0.5 in the official App, 1.5 in the other two). The farther off the line, the harder it turns; slightly off means only a slight turn, so it doesn't wobble left and right.
What you should see: the car glides smoothly along the line, drives through T-junctions without stopping, and stops with a beep at the crossroads.
Common problems
- Still wobbling left and right? → Make "the multiplier" a bit smaller (for example 0.5 → 0.3).
- Can't keep up on turns and runs off the line? → Make "the multiplier" a bit bigger, or lower the speed.
- Didn't stop at the crossroads? → The car is too fast and shot straight through it; lower the speed, or change "11" to 10.
- Stopped at a T-junction before reaching the crossroads? → The line is too wide; change "11" to 12 or 13 (the maximum is 16).
- The official App version never stops at the crossroads? → In our 2026-10 hub tests, the Education SPIKE App 3 dashboard showed NaN for the "color" block once the width went above 10, and we are still re-testing the 16-way crossroads stop in blocks (on the same hub, the official App's Python reads width 16 and stops). In the home edition (Robot Inventor) "color" tops out at 10, so always use "> 9" there. Swap example 1's "reflected light minus 16" for "color", put the sensor on the crossroads and watch the number on the display; if it only goes up to 10, change example 5's "> 10" to "> 9".
- Can't find the "raw red" block in the official App? → Opening the file should automatically add the "More Sensors" block category; if it is missing, click the "+" at the bottom-left of the block palette and add "More Sensors".
Next steps
- For more precise line following: SPIKE line following PID tutorial
- Full explanation of every value: official App, Education edition, Pybricks