
Pathfinder 8-Way (Line8) × EV3 × Pybricks
Interactive tutorialEV3
First time? Try the interactive tutorial in your browser first, then follow the steps below with your hub.
This page covers Pybricks v4 / EV3 MicroPython v2 only: how to set it up for the Pathfinder 8-Way (Line8) on MINDSTORMS EV3, how to read every value, the commands it supports and examples. Use the switcher above to change product, host or software.
Setup
What you need
- Sensor: Pathfinder 8-Way (Line8) (EV3 edition, RJ12 plug).
- Brick: LEGO MINDSTORMS EV3.
- Software (pick one):
- Pybricks v4: open code.pybricks.com in Chrome; the EV3 needs the Pybricks firmware first (the stable release now includes EV3 firmware, v4.1.1 as of 2026-10).
- EV3 MicroPython v2.0: the official LEGO "EV3 MicroPython" microSD boot card + the "LEGO MINDSTORMS EV3 MicroPython" extension for VS Code. Pick this if you already use it.
Install the software
Pybricks v4
- Open code.pybricks.com in Chrome.
- Follow the website to switch the EV3 to Pybricks firmware. The stable code.pybricks.com now includes EV3 firmware (v4.1.1 as of 2026-10). The examples on this site were first bench-tested on v4.0.0b10; v4.1.1 uses the same code.
- To open an example: drag the
.pyfile into the editor and press Run.
EV3 MicroPython v2.0
- Boot the EV3 from the official LEGO EV3 MicroPython microSD card.
- Install the "LEGO MINDSTORMS EV3 MicroPython" extension in VS Code.
- To open an example: paste the program into
main.pyand press F5 to download and run.
Make the software see the sensor
The beginner examples need no library; they read the sensor data directly:
- Pybricks v4 uses
LUMPDevice(Port.S1);sensor.read(mode)returns that mode's values. - EV3 MicroPython v2.0: always read with
Ev3devSensor. For products that show up as an infrared sensor, do not useInfraredSensor: every mode change waits about 1.1 s, andbuttons()/beacon()/keypad()raise errors or change the values. - Both can read modes that EV3-G and Classroom cannot, so examples marked "Pybricks / EV3 MicroPython / clev3r only" run here too.
Important
Do not switch modes often inside the main loop. The EV3 hardware adds a communication wait every time a sensor mode changes. Pick one mode for the task and keep it for the whole run.
Wiring
- Plug the sensor into EV3 port 1 with the cable (any of 1
4 works; use the same port asPort.S1Port.S4in the program). - Turn the EV3 on first, then plug in the sensor.
- Latch up, push the plug in gently.
EV3 test results and notes
Tested on the stock EV3 firmware and Pybricks v4 (2026-11-03); ev3dev / EV3 MicroPython v2 are supported.
- With the stock
InfraredSensorclass, do not usebuttons(): mode 2 carries line-position data, not remote button codes, and Pybricks raisesOSError(error 5, EIO). Usedistance()(= line position, can be negative), or read withLUMPDevice/ the MBC library. - Switching modes on the EV3 takes about 1.1 s: read one mode only in a line-following loop.
- The EV3 edition cannot take commands from the hub (E0~E9 cannot be sent); use the board buttons for white-line mode and calibration.
Calibrate first (only once)
The Pathfinder has to "learn" the black and white of your mat before its numbers are right. Calibration is stored in the sensor and survives power-off (until you change mats).
- Plug in the sensor and turn the hub on (the sensor lights come on).
- Hold the calibration button for about 0.5 s, then release it (do not keep holding it; holding it keeps restarting calibration).
- When the green calibration LED (next to the button) lights up, sweep the sensor back and forth between the black line and the white floor within 5 seconds. All 8 sensing points must pass over the darkest black line and the brightest white area.
- Keep the sensor 3~12 mm above the surface while sweeping; higher reads poorly.
- The green LED goes off = calibration done, saved in the sensor automatically.
How do I know it worked? On the white floor the "line width" is 0; on a normal black line it is 2~3.
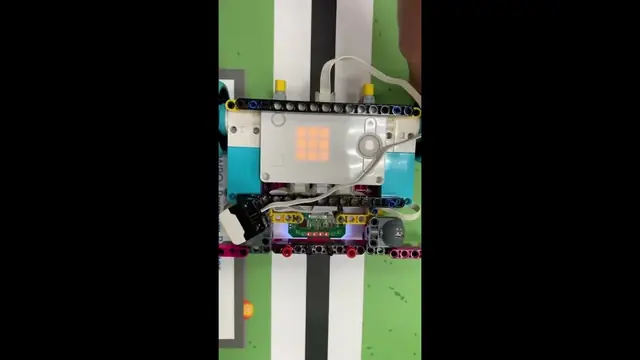
Library and example downloads
- Download pack (examples + library)
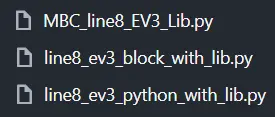
- Library: MBC_line8_EV3_Lib.py. Import it straight into your Pybricks project; the file name must match exactly for the
importto load it.
Method 1: native commands
Use Pybricks' low-level device.mode(mode) to get the data array directly:
| Command | Returns | Content |
|---|---|---|
device.mode(0) |
Tuple (1 byte) | Beginner mode: position -8 ~ 8, 0 = centre |
device.mode(1) |
Tuple (8 bytes) | Overview / debug mode: 8 calibrated reflection values, each 0 ~ 100 (0 = darkest, 100 = brightest), channel 1 on the far left |
device.mode(2) |
Tuple (4 bytes) | Competition mode: high-precision position -100 ~ 100, width 0 ~ 8, left edge light, right edge light |
Note
Pybricks has not yet updated the matching graphical and low-level commands, so native examples will follow later; for now Method 2 is recommended.
Method 2: import the library
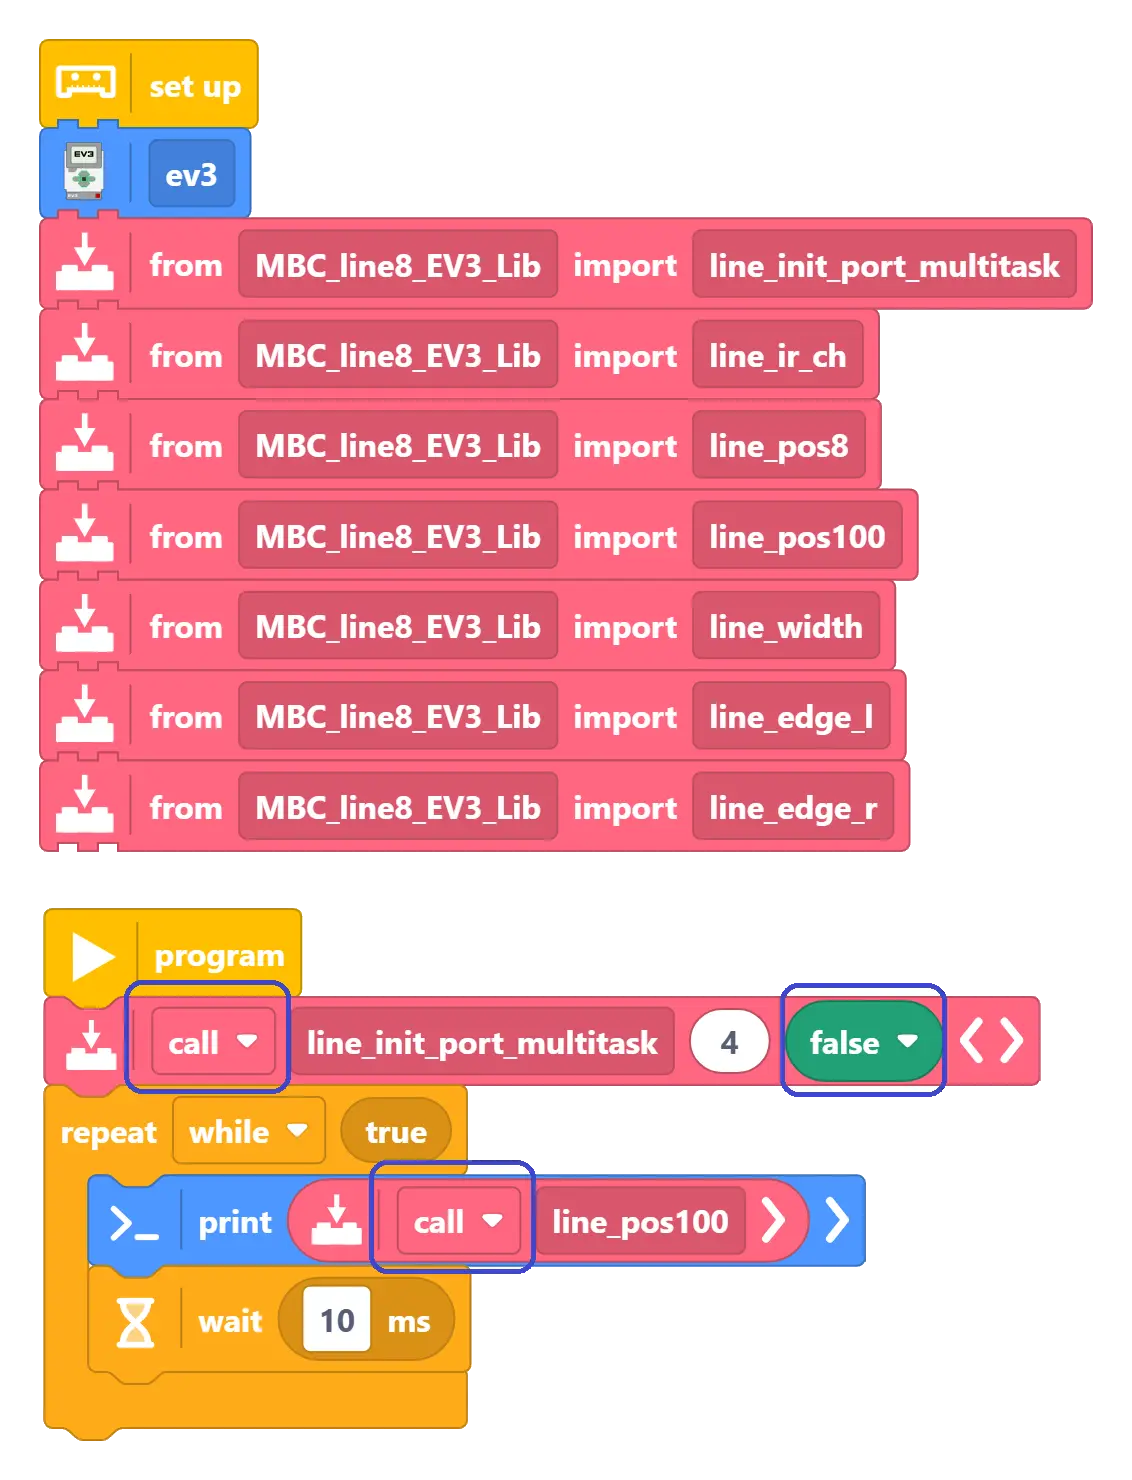
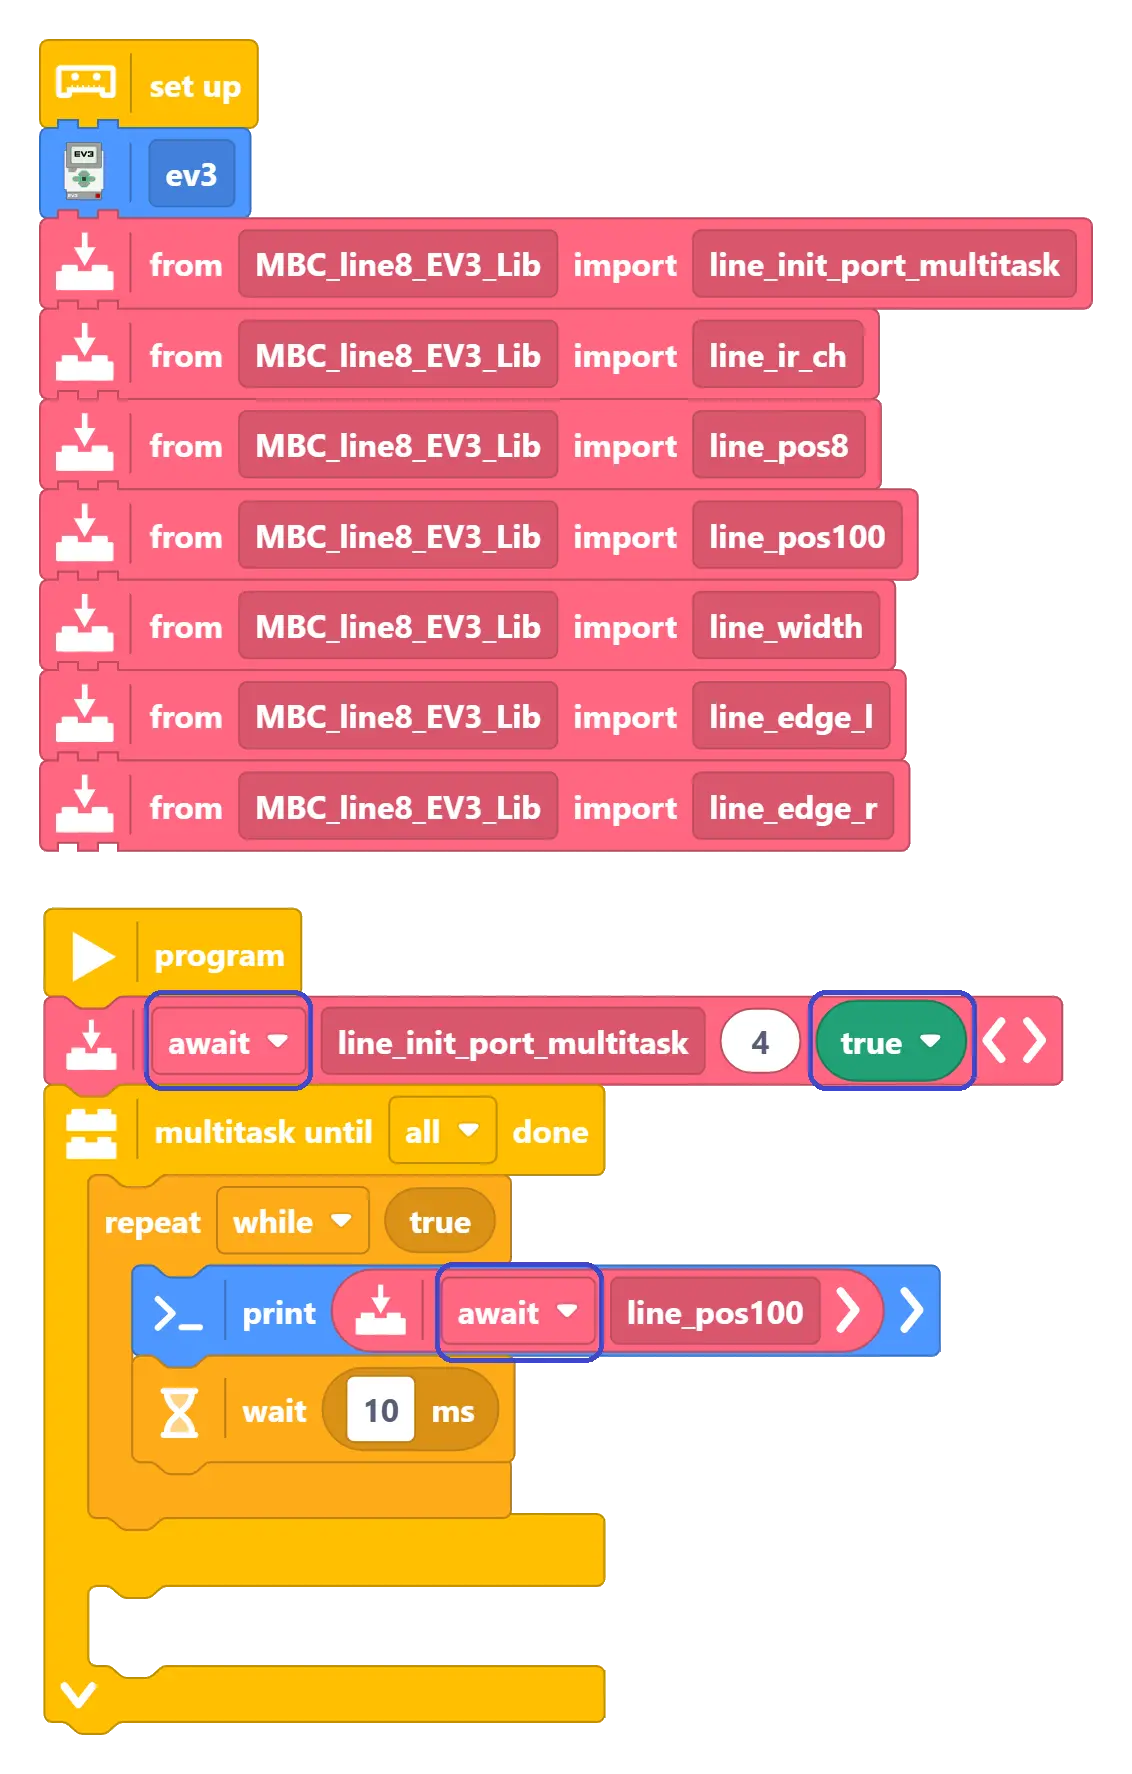
Initialise with line_init_port_multitask(port, multitask): port is an EV3 port object (for example hub.port.S1). Not multitask: multitask = False, and choose call in front of each call; multitask: True, and choose await.
| Mode | Function | Range | Meaning |
|---|---|---|---|
| Mode 0 (basic) | line_pos8() |
-8 ~ +8 |
Integer line position, 0 centre |
| Mode 1 (decode) | line_ir_ch(ch) |
1 ~ 9 |
One channel's quantised light, ch = 1~8, 1 darkest, 9 brightest |
| Mode 2 (competition) | line_pos100() |
-100 ~ +100 |
High-resolution interpolated position for PID / PD |
| Mode 2 (competition) | line_width() |
0 ~ 8 |
Line width, for junctions and wide lines |
| Mode 2 (competition) | line_edge_l() |
0 ~ 100 |
Left edge light (0 black, 100 white), to avoid losing the line |
| Mode 2 (competition) | line_edge_r() |
0 ~ 100 |
Right edge light (0 black, 100 white), to avoid losing the line |
Important
Mixing functions from different modes costs a mode-switch delay. For normal use and competition, stick to the mode 2 functions; use mode 1 on its own only when you need every raw sensor value for your own algorithm.
Examples: blocks (.py) · Python (.py)
Want to learn more advanced line following?
These coaches have plenty of competition and teaching experience: Coach LegoLauXiao (demo video), Coach legolaumo (demo video).
First test
- Open example 1 on this page and run it (F5 for the MicroPython version).
- If the number on the EV3 screen changes with what is in front of the sensor, everything is connected.
FAQ
- Cannot find Pybricks firmware for the EV3? Use the stable code.pybricks.com (EV3 v4.1.1 built in since 2026-10); the old ev3dev-based Pybricks (microSD card) is a different system and does not apply here.
- The number never changes? Unplug the sensor and plug it back in (the EV3 must be on first).
- The program reacts unevenly? The main loop reads different modes in turn and waits at every switch. Use one mode only.
- Error when importing a library? The library file must be imported into the same Pybricks project, and its file name must match the
importname exactly.
Reading values
Code assumes port 1 and reads raw modes with LUMPDevice; EV3 MicroPython v2 works the same way.
line position linePos
| Range | Meaning |
|---|---|
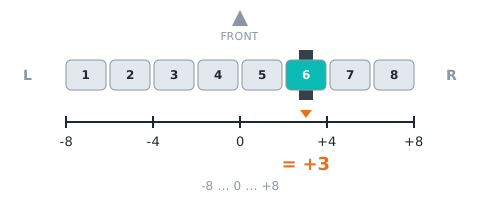
-8~+8 |
which channel the line is under: −8 (far left) to +8 (far right), 0 = centre; seen from behind the robot, negative = left |
from pybricks.iodevices import LUMPDevice
from pybricks.parameters import Port

sensor = LUMPDevice(Port.S1)   # sensor on port 1

linePos = sensor.read(0)[0]   # line position:-8~+8
mode 0 · int8 · IR-PROX (locked mode: firmware and hosts will not change it)
fine position linePosFine
| Range | Meaning |
|---|---|
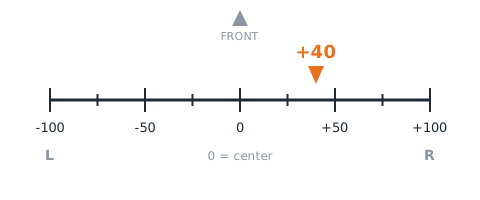
-100~+100 |
sub-channel position: −100 to +100, 0 = centre, negative = left (same sign as line position) |
from pybricks.iodevices import LUMPDevice
from pybricks.parameters import Port

sensor = LUMPDevice(Port.S1)   # sensor on port 1

linePosFine = sensor.read(2)[0]   # fine position:-100~+100
mode 2 · int8 · IR-REMOTE byte0 = highRes−100 存成 int8(F030 ev3Uart case 2),主機直接讀 (locked mode: firmware and hosts will not change it)
line width lineWidth
| Range | Meaning |
|---|---|
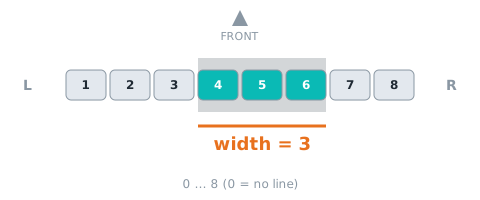
0~8 路 |
number of channels on the line, 0~8; 0 = no line |
from pybricks.iodevices import LUMPDevice
from pybricks.parameters import Port

sensor = LUMPDevice(Port.S1)   # sensor on port 1

lineWidth = sensor.read(2)[1]   # line width:0~8 路
mode 2 · int8 (locked mode: firmware and hosts will not change it)
line bitmap bitmap
| Range | Meaning |
|---|---|
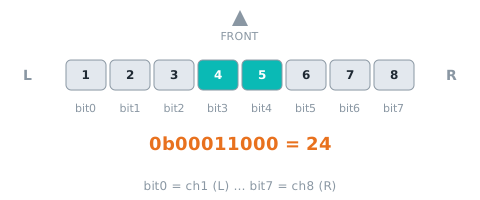
0~255 bit |
bit0 = channel 1 (left) … bit7 = channel 8; 1 = that channel sees the line |
from pybricks.iodevices import LUMPDevice
from pybricks.parameters import Port

sensor = LUMPDevice(Port.S1)   # sensor on port 1

bitmap = sensor.read(3)[0]   # line bitmap:0~255 bit
mode 3 · int16 · #67 新:IR-REM-A 1×int16
channel 1~8 reflect light
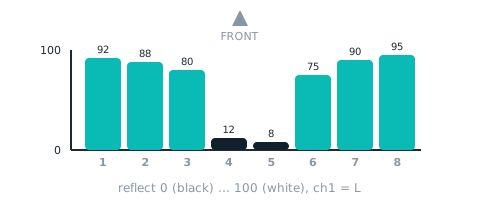
| Range | Meaning |
|---|---|
0~100 |
calibrated reflect of channel 1 |
from pybricks.iodevices import LUMPDevice
from pybricks.parameters import Port

sensor = LUMPDevice(Port.S1)   # sensor on port 1

light = sensor.read(1)[0:8]   # channel 1~8 reflect
mode 1 · int8 · IR-SEEK 8×int8 (locked mode: firmware and hosts will not change it)
Not readable here:line segments, last exit direction, threshold, calibrations done. Use Arduino / mBlock / micro:bit for these.
Commands
The EV3 port is read-only, so this software cannot send commands: calibrate with the button on the sensor and change settings over Arduino I2C, mBlock or micro:bit.
Examples
Example 1: See where the line is
What this example does: Put the sensor over the black line and the EV3 screen shows a number telling you where the line is. This is step one of every line-following program: learn to "read the number".
What you need:
- EV3 brick + Education base robot (left wheel on B, right wheel on C)
- Pathfinder 8-way (EV3 edition, RJ12 plug)
- A white mat with a black line (about 2 cm wide)
How to connect: Pathfinder 8-way in port 1, mounted under the front of the robot about 1 cm above the ground, facing straight down.
Download the program (pick your software):
⬇ Pybricks v4 | ⬇ EV3 MicroPython v2.0
Pybricks v4 code
# ============================================================
# 循行者 8 路循線感應器 EV3 新手範例 01:看看線在哪裡
# 軟體:Pybricks v4(用 Chrome 打開 https://code.pybricks.com ,EV3 版目前是 Beta)
# 接法:循行者 8 路插 1 號孔
# 這個範例會做什麼:把感應器放在黑線上,EV3 螢幕會顯示一個數字告訴你線在哪裡。這是所有循線程式的第一步:先學會「讀數字」。
# ============================================================

from pybricks.hubs import EV3Brick
from pybricks.iodevices import LUMPDevice
from pybricks.parameters import Port, Color
from pybricks.tools import wait

ev3 = EV3Brick()
sensor = LUMPDevice(Port.S1)       # 循行者 8 路插 1 號孔


def read_pos():
    # 線的位置:-8 ~ +8,0=線在正中間
    return sensor.read(0)[0]


# ---------- 程式從這裡開始 ----------
# 先把螢幕清乾淨
ev3.screen.clear()
# 下面的動作一直重複
while True:
    # 讀取線的位置,顯示在螢幕第 1 行
    ev3.screen.draw_text(0, 0, "POS " + str(read_pos()) + "      ", Color.BLACK, Color.WHITE)
    # 等 0.1 秒再讀下一次,數字才不會閃太快
    wait(100)
EV3 MicroPython v2.0 code
#!/usr/bin/env pybricks-micropython
# ============================================================
# 循行者 8 路循線感應器 EV3 新手範例 01:看看線在哪裡
# 軟體:樂高官方 EV3 MicroPython v2.0(microSD 開機卡+VS Code「LEGO MINDSTORMS EV3 MicroPython」擴充套件)
# 接法:循行者 8 路插 1 號孔
# 這個範例會做什麼:把感應器放在黑線上,EV3 螢幕會顯示一個數字告訴你線在哪裡。這是所有循線程式的第一步:先學會「讀數字」。
# ============================================================

from pybricks.hubs import EV3Brick
from pybricks.iodevices import Ev3devSensor
from pybricks.parameters import Port, Color
from pybricks.tools import wait

ev3 = EV3Brick()
sensor = Ev3devSensor(Port.S1)     # 循行者 8 路插 1 號孔


def read_pos():
    # 線的位置:-8 ~ +8,0=線在正中間
    return sensor.read('IR-PROX')[0]


# ---------- 程式從這裡開始 ----------
# 先把螢幕清乾淨
ev3.screen.clear()
# 下面的動作一直重複
while True:
    # 讀取線的位置,顯示在螢幕第 1 行
    ev3.screen.draw_text(0, 0, "POS " + str(read_pos()) + "      ", Color.BLACK, Color.WHITE)
    # 等 0.1 秒再讀下一次,數字才不會閃太快
    wait(100)
Step by step:
- Clear the screen first
- Repeat the steps below forever
- Read the line position and show it on screen row 1
- Wait 0.1 s before the next read so the number does not flicker
What you should see: With the black line in the middle of the sensor the screen shows 0; move the line left and the number goes negative, move it right and it goes positive, up to ±8 at the edges (left/right as seen standing behind the robot, facing forward).
FAQ:
- The line is gone but the number stays at the last value? That is normal: when the line leaves the sensor, the position stays where it was last seen. To detect "line lost", use the line width from example 4 (width = 0).
- The number never changes? Check that the sensor light is on and the cable is seated. Turn the EV3 on before plugging in the sensor, or unplug and plug it back in.
- The robot steers the wrong way and gets worse? Swap the "+" and "−" in the program (swap the left/right wheel corrections), or check that the left wheel is on B and the right wheel on C.
Example 2: Three-way line following: left, right, straight
What this example does: Use "if … then … else" to make the robot follow the black line: turn left when the line is to the left, turn right when it is to the right, go straight when it is in the middle.
What you need:
- EV3 brick + Education base robot (left wheel on B, right wheel on C)
- Pathfinder 8-way (EV3 edition, RJ12 plug)
- A white mat with a black line (about 2 cm wide)
How to connect: Pathfinder 8-way in port 1, mounted under the front of the robot about 1 cm above the ground, facing straight down.
Download the program (pick your software):
⬇ Pybricks v4 | ⬇ EV3 MicroPython v2.0
Pybricks v4 code
# ============================================================
# 循行者 8 路循線感應器 EV3 新手範例 02:三段式循線:偏左、偏右、直走
# 軟體:Pybricks v4(用 Chrome 打開 https://code.pybricks.com ,EV3 版目前是 Beta)
# 接法:循行者 8 路插 1 號孔;左輪馬達接 B、右輪馬達接 C
# 這個範例會做什麼:用「如果…就…否則…」讓車子沿著黑線走:線偏左就往左轉,線偏右就往右轉,在中間就直走。
# ============================================================

from pybricks.hubs import EV3Brick
from pybricks.ev3devices import Motor
from pybricks.iodevices import LUMPDevice
from pybricks.parameters import Port
from pybricks.tools import wait

ev3 = EV3Brick()
sensor = LUMPDevice(Port.S1)       # 循行者 8 路插 1 號孔
left_motor = Motor(Port.B)        # 左輪
right_motor = Motor(Port.C)       # 右輪


def read_pos():
    # 線的位置:-8 ~ +8,0=線在正中間
    return sensor.read(0)[0]


# ---------- 程式從這裡開始 ----------
# 一直重複檢查線的位置
while True:
    # 如果線的位置小於 -2(偏左)
    if read_pos() < (-2):
        # 線偏左:左輪慢、右輪快,車子往左修
        left_motor.dc(10)
        right_motor.dc(40)
    # 否則,如果線的位置大於 2(偏右)
    elif read_pos() > 2:
        # 線偏右:左輪快、右輪慢,車子往右修
        left_motor.dc(40)
        right_motor.dc(10)
    else:
        # 線在中間:兩輪一樣快,直直走
        left_motor.dc(30)
        right_motor.dc(30)
EV3 MicroPython v2.0 code
#!/usr/bin/env pybricks-micropython
# ============================================================
# 循行者 8 路循線感應器 EV3 新手範例 02:三段式循線:偏左、偏右、直走
# 軟體:樂高官方 EV3 MicroPython v2.0(microSD 開機卡+VS Code「LEGO MINDSTORMS EV3 MicroPython」擴充套件)
# 接法:循行者 8 路插 1 號孔;左輪馬達接 B、右輪馬達接 C
# 這個範例會做什麼:用「如果…就…否則…」讓車子沿著黑線走:線偏左就往左轉,線偏右就往右轉,在中間就直走。
# ============================================================

from pybricks.hubs import EV3Brick
from pybricks.ev3devices import Motor
from pybricks.iodevices import Ev3devSensor
from pybricks.parameters import Port
from pybricks.tools import wait

ev3 = EV3Brick()
sensor = Ev3devSensor(Port.S1)     # 循行者 8 路插 1 號孔
left_motor = Motor(Port.B)        # 左輪
right_motor = Motor(Port.C)       # 右輪


def read_pos():
    # 線的位置:-8 ~ +8,0=線在正中間
    return sensor.read('IR-PROX')[0]


# ---------- 程式從這裡開始 ----------
# 一直重複檢查線的位置
while True:
    # 如果線的位置小於 -2(偏左)
    if read_pos() < (-2):
        # 線偏左:左輪慢、右輪快,車子往左修
        left_motor.dc(10)
        right_motor.dc(40)
    # 否則,如果線的位置大於 2(偏右)
    elif read_pos() > 2:
        # 線偏右:左輪快、右輪慢,車子往右修
        left_motor.dc(40)
        right_motor.dc(10)
    else:
        # 線在中間:兩輪一樣快,直直走
        left_motor.dc(30)
        right_motor.dc(30)
Step by step:
- Keep checking the line position
- If the line position is less than -2 (line is to the left)
- Line to the left: left wheel slow, right wheel fast, the robot steers left
- Otherwise:
- Otherwise, if the line position is greater than 2 (line is to the right)
- Line to the right: left wheel fast, right wheel slow, the robot steers right
- Otherwise:
- Line in the centre: both wheels the same speed, go straight
- Otherwise, if the line position is greater than 2 (line is to the right)
- If the line position is less than -2 (line is to the left)
What you should see: The robot wobbles left and right along the black line. On sharp bends it may run off; try lowering 40 and changing 10 to 0.
FAQ:
- The number never changes? Check that the sensor light is on and the cable is seated. Turn the EV3 on before plugging in the sensor, or unplug and plug it back in.
- The robot steers the wrong way and gets worse? Swap the "+" and "−" in the program (swap the left/right wheel corrections), or check that the left wheel is on B and the right wheel on C.
Example 3: Proportional line following: the further off, the harder it turns
What this example does: Three-way line following keeps wobbling. This example uses "line position × a number" as the steering power: a little off means a little turn, a lot off means a big turn, so the robot drives more smoothly.
What you need:
- EV3 brick + Education base robot (left wheel on B, right wheel on C)
- Pathfinder 8-way (EV3 edition, RJ12 plug)
- A white mat with a black line (about 2 cm wide)
How to connect: Pathfinder 8-way in port 1, mounted under the front of the robot about 1 cm above the ground, facing straight down.
Download the program (pick your software):
⬇ Pybricks v4 | ⬇ EV3 MicroPython v2.0
Pybricks v4 code
# ============================================================
# 循行者 8 路循線感應器 EV3 新手範例 03:比例循線:偏越多、轉越多
# 軟體:Pybricks v4(用 Chrome 打開 https://code.pybricks.com ,EV3 版目前是 Beta)
# 接法:循行者 8 路插 1 號孔;左輪馬達接 B、右輪馬達接 C
# 這個範例會做什麼:三段式循線會一直搖擺。這個範例把「線的位置 × 一個數字」當成轉彎的力量:偏一點就轉一點、偏很多就轉很多,車子會走得更順。
# ============================================================

from pybricks.hubs import EV3Brick
from pybricks.ev3devices import Motor
from pybricks.iodevices import LUMPDevice
from pybricks.parameters import Port
from pybricks.tools import wait

ev3 = EV3Brick()
sensor = LUMPDevice(Port.S1)       # 循行者 8 路插 1 號孔
left_motor = Motor(Port.B)        # 左輪
right_motor = Motor(Port.C)       # 右輪


def read_pos():
    # 線的位置:-8 ~ +8,0=線在正中間
    return sensor.read(0)[0]


# ---------- 程式從這裡開始 ----------
# 一直重複
while True:
    # 轉彎力量 turn = 線的位置 × 4
    turn = read_pos() * 4
    # 左輪=30+turn、右輪=30-turn:線偏哪邊,車子就往哪邊修
    left_motor.dc(30 + turn)
    right_motor.dc(30 - turn)
EV3 MicroPython v2.0 code
#!/usr/bin/env pybricks-micropython
# ============================================================
# 循行者 8 路循線感應器 EV3 新手範例 03:比例循線:偏越多、轉越多
# 軟體:樂高官方 EV3 MicroPython v2.0(microSD 開機卡+VS Code「LEGO MINDSTORMS EV3 MicroPython」擴充套件)
# 接法:循行者 8 路插 1 號孔;左輪馬達接 B、右輪馬達接 C
# 這個範例會做什麼:三段式循線會一直搖擺。這個範例把「線的位置 × 一個數字」當成轉彎的力量:偏一點就轉一點、偏很多就轉很多,車子會走得更順。
# ============================================================

from pybricks.hubs import EV3Brick
from pybricks.ev3devices import Motor
from pybricks.iodevices import Ev3devSensor
from pybricks.parameters import Port
from pybricks.tools import wait

ev3 = EV3Brick()
sensor = Ev3devSensor(Port.S1)     # 循行者 8 路插 1 號孔
left_motor = Motor(Port.B)        # 左輪
right_motor = Motor(Port.C)       # 右輪


def read_pos():
    # 線的位置:-8 ~ +8,0=線在正中間
    return sensor.read('IR-PROX')[0]


# ---------- 程式從這裡開始 ----------
# 一直重複
while True:
    # 轉彎力量 turn = 線的位置 × 4
    turn = read_pos() * 4
    # 左輪=30+turn、右輪=30-turn:線偏哪邊,車子就往哪邊修
    left_motor.dc(30 + turn)
    right_motor.dc(30 - turn)
Step by step:
- Repeat forever
- Steering power turn = line position × 4
- Left wheel = 30 + turn, right wheel = 30 − turn: the robot steers towards the line
What you should see: The robot follows the black line more smoothly than in example 2. The number 4 is the "proportional gain": too big and it swings left and right, too small and it cannot make the bends. Tune it yourself.
FAQ:
- It keeps swinging even on a straight line? Lower 4 a little (for example 2).
- The number never changes? Check that the sensor light is on and the cable is seated. Turn the EV3 on before plugging in the sensor, or unplug and plug it back in.
- The robot steers the wrong way and gets worse? Swap the "+" and "−" in the program (swap the left/right wheel corrections), or check that the left wheel is on B and the right wheel on C.
Example 4: Stop at a crossing
What this example does: The sensor also tells you "how many channels see the black line" (line width). Normally that is 2~3; at a crossing it suddenly jumps. This example follows the line while watching the width, and stops with a beep when it is 6 or more.
What you need:
- EV3 brick + Education base robot (left wheel on B, right wheel on C)
- Pathfinder 8-way (EV3 edition, RJ12 plug)
- A black-line mat with crossings
How to connect: Pathfinder 8-way in port 1, mounted under the front of the robot about 1 cm above the ground, facing straight down.
Download the program (pick your software):
⬇ Pybricks v4 | ⬇ EV3 MicroPython v2.0
Pybricks v4 code
# ============================================================
# 循行者 8 路循線感應器 EV3 新手範例 04:碰到十字路口就停車
# 軟體:Pybricks v4(用 Chrome 打開 https://code.pybricks.com ,EV3 版目前是 Beta)
# 接法:循行者 8 路插 1 號孔;左輪馬達接 B、右輪馬達接 C
# 這個範例會做什麼:感應器還會告訴你「壓到黑線的格數」(線寬)。平常只有 2~3 格,到十字路口會一下子變很多。這個範例邊循線邊看線寬,大於等於 6 就停車並嗶一聲。
# ============================================================

from pybricks.hubs import EV3Brick
from pybricks.ev3devices import Motor
from pybricks.iodevices import LUMPDevice
from pybricks.parameters import Port
from pybricks.tools import wait

ev3 = EV3Brick()
sensor = LUMPDevice(Port.S1)       # 循行者 8 路插 1 號孔
left_motor = Motor(Port.B)        # 左輪
right_motor = Motor(Port.C)       # 右輪


def read_width():
    # 線的寬度(壓到黑線的格數):0 ~ 8,0=看不到線
    return sensor.read(2)[1]


def read_pos100():
    # 線的位置(細):-100 ~ +100,0=線在正中間
    return sensor.read(2)[0]


# ---------- 程式從這裡開始 ----------
# 一直循線,直到線寬大於等於 6(到路口了)
while not (read_width() >= 6):
    # 轉彎力量 turn = 線的位置(-100~100)× 0.3
    turn = read_pos100() * 0.3
    # 一樣用比例循線往前走,速度放慢到 25
    left_motor.dc(25 + turn)
    right_motor.dc(25 - turn)
# 停車
left_motor.brake()
right_motor.brake()
# 嗶一聲告訴你到了
ev3.speaker.beep()
EV3 MicroPython v2.0 code
#!/usr/bin/env pybricks-micropython
# ============================================================
# 循行者 8 路循線感應器 EV3 新手範例 04:碰到十字路口就停車
# 軟體:樂高官方 EV3 MicroPython v2.0(microSD 開機卡+VS Code「LEGO MINDSTORMS EV3 MicroPython」擴充套件)
# 接法:循行者 8 路插 1 號孔;左輪馬達接 B、右輪馬達接 C
# 這個範例會做什麼:感應器還會告訴你「壓到黑線的格數」(線寬)。平常只有 2~3 格,到十字路口會一下子變很多。這個範例邊循線邊看線寬,大於等於 6 就停車並嗶一聲。
# ============================================================

from pybricks.hubs import EV3Brick
from pybricks.ev3devices import Motor
from pybricks.iodevices import Ev3devSensor
from pybricks.parameters import Port
from pybricks.tools import wait

ev3 = EV3Brick()
sensor = Ev3devSensor(Port.S1)     # 循行者 8 路插 1 號孔
left_motor = Motor(Port.B)        # 左輪
right_motor = Motor(Port.C)       # 右輪


def read_width():
    # 線的寬度(壓到黑線的格數):0 ~ 8,0=看不到線
    return sensor.read('IR-REMOTE')[1]


def read_pos100():
    # 線的位置(細):-100 ~ +100,0=線在正中間
    return sensor.read('IR-REMOTE')[0]


# ---------- 程式從這裡開始 ----------
# 一直循線,直到線寬大於等於 6(到路口了)
while not (read_width() >= 6):
    # 轉彎力量 turn = 線的位置(-100~100)× 0.3
    turn = read_pos100() * 0.3
    # 一樣用比例循線往前走,速度放慢到 25
    left_motor.dc(25 + turn)
    right_motor.dc(25 - turn)
# 停車
left_motor.brake()
right_motor.brake()
# 嗶一聲告訴你到了
ev3.speaker.beep()
Step by step:
- Keep following the line until the line width is 6 or more (reached a crossing)
- Steering power turn = line position (-100~100) × 0.3
- Same proportional line following, slowed down to 25
- Stop
- Beep to tell you it arrived
What you should see: The robot follows the line and stops with a beep when it reaches a crossing.
FAQ:
- It stops before the crossing? Bends can also widen the line; raise 6 a little.
- It does not stop at the crossing? Show the line width the way example 1 does, read the real value at the crossing, then change 6 in the program.
- The number never changes? Check that the sensor light is on and the cable is seated. Turn the EV3 on before plugging in the sensor, or unplug and plug it back in.
- The robot steers the wrong way and gets worse? Swap the "+" and "−" in the program (swap the left/right wheel corrections), or check that the left wheel is on B and the right wheel on C.
Example 5: Count crossings: stop at the 3rd one
What this example does: Competitions often say "drive to the Nth crossing". This example counts crossings with a variable count and uses another variable onCross to remember "am I on a crossing right now", so one crossing is not counted many times.
What you need:
- EV3 brick + Education base robot (left wheel on B, right wheel on C)
- Pathfinder 8-way (EV3 edition, RJ12 plug)
- A black-line mat with 3 or more crossings
How to connect: Pathfinder 8-way in port 1, mounted under the front of the robot about 1 cm above the ground, facing straight down.
Download the program (pick your software):
⬇ Pybricks v4 | ⬇ EV3 MicroPython v2.0
Pybricks v4 code
# ============================================================
# 循行者 8 路循線感應器 EV3 新手範例 05:數路口:第 3 個路口停車
# 軟體:Pybricks v4(用 Chrome 打開 https://code.pybricks.com ,EV3 版目前是 Beta)
# 接法:循行者 8 路插 1 號孔;左輪馬達接 B、右輪馬達接 C
# 這個範例會做什麼:比賽常常要「走到第幾個路口」。這個範例用一個變數 count 數路口,用另一個變數 onCross 記住「現在是不是正壓在路口上」,避免同一個路口被數很多次。
# ============================================================

from pybricks.hubs import EV3Brick
from pybricks.ev3devices import Motor
from pybricks.iodevices import LUMPDevice
from pybricks.parameters import Port, Color
from pybricks.tools import wait

ev3 = EV3Brick()
sensor = LUMPDevice(Port.S1)       # 循行者 8 路插 1 號孔
left_motor = Motor(Port.B)        # 左輪
right_motor = Motor(Port.C)       # 右輪


def read_pos100():
    # 線的位置(細):-100 ~ +100,0=線在正中間
    return sensor.read(2)[0]


def read_width():
    # 線的寬度(壓到黑線的格數):0 ~ 8,0=看不到線
    return sensor.read(2)[1]


# ---------- 程式從這裡開始 ----------
# 路口數 count 從 0 開始
count = 0
# onCross=0 代表「現在不在路口上」
onCross = 0
# 一直循線,直到數滿 3 個路口
while not (count >= 3):
    # 比例循線:turn = 線的位置 × 0.3
    turn = read_pos100() * 0.3
    # 左輪=25+turn、右輪=25-turn
    left_motor.dc(25 + turn)
    right_motor.dc(25 - turn)
    # 如果線寬大於等於 6(壓在路口上)
    if read_width() >= 6:
        # 而且剛剛還不在路口上
        if onCross == 0:
            # 剛壓到新路口:count 加 1
            count = count + 1
            # 記住「正在路口上」,同一個路口不要再數
            onCross = 1
            # 嗶一聲
            ev3.speaker.beep()
    else:
        # 離開路口了:onCross 改回 0,準備數下一個
        onCross = 0
    # 螢幕顯示已經數到第幾個路口
    ev3.screen.draw_text(0, 0, "COUNT " + str(count) + "      ", Color.BLACK, Color.WHITE)
# 停車
left_motor.brake()
right_motor.brake()
EV3 MicroPython v2.0 code
#!/usr/bin/env pybricks-micropython
# ============================================================
# 循行者 8 路循線感應器 EV3 新手範例 05:數路口:第 3 個路口停車
# 軟體:樂高官方 EV3 MicroPython v2.0(microSD 開機卡+VS Code「LEGO MINDSTORMS EV3 MicroPython」擴充套件)
# 接法:循行者 8 路插 1 號孔;左輪馬達接 B、右輪馬達接 C
# 這個範例會做什麼:比賽常常要「走到第幾個路口」。這個範例用一個變數 count 數路口,用另一個變數 onCross 記住「現在是不是正壓在路口上」,避免同一個路口被數很多次。
# ============================================================

from pybricks.hubs import EV3Brick
from pybricks.ev3devices import Motor
from pybricks.iodevices import Ev3devSensor
from pybricks.parameters import Port, Color
from pybricks.tools import wait

ev3 = EV3Brick()
sensor = Ev3devSensor(Port.S1)     # 循行者 8 路插 1 號孔
left_motor = Motor(Port.B)        # 左輪
right_motor = Motor(Port.C)       # 右輪


def read_pos100():
    # 線的位置(細):-100 ~ +100,0=線在正中間
    return sensor.read('IR-REMOTE')[0]


def read_width():
    # 線的寬度(壓到黑線的格數):0 ~ 8,0=看不到線
    return sensor.read('IR-REMOTE')[1]


# ---------- 程式從這裡開始 ----------
# 路口數 count 從 0 開始
count = 0
# onCross=0 代表「現在不在路口上」
onCross = 0
# 一直循線,直到數滿 3 個路口
while not (count >= 3):
    # 比例循線:turn = 線的位置 × 0.3
    turn = read_pos100() * 0.3
    # 左輪=25+turn、右輪=25-turn
    left_motor.dc(25 + turn)
    right_motor.dc(25 - turn)
    # 如果線寬大於等於 6(壓在路口上)
    if read_width() >= 6:
        # 而且剛剛還不在路口上
        if onCross == 0:
            # 剛壓到新路口:count 加 1
            count = count + 1
            # 記住「正在路口上」,同一個路口不要再數
            onCross = 1
            # 嗶一聲
            ev3.speaker.beep()
    else:
        # 離開路口了:onCross 改回 0,準備數下一個
        onCross = 0
    # 螢幕顯示已經數到第幾個路口
    ev3.screen.draw_text(0, 0, "COUNT " + str(count) + "      ", Color.BLACK, Color.WHITE)
# 停車
left_motor.brake()
right_motor.brake()
Step by step:
- Crossing counter count starts at 0
- onCross = 0 means "not on a crossing right now"
- Keep following the line until 3 crossings have been counted
- Proportional line following: turn = line position × 0.3
- Left wheel = 25 + turn, right wheel = 25 − turn
- If the line width is 6 or more (on a crossing)
- and we were not on a crossing a moment ago
- Just reached a new crossing: add 1 to count
- Remember "on a crossing" so the same crossing is not counted again
- Beep
- Otherwise:
- Left the crossing: set onCross back to 0, ready for the next one
- and we were not on a crossing a moment ago
- Show how many crossings have been counted
- Stop
What you should see: Every crossing beeps once and adds 1 on the screen; the robot stops at the 3rd crossing. Change the 3 to stop at a different crossing.
FAQ:
- One crossing is counted twice? Happens when the black line at the crossing is damaged or shiny. Slow the speed 25 down or raise the width threshold.
- The number never changes? Check that the sensor light is on and the cable is seated. Turn the EV3 on before plugging in the sensor, or unplug and plug it back in.
- The robot steers the wrong way and gets worse? Swap the "+" and "−" in the program (swap the left/right wheel corrections), or check that the left wheel is on B and the right wheel on C.
Example 6: Line bitmap: draw an LED ruler on the screen
Pybricks v4 / EV3 MicroPython v2.0 / clev3r only (the EV3-G and Classroom blocks cannot read this mode)
What this example does: Mode 3 sends the "line bitmap": 8 bits, one per channel, 1 when that channel is on the line. This example draws it as a ruler (# = on the line, . = not), just like the LEDs on the sensor, so you can see at a glance which channels see the line and whether there is a fork.
What you need:
- Pathfinder 8-way (EV3 edition, firmware v4.0 or later)
- EV3 brick
- A white mat with a black line
How to connect: Pathfinder 8-way in port 1, mounted under the front of the robot about 1 cm above the ground, facing straight down.
Download the program (pick your software):
⬇ Pybricks v4 | ⬇ EV3 MicroPython v2.0
(The code is the example; no screenshot needed.)
Pybricks v4 code
# ============================================================
# 循行者 8 路循線感應器 EV3 新手範例 06:壓線位元圖:在螢幕上畫一把 LED 尺
# 軟體:Pybricks v4(用 Chrome 打開 https://code.pybricks.com ,EV3 版目前是 Beta)
# 接法:循行者 8 路插 1 號孔
# 這個範例會做什麼:模式 3 送出「壓線位元圖」:8 個位元,每一路壓到線就是 1。這個範例把它畫成一把尺(# =壓到線、. =沒壓到),跟感應器上的 LED 一樣,一眼就看出線在哪幾路、有沒有分岔。
# ============================================================

from pybricks.hubs import EV3Brick
from pybricks.iodevices import LUMPDevice
from pybricks.parameters import Port, Color
from pybricks.tools import wait

ev3 = EV3Brick()
sensor = LUMPDevice(Port.S1)       # 循行者 8 路插 1 號孔


def read_bitmap():
    # 壓線位元圖:0 ~ 255:bit0=第 1 路(最左)… bit7=第 8 路,1=那一路壓到線
    return sensor.read(3)[0] & 0xFFFF


# ---------- 程式從這裡開始 ----------
# 清除螢幕
ev3.screen.clear()
# 一直重複
while True:
    # 第 1 行畫尺:8 格,最左是第 1 路,# =壓到線、. =沒壓到
    bits_value = read_bitmap()
    bits_text = ""
    for b in range(8):
        if (bits_value // (2 ** b)) % 2 == 1:   # 第 b 個位元是 1
            bits_text = bits_text + "#"
        else:
            bits_text = bits_text + "."
    ev3.screen.draw_text(0, 0, "LINE " + bits_text + "  ", Color.BLACK, Color.WHITE)
    # 第 2 行顯示位元圖的數字(第 1 路=1、第 2 路=2、第 3 路=4…相加)
    ev3.screen.draw_text(0, 16, "BITS " + str(read_bitmap()) + "      ", Color.BLACK, Color.WHITE)
    # 等 0.1 秒
    wait(100)
EV3 MicroPython v2.0 code
#!/usr/bin/env pybricks-micropython
# ============================================================
# 循行者 8 路循線感應器 EV3 新手範例 06:壓線位元圖:在螢幕上畫一把 LED 尺
# 軟體:樂高官方 EV3 MicroPython v2.0(microSD 開機卡+VS Code「LEGO MINDSTORMS EV3 MicroPython」擴充套件)
# 接法:循行者 8 路插 1 號孔
# 這個範例會做什麼:模式 3 送出「壓線位元圖」:8 個位元,每一路壓到線就是 1。這個範例把它畫成一把尺(# =壓到線、. =沒壓到),跟感應器上的 LED 一樣,一眼就看出線在哪幾路、有沒有分岔。
# ============================================================

from pybricks.hubs import EV3Brick
from pybricks.iodevices import Ev3devSensor
from pybricks.parameters import Port, Color
from pybricks.tools import wait

ev3 = EV3Brick()
sensor = Ev3devSensor(Port.S1)     # 循行者 8 路插 1 號孔


def read_bitmap():
    # 壓線位元圖:0 ~ 255:bit0=第 1 路(最左)… bit7=第 8 路,1=那一路壓到線
    return sensor.read('IR-REM-A')[0] & 0xFFFF


# ---------- 程式從這裡開始 ----------
# 清除螢幕
ev3.screen.clear()
# 一直重複
while True:
    # 第 1 行畫尺:8 格,最左是第 1 路,# =壓到線、. =沒壓到
    bits_value = read_bitmap()
    bits_text = ""
    for b in range(8):
        if (bits_value // (2 ** b)) % 2 == 1:   # 第 b 個位元是 1
            bits_text = bits_text + "#"
        else:
            bits_text = bits_text + "."
    ev3.screen.draw_text(0, 0, "LINE " + bits_text + "  ", Color.BLACK, Color.WHITE)
    # 第 2 行顯示位元圖的數字(第 1 路=1、第 2 路=2、第 3 路=4…相加)
    ev3.screen.draw_text(0, 16, "BITS " + str(read_bitmap()) + "      ", Color.BLACK, Color.WHITE)
    # 等 0.1 秒
    wait(100)
Step by step:
- Clear the screen
- Repeat forever
- Row 1 draws the ruler: 8 cells, channel 1 on the far left, # = on the line, . = not
- Row 2 shows the bitmap as a number (channel 1 = 1, channel 2 = 2, channel 3 = 4 … added up)
- Wait 0.1 s
What you should see: Put the sensor over the black line: 2~3 # marks follow the line along the ruler; at a crossing the whole row turns into #; with no line it is all dots. The number is the sum of 1, 2, 4, 8 … for the channels on the line, for example channels 1 and 2 = 3.
FAQ:
- The ruler is mirrored compared with the sensor LEDs? The ruler is seen from behind the robot (far left = channel 1); the LEDs may look mirrored when viewed from above.
- The number stays at 0 or never changes? This mode needs sensor firmware v4.0 (2026-10) or later; update older firmware first.
- Why is there no EV3-G / Classroom version? This example uses a new mode (firmware v4, 2026-10). The EV3-G and Classroom infrared blocks cannot read it; only Pybricks, EV3 MicroPython and clev3r can.
- The number never changes? Check that the sensor light is on and the cable is seated. Turn the EV3 on before plugging in the sensor, or unplug and plug it back in.
Still stuck? Leave a message on Contact us with the software you use and a screenshot of your program, and we will help.
More questions
- The EV3 shows an infrared sensor? Expected: the sensor emulates a LEGO sensor so the stock blocks can read it.
- A short freeze when switching modes? The EV3 needs about 1 s per mode change. Stick to one mode during a run.
Still stuck? Contact us with your software and a screenshot of the program.
Downloads
- line8_pybricks_ev3.zip
- MBC_line8_EV3_Lib.py
- MBC_sensors.py
- line8_ev3_block_with_lib.py
- line8_ev3_python_with_lib.py
- Download centre (libraries, firmware, catalogue for every product)
Sources
- Host and software list:
_build/guides.json - Values and commands:
_build/protocol/line8.json(single source of truth) - Setup:
_build/guides/software/ev3-pybricks.en.md、_build/guides/product/line8/ev3-pybricks.en.md - Examples:
sensors/line8/ev3-examples.md