
Pathfinder 8-Way (Line8) × SPIKE × Pybricks
Interactive tutorialSPIKE
First time? Try the interactive tutorial in your browser first, then follow the steps below with your hub.
MicroPython (Pybricks)Pybricks blocksPybricks built-in blocks (no library)
This page covers Pybricks (Python) only: how to set it up for the Pathfinder 8-Way (Line8) on SPIKE Prime / Robot Inventor, how to read every value, the commands it supports and examples. Use the switcher above to change product, host or software.
Setup
What you need
- Sensor: Pathfinder 8-Way (Line8) (SPIKE edition).
- Hub: SPIKE Prime or Robot Inventor.
- Computer: Chrome. Open code.pybricks.com and start writing; nothing to install.
- Hub firmware: must be switched to Pybricks firmware v4.1 first (the stable code.pybricks.com is v4.1.1; v4.1.0 from the MBC SPIKE Blocks website works too). Every example on this site is written for v4.1.
- Library:
MBC_line8_obj_Lib.py(only needed for the "import the library" method). For a new program of your own, import justMBC_sensors.py: one file for every MBC sensor.
Note
The Pybricks 3.6.1 libraries and examples are no longer updated (the 2026 SPIKE Prime hubs cannot run 3.6.1 either). For hubs that have not been upgraded, the old files are under "Legacy (no longer updated)" on the Downloads page.
Install the software
- Open code.pybricks.com in Chrome.
- Switch the hub to Pybricks firmware. The easiest way is the MBC SPIKE Blocks website: top menu "SPIKE Hub → Install/Update Pybricks firmware", about 3 minutes.
- To go back to the official LEGO App later, switch back to the original LEGO firmware with the SPIKE App.
Make the software see the sensor
Pybricks can read the sensor two ways; pick one:
- Built-in commands (no library): read the sensor with Pybricks' own sensor commands. No extra file, quickest to start.
- Import the library: download MBC_line8_obj_Lib.py to get more data, such as the high-resolution position and every channel.
To import the library:
- In code.pybricks.com, click "Import a file" in the file panel on the left.
- Import both the example file and
MBC_line8_obj_Lib.py, so they are in the same project list. - Open the example and press ▶ to run.
Important
New projects: use
MBC_sensors.py. Old projects: just replace the one file they already use.MBC_sensors.pyis one file for every MBC sensor (the EXP6 and Servo6 expander libraries are separate downloads); writefrom MBC_sensors import MBC_LINE8, with the same class names as in the old files. The old file names (such asMBC_line8_obj_Lib.pyused by the examples on this page) are kept for existing programs: swap in the new file with the same name and the program needs no changes. But every old-name file is the whole shared library, so importing 3 or more of them in one program goes over the SPIKE program slot limit of about 51 KB; to mix several sensors, import onlyMBC_sensors.py.
Tip
The file name must match the name in the program's
importexactly, or you will get anImportError. The library files on this site have no version suffix, so you do not need to rename them.
Tip
Most libraries take a
multitaskargument when you create the object:Falseis normal mode, one line after another;Trueis multitask mode, where every call needsawaitin front so the robot can do several things at once.
Wiring
- Plug the sensor into hub port C with the cable (any of A~F works).
- Use the same port in the program: built-in commands use
Port.APort.F; a library'sportargument is usually16for A~F. - Latch up, push the plug in gently.
Calibrate first (only once)
The Pathfinder has to "learn" the black and white of your mat before its numbers are right. Calibration is stored in the sensor and survives power-off (until you change mats).
- Plug in the sensor and turn the hub on (the sensor lights come on).
- Hold the calibration button for about 0.5 s, then release it (do not keep holding it; holding it keeps restarting calibration).
- When the green calibration LED (next to the button) lights up, sweep the sensor back and forth between the black line and the white floor within 5 seconds. All 8 sensing points must pass over the darkest black line and the brightest white area.
- Keep the sensor 3~12 mm above the surface while sweeping; higher reads poorly.
- The green LED goes off = calibration done, saved in the sensor automatically.
How do I know it worked? On the white floor the "line width" is 0; on a normal black line it is 2~3.
Library and example downloads
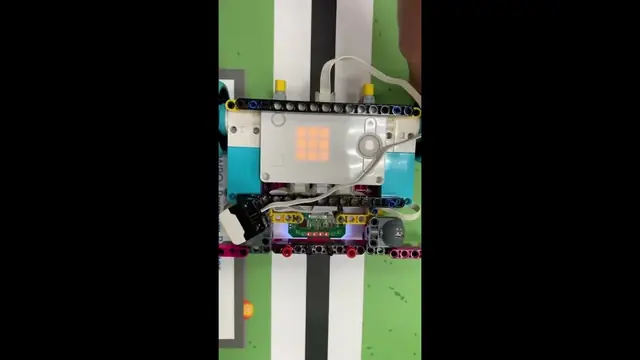
The hub needs Pybricks firmware v4.1 (tested on Pybricks 4.1.2 from 2026-10-29 to 11-01: the library, built-in ColorSensor, Pybricks Code blocks and the command examples all ran on a hub). The zip has MBC_sensors.py, MBC_line8_obj_Lib.py and 4 examples:
Library only: MBC_sensors.py (use this for new projects: one file for every MBC sensor) · MBC_line8.py (when only a Pathfinder 8-Way is connected: smaller file, faster upload: from MBC_line8 import MBC_LINE8) · MBC_line8_obj_Lib.py (for the examples on this page and older programs)
Important
The examples say
from MBC_line8_obj_Lib import MBC_LINE8, so importMBC_line8_obj_Lib.py(no renaming needed). For a new program of your own, writefrom MBC_sensors import MBC_LINE8and import onlyMBC_sensors.py. The library must be in the same project list as the main program.
Warning
MBC libraries downloaded before 2026-10-29 stop with
NameError: name 'property' isn't definedas soon as they are imported on Pybricks 4.1.2 (the 4.1.2 hub has noproperty). Download the files on this page again (fixed and tested on 4.1.2).
Note
Pybricks 3.6.1 is no longer updated; the old files are under "Legacy (no longer updated)" on the Downloads page. The 3.6.1 built-in examples only fit sensor firmware before 2026-10-30 (with newer firmware the old split reads the width ×10).
Method 1: built-in sensor commands (no library)
Read with Pybricks' built-in ColorSensor commands, no extra file. These values are computed from the built-in commands:
| Set | Function | Range | Meaning |
|---|---|---|---|
| Basic (less sensitive to calibration, but calibrate once) | getLinePos8() |
-8 ~ +8 |
Line position (integer), 0 centre, negative left, positive right |
getLineWidth8() |
0 ~ 8 |
Line width (sensors triggered), for crossings and T-junctions | |
| High precision (calibrate properly first) | getLinePos100() |
-100 ~ +100 |
High-resolution interpolated position for advanced PID |
getLineWidth100() |
0 ~ 8 |
Line width in high-precision mode, in sync with getLinePos100() |
Tip
Use position and width from the same set:
getLinePos8()withgetLineWidth8(),getLinePos100()withgetLineWidth100(), so both come from the same moment.
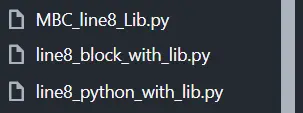
Examples: blocks line8_block_native.py; Python line8_python_native.py
Important
Decoding on Pybricks 4.1 (the examples above already do this)
reflection()(mode 5) = coarse position + width. Always convert to an integer before splitting:r = int(line.reflection()); 8-ch: position =r // 10 - 8(−8 to +8), width =r % 10. Sensor firmware from 2026-11-01 (release v1.0-261101) sends an exact integer; older firmware gives one decimal on Pybricks 4.x (e.g. 81.3), and without the conversion the width splits into values like 2.5. Keep theint()and it works on old and new firmware. Blocks have no "integer" block: use "floor" for values ≥ 0 and "ceiling" for negative ones, which equalsint()(the 8-way tops out at 168 and is never negative).ambient()(mode 7) = "fine position + 100 . width", width in the first decimal: fine position = integer part − 100, width =round(line.ambient() * 10) % 10. Needs sensor firmware from 2026-10-30 or later; on older firmware the width reads 0 (position still works). With older firmware, take the width from reflection instead, or install the MBC library (mode 9 gives every value on old and new firmware).- Positions are sent with an offset and subtracted after reading; negative numbers are never sent directly.
- Direction: line on the left = negative, on the right = positive (seen from behind the robot). With the whole row on white paper (no line) the width is 0 and the position stays on the side where the line was last seen (e.g. +8) instead of going back to 0, so check the width to tell whether there is a line.
- Advanced (Python only):
line.hsv(surface=False).h= (fine position + 100) × 100 + width, giving the full width.
Method 2: import the library
| Function | Range | Meaning |
|---|---|---|
line_init_port_multitask(port, multitask) |
— | Initialise. port = 1multitask=True enables async mode (use with await) |
line_pos8() |
-8 ~ +8 |
Integer line position, less sensitive to calibration (without calibration every channel reads as black) |
line_pos100() |
-100 ~ +100 |
High-resolution interpolated position, best for PID; calibrate properly |
line_width() |
0 ~ 8 |
Line width, works with both position functions |
line_ir_calibration() |
list[8] |
8 calibrated values (each 0 ~ 100). Seen from behind the robot: index 0 = far left (ch1) |
line_ir_ch(ch) |
0 ~ 100 |
One calibrated channel, ch = 1~8; fast to call repeatedly (shared cache) |
line_junction() |
0, 1, 2+ |
Number of line groups: 0 none, 1 single line, 2+ junction |
line_junction_name() |
str |
"none", "line", "junction" |
line_bin_raw() |
0 ~ 255 |
8-bit trigger mask, bit0 = ch1, 1 = line seen |
line_on_sensors() |
list[int] |
Channels seeing the line, e.g. [4, 5] |
line_read_all() |
dict |
Everything at once: ir_calibration, line_pos8, line_pos100, line_width, bin_raw, on_sensors, junction, junction_name |
Examples: blocks line8_block_with_lib.py; Python line8_python_with_lib.py
Command examples (calibration, mirror)
These send commands with the shared MBC library (see "Commands" further down this page for each command). First upload MBC_sensors.py to Pybricks Code into the same project list; sensor on port C; follow the hints in the output pane and press the hub's left button to go on (the centre button still stops the program). Needs sensor firmware from 2026-10 or later. All 3 have been run on a hub.
| Example | What it does | How to tell it worked |
|---|---|---|
| line8_cmd_calib_bw.py | Black/white calibration (E2 black, E3 white): put the whole row on black and press left, then on white paper and press left (keep the height fixed) | Black light values all 0; white-paper light values (ir_calibration(), 0–100) 80 or more |
| line8_cmd_calib_auto.py | E7 5-second auto calibration: sweep the sensor across the black line and white surface for 5 s (fixed height, no tilt) | State goes from busy to done; white-paper light values 70 or more (quality depends on how you sweep) |
| line8_cmd_reverse.py | E9 mirror left/right, and shows that a wrong parameter returns "failed" | Line position changes sign (e.g. −7 → +7, send 0 to switch back); sending 5 returns "failed" |
- Keep the sensor at a fixed height while calibrating (mounted on the robot or propped on bricks, about 5–10 mm above the paper). Calibrating hand-held or with the sensor flat on the paper gives low white readings (measured 66–85; 86–100 at a fixed height).
- Commands tested on a hub (2026-10-29 to 31, Pybricks 4.1.2): E0, E1, E2, E3, E4, E7 and E9 behave as described under "Commands" below; sending E2 during a calibration returns 3 (rejected); the unsupported E5, E6, E8, EA, EE, EF and F8 return 3; resending the same command does not run it again.
PD line-following demos (speed 50)
One PD line-following logic in 4 reading methods, each as blocks and as Python: 8 programs. They stop at a crossing (the whole row on the line). All 8 have been run on a Pybricks hub.
| Method | Reads | Suggested KP / KD | Stops at crossing | Blocks | Python |
|---|---|---|---|---|---|
| Built-in reflection (mode 5) | ColorSensor.reflection(): coarse position + width |
5 / 20 | width > 5 | mode5_block | mode5_python |
| Built-in ambient (mode 7) | ColorSensor.ambient(): fine position + width (firmware 2026-10-30 or later) |
0.4 / 1.5 | width > 5 | mode7_block | mode7_python |
| Product library | MBC_line8_obj_Lib: pos100() + width() (mode 9) |
0.4 / 1.5 | width > 5 | lib_block | lib_python |
| Shared library | MBC_sensors: same |
0.4 / 1.5 | width > 5 | sensors_block | sensors_python |
- Wiring: sensor on port C, left motor on E (set to COUNTERCLOCKWISE in the program), right motor on F.
- Speed 50 (power %). KP and KD are starting values; tune them on your robot: lower KP if it wobbles, lower KD if turns are too slow.
- For the two library methods, first upload
MBC_line8_obj_Lib.pyorMBC_sensors.pyto Pybricks Code into the same project list as the program (included in the zip). - The block files open as Pybricks blocks; the first line holds the block data, so import the whole file rather than copying only the Python part.
Want to learn more advanced line following?
These coaches have plenty of competition and teaching experience: Coach LegoLauXiao (demo video), Coach legolaumo (demo video).
First test
- Turn on the hub and connect it in code.pybricks.com.
- Import and open example 1 on this page, then press ▶.
- If the numbers printed in the console change with what is in front of the sensor, everything is connected.
FAQ
ImportError? The library was not imported into the same project, or its file name differs from theimportname. Rename it toMBC_line8_obj_Lib.pyand import it again.- The example does not run, or a command is unknown? The hub firmware is too old: the examples on this site are written for Pybricks v4.1, so update the hub to v4.1 first. 3.6.1 is no longer updated; the old files are on the Downloads page.
- What happens if the sensor cable comes out? The program keeps running: the library returns the last value it read and prints one notice in the console (in Chinese and English:
MBC: Port C 讀不到感應器,先回傳上一次的值 / no sensor, using the last value); if the sensor was never connected it returnsNone. To check in your program, call the object'ssensor_ok():Trueif the last read worked,Falseif not (addawaitin multitask mode). Once you plug it back in the library keeps reading; if the sensor was missing from the start and you use multitask mode, run the program again. - An example marked "Pybricks only" shows strange numbers? It uses a new mode in sensor firmware from 2026-10 on; older firmware returns different numbers.
- The official App cannot connect any more? The hub now runs Pybricks firmware: switch back to the original LEGO firmware with the SPIKE App.
Reading values
Code assumes the sensor is on port A. For the MBC library form, import the library .py into Pybricks too.
line position linePos
| Range | Meaning |
|---|---|
-8~+8 |
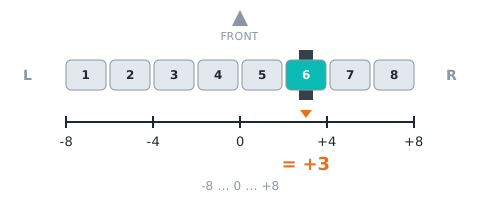
which channel the line is under: −8 (far left) to +8 (far right), 0 = centre; seen from behind the robot, negative = left |
from pybricks.iodevices import PUPDevice
from pybricks.parameters import Port

dev = PUPDevice(Port.A)   # sensor on port A

w = dev.read(9)[4]
linePos = (w & 0xFF) - 8   # line position(lo byte)
MBC library
from pybricks.parameters import Port
from MBC_line8_obj_Lib import MBC_LINE8

line = MBC_LINE8(Port.A)
linePos = line.pos8()
mode 0 (edu) byte 1 −8 🔒; mode 0 (toy) byte 0 −8 🔒; mode 1 byte 0 −8; mode 5 v[0] 🔒; mode 9 v[4] lo −8 🔒. Note: Pybricks reflection() 編碼:X = (線位置+8)×10 + 線寬(0~168),共用核心 mbcReflFill8 送出:2026-11-01 以後的韌體 reflection() 剛好 = X(3.x、4.x 都是整數);舊韌體(R=G=B=a×256+b)在 4.x 帶 0.3~0.9 的小數,先 int()。主機 ÷10 取整−8 = 線位置、取餘數 = 線寬(INO:947-950)
fine position linePosFine
| Range | Meaning |
|---|---|
-100~+100 |
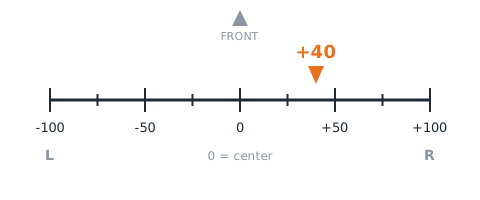
sub-channel position: −100 to +100, 0 = centre, negative = left (same sign as line position) |
from pybricks.iodevices import PUPDevice
from pybricks.parameters import Port

dev = PUPDevice(Port.A)   # sensor on port A

w = dev.read(9)[5]
linePosFine = (w & 0xFF) - 100   # fine position(lo byte)
MBC library
from pybricks.parameters import Port
from MBC_line8_obj_Lib import MBC_LINE8

line = MBC_LINE8(Port.A)
linePosFine = line.pos100()
mode 0 (edu) byte 2 −100 🔒; mode 3 byte 0 −100; mode 4 v[0] −100; mode 7 v[0] 🔒; mode 9 v[5] lo −100 🔒. Note: 4 個 int16:第 1、2、4 格 = (細位置+100)×100 + 線寬(0~20008;Pybricks hsv(surface=False).h 讀第 1 格,原封不動);第 3 格 = (細位置+100)×100 + min(線寬,9)×10(Pybricks ambient() 讀這格:4.1.2 先 ÷10 去尾再 ÷10、3.6.1/4.0.0 ÷100,都得到 細位置+100 . 線寬)。2026-10-30 起第 3 格改這個編碼
line width lineWidth
| Range | Meaning |
|---|---|
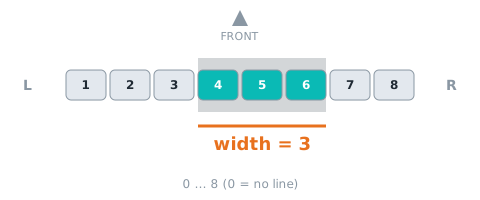
0~8 路 |
number of channels on the line, 0~8; 0 = no line |
from pybricks.iodevices import PUPDevice
from pybricks.parameters import Port

dev = PUPDevice(Port.A)   # sensor on port A

w = dev.read(9)[4]
lineWidth = ((w >> 8) & 0xFF)   # line width(hi byte)
MBC library
from pybricks.parameters import Port
from MBC_line8_obj_Lib import MBC_LINE8

line = MBC_LINE8(Port.A)
lineWidth = line.width()
mode 0 (edu) byte 0 🔒; mode 0 (toy) byte 1 🔒; mode 2 byte 0; mode 5 v[0] 🔒; mode 7 v[0] 🔒; mode 9 v[4] hi 🔒. Note: 跟線位置合在 reflection() 的個位數(見線位置); 跟細位置合在一起(見細位置):第 1、2、4 格是個位數(hsv(surface=False).h),第 3 格是十位數、最多 9(ambient() 的小數第 1 位)
line segments groupCount
| Range | Meaning |
|---|---|
0~4 |
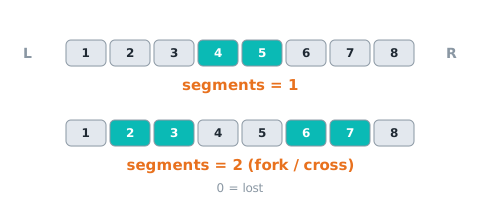
number of separate line segments: 0 = lost, 1 = one line, ≥2 = fork / crossing |
from pybricks.iodevices import PUPDevice
from pybricks.parameters import Port

dev = PUPDevice(Port.A)   # sensor on port A

w = dev.read(9)[5]
groupCount = ((w >> 8) & 0xFF)   # line segments(hi byte)
MBC library
from pybricks.parameters import Port
from MBC_line8_obj_Lib import MBC_LINE8

line = MBC_LINE8(Port.A)
groupCount = line.junction()
mode 9 v[5] hi 🔒
line bitmap bitmap
| Range | Meaning |
|---|---|
0~255 bit |
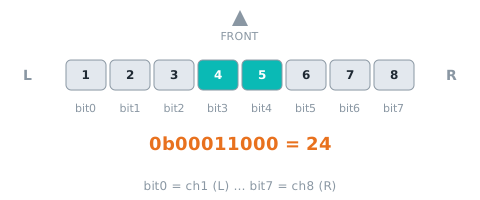
bit0 = channel 1 (left) … bit7 = channel 8; 1 = that channel sees the line |
from pybricks.iodevices import PUPDevice
from pybricks.parameters import Port

dev = PUPDevice(Port.A)   # sensor on port A

w = dev.read(9)[6]
bitmap = (w & 0xFF)   # line bitmap(lo byte)
MBC library
from pybricks.parameters import Port
from MBC_line8_obj_Lib import MBC_LINE8

line = MBC_LINE8(Port.A)
bitmap = line.bin_raw()
mode 4 v[1]; mode 9 v[6] lo 🔒
channel 1~8 reflect light
| Range | Meaning |
|---|---|
0~100 |
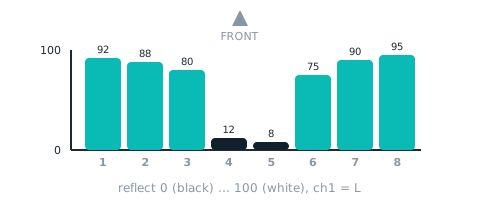
calibrated reflect of channel 1 |
from pybricks.iodevices import PUPDevice
from pybricks.parameters import Port

dev = PUPDevice(Port.A)   # sensor on port A

words = dev.read(9)[0:4]
light = []
for w in words:
    light.append(w & 0xFF)          # odd channel
    light.append((w >> 8) & 0xFF)   # even channel
MBC library
from pybricks.parameters import Port
from MBC_line8_obj_Lib import MBC_LINE8

line = MBC_LINE8(Port.A)
light = line.ir_calibration()   # list, channel 1 = [0]
mode 0 (edu) byte 4 🔒; mode 9 v[0] 🔒. Note: 4-bit (v×10)>>6; 每 int16 兩路:lo = 奇數路、hi = 偶數路
Not readable here:last exit direction, threshold, calibrations done. Use Arduino / mBlock / micro:bit for these.
Commands
Commands need the MBC library (2026-10 or later) and sensor firmware from 2026-10 or later: send with cmd(code, params…), then wait_done() waits for it (True = done; False = failed, rejected or timed out). Sensor states: 0 done, 1 busy, 2 failed (e.g. parameter out of range), 3 rejected (unknown command, or another command sent during calibration).
- On older firmware
cmd()reports "firmware too old"; readings keep working. - The same command with the same parameters is not repeated (even inside a loop); pass
cmd(…, again=True)to run it again. wait_done()costs 40–60 ms each time: use it for stop-and-do commands such as calibration, not inside a line-following loop.- The official SPIKE App 3 and Pybricks' built-in ColorSensor blocks cannot send commands.
black line mode blackLine
follow a black line (default); RAM only, back to the default after reset
from pybricks.parameters import Port
from MBC_sensors import MBC_LINE8

line = MBC_LINE8(Port.A)
line.cmd(0xE0)   # black line mode
ok = line.wait_done()   # True = done; False = failed / rejected / timed out
Pybricks + the MBC library only (not the official app or built-in ColorSensor blocks); needs sensor firmware from 2026-10 or later.
white line mode whiteLine
follow a white line (F3 b1 = 1); RAM only, back to the default after reset
from pybricks.parameters import Port
from MBC_sensors import MBC_LINE8

line = MBC_LINE8(Port.A)
line.cmd(0xE1)   # white line mode
ok = line.wait_done()   # True = done; False = failed / rejected / timed out
Pybricks + the MBC library only (not the official app or built-in ColorSensor blocks); needs sensor firmware from 2026-10 or later.
calibrate black calibBlack
store the current reading as black (sensor over the black line), ~50 ms; saved to EEPROM
from pybricks.parameters import Port
from MBC_sensors import MBC_LINE8

line = MBC_LINE8(Port.A)
line.cmd(0xE2)   # calibrate black
ok = line.wait_done()   # True = done; False = failed / rejected / timed out
Pybricks + the MBC library only (not the official app or built-in ColorSensor blocks); needs sensor firmware from 2026-10 or later.
calibrate white calibWhite
store the current reading as white (sensor over the white surface), ~50 ms; saved to EEPROM
from pybricks.parameters import Port
from MBC_sensors import MBC_LINE8

line = MBC_LINE8(Port.A)
line.cmd(0xE3)   # calibrate white
ok = line.wait_done()   # True = done; False = failed / rejected / timed out
Pybricks + the MBC library only (not the official app or built-in ColorSensor blocks); needs sensor firmware from 2026-10 or later.
set threshold setThreshold
threshold 1~99 (RAM only, back to 50 after reboot); on SPIKE an out-of-range value returns failed (state 2)
from pybricks.parameters import Port
from MBC_sensors import MBC_LINE8

line = MBC_LINE8(Port.A)
line.cmd(0xE4, 50)   # set threshold(threshold 1~99)
ok = line.wait_done()   # True = done; False = failed / rejected / timed out
Pybricks + the MBC library only (not the official app or built-in ColorSensor blocks); needs sensor firmware from 2026-10 or later.
5-second auto calibration calibAuto
sweep the sensor across black line and white surface for 5 s; min/max become the references; F3 b2 = 1 meanwhile
from pybricks.parameters import Port
from MBC_sensors import MBC_LINE8

line = MBC_LINE8(Port.A)
line.cmd(0xE7)   # 5-second auto calibration
ok = line.wait_done(8000)   # True = done; False = failed / rejected / timed out
Pybricks + the MBC library only (not the official app or built-in ColorSensor blocks); needs sensor firmware from 2026-10 or later.
mirror left/right reverse
[0 normal / 1 mirrored]: for a sensor mounted backwards — channel order and line position are mirrored; calibration stays per physical channel; RAM only, 0 after reset (not in legacy mBlock); on SPIKE an out-of-range value returns failed (state 2)
from pybricks.parameters import Port
from MBC_sensors import MBC_LINE8

line = MBC_LINE8(Port.A)
line.cmd(0xE9, 1)   # mirror left/right(mirrored 0~1)
ok = line.wait_done()   # True = done; False = failed / rejected / timed out
Pybricks + the MBC library only (not the official app or built-in ColorSensor blocks); needs sensor firmware from 2026-10 or later.
Examples
Example 1: See the black line
What this example does: the hub display keeps showing the line position (-8 to 8). Slowly move the black line from left to right and the number goes from negative to positive.
What you need
- 1 SPIKE hub
- 1 Pathfinder 8-Way (calibrated)
- A sheet of white paper with a black line drawn on it (or a competition mat)
How to connect: Pathfinder on port C.
Download the program
| Pybricks |
|---|
| ex01_show_position.py + library |
Pybricks code
# 循行者 8 路 範例 1:看見黑線(顯示線位置)
# 接線:循行者 8 路 → C 埠
from pybricks.hubs import PrimeHub
from pybricks.tools import wait
from MBC_line8_obj_Lib import MBC_LINE8

hub = PrimeHub()
line8 = MBC_LINE8(3)          # 3 = C 埠(1=A、2=B、3=C、4=D、5=E、6=F)

while True:
    pos = line8.pos8()        # 線位置:-8(線在左)~ 0(中間)~ 8(線在右)
    hub.display.number(pos)   # 主機螢幕顯示這個數字
    print(pos)                # 電腦畫面也印出來
    wait(200)                 # 等 0.2 秒再讀下一次
Step by step through the program
- Repeat forever: the blocks inside keep running until you press stop.
- Read the line position: in the official App it is "reflected light minus 8"; the MBC Blocks website and Pybricks have "line position (-8~8)" directly.
- Show it on the display: the official App uses the "write" block, the MBC Blocks website uses "show number on display", and Pybricks uses
hub.display.number(). - Wait 0.2 seconds: lets the number sit still long enough for your eyes to read it.
What you should see
- Line right under the sensor: the display shows 0 (-1 and 1 count as center too).
- Move the black line to the left: the number goes negative, closer to -8 the farther left you go.
- Move it to the right: it goes positive, closer to 8 the farther right you go.
Common problems
- The number is stuck at 0 and never changes? → First check whether "line width" is 8 (every point thinks it sees black): that means the sensor is not calibrated yet; go back to "calibrate" above.
- Left and right are swapped? → The sensor is mounted upside down (the side with the components must face down, toward the floor).
- The official App shows 8 instead of 0? → You forgot to "subtract 8".
Example 2: Black line alarm
What this example does: when it sees the black line, the hub's center light turns green; when it can't find the line, the light turns red and the hub keeps beeping.
What you need: same as example 1.
How to connect: Pathfinder on port C.
Download the program
| Pybricks |
|---|
| ex02_line_alarm.py + library |
Pybricks code
# 循行者 8 路 範例 2:黑線警報(壓到線亮綠燈;找不到線亮紅燈並嗶一聲)
# 接線:循行者 8 路 → C 埠
from pybricks.hubs import PrimeHub
from pybricks.parameters import Color
from pybricks.tools import wait
from MBC_line8_obj_Lib import MBC_LINE8

hub = PrimeHub()
line8 = MBC_LINE8(3)                  # 3 = C 埠

while True:
    if line8.width() > 0:             # 線寬 = 有幾路踩在黑線上;大於 0 就是有看到線
        hub.light.on(Color.GREEN)
    else:                             # 線寬 = 0:一路都沒踩到 → 找不到線
        hub.light.on(Color.RED)
        hub.speaker.beep(880, 100)    # 頻率 880 Hz,響 0.1 秒
    wait(100)
Step by step through the program
- Read the line width: in the official App use the "color" block; what it returns is the line width.
- If line width > 0 then…: at least one sensor point is on the black line → green light.
- Else…: line width is 0, meaning not a single point is on the line → red light and a beep.
- Wait 0.1 seconds, then check again.
What you should see
- Sensor on the black line: green light.
- Move it onto the white floor: red light + nonstop beeping.
Common problems
- Always green, even on white paper? → Not calibrated yet (every point is being read as black).
- How do I pick the light color in the official App? → Click the color dot on the "set Power Button light to" block to change it.
Example 3: Which side is the line on
What this example does: the hub display uses an arrow to tell you where the line is: line on the left → ⬅, line on the right → ➡, in the center → ⬆, no line found → ✕.
What you need: same as example 1.
How to connect: Pathfinder on port C.
Download the program
| Pybricks |
|---|
| ex03_which_side.py + library |
Pybricks code
# 循行者 8 路 範例 3:線在哪一邊(主機螢幕顯示箭頭)
# 接線:循行者 8 路 → C 埠
from pybricks.hubs import PrimeHub
from pybricks.parameters import Icon
from pybricks.tools import wait
from MBC_line8_obj_Lib import MBC_LINE8

hub = PrimeHub()
line8 = MBC_LINE8(3)                      # 3 = C 埠

while True:
    pos = line8.pos8()                    # 負 = 線在左,正 = 線在右
    if line8.width() == 0:                # 沒看到線(這時位置會停在最後一次的值,不能拿來判斷)
        hub.display.icon(Icon.FALSE)      # 顯示 ✕
    elif pos < -1:
        hub.display.icon(Icon.ARROW_LEFT)
    elif pos > 1:
        hub.display.icon(Icon.ARROW_RIGHT)
    else:                                 # -1、0、1 都算在中間
        hub.display.icon(Icon.ARROW_UP)
    wait(100)
Step by step through the program
- First read the line position and line width and store them in two "variables" (a variable = a box with a name that can hold one number).
- If line width = 0 → show ✕ (no line found; the line position is not reliable right now, so this check comes first).
- Else, if line position < -1 → show the left arrow.
- Else, if line position > 1 → show the right arrow.
- Otherwise (-1, 0, 1) → show the up arrow, meaning the line is in the center.
What you should see: slowly move the line from left to right and the arrow changes ⬅ → ⬆ → ➡; lift the sensor off the line and it becomes ✕.
Common problems
- Why is the center -1 to 1 instead of just 0? → The line has some width, so being slightly off still counts as center; otherwise the arrow would flicker back and forth all the time.
- How do I change the picture in the official App? → Click the little grid image on the "turn on" block and light up whichever pixels you want.
Example 4: The simplest line following
What this example does: the robot follows the black line on its own. Line on the left → turn left; line on the right → turn right; line in the center → go straight.
What you need
- Everything from example 1, plus
- A two-wheel robot car (two motors as wheels)
- A closed loop of black line (about 2 cm wide, no sharp turns)
How to connect
- Pathfinder on port C, mounted at the front of the car, about 0.5 to 1 cm above the floor
- Left wheel motor on E, right wheel motor on F
Download the program
| Pybricks |
|---|
| ex04_simple_follow.py + library |
Pybricks code
# 循行者 8 路 範例 4:最簡單的循線(線在左就左轉、線在右就右轉、中間就直走)
# 接線:循行者 8 路 → C 埠;左輪馬達 → E 埠;右輪馬達 → F 埠
from pybricks.parameters import Direction, Port
from pybricks.pupdevices import Motor
from pybricks.robotics import DriveBase
from pybricks.tools import wait
from MBC_line8_obj_Lib import MBC_LINE8

line8 = MBC_LINE8(3)                                   # 3 = C 埠
left = Motor(Port.E, Direction.COUNTERCLOCKWISE)       # 左輪:反過來裝,所以設成逆時針才是往前
right = Motor(Port.F)                                  # 右輪
robot = DriveBase(left, right, wheel_diameter=56, axle_track=112)   # 輪子直徑 56 mm、兩輪距離 112 mm

while True:
    pos = line8.pos8()
    if pos < -1:                  # 線在左邊 → 一邊前進一邊左轉
        robot.drive(100, -60)     # 速度 100 mm/秒,每秒左轉 60 度
    elif pos > 1:                 # 線在右邊 → 右轉
        robot.drive(100, 60)
    else:                         # 線在中間 → 直走
        robot.drive(100, 0)
    wait(10)
Step by step through the program
- Tell the hub where the wheels are: in the official App it is "set movement motors to E+F"; on the MBC Blocks website and in Pybricks it is "drive base: left wheel E, right wheel F".
- Set the speed: 30% in the official App; 100 mm per second in the other two. Start slow, and speed up once it works.
- Repeat forever: read the line position.
- If line position < -1 (line on the left) → turn left while driving.
- Else if line position > 1 (line on the right) → turn right.
- Else → go straight.
What you should see: the car follows the line, wobbling left and right as it goes (that is normal; example 5 improves it).
Common problems
- It shoots off right away and gets farther and farther from the line? → The turn directions are reversed: swap the sign of the two turn numbers (official App: swap -40 and 40; the other two: swap -60 and 60).
- The car drives backward? → The motors are mounted the opposite way from LEGO's standard car. Official App: mount the motors the same way as LEGO's "Driving Base" model; MBC Blocks website: in the "drive base" block, flip the "forward" direction of both the left and right wheels; Pybricks: change the left wheel to
Direction.CLOCKWISEand the right wheel toMotor(Port.F, Direction.COUNTERCLOCKWISE). - It overshoots and runs off on sharp turns? → Lower the speed.
Example 5: Smooth line following + stop at the crossroads
What this example does: follows the line using "turn as much as you are off the line", which is smoother than example 4; when it reaches a crossroads (the whole row of sensor points is on black), it stops and beeps.
What you need: same as example 4, and the black line needs one crossroads.
How to connect: Pathfinder on port C; left wheel motor on E, right wheel motor on F.
Download the program
| Pybricks |
|---|
| ex05_smooth_follow_stop.py + library |
Pybricks code
# 循行者 8 路 範例 5:平順循線,遇到十字路口就停車
# 接線:循行者 8 路 → C 埠;左輪馬達 → E 埠;右輪馬達 → F 埠
from pybricks.hubs import PrimeHub
from pybricks.parameters import Direction, Port
from pybricks.pupdevices import Motor
from pybricks.robotics import DriveBase
from pybricks.tools import wait
from MBC_line8_obj_Lib import MBC_LINE8

hub = PrimeHub()
line8 = MBC_LINE8(3)                                   # 3 = C 埠
left = Motor(Port.E, Direction.COUNTERCLOCKWISE)
right = Motor(Port.F)
robot = DriveBase(left, right, wheel_diameter=56, axle_track=112)

while True:
    if line8.width() >= 6:        # 6 路以上同時踩到黑線 → 十字路口
        robot.stop()
        hub.speaker.beep(880, 500)
        break                     # 跳出迴圈,程式結束
    pos = line8.pos100()          # 更精細的位置:-100 ~ 100
    robot.drive(120, pos * 1.5)   # 偏多少就轉多少:偏越多轉越快
    wait(10)
Step by step through the program
- Read the fine line position (-100 to 100): in the official App it is "raw red minus 100".
- Read the line width.
- If line width ≥ 6 (the official App writes it as "line width > 5", same meaning) → crossroads: stop → beep → end the program.
- Else → turn amount = line position × a number (0.5 in the official App, 1.5 in the other two). The farther off the line, the harder it turns; slightly off means only a slight turn, so it doesn't wobble left and right.
What you should see: the car glides smoothly along the line and stops with a beep at the crossroads.
Common problems
- Still wobbling left and right? → Make "the multiplier" a bit smaller (for example 0.5 → 0.3).
- Can't keep up on turns and runs off the line? → Make "the multiplier" a bit bigger, or lower the speed.
- Stops before reaching the crossroads? → The line is too wide or the sensor is too close to the floor; change "6" to 7.
- Can't find the "raw red" block in the official App? → Opening the file should automatically add the "More Sensors" block category; if it is missing, click the "+" at the bottom-left of the block palette and add "More Sensors".
More questions
- The hub does not detect the sensor? Unplug and replug, wait 2 s, try another port. The official app shows it as a colour sensor — that is expected.
- Can I use the official app and Pybricks on the same hub? One firmware at a time: Pybricks and the MBC Blocks website need Pybricks firmware, the official app needs LEGO firmware; you can switch back any time with the SPIKE app.
Still stuck? Contact us with your software and a screenshot of the program.
Downloads
- Pybricks library MBC_line8_obj_Lib.py
- Shared library (for new projects, one file for every MBC sensor) MBC_sensors.py
- line8_pybricks_spike_v4.x.zip
- Download centre (libraries, firmware, catalogue for every product)
Sources
- Host and software list:
_build/guides.json - Values and commands:
_build/protocol/line8.json(single source of truth) - Setup:
_build/guides/software/spike-pybricks.en.md、_build/guides/product/line8/spike-pybricks.en.md - Examples:
sensors/line8/spike-examples.md