
Pathfinder 8-Way (Line8) × SPIKE × MBC Blocks website
Interactive tutorialSPIKE
First time? Try the interactive tutorial in your browser first, then follow the steps below with your hub.
This page covers MBC SPIKE Blocks website only: how to set it up for the Pathfinder 8-Way (Line8) on SPIKE Prime / Robot Inventor, how to read every value, the commands it supports and examples. Use the switcher above to change product, host or software.
Setup
What you need
- Sensor: Pathfinder 8-Way (Line8) (SPIKE edition).
- Hub: SPIKE Prime or Robot Inventor.
- Computer: open the website in Chrome. Nothing to install.
- Hub firmware: must be switched to Pybricks firmware first (step 2 below, done from the website).
Install the software
- Open the MBC SPIKE Blocks website (blocks with a Chinese interface, nothing to install).
- Switch the firmware: top menu "SPIKE Hub → Install/Update Pybricks firmware", follow the screen, about 3 minutes. The website flashes Pybricks v4.1.0.
- To go back to the official LEGO App later, switch back to the original LEGO firmware with the SPIKE App.
Make the software see the sensor
No library needed: the MBC sensor blocks are built into the website, one block per value.
- To open an example: top menu "File → Open" (or press Ctrl+O) → pick the downloaded
.abp. - The Blocks website reads more data than the official App (no need to split numbers yourself), but example 6, marked "Pybricks only", uses a new mode that the Blocks website cannot read either.
Wiring
- Plug the sensor into hub port C with the cable (any of A~F works; choose the same port in the blocks).
- Latch up, push the plug in gently.
- When the hub is on, the light on the sensor comes on.
Calibrate first (only once)
The Pathfinder has to "learn" the black and white of your mat before its numbers are right. Calibration is stored in the sensor and survives power-off (until you change mats).
- Plug in the sensor and turn the hub on (the sensor lights come on).
- Hold the calibration button for about 0.5 s, then release it (do not keep holding it; holding it keeps restarting calibration).
- When the green calibration LED (next to the button) lights up, sweep the sensor back and forth between the black line and the white floor within 5 seconds. All 8 sensing points must pass over the darkest black line and the brightest white area.
- Keep the sensor 3~12 mm above the surface while sweeping; higher reads poorly.
- The green LED goes off = calibration done, saved in the sensor automatically.
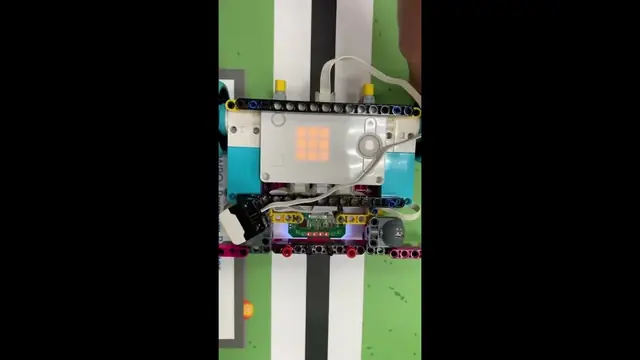
How do I know it worked? On the white floor the "line width" is 0; on a normal black line it is 2~3.
First test
- Connect the website to the hub (the hub must be running Pybricks firmware).
- Open the
.abpof example 1 on this page and press Run. - If the number changes with what is in front of the sensor, everything is connected.
FAQ
- The website can't connect to the hub? The hub still has the original LEGO firmware: do step 2 of "Install the software" to switch to Pybricks firmware.
- The official App can't connect any more? The hub now runs Pybricks firmware: switch back to the original LEGO firmware with the SPIKE App.
- Nothing happens when I plug it in? Check in order: cable firmly in → another port → another cable → another hub.
Reading values
The hub needs Pybricks firmware. The MBC Blocks website reads mode 9 of the sensor (all values in one read).
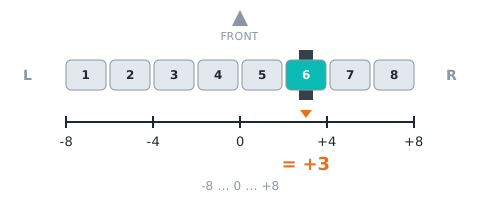
line position linePos
| Range | Meaning |
|---|---|
-8~+8 |
which channel the line is under: −8 (far left) to +8 (far right), 0 = centre; seen from behind the robot, negative = left |
Add this sensor's blocks on the MBC Blocks website and use the "line position" block; on the hub it runs this Pybricks code (mode 9):
from pybricks.iodevices import PUPDevice
from pybricks.parameters import Port

dev = PUPDevice(Port.A)   # sensor on port A

w = dev.read(9)[4]
linePos = (w & 0xFF) - 8   # line position(lo byte)
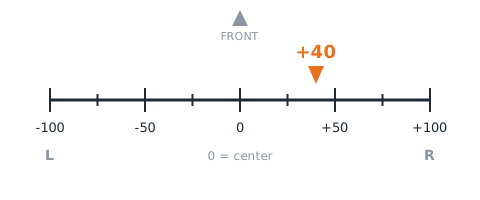
fine position linePosFine
| Range | Meaning |
|---|---|
-100~+100 |
sub-channel position: −100 to +100, 0 = centre, negative = left (same sign as line position) |
Add this sensor's blocks on the MBC Blocks website and use the "fine position" block; on the hub it runs this Pybricks code (mode 9):
from pybricks.iodevices import PUPDevice
from pybricks.parameters import Port

dev = PUPDevice(Port.A)   # sensor on port A

w = dev.read(9)[5]
linePosFine = (w & 0xFF) - 100   # fine position(lo byte)
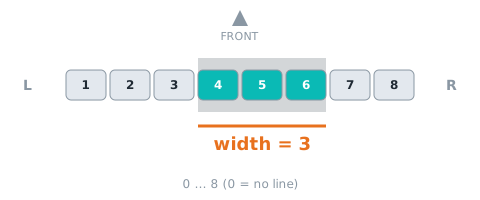
line width lineWidth
| Range | Meaning |
|---|---|
0~8 路 |
number of channels on the line, 0~8; 0 = no line |
Add this sensor's blocks on the MBC Blocks website and use the "line width" block; on the hub it runs this Pybricks code (mode 9):
from pybricks.iodevices import PUPDevice
from pybricks.parameters import Port

dev = PUPDevice(Port.A)   # sensor on port A

w = dev.read(9)[4]
lineWidth = ((w >> 8) & 0xFF)   # line width(hi byte)
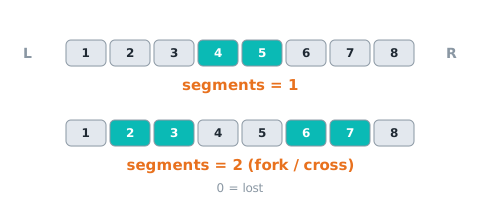
line segments groupCount
| Range | Meaning |
|---|---|
0~4 |
number of separate line segments: 0 = lost, 1 = one line, ≥2 = fork / crossing |
Add this sensor's blocks on the MBC Blocks website and use the "line segments" block; on the hub it runs this Pybricks code (mode 9):
from pybricks.iodevices import PUPDevice
from pybricks.parameters import Port

dev = PUPDevice(Port.A)   # sensor on port A

w = dev.read(9)[5]
groupCount = ((w >> 8) & 0xFF)   # line segments(hi byte)
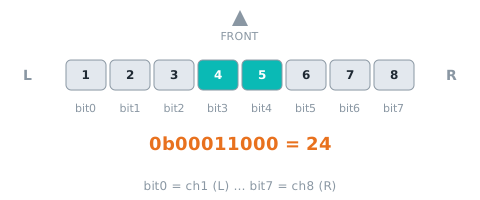
line bitmap bitmap
| Range | Meaning |
|---|---|
0~255 bit |
bit0 = channel 1 (left) … bit7 = channel 8; 1 = that channel sees the line |
Add this sensor's blocks on the MBC Blocks website and use the "line bitmap" block; on the hub it runs this Pybricks code (mode 9):
from pybricks.iodevices import PUPDevice
from pybricks.parameters import Port

dev = PUPDevice(Port.A)   # sensor on port A

w = dev.read(9)[6]
bitmap = (w & 0xFF)   # line bitmap(lo byte)
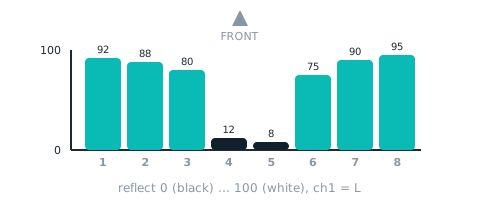
channel 1~8 reflect light
| Range | Meaning |
|---|---|
0~100 |
calibrated reflect of channel 1 |
Add this sensor's blocks on the MBC Blocks website and use the "channel 1~8 reflect" block; on the hub it runs this Pybricks code (mode 9):
from pybricks.iodevices import PUPDevice
from pybricks.parameters import Port

dev = PUPDevice(Port.A)   # sensor on port A

words = dev.read(9)[0:4]
light = []
for w in words:
    light.append(w & 0xFF)          # odd channel
    light.append((w >> 8) & 0xFF)   # even channel
Not readable here:last exit direction, threshold, calibrations done. Use Arduino / mBlock / micro:bit for these.
Commands
This software cannot send commands (neither the official SPIKE App 3 nor Pybricks' built-in ColorSensor blocks can). To send commands use Pybricks + the MBC library; you can also calibrate with the button on the sensor.
Examples
Example 1: See the black line
What this example does: the hub display keeps showing the line position (-8 to 8). Slowly move the black line from left to right and the number goes from negative to positive.
What you need
- 1 SPIKE hub
- 1 Pathfinder 8-Way (calibrated)
- A sheet of white paper with a black line drawn on it (or a competition mat)
How to connect: Pathfinder on port C.
Download the program
| MBC Blocks website |
|---|
| ex01_show_position.abp |
🟦 Blocks on the MBC Blocks website
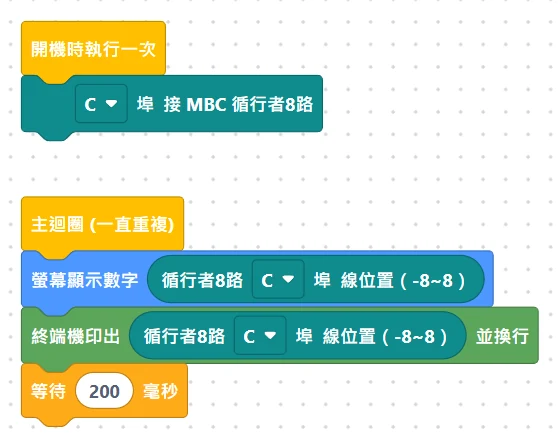
Step by step through the program
- Repeat forever: the blocks inside keep running until you press stop.
- Read the line position: in the official App it is "reflected light minus 8"; the MBC Blocks website and Pybricks have "line position (-8~8)" directly.
- Show it on the display: the official App uses the "write" block, the MBC Blocks website uses "show number on display", and Pybricks uses
hub.display.number(). - Wait 0.2 seconds: lets the number sit still long enough for your eyes to read it.
What you should see
- Line right under the sensor: the display shows 0 (-1 and 1 count as center too).
- Move the black line to the left: the number goes negative, closer to -8 the farther left you go.
- Move it to the right: it goes positive, closer to 8 the farther right you go.
Common problems
- The number is stuck at 0 and never changes? → First check whether "line width" is 8 (every point thinks it sees black): that means the sensor is not calibrated yet; go back to "calibrate" above.
- Left and right are swapped? → The sensor is mounted upside down (the side with the components must face down, toward the floor).
- The official App shows 8 instead of 0? → You forgot to "subtract 8".
Example 2: Black line alarm
What this example does: when it sees the black line, the hub's center light turns green; when it can't find the line, the light turns red and the hub keeps beeping.
What you need: same as example 1.
How to connect: Pathfinder on port C.
Download the program
| MBC Blocks website |
|---|
| ex02_line_alarm.abp |
🟦 Blocks on the MBC Blocks website
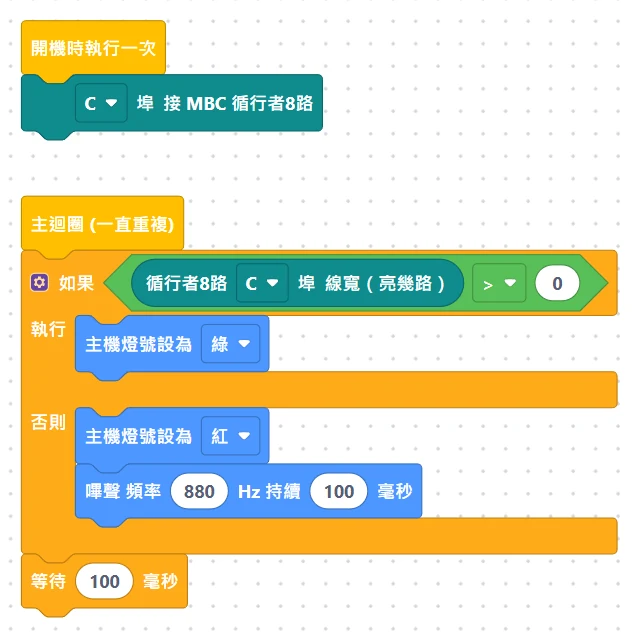
Step by step through the program
- Read the line width: in the official App use the "color" block; what it returns is the line width.
- If line width > 0 then…: at least one sensor point is on the black line → green light.
- Else…: line width is 0, meaning not a single point is on the line → red light and a beep.
- Wait 0.1 seconds, then check again.
What you should see
- Sensor on the black line: green light.
- Move it onto the white floor: red light + nonstop beeping.
Common problems
- Always green, even on white paper? → Not calibrated yet (every point is being read as black).
- How do I pick the light color in the official App? → Click the color dot on the "set Power Button light to" block to change it.
Example 3: Which side is the line on
What this example does: the hub display uses an arrow to tell you where the line is: line on the left → ⬅, line on the right → ➡, in the center → ⬆, no line found → ✕.
What you need: same as example 1.
How to connect: Pathfinder on port C.
Download the program
| MBC Blocks website |
|---|
| ex03_which_side.abp |
🟦 Blocks on the MBC Blocks website
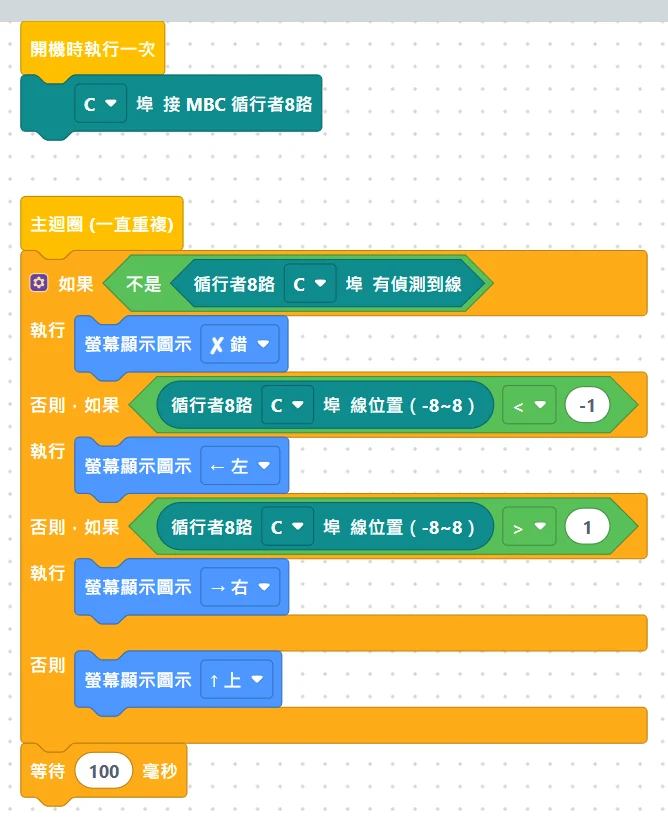
Step by step through the program
- First read the line position and line width and store them in two "variables" (a variable = a box with a name that can hold one number).
- If line width = 0 → show ✕ (no line found; the line position is not reliable right now, so this check comes first).
- Else, if line position < -1 → show the left arrow.
- Else, if line position > 1 → show the right arrow.
- Otherwise (-1, 0, 1) → show the up arrow, meaning the line is in the center.
What you should see: slowly move the line from left to right and the arrow changes ⬅ → ⬆ → ➡; lift the sensor off the line and it becomes ✕.
Common problems
- Why is the center -1 to 1 instead of just 0? → The line has some width, so being slightly off still counts as center; otherwise the arrow would flicker back and forth all the time.
- How do I change the picture in the official App? → Click the little grid image on the "turn on" block and light up whichever pixels you want.
Example 4: The simplest line following
What this example does: the robot follows the black line on its own. Line on the left → turn left; line on the right → turn right; line in the center → go straight.
What you need
- Everything from example 1, plus
- A two-wheel robot car (two motors as wheels)
- A closed loop of black line (about 2 cm wide, no sharp turns)
How to connect
- Pathfinder on port C, mounted at the front of the car, about 0.5 to 1 cm above the floor
- Left wheel motor on E, right wheel motor on F
Download the program
| MBC Blocks website |
|---|
| ex04_simple_follow.abp |
🟦 Blocks on the MBC Blocks website
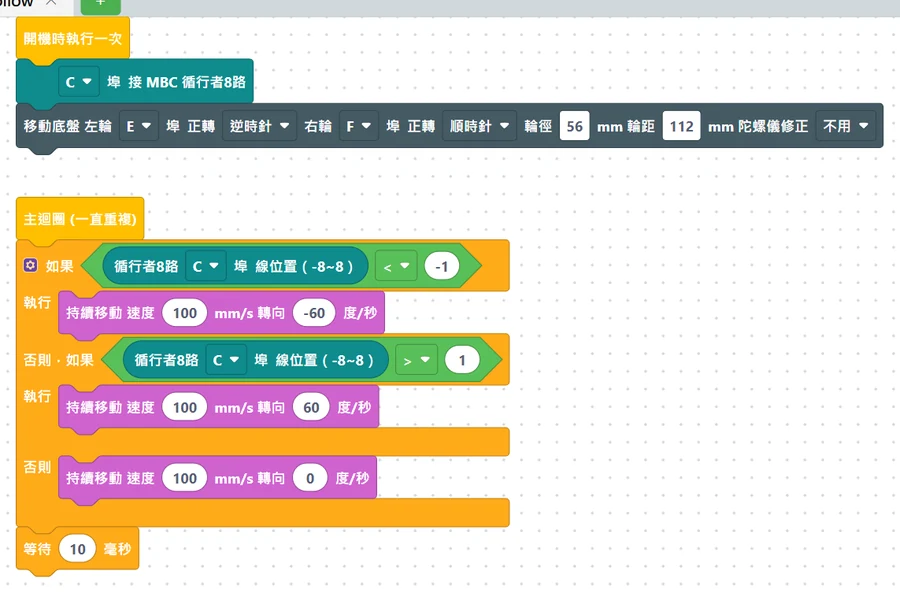
Step by step through the program
- Tell the hub where the wheels are: in the official App it is "set movement motors to E+F"; on the MBC Blocks website and in Pybricks it is "drive base: left wheel E, right wheel F".
- Set the speed: 30% in the official App; 100 mm per second in the other two. Start slow, and speed up once it works.
- Repeat forever: read the line position.
- If line position < -1 (line on the left) → turn left while driving.
- Else if line position > 1 (line on the right) → turn right.
- Else → go straight.
What you should see: the car follows the line, wobbling left and right as it goes (that is normal; example 5 improves it).
Common problems
- It shoots off right away and gets farther and farther from the line? → The turn directions are reversed: swap the sign of the two turn numbers (official App: swap -40 and 40; the other two: swap -60 and 60).
- The car drives backward? → The motors are mounted the opposite way from LEGO's standard car. Official App: mount the motors the same way as LEGO's "Driving Base" model; MBC Blocks website: in the "drive base" block, flip the "forward" direction of both the left and right wheels; Pybricks: change the left wheel to
Direction.CLOCKWISEand the right wheel toMotor(Port.F, Direction.COUNTERCLOCKWISE). - It overshoots and runs off on sharp turns? → Lower the speed.
Example 5: Smooth line following + stop at the crossroads
What this example does: follows the line using "turn as much as you are off the line", which is smoother than example 4; when it reaches a crossroads (the whole row of sensor points is on black), it stops and beeps.
What you need: same as example 4, and the black line needs one crossroads.
How to connect: Pathfinder on port C; left wheel motor on E, right wheel motor on F.
Download the program
| MBC Blocks website |
|---|
| ex05_smooth_follow_stop.abp |
🟦 Blocks on the MBC Blocks website
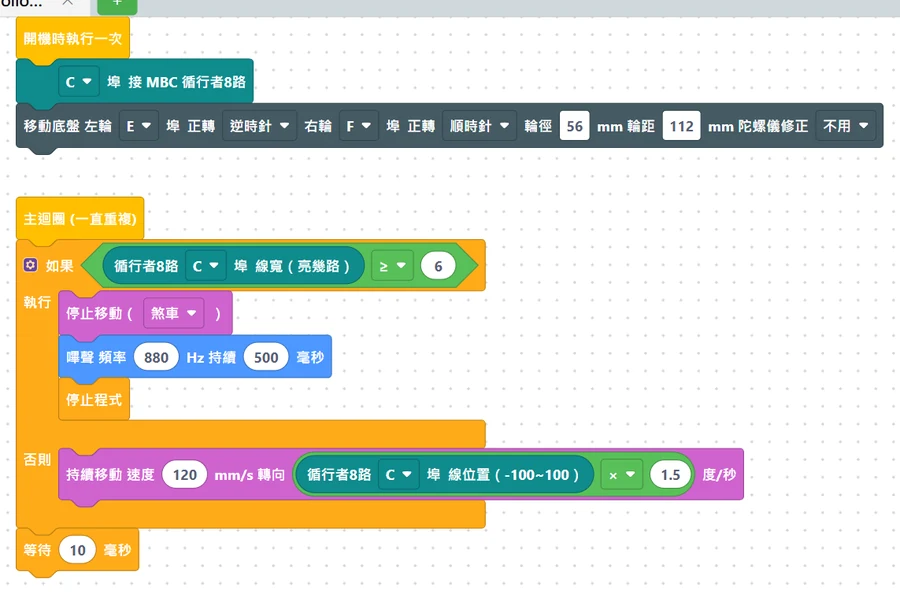
Step by step through the program
- Read the fine line position (-100 to 100): in the official App it is "raw red minus 100".
- Read the line width.
- If line width ≥ 6 (the official App writes it as "line width > 5", same meaning) → crossroads: stop → beep → end the program.
- Else → turn amount = line position × a number (0.5 in the official App, 1.5 in the other two). The farther off the line, the harder it turns; slightly off means only a slight turn, so it doesn't wobble left and right.
What you should see: the car glides smoothly along the line and stops with a beep at the crossroads.
Common problems
- Still wobbling left and right? → Make "the multiplier" a bit smaller (for example 0.5 → 0.3).
- Can't keep up on turns and runs off the line? → Make "the multiplier" a bit bigger, or lower the speed.
- Stops before reaching the crossroads? → The line is too wide or the sensor is too close to the floor; change "6" to 7.
- Can't find the "raw red" block in the official App? → Opening the file should automatically add the "More Sensors" block category; if it is missing, click the "+" at the bottom-left of the block palette and add "More Sensors".
More questions
- The hub does not detect the sensor? Unplug and replug, wait 2 s, try another port. The official app shows it as a colour sensor — that is expected.
- Can I use the official app and Pybricks on the same hub? One firmware at a time: Pybricks and the MBC Blocks website need Pybricks firmware, the official app needs LEGO firmware; you can switch back any time with the SPIKE app.
Still stuck? Contact us with your software and a screenshot of the program.
Downloads
- MBC SPIKE Blocks website (online, nothing to install)
- Download centre (libraries, firmware, catalogue for every product)
Sources
- Host and software list:
_build/guides.json - Values and commands:
_build/protocol/line8.json(single source of truth) - Setup:
_build/guides/software/spike-mbcblocks.en.md、_build/guides/product/line8/spike-mbcblocks.en.md - Examples:
sensors/line8/spike-examples.md