
MBC EXP6 6-Port Motor Expander (for LEGO® SPIKE™) × SPIKE × MBC Blocks website
Interactive tutorialSPIKE
First time? Try the interactive tutorial in your browser first, then follow the steps below with your hub.
This page covers MBC SPIKE Blocks website only: how to set it up for the MBC EXP6 6-Port Motor Expander (for LEGO® SPIKE™) on SPIKE Prime / Robot Inventor, how to read every value and examples. Use the switcher above to change product, host or software.
Setup
What you need
- Sensor: MBC EXP6 6-Port Motor Expander (for LEGO® SPIKE™) (SPIKE edition).
- Hub: SPIKE Prime or Robot Inventor.
- Computer: open the website in Chrome. Nothing to install.
- Hub firmware: must be switched to Pybricks firmware first (step 2 below, done from the website).
Install the software
- Open the MBC SPIKE Blocks website (blocks with a Chinese interface, nothing to install).
- Switch the firmware: top menu "SPIKE Hub → Install/Update Pybricks firmware", follow the screen, about 3 minutes. The website flashes Pybricks v4.1.0.
- To go back to the official LEGO App later, switch back to the original LEGO firmware with the SPIKE App.
Make the software see the sensor
No library needed: the MBC sensor blocks are built into the website, one block per value.
- To open an example: top menu "File → Open" (or press Ctrl+O) → pick the downloaded
.abp. - The Blocks website reads more data than the official App (no need to split numbers yourself), but example 6, marked "Pybricks only", uses a new mode that the Blocks website cannot read either.
Wiring
- Plug the sensor into hub port A with the cable (any of A~F works; choose the same port in the blocks).
- Latch up, push the plug in gently.
- When the hub is on, the light on the sensor comes on.
Wiring and power
- Plug the EXP6 Host cable into any SPIKE Prime port (A~F).
- The EXP6 must have a 2S LiPo battery (XT30 connector) to power the motors and LEGO sensors; do not use 3S or higher (above 9 V, it cuts power to LEGO Color / Ultrasonic sensors).
- Plug LEGO sensors and motors into the expander's ports 1~6.
Warning
With this software the EXP6 works with the SPIKE Prime hub only (on a Robot Inventor (51515) hub use Python in the Robot Inventor App; not EV3). Before switching to another programming method, power the EXP6 off once (turn off the hub or unplug the Host cable): once it has run a Pybricks program it keeps talking the Pybricks way until it restarts.
First test
- Connect the website to the hub (the hub must be running Pybricks firmware).
- Open the
.abpof example 1 on this page and press Run. - If the number changes with what is in front of the sensor, everything is connected.
FAQ
- The website can't connect to the hub? The hub still has the original LEGO firmware: do step 2 of "Install the software" to switch to Pybricks firmware.
- The official App can't connect any more? The hub now runs Pybricks firmware: switch back to the original LEGO firmware with the SPIKE App.
- Nothing happens when I plug it in? Check in order: cable firmly in → another port → another cable → another hub.
Examples
Example 1: One motor turns one full turn
What this example does: the motor on expansion port 1 turns one full turn (360 degrees) and the hub display shows the angle; then it turns one full turn back to where it started and the display shows about 0.
What you need
- 1 SPIKE hub, 1 EXP6 (with battery connected)
- 1 LEGO motor
How to wire it: EXP6 Host cable → hub port C; motor → EXP6 expansion port 1.
Download the program
| MBC Blocks website |
|---|
| ex01_one_turn.abp |
🟦 MBC Blocks website blocks
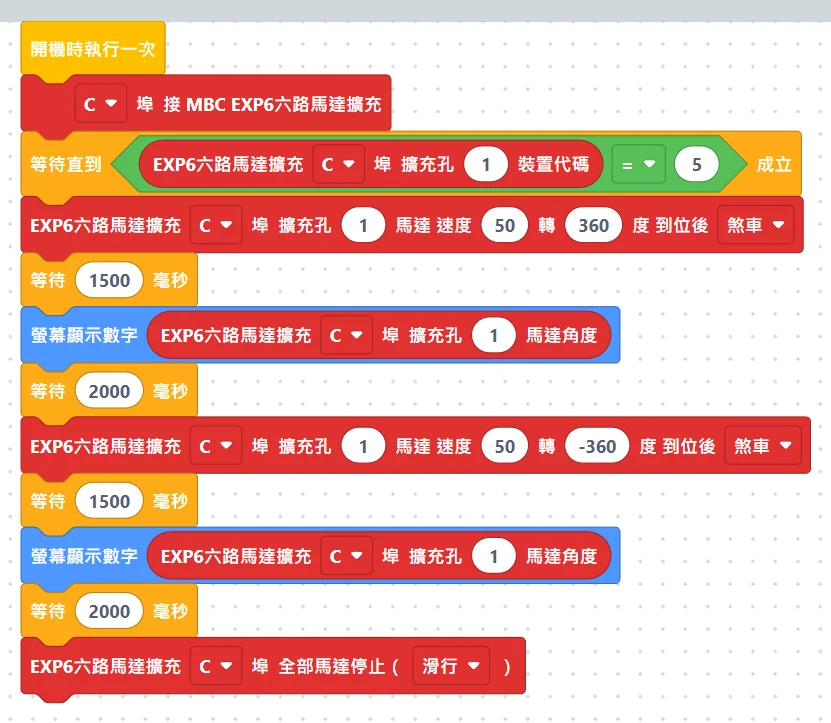
Understanding the program step by step
- Connect to EXP6: tell the hub that EXP6 is on port C. The official App writes
port.C; Pybricks writes3(1=A, 2=B, 3=C...); on the MBC Blocks website it is the "C connect MBC EXP6 6-way motor expander" block. - Wait for the motor to be ready (rule ①).
- Turn 360 degrees: "expansion port 1, speed 50, turn 360 degrees, brake when done".
- Wait 1.5 seconds for it to finish turning (rule ②), then show the angle on the hub display.
- Turn -360 degrees: a negative angle = the opposite direction, back to where it started.
- Stop all (rule ③).
What you should see when it runs: the motor turns one full turn and stops, and the display shows about 360; 2 seconds later it turns back one full turn and the display shows about 0 (being off by a few degrees is normal).
Common problems
- The motor does not move at all? → ① Is the battery connected and charged? ② Is the motor in port 1? ③ Is the Host cable in hub port C?
- Only the first turn happened, not the second? → The wait in between is too short; the first turn was not finished yet. Make "wait 1.5 seconds" longer.
- Want it to turn the other way? → Make the angle negative. The official App library only looks at the sign of the angle, so a negative speed does nothing; to keep all three versions behaving the same, speeds on this page are always positive.
Example 2: Three motors turn together
What this example does: 3 motors turn at the same time at different speeds for 3 seconds (slow, medium, fast), then all reverse together for 3 seconds, then all brake and the hub beeps once.
What you need: the same as example 1, but with 3 motors.
How to wire it: EXP6 Host cable → hub port C; motors → EXP6 expansion ports 1, 2, 3.
Download the program
| MBC Blocks website |
|---|
| ex02_three_motors.abp |
🟦 MBC Blocks website blocks
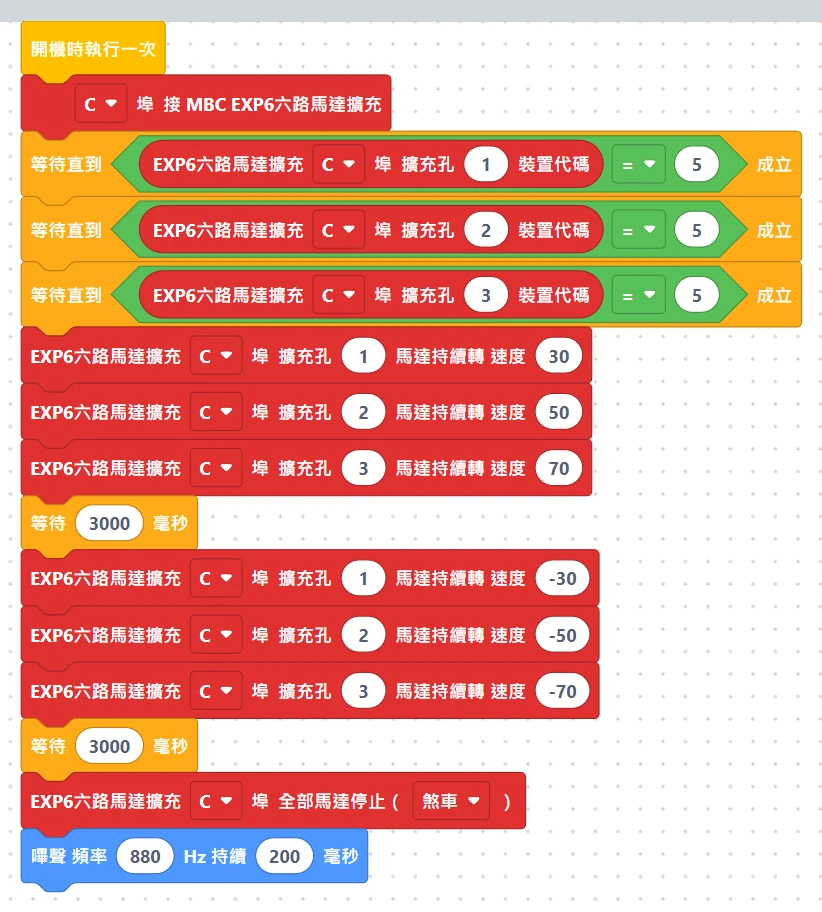
Understanding the program step by step
- Wait for all 3 motors to be ready: the MBC Blocks website and Pybricks check "device code = 5" one motor at a time.
- Run continuously: "expansion port 1 speed 30", "expansion port 2 speed 50", "expansion port 3 speed 70". Once a run command is sent, the motor keeps turning and the program moves straight on, so all 3 start almost at the same time.
- Wait 3 seconds.
- Change the speeds to negative → all 3 reverse together, then wait another 3 seconds.
- Stop all, 2 = brake, then one beep.
What you should see when it runs: 3 motors turn together, one slow, one medium, one fast; after 3 seconds they all turn the other way; after another 3 seconds they all stop and the hub beeps.
Common problems
- One of them does not turn? → That motor is in the wrong port number, or is not plugged in firmly. Move it to a different port to find out whether the problem is the motor or the port.
- Speed 100 is very fast and very strong? → EXP6 drives the motors straight from the battery; at high speed a motor mounted in a mechanism can easily break something, so start with 50 or lower.
Example 3: Light switch (color sensor controls a motor)
What this example does: hold a sheet of white paper in front of the color sensor (bright) → the motor turns and the hub light turns green; take it away (dark) → the motor stops and the light turns red. Hold the left and right buttons together to end the program.
What you need
- The same as example 1, plus
- 1 SPIKE Color Sensor, 1 sheet of white paper
How to wire it: EXP6 Host cable → hub port C; motor → expansion port 1; color sensor → expansion port 4.
Download the program
| MBC Blocks website |
|---|
| ex03_light_switch.abp |
🟦 MBC Blocks website blocks
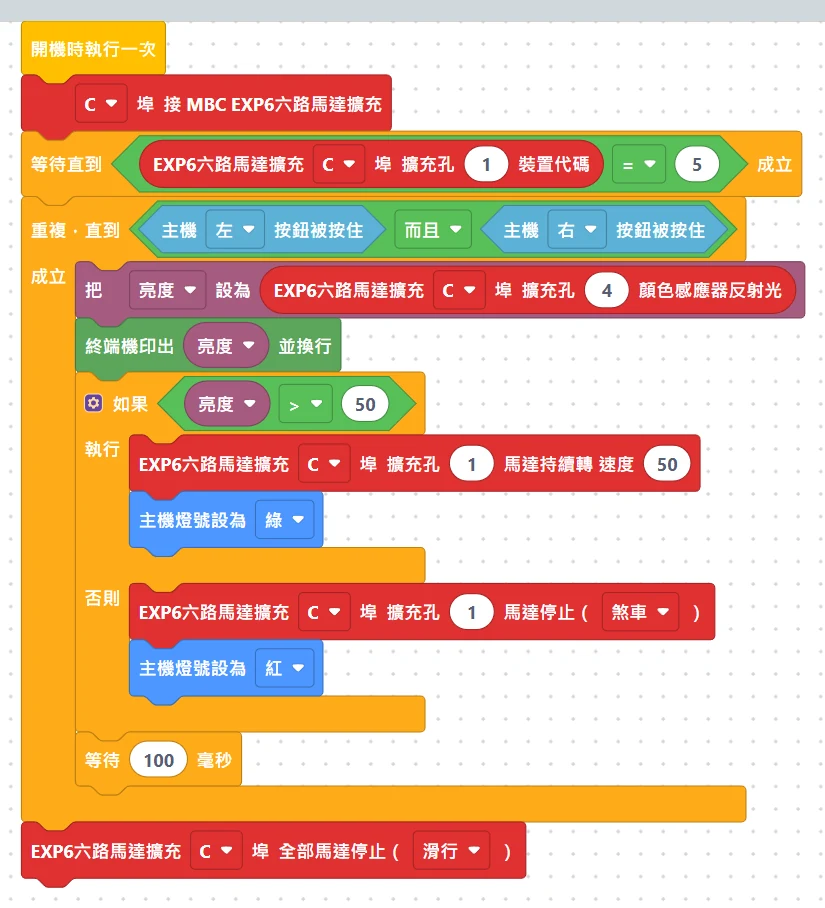
Understanding the program step by step
- Repeat until the left and right buttons are held together: everything inside keeps running; pressing both buttons at once jumps out.
- Read the reflected light: how bright the color sensor on expansion port 4 sees (0 to 100, bigger = brighter), stored in a variable called "brightness" (a variable is a box with a name that holds one number), and also printed on the computer screen.
- If brightness > 50 → the motor turns and the light turns green.
- Else → the motor stops (brake) and the light turns red.
- Wait 0.1 seconds, then check again.
- After jumping out → stop all.
What you should see when it runs: with nothing in front of the sensor: red light, motor not moving. Bring the white paper close to the sensor (1 to 2 cm): green light, motor turns. Take it away and it stops again. Hold the left and right buttons together: the program ends and the motor stops.
Common problems
- Always red / always green? → Look at the numbers printed on the computer screen: note the value with the paper in place and with it away, and change "50" to a value between the two.
- The official App's numbers differ from the other two versions? → That is normal. The official App library estimates brightness from the sensor's red, green and blue readings, while Pybricks and the MBC Blocks website read the sensor's true reflected light, so the same sheet of paper gives slightly different numbers.
- Always reads 0? → Is the color sensor in port 4? EXP6 only recognizes the LEGO SPIKE Color Sensor.
Example 4: Control a motor with the hub buttons
What this example does: hold the left button → the motor turns forward; hold the right button → it reverses; let go → it stops. Hold the left and right buttons together to end the program.
What you need: the same as example 1.
How to wire it: EXP6 Host cable → hub port C; motor → expansion port 1.
Download the program
| MBC Blocks website |
|---|
| ex04_button_motor.abp |
🟦 MBC Blocks website blocks
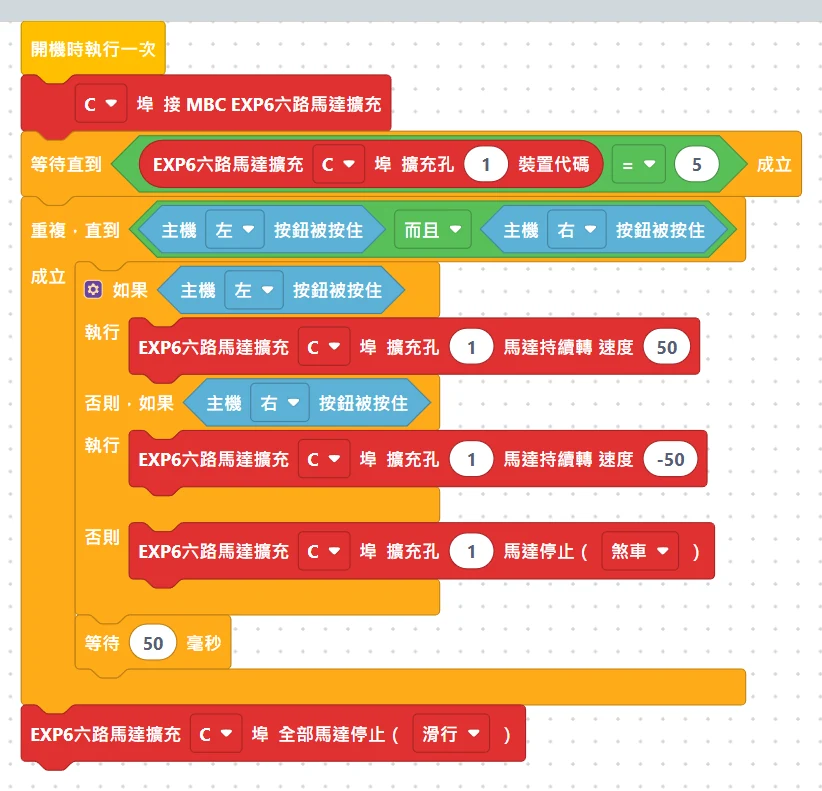
Understanding the program step by step
- Repeat until the left and right buttons are held together (same as example 3).
- If the left button is held → expansion port 1 speed 50 (forward).
- Else, if the right button is held → speed -50 (reverse).
- Neither pressed → stop (brake).
- Wait 0.05 seconds, then check the buttons again.
- After jumping out → stop all.
What you should see when it runs: hold the left button and the motor turns, let go and it stops; hold the right button and it turns the other way. Hold both together and the program ends.
Common problems
- Why not use the center button? → The center button is the hub's power switch and also the stop-program button, so the examples on this page do not use it to control the motor.
- A short delay after pressing before it turns? → The program checks the buttons every 0.05 seconds, and the official App also takes a moment to send the command, so a small lag is normal.
- Pressed stop in the official App but the motor is still turning? → Rule ③: the official App has no automatic protection. End the program by "holding the left and right buttons together"; if it really will not stop, turn the hub off.
Example 5: Two-wheel car drives a square
What this example does: a two-wheel car drives straight about 35 cm → turns right 90 degrees in place, repeated 4 times, driving a square and coming back to the start.
What you need
- The same as example 1, plus
- A two-wheel car (two motors as wheels, wheel diameter 56 mm, wheel spacing 112 mm, i.e. the standard LEGO car)
- A flat floor area (about 50 × 50 cm)
How to wire it: EXP6 Host cable → hub port C; left wheel motor → expansion port 1, right wheel motor → expansion port 2.
Download the program
| MBC Blocks website |
|---|
| ex05_square.abp |
🟦 MBC Blocks website blocks
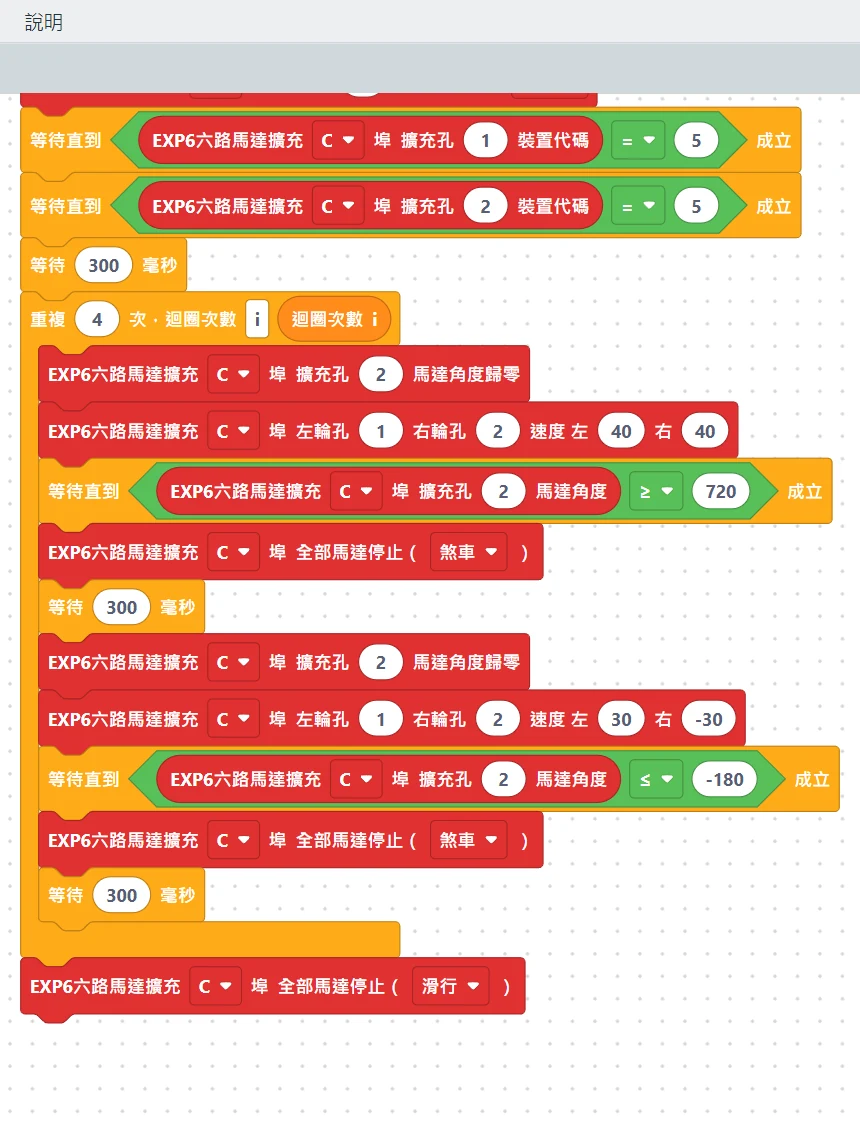
Understanding the program step by step
- Set the left wheel as "inverted": the car's two motors are mounted mirror-image, so the left wheel turns the opposite way from the right wheel. Once it is set as inverted, both wheels follow "positive speed = forward".
- Wait for both motors to be ready.
- Repeat 4 times (4 sides of the square):
- Reset the right wheel angle to zero: we will use it to measure how far the car has gone.
- Drive both wheels: "left wheel port 1, right wheel port 2, left 40, right 40" → straight ahead. EXP6 keeps the two wheels in sync, so it drives straighter.
- Wait until the right wheel has turned 720 degrees (2 turns ≈ 35 cm) → stop all (brake), pause 0.3 seconds.
- Reset the right wheel angle again, "left 30, right -30" → left wheel forward, right wheel backward → turn right in place.
- Wait until the right wheel has turned back 180 degrees → the car has turned exactly 90 degrees (wheel turns 180 degrees × wheel diameter 56 ÷ wheel spacing 112 = 90 degrees) → stop.
- Stop all (coast).
What you should see when it runs: the car drives a stretch, turns right, drives a stretch, turns right... after 4 sides it ends up roughly back where it started.
Common problems
- The car spins in place and does not go forward? → The left wheel is not set as inverted, or the two motors are swapped (the left wheel must be in port 1).
- The car drives backward? → The motors are mounted the opposite way from the standard LEGO car: set expansion port 2 as inverted instead (official App / Pybricks: change the 1 in
set_motor_inverted(1, True)to 2; MBC Blocks website: change the expansion port in the "mounting direction" block to 2); no need to change the wiring. - Turns less than 90 degrees / more than 90? → The floor is slippery or the wheels are not the same size. Make 180 bigger (not turning enough) or smaller (turning too much), 5 to 10 at a time.
- The sides are not the same length? → Make 720 bigger or smaller. 720 degrees ≈ 35 cm, so every 100 degrees is about 5 cm.
More questions
- The hub does not detect the sensor? Unplug and replug, wait 2 s, try another port. The official app shows it as a colour sensor — that is expected.
- Can I use the official app and Pybricks on the same hub? One firmware at a time: Pybricks and the MBC Blocks website need Pybricks firmware, the official app needs LEGO firmware; you can switch back any time with the SPIKE app.
Still stuck? Contact us with your software and a screenshot of the program.
Downloads
- MBC SPIKE Blocks website (online, nothing to install)
- Download centre (libraries, firmware, catalogue for every product)
Sources
- Host and software list:
_build/guides.json - Setup:
_build/guides/software/spike-mbcblocks.en.md、_build/guides/product/exp6/spike-mbcblocks.en.md - Examples:
sensors/exp6/spike-examples.md