
MBC EXP6 6-Port Motor Expander (for LEGO® SPIKE™) × SPIKE × Pybricks
Interactive tutorialSPIKE
First time? Try the interactive tutorial in your browser first, then follow the steps below with your hub.
This page covers Pybricks (Python) only: how to set it up for the MBC EXP6 6-Port Motor Expander (for LEGO® SPIKE™) on SPIKE Prime / Robot Inventor, how to read every value and examples. Use the switcher above to change product, host or software.
Setup
What you need
- Sensor: MBC EXP6 6-Port Motor Expander (for LEGO® SPIKE™) (SPIKE edition).
- Hub: SPIKE Prime or Robot Inventor.
- Computer: Chrome. Open code.pybricks.com and start writing; nothing to install.
- Hub firmware: must be switched to Pybricks firmware v4.1 first (the stable code.pybricks.com is v4.1.1; v4.1.0 from the MBC SPIKE Blocks website works too). Every example on this site is written for v4.1.
- Library:
MBC_exp6_obj_Lib.py(only needed for the "import the library" method). For a new program of your own, import justMBC_sensors.py: one file for every MBC sensor.
Note
The Pybricks 3.6.1 libraries and examples are no longer updated (the 2026 SPIKE Prime hubs cannot run 3.6.1 either). For hubs that have not been upgraded, the old files are under "Legacy (no longer updated)" on the Downloads page.
Install the software
- Open code.pybricks.com in Chrome.
- Switch the hub to Pybricks firmware. The easiest way is the MBC SPIKE Blocks website: top menu "SPIKE Hub → Install/Update Pybricks firmware", about 3 minutes.
- To go back to the official LEGO App later, switch back to the original LEGO firmware with the SPIKE App.
Make the software see the sensor
Pybricks can read the sensor two ways; pick one:
- Built-in commands (no library): read the sensor with Pybricks' own sensor commands. No extra file, quickest to start.
- Import the library: download MBC_exp6_obj_Lib.py to get more data, such as the high-resolution position and every channel.
To import the library:
- In code.pybricks.com, click "Import a file" in the file panel on the left.
- Import both the example file and
MBC_exp6_obj_Lib.py, so they are in the same project list. - Open the example and press ▶ to run.
Important
New projects: use
MBC_sensors.py. Old projects: just replace the one file they already use.MBC_sensors.pyis one file for every MBC sensor (the EXP6 and Servo6 expander libraries are separate downloads); writefrom MBC_sensors import MBC_LINE8, with the same class names as in the old files. The old file names (such asMBC_exp6_obj_Lib.pyused by the examples on this page) are kept for existing programs: swap in the new file with the same name and the program needs no changes. But every old-name file is the whole shared library, so importing 3 or more of them in one program goes over the SPIKE program slot limit of about 51 KB; to mix several sensors, import onlyMBC_sensors.py.
Tip
The file name must match the name in the program's
importexactly, or you will get anImportError. The library files on this site have no version suffix, so you do not need to rename them.
Tip
Most libraries take a
multitaskargument when you create the object:Falseis normal mode, one line after another;Trueis multitask mode, where every call needsawaitin front so the robot can do several things at once.
Wiring
- Plug the sensor into hub port A with the cable (any of A~F works).
- Use the same port in the program: built-in commands use
Port.APort.F; a library'sportargument is usually16for A~F. - Latch up, push the plug in gently.
Wiring and power
- Host cable: plug the expander's Host cable into any SPIKE hub port (A~F).
- Separate power: the expander must have a 2S LiPo battery (7.4 V, 8.4 V fully charged, XT30 connector), which powers the motors and LEGO sensors; motor current is not drawn from the hub, and the hub signal lines go through an isolator. Do not use 3S or higher: above 9 V, EXP6 cuts power to LEGO Color / Ultrasonic sensors.
- Devices: plug LEGO sensors (colour, ultrasonic, force) and motors into any of the expander's ports 1~6.
Warning
With this software the EXP6 works with the SPIKE Prime hub only (on a Robot Inventor (51515) hub use Python in the Robot Inventor App; not EV3). Before switching to another programming method, power the EXP6 off once (turn off the hub or unplug the Host cable): once it has run a Pybricks program it keeps talking the Pybricks way until it restarts, and the official App cannot connect.
Import the EXP6 library
- Download Pybricks library + examples (.zip). The EXP6 needs firmware dated 2026-11-03 or later; use Pybricks firmware v4.1 on the hub. The function reference is
EXP6_Library_Manual.pdfin the pack. - Put the files you need in the same Pybricks project (no renaming needed):
- Always:
MBC_exp6_obj_Lib.py(EXP6, motors, LEGO sensors). The pack's examples sayfrom MBC_exp6_obj_Lib import MBC_EXP6. - Only with MBC sensors:
MBC_exp6_mbc_common.py, a shared file that the product files below load automatically. Add the product files you use:MBC_exp6_line.py(Line Follower 8/16-ch),MBC_exp6_laser.py(Laser Ranger 2/8-ch),MBC_exp6_pad.py(PS2/PS4 receiver),MBC_exp6_unicam.py(SharpShot Vision). - Leave out the rest: a Pybricks hub program (your code plus all libraries) is limited to about 52 KB, and all the files together are too big.
- Pybricks blocks: the pack's
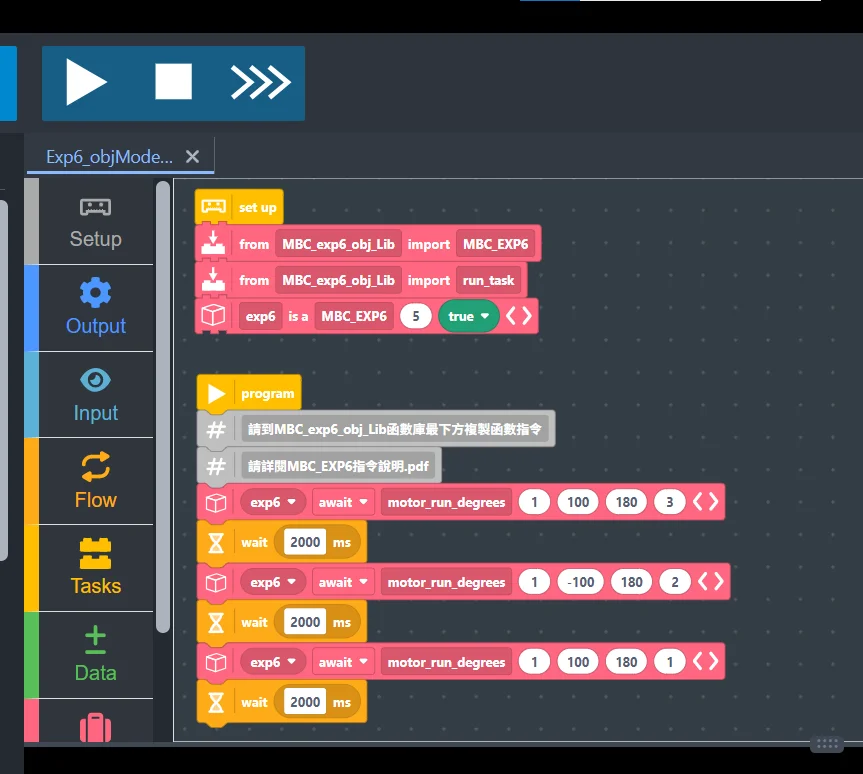
beginner_examples/folder has 5 block examples, also as single downloads: ex01 one turn, ex02 three motors, ex03 light switch, ex04 button control, ex05 square. In Pybricks Code click "Import a file", pick the file and keep it in the same project asMBC_exp6_obj_Lib.py; it opens as blocks. Any wait block turns the program into multitask mode (MBC_EXP6(3, True), every command isawaited), so the examples add one more block, "from MBC_exp6_obj_Lib import run_task": it sends the heartbeat in the background while waiting, so the EXP6 watchdog does not stop the motors.
- Always:
Normal mode and multitask mode
Assuming the expander is on hub port C (3):
# Normal mode: one line after another
from MBC_exp6_obj_Lib import MBC_EXP6
exp6 = MBC_EXP6(3, False)
exp6.motor_power(6, 100)
exp6.keep_alive_wait(5000)
# Multitask mode: await in front of every command, use the library's run_task
from pybricks.tools import multitask, run_task, wait
from MBC_exp6_obj_Lib import MBC_EXP6, run_task
exp6 = MBC_EXP6(3, True)
async def main():
await exp6.motor_power(6, 100)
await exp6.keep_alive_wait(5000)
run_task(main())Important
Pybricks has a watchdog: if the expander hears nothing from the hub for about 0.5 s (disconnect or crash), the motors coast to a stop. In multitask mode the library's
run_tasksends the heartbeat in the background; in normal mode, wait withexp6.keep_alive_wait(ms)instead ofwait, and callexp6.keep_alive()inside long loops.
MBC sensors on the EXP6
When you run out of hub ports, you can plug MBC sensors into EXP6 ports 1–6: Line Follower 8/16-ch, Laser Ranger 2/8-ch, PS2/PS4 receiver and SharpShot Vision. The function names and return values are the same as when the sensor is plugged straight into the hub.
- Just plug the sensors in, the same as into the hub; there is nothing to set up.
- The EXP6 needs firmware from 2026-11-03 or later. For older firmware, contact us to update it.
1. Normal mode: declare what is on each port. When you create the EXP6 object, write p5=LINE16 (Line Follower 16-ch on port 5). For the camera, write (UNICAM, camera_mode). Then get each sensor object with exp6.sensor(port).
- When the program starts, the library checks that every port has the declared sensor.
- A wrong sensor stops the program with a message naming what was found, for example "port 5 should be Line16 but reads Laser2".
- The camera switches to the declared mode right away.
from MBC_exp6_obj_Lib import MBC_EXP6
from MBC_exp6_line import *       # Line Follower LINE8, LINE16
from MBC_exp6_unicam import *     # SharpShot Vision UNICAM

# EXP6 on hub port C (3); Line Follower 16-ch on EXP6 port 5, camera on port 6 (mode 51, object detection)
exp6 = MBC_EXP6(3, False, p5=LINE16, p6=(UNICAM, 51))
line = exp6.sensor(5)
cam = exp6.sensor(6)

while True:
    print("pos100 =", line.pos100(), " objects =", cam.object_count())
    exp6.keep_alive_wait(100)     # in normal mode, wait with keep_alive_wait
2. Multitask mode. Declare the sensors the same way. exp6.sensor() needs no await, but it must come before run_task. Multitask mode does not check the sensors when you declare them.
- Switch the camera mode yourself once, with
await cam.set_mode(mode)insidemain(). - Put
awaitin front of every sensor function. - For the receiver, call
pad.update()once per loop. The buttons and sticks in that loop all use that one reading, the same as on the hub. buttons()uses the same bit order as on the hub. The old PSX order is now calledbuttons_psx().
from pybricks.tools import multitask, run_task, wait
from MBC_exp6_obj_Lib import MBC_EXP6, run_task
from MBC_exp6_pad import *        # receiver PS2, PS4
from MBC_exp6_unicam import *     # SharpShot Vision UNICAM

exp6 = MBC_EXP6(3, True, p4=PS4, p6=(UNICAM, 13))   # EXP6 on hub port C (3)
pad = exp6.sensor(4)              # no await needed, but do it before run_task
cam = exp6.sensor(6)

async def main():
    await cam.set_mode(13)        # multitask: switch the camera mode yourself once
    while True:
        await pad.update()        # read the controller once per loop; buttons and sticks below use this reading
        if await pad.pressed("CROSS"):
            break
        print("LX =", await pad.lx(), " colour 1 at", await cam.xy(1))
        await wait(50)
    print("done")

run_task(main())
3. The old style still works. You can still write exp6.line16(5), exp6.laser8(3), exp6.ps2(4) and exp6.unicam(5, 13), but they do not check which sensor is plugged in. Old programs need one extra import line for the product file, for example from MBC_exp6_line import *. Without it, the program tells you which line to add.
The pack's examples/11_MBC_Sensors.py shows the Line Follower 8-ch, Laser Ranger 8-ch, PS2 receiver and camera together.
4. With blocks. Blocks only take values in order, so create the sensor object as EXP6_LINE8(exp6, 5) (first slot the EXP6 object, second the EXP6 port) and add one more import block for the product file. Example: PD line following with a Line Follower 8-ch in EXP6 port 5, block file and Python file (left motor in EXP6 port 1, right motor in port 2); step-by-step in the EXP6 Pybricks blocks tutorial.
Note
Hardware-tested on 2026-11-03: EXP6 examples P1–P5, example 11 and MBC SPIKE Blocks examples M1–M5. All 11 passed.
First test
- Turn on the hub and connect it in code.pybricks.com.
- Import and open example 1 on this page, then press ▶.
- If the numbers printed in the console change with what is in front of the sensor, everything is connected.
FAQ
ImportError? The library was not imported into the same project, or its file name differs from theimportname. Rename it toMBC_exp6_obj_Lib.pyand import it again.- The example does not run, or a command is unknown? The hub firmware is too old: the examples on this site are written for Pybricks v4.1, so update the hub to v4.1 first. 3.6.1 is no longer updated; the old files are on the Downloads page.
- What happens if the sensor cable comes out? The program keeps running: the library returns the last value it read and prints one notice in the console (in Chinese and English:
MBC: Port C 讀不到感應器,先回傳上一次的值 / no sensor, using the last value); if the sensor was never connected it returnsNone. To check in your program, call the object'ssensor_ok():Trueif the last read worked,Falseif not (addawaitin multitask mode). Once you plug it back in the library keeps reading; if the sensor was missing from the start and you use multitask mode, run the program again. - An example marked "Pybricks only" shows strange numbers? It uses a new mode in sensor firmware from 2026-10 on; older firmware returns different numbers.
- The official App cannot connect any more? The hub now runs Pybricks firmware: switch back to the original LEGO firmware with the SPIKE App.
Examples
Example 1: One motor turns one full turn
What this example does: the motor on expansion port 1 turns one full turn (360 degrees) and the hub display shows the angle; then it turns one full turn back to where it started and the display shows about 0.
What you need
- 1 SPIKE hub, 1 EXP6 (with battery connected)
- 1 LEGO motor
How to wire it: EXP6 Host cable → hub port C; motor → EXP6 expansion port 1.
Download the program
| Pybricks |
|---|
| ex01_one_turn.py + library |
Pybricks code
# EXP6 範例 1:一顆馬達轉一圈再轉回來(Pybricks)
# 接線:EXP6 的 Host 線 → 主機 C 孔;馬達 → EXP6 擴充孔 1;EXP6 接上電池
from pybricks.hubs import PrimeHub
from MBC_exp6_obj_Lib import MBC_EXP6

hub = PrimeHub()
exp6 = MBC_EXP6(3, False)    # 3 = C 孔(1=A、2=B、3=C、4=D、5=E、6=F);False = 一般寫法

while exp6.get_device_id(1) != 5:        # 等擴充孔 1 的馬達準備好(5 = 馬達,開機大約 1 秒)
    exp6.keep_alive_wait(100)

exp6.motor_run_degrees(1, 50, 360, 2)    # 擴充孔 1:速度 50%,轉 360 度(一圈),到了就煞車(2)
exp6.keep_alive_wait(1500)               # 等它轉完。等待一律用 keep_alive_wait,不要用 wait
hub.display.number(exp6.get_motor_angle(1))   # 螢幕顯示現在的角度(大約 360)
exp6.keep_alive_wait(2000)

exp6.motor_run_degrees(1, 50, -360, 2)   # 角度寫負的 = 反方向轉一圈,回到原來的位置
exp6.keep_alive_wait(1500)
hub.display.number(exp6.get_motor_angle(1))   # 大約 0
exp6.keep_alive_wait(2000)

exp6.stop_all(1)             # 最後全部停止(1 = 滑行)
Understanding the program step by step
- Connect to EXP6: tell the hub that EXP6 is on port C. The official App writes
port.C; Pybricks writes3(1=A, 2=B, 3=C...); on the MBC Blocks website it is the "C connect MBC EXP6 6-way motor expander" block. - Wait for the motor to be ready (rule ①).
- Turn 360 degrees: "expansion port 1, speed 50, turn 360 degrees, brake when done".
- Wait 1.5 seconds for it to finish turning (rule ②), then show the angle on the hub display.
- Turn -360 degrees: a negative angle = the opposite direction, back to where it started.
- Stop all (rule ③).
What you should see when it runs: the motor turns one full turn and stops, and the display shows about 360; 2 seconds later it turns back one full turn and the display shows about 0 (being off by a few degrees is normal).
Common problems
- The motor does not move at all? → ① Is the battery connected and charged? ② Is the motor in port 1? ③ Is the Host cable in hub port C?
- Only the first turn happened, not the second? → The wait in between is too short; the first turn was not finished yet. Make "wait 1.5 seconds" longer.
- Want it to turn the other way? → Make the angle negative. The official App library only looks at the sign of the angle, so a negative speed does nothing; to keep all three versions behaving the same, speeds on this page are always positive.
Example 2: Three motors turn together
What this example does: 3 motors turn at the same time at different speeds for 3 seconds (slow, medium, fast), then all reverse together for 3 seconds, then all brake and the hub beeps once.
What you need: the same as example 1, but with 3 motors.
How to wire it: EXP6 Host cable → hub port C; motors → EXP6 expansion ports 1, 2, 3.
Download the program
| Pybricks |
|---|
| ex02_three_motors.py + library |
Pybricks code
# EXP6 範例 2:三顆馬達一起轉(Pybricks)
# 接線:EXP6 的 Host 線 → 主機 C 孔;馬達 → EXP6 擴充孔 1、2、3;EXP6 接上電池
from pybricks.hubs import PrimeHub
from MBC_exp6_obj_Lib import MBC_EXP6

hub = PrimeHub()
exp6 = MBC_EXP6(3, False)    # 3 = C 孔

for m in (1, 2, 3):          # 三顆馬達都要準備好(5 = 馬達)
    while exp6.get_device_id(m) != 5:
        exp6.keep_alive_wait(100)

exp6.motor_run(1, 30)        # 擴充孔 1:速度 30%(慢)
exp6.motor_run(2, 50)        # 擴充孔 2:速度 50%
exp6.motor_run(3, 70)        # 擴充孔 3:速度 70%(快)
exp6.keep_alive_wait(3000)   # 一起轉 3 秒

exp6.motor_run(1, -30)       # 速度寫負的 = 反轉
exp6.motor_run(2, -50)
exp6.motor_run(3, -70)
exp6.keep_alive_wait(3000)

exp6.stop_all(2)             # 全部停止(2 = 煞車,馬上停)
hub.speaker.beep(880, 200)
Understanding the program step by step
- Wait for all 3 motors to be ready: the MBC Blocks website and Pybricks check "device code = 5" one motor at a time.
- Run continuously: "expansion port 1 speed 30", "expansion port 2 speed 50", "expansion port 3 speed 70". Once a run command is sent, the motor keeps turning and the program moves straight on, so all 3 start almost at the same time.
- Wait 3 seconds.
- Change the speeds to negative → all 3 reverse together, then wait another 3 seconds.
- Stop all, 2 = brake, then one beep.
What you should see when it runs: 3 motors turn together, one slow, one medium, one fast; after 3 seconds they all turn the other way; after another 3 seconds they all stop and the hub beeps.
Common problems
- One of them does not turn? → That motor is in the wrong port number, or is not plugged in firmly. Move it to a different port to find out whether the problem is the motor or the port.
- Speed 100 is very fast and very strong? → EXP6 drives the motors straight from the battery; at high speed a motor mounted in a mechanism can easily break something, so start with 50 or lower.
Example 3: Light switch (color sensor controls a motor)
What this example does: hold a sheet of white paper in front of the color sensor (bright) → the motor turns and the hub light turns green; take it away (dark) → the motor stops and the light turns red. Hold the left and right buttons together to end the program.
What you need
- The same as example 1, plus
- 1 SPIKE Color Sensor, 1 sheet of white paper
How to wire it: EXP6 Host cable → hub port C; motor → expansion port 1; color sensor → expansion port 4.
Download the program
| Pybricks |
|---|
| ex03_light_switch.py + library |
Pybricks code
# EXP6 範例 3:光控開關(Pybricks)
# 感應器前面亮(放一張白紙)→ 馬達轉、主機燈變綠;暗 → 馬達停、燈變紅
# 接線:EXP6 的 Host 線 → 主機 C 孔;馬達 → 擴充孔 1;顏色感應器 → 擴充孔 4;EXP6 接上電池
from pybricks.hubs import PrimeHub
from pybricks.parameters import Button, Color
from MBC_exp6_obj_Lib import MBC_EXP6

hub = PrimeHub()
exp6 = MBC_EXP6(3, False)    # 3 = C 孔

while exp6.get_device_id(1) != 5:        # 等擴充孔 1 的馬達準備好
    exp6.keep_alive_wait(100)

while not (Button.LEFT in hub.buttons.pressed() and Button.RIGHT in hub.buttons.pressed()):   # 左右鍵一起按住 → 結束
    bright = exp6.get_color_reflection(4)    # 擴充孔 4 的顏色感應器:反射光 0~100(越亮越大)
    print(bright)
    if bright > 50:                          # 亮 → 馬達轉
        exp6.motor_run(1, 50)
        hub.light.on(Color.GREEN)
    else:                                    # 暗 → 馬達停
        exp6.motor_stop(1, 2)
        hub.light.on(Color.RED)
    exp6.keep_alive_wait(100)

exp6.stop_all(1)
Understanding the program step by step
- Repeat until the left and right buttons are held together: everything inside keeps running; pressing both buttons at once jumps out.
- Read the reflected light: how bright the color sensor on expansion port 4 sees (0 to 100, bigger = brighter), stored in a variable called "brightness" (a variable is a box with a name that holds one number), and also printed on the computer screen.
- If brightness > 50 → the motor turns and the light turns green.
- Else → the motor stops (brake) and the light turns red.
- Wait 0.1 seconds, then check again.
- After jumping out → stop all.
What you should see when it runs: with nothing in front of the sensor: red light, motor not moving. Bring the white paper close to the sensor (1 to 2 cm): green light, motor turns. Take it away and it stops again. Hold the left and right buttons together: the program ends and the motor stops.
Common problems
- Always red / always green? → Look at the numbers printed on the computer screen: note the value with the paper in place and with it away, and change "50" to a value between the two.
- The official App's numbers differ from the other two versions? → That is normal. The official App library estimates brightness from the sensor's red, green and blue readings, while Pybricks and the MBC Blocks website read the sensor's true reflected light, so the same sheet of paper gives slightly different numbers.
- Always reads 0? → Is the color sensor in port 4? EXP6 only recognizes the LEGO SPIKE Color Sensor.
Example 4: Control a motor with the hub buttons
What this example does: hold the left button → the motor turns forward; hold the right button → it reverses; let go → it stops. Hold the left and right buttons together to end the program.
What you need: the same as example 1.
How to wire it: EXP6 Host cable → hub port C; motor → expansion port 1.
Download the program
| Pybricks |
|---|
| ex04_button_motor.py + library |
Pybricks code
# EXP6 範例 4:用主機按鈕控制馬達(Pybricks)
# 按住左鍵 → 正轉;按住右鍵 → 反轉;放開 → 停;左右鍵一起按 → 結束
# 接線:EXP6 的 Host 線 → 主機 C 孔;馬達 → EXP6 擴充孔 1;EXP6 接上電池
from pybricks.hubs import PrimeHub
from pybricks.parameters import Button
from MBC_exp6_obj_Lib import MBC_EXP6

hub = PrimeHub()
exp6 = MBC_EXP6(3, False)    # 3 = C 孔

while exp6.get_device_id(1) != 5:        # 等擴充孔 1 的馬達準備好
    exp6.keep_alive_wait(100)

while not (Button.LEFT in hub.buttons.pressed() and Button.RIGHT in hub.buttons.pressed()):   # 左右鍵一起按住 → 結束
    if Button.LEFT in hub.buttons.pressed():         # 按住左鍵
        exp6.motor_run(1, 50)                        # 正轉,速度 50%
    elif Button.RIGHT in hub.buttons.pressed():      # 按住右鍵
        exp6.motor_run(1, -50)                       # 反轉
    else:                                            # 都沒按
        exp6.motor_stop(1, 2)                        # 停止(2 = 煞車)
    exp6.keep_alive_wait(50)

exp6.stop_all(1)
Understanding the program step by step
- Repeat until the left and right buttons are held together (same as example 3).
- If the left button is held → expansion port 1 speed 50 (forward).
- Else, if the right button is held → speed -50 (reverse).
- Neither pressed → stop (brake).
- Wait 0.05 seconds, then check the buttons again.
- After jumping out → stop all.
What you should see when it runs: hold the left button and the motor turns, let go and it stops; hold the right button and it turns the other way. Hold both together and the program ends.
Common problems
- Why not use the center button? → The center button is the hub's power switch and also the stop-program button, so the examples on this page do not use it to control the motor.
- A short delay after pressing before it turns? → The program checks the buttons every 0.05 seconds, and the official App also takes a moment to send the command, so a small lag is normal.
- Pressed stop in the official App but the motor is still turning? → Rule ③: the official App has no automatic protection. End the program by "holding the left and right buttons together"; if it really will not stop, turn the hub off.
Example 5: Two-wheel car drives a square
What this example does: a two-wheel car drives straight about 35 cm → turns right 90 degrees in place, repeated 4 times, driving a square and coming back to the start.
What you need
- The same as example 1, plus
- A two-wheel car (two motors as wheels, wheel diameter 56 mm, wheel spacing 112 mm, i.e. the standard LEGO car)
- A flat floor area (about 50 × 50 cm)
How to wire it: EXP6 Host cable → hub port C; left wheel motor → expansion port 1, right wheel motor → expansion port 2.
Download the program
| Pybricks |
|---|
| ex05_square.py + library |
Pybricks code
# EXP6 範例 5:兩輪小車走正方形(Pybricks)
# 接線:EXP6 的 Host 線 → 主機 C 孔;左輪馬達 → 擴充孔 1;右輪馬達 → 擴充孔 2;EXP6 接上電池
# 小車:輪子直徑 56 mm、兩輪距離 112 mm(樂高標準小車)
from pybricks.hubs import PrimeHub
from MBC_exp6_obj_Lib import MBC_EXP6

hub = PrimeHub()
exp6 = MBC_EXP6(3, False)          # 3 = C 孔
exp6.set_motor_inverted(1, True)   # 左輪是反過來裝的:設成「反裝」,速度正的才會往前

for m in (1, 2):                   # 兩顆馬達都要準備好
    while exp6.get_device_id(m) != 5:
        exp6.keep_alive_wait(100)
exp6.keep_alive_wait(300)

for side in range(4):              # 正方形有 4 個邊
    exp6.reset_angle(2)                        # 右輪角度歸零,用來量走了多遠
    exp6.drive(1, 2, 40, 40)                   # 左輪孔 1、右輪孔 2,兩輪都 40% → 直走
    while exp6.get_motor_angle(2) < 720:       # 右輪轉滿 720 度(2 圈,大約 35 公分)
        exp6.keep_alive_wait(10)
    exp6.stop_all(2)                           # 煞車
    exp6.keep_alive_wait(300)

    exp6.reset_angle(2)
    exp6.drive(1, 2, 30, -30)                  # 左輪往前、右輪往後 → 原地右轉
    while exp6.get_motor_angle(2) > -180:      # 右輪倒轉 180 度 ≈ 車子轉 90 度
        exp6.keep_alive_wait(10)
    exp6.stop_all(2)
    exp6.keep_alive_wait(300)

exp6.stop_all(1)
Understanding the program step by step
- Set the left wheel as "inverted": the car's two motors are mounted mirror-image, so the left wheel turns the opposite way from the right wheel. Once it is set as inverted, both wheels follow "positive speed = forward".
- Wait for both motors to be ready.
- Repeat 4 times (4 sides of the square):
- Reset the right wheel angle to zero: we will use it to measure how far the car has gone.
- Drive both wheels: "left wheel port 1, right wheel port 2, left 40, right 40" → straight ahead. EXP6 keeps the two wheels in sync, so it drives straighter.
- Wait until the right wheel has turned 720 degrees (2 turns ≈ 35 cm) → stop all (brake), pause 0.3 seconds.
- Reset the right wheel angle again, "left 30, right -30" → left wheel forward, right wheel backward → turn right in place.
- Wait until the right wheel has turned back 180 degrees → the car has turned exactly 90 degrees (wheel turns 180 degrees × wheel diameter 56 ÷ wheel spacing 112 = 90 degrees) → stop.
- Stop all (coast).
What you should see when it runs: the car drives a stretch, turns right, drives a stretch, turns right... after 4 sides it ends up roughly back where it started.
Common problems
- The car spins in place and does not go forward? → The left wheel is not set as inverted, or the two motors are swapped (the left wheel must be in port 1).
- The car drives backward? → The motors are mounted the opposite way from the standard LEGO car: set expansion port 2 as inverted instead (official App / Pybricks: change the 1 in
set_motor_inverted(1, True)to 2; MBC Blocks website: change the expansion port in the "mounting direction" block to 2); no need to change the wiring. - Turns less than 90 degrees / more than 90? → The floor is slippery or the wheels are not the same size. Make 180 bigger (not turning enough) or smaller (turning too much), 5 to 10 at a time.
- The sides are not the same length? → Make 720 bigger or smaller. 720 degrees ≈ 35 cm, so every 100 degrees is about 5 cm.
More questions
- The hub does not detect the sensor? Unplug and replug, wait 2 s, try another port. The official app shows it as a colour sensor — that is expected.
- Can I use the official app and Pybricks on the same hub? One firmware at a time: Pybricks and the MBC Blocks website need Pybricks firmware, the official app needs LEGO firmware; you can switch back any time with the SPIKE app.
Still stuck? Contact us with your software and a screenshot of the program.
Downloads
- MBC_EXP6_Pybricks_Lib.zip
- Pybricks block example ex01_one_turn_block.py
- Pybricks block example ex02_three_motors_block.py
- Pybricks block example ex03_light_switch_block.py
- Pybricks block example ex04_button_motor_block.py
- Pybricks block example ex05_square_block.py
- Pybricks block example exp6_line8_pd_block.py
- Download centre (libraries, firmware, catalogue for every product)
Sources
- Host and software list:
_build/guides.json - Setup:
_build/guides/software/spike-pybricks.en.md、_build/guides/product/exp6/spike-pybricks.en.md - Examples:
sensors/exp6/spike-examples.md