
Ranger 8-Way (TOF8) × SPIKE × Pybricks
Interactive tutorialSPIKE
First time? Try the interactive tutorial in your browser first, then follow the steps below with your hub.
MicroPython (Pybricks)Pybricks blocksPybricks built-in blocks (no library)
This page covers Pybricks (Python) only: how to set it up for the Ranger 8-Way (TOF8) on SPIKE Prime / Robot Inventor, how to read every value, the commands it supports and examples. Use the switcher above to change product, host or software.
Setup
What you need
- Sensor: Ranger 8-Way (TOF8) (SPIKE edition).
- Hub: SPIKE Prime or Robot Inventor.
- Computer: Chrome. Open code.pybricks.com and start writing; nothing to install.
- Hub firmware: must be switched to Pybricks firmware v4.1 first (the stable code.pybricks.com is v4.1.1; v4.1.0 from the MBC SPIKE Blocks website works too). Every example on this site is written for v4.1.
- Library:
MBC_laser8_obj_Lib.py(only needed for the "import the library" method). For a new program of your own, import justMBC_sensors.py: one file for every MBC sensor.
Note
The Pybricks 3.6.1 libraries and examples are no longer updated (the 2026 SPIKE Prime hubs cannot run 3.6.1 either). For hubs that have not been upgraded, the old files are under "Legacy (no longer updated)" on the Downloads page.
Install the software
- Open code.pybricks.com in Chrome.
- Switch the hub to Pybricks firmware. The easiest way is the MBC SPIKE Blocks website: top menu "SPIKE Hub → Install/Update Pybricks firmware", about 3 minutes.
- To go back to the official LEGO App later, switch back to the original LEGO firmware with the SPIKE App.
Make the software see the sensor
Pybricks can read the sensor two ways; pick one:
- Built-in commands (no library): read the sensor with Pybricks' own sensor commands. No extra file, quickest to start.
- Import the library: download MBC_laser8_obj_Lib.py to get more data, such as the high-resolution position and every channel.
To import the library:
- In code.pybricks.com, click "Import a file" in the file panel on the left.
- Import both the example file and
MBC_laser8_obj_Lib.py, so they are in the same project list. - Open the example and press ▶ to run.
Important
New projects: use
MBC_sensors.py. Old projects: just replace the one file they already use.MBC_sensors.pyis one file for every MBC sensor (the EXP6 and Servo6 expander libraries are separate downloads); writefrom MBC_sensors import MBC_LINE8, with the same class names as in the old files. The old file names (such asMBC_laser8_obj_Lib.pyused by the examples on this page) are kept for existing programs: swap in the new file with the same name and the program needs no changes. But every old-name file is the whole shared library, so importing 3 or more of them in one program goes over the SPIKE program slot limit of about 51 KB; to mix several sensors, import onlyMBC_sensors.py.
Tip
The file name must match the name in the program's
importexactly, or you will get anImportError. The library files on this site have no version suffix, so you do not need to rename them.
Tip
Most libraries take a
multitaskargument when you create the object:Falseis normal mode, one line after another;Trueis multitask mode, where every call needsawaitin front so the robot can do several things at once.
Wiring
- Plug the sensor into hub port C with the cable (any of A~F works).
- Use the same port in the program: built-in commands use
Port.APort.F; a library'sportargument is usually16for A~F. - Latch up, push the plug in gently.
Wait 2~4 seconds after power-on
The Ranger 8-Way needs no calibration; plug it in and go. After power-on, wait 2~4 seconds for the 8 lasers to get ready; meanwhile everything reads 120 (cm). Start your program with a short wait before reading distances.
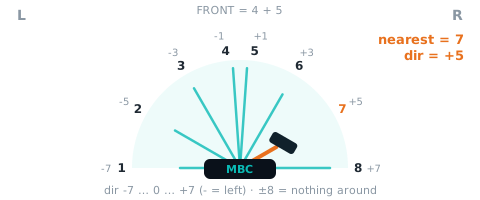
| Channel | 1 | 2 | 3 | 4 | 5 | 6 | 7 | 8 |
|---|---|---|---|---|---|---|---|---|
| Facing | left | left-front 60° | left-front 30° | front | front | right-front 30° | right-front 60° | right |
The table assumes the sensor faces forward with the components up. Put your hand on the robot's left: example 1 should show a negative direction. If it shows a positive one, the sensor is mounted the other way, and "turn left" / "turn right" in the examples must be swapped too.
First test
- Turn on the hub and connect it in code.pybricks.com.
- Import and open example 1 on this page, then press ▶.
- If the numbers printed in the console change with what is in front of the sensor, everything is connected.
FAQ
ImportError? The library was not imported into the same project, or its file name differs from theimportname. Rename it toMBC_laser8_obj_Lib.pyand import it again.- The example does not run, or a command is unknown? The hub firmware is too old: the examples on this site are written for Pybricks v4.1, so update the hub to v4.1 first. 3.6.1 is no longer updated; the old files are on the Downloads page.
- What happens if the sensor cable comes out? The program keeps running: the library returns the last value it read and prints one notice in the console (in Chinese and English:
MBC: Port C 讀不到感應器,先回傳上一次的值 / no sensor, using the last value); if the sensor was never connected it returnsNone. To check in your program, call the object'ssensor_ok():Trueif the last read worked,Falseif not (addawaitin multitask mode). Once you plug it back in the library keeps reading; if the sensor was missing from the start and you use multitask mode, run the program again. - An example marked "Pybricks only" shows strange numbers? It uses a new mode in sensor firmware from 2026-10 on; older firmware returns different numbers.
- The official App cannot connect any more? The hub now runs Pybricks firmware: switch back to the original LEGO firmware with the SPIKE App.
Reading values
Code assumes the sensor is on port A. For the MBC library form, import the library .py into Pybricks too.
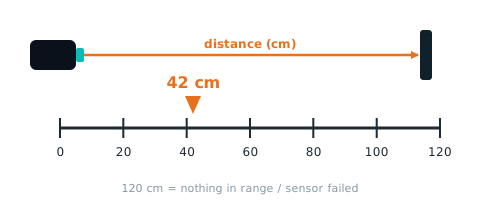
nearest distance (cm) nearCm
| Range | Meaning |
|---|---|
0~120 cm |
smallest of the 8 distances, 0~120 cm (a failed sensor counts as 120); 120 = nothing around |
from pybricks.iodevices import PUPDevice
from pybricks.parameters import Port

dev = PUPDevice(Port.A)   # sensor on port A

w = dev.read(9)[4]
nearCm = ((w >> 8) & 0xFF)   # nearest distance (cm)(hi byte)
MBC library
from pybricks.parameters import Port
from MBC_laser8_obj_Lib import MBC_LASER8

laser = MBC_LASER8(Port.A)
nearCm = laser.min_distance()
mode 2 byte 0; mode 3 byte 1; mode 4 v[0] hi; mode 7 v[2] 🔒; mode 9 v[4] hi 🔒. Note: [最近方向, 最近距離, 第 1 顆](第 4 byte 第 8 顆被描述表砍掉); Pybricks ambient() = int16[2]/100 = 最近 cm(INO:348-361)
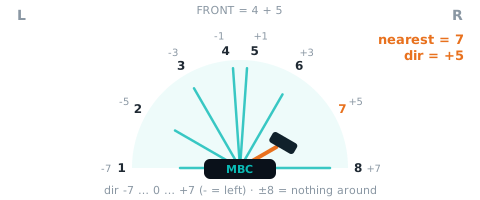
nearest direction nearDir
| Range | Meaning |
|---|---|
-8~+8 |
direction of the nearest object: −7 (left) to +7 (right), 0 = straight ahead, negative = left; ±8 = nothing around (keeps the last side) |
from pybricks.iodevices import PUPDevice
from pybricks.parameters import Port

dev = PUPDevice(Port.A)   # sensor on port A

w = dev.read(9)[4]
nearDir = (w & 0xFF) - 8   # nearest direction(lo byte)
MBC library
from pybricks.parameters import Port
from MBC_laser8_obj_Lib import MBC_LASER8

laser = MBC_LASER8(Port.A)
nearDir = laser.min_direction()
mode 1 byte 0 −8; mode 3 byte 0 −8; mode 4 v[0] lo −8; mode 5 v[0] 🔒; mode 6 v[2]; mode 9 v[4] lo −8 🔒. Note: 原始方位 0~16(8 = 正前); Pybricks reflection() 編碼:x = 方位−8,負數 +6399,a = x/25、b = 10×(x mod 25)+9,3 個 int16 = a×256+b → reflection() 向零截斷 = −8~+8(INO:319-336); #67 新:HSV 3×int16 = [最近 mm, 正前方 mm, 最近方向 −8~+8]
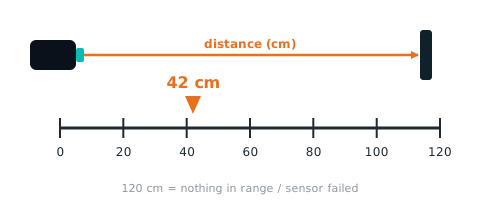
farthest distance (cm) farCm
| Range | Meaning |
|---|---|
0~120 cm |
largest of the 8 distances, 0~120 cm (a failed sensor always reads 120 and looks 'farthest') |
from pybricks.iodevices import PUPDevice
from pybricks.parameters import Port

dev = PUPDevice(Port.A)   # sensor on port A

w = dev.read(9)[5]
farCm = ((w >> 8) & 0xFF)   # farthest distance (cm)(hi byte)
MBC library
from pybricks.parameters import Port
from MBC_laser8_obj_Lib import MBC_LASER8

laser = MBC_LASER8(Port.A)
farCm = laser.max_distance()
mode 9 v[5] hi 🔒
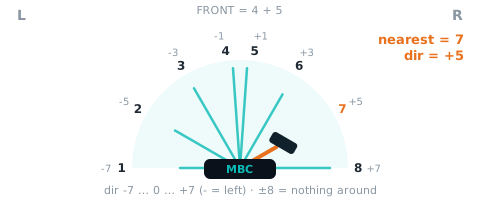
farthest direction farDir
| Range | Meaning |
|---|---|
-7~+7 |
direction of the most open side: −7 to +7, 0 = straight ahead, negative = left; 0 when all 8 read 120 |
from pybricks.iodevices import PUPDevice
from pybricks.parameters import Port

dev = PUPDevice(Port.A)   # sensor on port A

w = dev.read(9)[5]
farDir = (w & 0xFF) - 8   # farthest direction(lo byte)
MBC library
from pybricks.parameters import Port
from MBC_laser8_obj_Lib import MBC_LASER8

laser = MBC_LASER8(Port.A)
farDir = laser.max_direction()
mode 9 v[5] lo −8 🔒
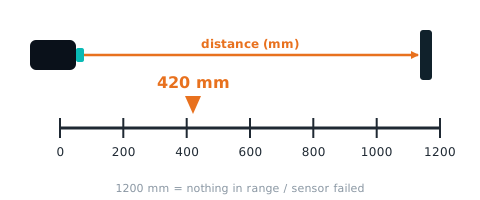
nearest distance (mm) nearMm
| Range | Meaning |
|---|---|
0~1200 mm |
smallest of the 8 mm readings, 0~1200 (failed sensor counts as 1200); 1200 = nothing around |
from pybricks.iodevices import PUPDevice
from pybricks.parameters import Port

dev = PUPDevice(Port.A)   # sensor on port A

nearMm = dev.read(6)[0]   # nearest distance (mm)
MBC library
from pybricks.parameters import Port
from MBC_laser8_obj_Lib import MBC_LASER8

laser = MBC_LASER8(Port.A)
nearMm = laser.nearest_mm()
mode 6 v[0]. Note: #67 新:[最近 mm, 正前方 mm, 方向]
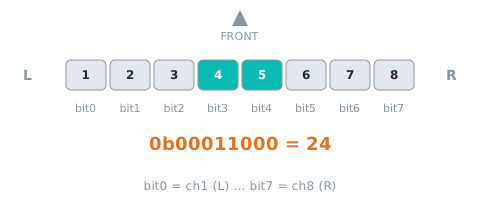
init bitmap initOk
| Range | Meaning |
|---|---|
0~255 bit |
bit0 = sensor 1 (left) … bit7 = sensor 8; 1 = initialised at power-on (8 sensors take |
from pybricks.iodevices import PUPDevice
from pybricks.parameters import Port

dev = PUPDevice(Port.A)   # sensor on port A

w = dev.read(9)[6]
initOk = (w & 0xFF)   # init bitmap(lo byte)
MBC library
from pybricks.parameters import Port
from MBC_laser8_obj_Lib import MBC_LASER8

laser = MBC_LASER8(Port.A)
initOk = laser.is_ok(1)
mode 9 v[6] lo 🔒
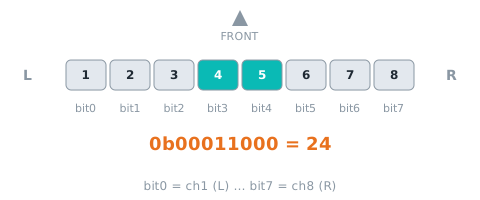
fault bitmap fault
| Range | Meaning |
|---|---|
0~255 bit |
bit0 = sensor 1 … bit7 = sensor 8; 1 = currently failing (I2C error or no update for 200 ms); its distance reads 120 / 1200 |
from pybricks.iodevices import PUPDevice
from pybricks.parameters import Port

dev = PUPDevice(Port.A)   # sensor on port A

w = dev.read(9)[6]
fault = ((w >> 8) & 0xFF)   # fault bitmap(hi byte)
MBC library
from pybricks.parameters import Port
from MBC_laser8_obj_Lib import MBC_LASER8

laser = MBC_LASER8(Port.A)
fault = laser.is_ok(1)
mode 9 v[6] hi 🔒
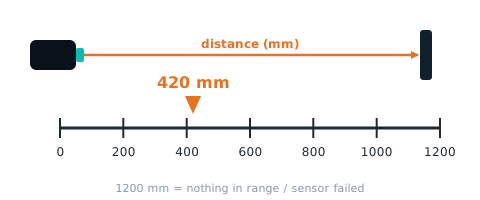
front distance (mm) frontMm
| Range | Meaning |
|---|---|
0~1200 mm |
average of sensors 4 and 5 (the two facing forward), 0~1200 mm; 1200 = nothing ahead. cm version is 05 |
from pybricks.iodevices import PUPDevice
from pybricks.parameters import Port

dev = PUPDevice(Port.A)   # sensor on port A

frontMm = dev.read(6)[1]   # front distance (mm)
MBC library
from pybricks.parameters import Port
from MBC_laser8_obj_Lib import MBC_LASER8

laser = MBC_LASER8(Port.A)
frontMm = laser.front_mm()
mode 6 v[1]. Note: #67 新:正前方 mm
sensor 1~8 distance (cm) distCm
| Range | Meaning |
|---|---|
0~120 cm |
distance of each sensor 1 |
from pybricks.iodevices import PUPDevice
from pybricks.parameters import Port

dev = PUPDevice(Port.A)   # sensor on port A

words = dev.read(9)[0:4]
distCm = []
for w in words:
    distCm.append(w & 0xFF)          # odd channel
    distCm.append((w >> 8) & 0xFF)   # even channel
MBC library
from pybricks.parameters import Port
from MBC_laser8_obj_Lib import MBC_LASER8

laser = MBC_LASER8(Port.A)
distCm = laser.distances()   # list, channel 1 = [0]
mode 0 (edu) byte 0 🔒; mode 0 (toy) byte 0 🔒; mode 3 byte 2; mode 4 v[1]; mode 8 v[0]; mode 9 v[0] 🔒. Note: 16 B = [第 1~8 顆, 0×8]:App 顏色 = 第 1 顆、反射光 = 第 2 顆、原始紅 = 第 3+256×第 4 …; byte0/1 = 第 1、2 顆 ×10/120(0~10);byte2~7 = 第 3~8 顆兩顆一組 4-bit 再查表編碼(spikeEncodeU8,INO:259-284); byte2 = 第 1 顆(byte3 = 第 8 顆被描述表砍掉); v1 = 第 1 顆 + 256×第 8 顆; 只送 4 B:v0 = 第 1+256×第 2、v1 = 第 3+256×第 4; 每 int16 兩顆:lo = 第 2k+1 顆、hi = 第 2k+2 顆(v0~v3 = 第 1~8 顆)
Not readable here:front distance (cm), sensor 1~8 distance (mm). Use Arduino / mBlock / micro:bit for these.
Examples
Example 1: Which direction is the nearest thing
What this example does: the hub display shows which direction the nearest thing is in (-7 to 7). Hand on the left shows a negative number, straight ahead shows 0, on the right shows a positive number; nothing around shows ✕.
What you need
- 1 SPIKE hub
- 1 Ranger 8-Way
- Your hand (or a book)
How to connect: plug the Ranger 8-Way into port C.
Download the program
| Pybricks |
|---|
| ex01_nearest_direction.py + library |
Pybricks code
# 測距者 8 路 範例 1:最近的東西在哪個方向(螢幕顯示 -7 ~ 7,沒東西顯示 ✕)
# 接線:測距者 8 路 → C 埠
from pybricks.hubs import PrimeHub
from pybricks.parameters import Icon
from pybricks.tools import wait
from MBC_laser8_obj_Lib import MBC_LASER8

hub = PrimeHub()
laser8 = MBC_LASER8(3)                      # 3 = C 埠(1=A、2=B、3=C、4=D、5=E、6=F)

while True:
    dist = laser8.min_distance()            # 最近的東西有多遠(公分,0~120;120 = 四周都沒東西)
    direction = laser8.min_direction()      # 最近的東西在哪個方向:負的 = 左邊、0 = 正前方、正的 = 右邊
    if dist >= 120:
        hub.display.icon(Icon.FALSE)        # 沒看到東西 → 顯示 ✕
    else:
        hub.display.number(direction)
        print('方向', direction, '  距離', dist)
    wait(200)                               # 等 0.2 秒再讀下一次
Step by step: what the program does
- Repeat forever: the blocks inside keep running until you press stop.
- Read the nearest distance and direction: the MBC Blocks website and Pybricks have "nearest target distance" and "nearest target direction" directly.
In the official App you build it yourself, in 3 parts:
- Read the 8 channels: following the table above, split the 5 blocks into 8 variables, "ch1" to "ch8".
- Compare channel by channel: start by assuming the "nearest distance" is 120 and the "nearest channel" is 0; then go from channel 1 to channel 8, and if this channel is closer than the "nearest distance", remember it. After the comparison, "nearest channel" is the closest channel (it stays 0 if nothing is there).
- Convert to a direction: direction = channel × 2 − 9 (channel 1 → -7, channel 4 → -1, channel 5 → 1, channel 8 → 7).
- If nothing is there (MBC Blocks website and Pybricks: nearest distance ≥ 120; official App: nearest channel = 0) → show ✕.
- Else → show the direction on the display. The MBC Blocks website and Pybricks also print the direction and distance on the computer screen.
What you should see when it runs
- Nothing around: ✕.
- Hand 30 cm to the far left: -7; front-left: -5 or -3.
- Hand straight ahead: 0 (the official App version shows -1 or 1, because it picks only one channel, and both channels 4 and 5 point straight ahead).
- Hand on the right: a positive number.
Common questions
- Left and right are swapped? → Your sensor is mounted the opposite way from the table (for example upside down), so you will need to swap the left and right turns in the later examples too.
- It always shows ✕? → Wait 2 to 4 seconds after power-on; or your hand is too far away (over 120 cm), or the object is black/transparent.
- The MBC Blocks website shows even numbers (for example -6, -2)? → That's normal. When your hand is right between two channels and both see it, the direction is averaged.
- It shows the same number wherever my hand is? → One channel may be broken or blocked and keeps reading a very small number. Check with the "channel N OK" block on the MBC Blocks website or
laser8.is_ok(1)tois_ok(8)in Pybricks.
Example 2: Change the light when something gets close
What this example does: when something gets close in any of the 8 directions, the hub light changes: yellow within 50 cm, red with beeping within 20 cm, green when nothing is near. Like a parking sensor.
What you need: same as Example 1.
How to connect: plug the Ranger 8-Way into port C.
Download the program
| Pybricks |
|---|
| ex02_near_light.py + library |
Pybricks code
# 測距者 8 路 範例 2:有東西靠近就變燈號(< 20 公分紅燈+嗶、< 50 公分黃燈、其他綠燈)
# 接線:測距者 8 路 → C 埠
from pybricks.hubs import PrimeHub
from pybricks.parameters import Color
from pybricks.tools import wait
from MBC_laser8_obj_Lib import MBC_LASER8

hub = PrimeHub()
laser8 = MBC_LASER8(3)                  # 3 = C 埠

while True:
    dist = laser8.min_distance()        # 8 路裡最近的那個距離(公分)
    if dist < 20:                       # 很近了!
        hub.light.on(Color.RED)
        hub.speaker.beep(880, 100)
    elif dist < 50:                     # 有東西在附近
        hub.light.on(Color.YELLOW)
    else:                               # 50 公分內都沒東西
        hub.light.on(Color.GREEN)
    wait(100)
Step by step: what the program does
- Read the nearest distance: the official App uses the "read 8 channels + compare channel by channel" blocks from Example 1; the other two read "nearest target distance" directly.
- If nearest distance < 20 → red light and a beep.
- Else, if nearest distance < 50 → yellow light.
- Otherwise → green light.
- Wait 0.1 seconds, then check again.
What you should see when it runs: move your hand in slowly from far away, and the light goes green → yellow → red (beeping). It changes the same way when your hand comes in from the left or the right.
Common questions
- Why check < 20 first, then < 50? → 15 cm is also "less than 50". If you checked < 50 first, the red light would never come on. Write the conditions starting from the strictest one.
- It turns green when my hand touches the sensor? → When something is extremely close (within a few cm), the laser may not be able to measure it and reads 120. Leave a little gap.
- It stays yellow when sitting on the desk? → The side channels are seeing other things on the desk, or the sensor is mounted too low and sees the desktop.
Example 3: Turn to face the nearest thing
What this example does: the robot turns on the spot so its front faces the nearest thing (within 60 cm). Hand on the left → it turns left; on the right → it turns right; once it is facing you, it stops.
What you need
- Everything from Example 1, plus
- A two-wheeled robot car (two motors as the wheels)
How to connect
- Plug the Ranger 8-Way into port C, mounted at the front of the car, with channels 4 and 5 pointing straight ahead, at least 5 cm off the floor
- Left wheel motor on E, right wheel motor on F
Download the program
| Pybricks |
|---|
| ex03_turn_to_nearest.py + library |
Pybricks code
# 測距者 8 路 範例 3:原地轉頭,讓車頭朝向最近的東西(60 公分外的不理它)
# 接線:測距者 8 路 → C 埠(裝在車頭);左輪馬達 → E 埠;右輪馬達 → F 埠
from pybricks.parameters import Direction, Port
from pybricks.pupdevices import Motor
from pybricks.robotics import DriveBase
from pybricks.tools import wait
from MBC_laser8_obj_Lib import MBC_LASER8

laser8 = MBC_LASER8(3)                                 # 3 = C 埠
left = Motor(Port.E, Direction.COUNTERCLOCKWISE)       # 左輪:反過來裝,所以設成逆時針才是往前
right = Motor(Port.F)                                  # 右輪
robot = DriveBase(left, right, wheel_diameter=56, axle_track=112)   # 輪子直徑 56 mm、兩輪距離 112 mm

while True:
    dist = laser8.min_distance()
    direction = laser8.min_direction()      # -7(最左)~ 0(正前方)~ 7(最右)
    if dist > 60:                           # 太遠或沒東西 → 停著等
        robot.stop()
    elif direction < -1:                    # 東西在左邊 → 原地左轉
        robot.drive(0, -90)                 # 不前進,每秒左轉 90 度
    elif direction > 1:                     # 東西在右邊 → 原地右轉
        robot.drive(0, 90)
    else:                                   # -1、0、1:已經在正前方 → 停
        robot.stop()
    wait(50)
Step by step: what the program does
- Tell the hub where the wheels are: in the official App it is "set movement motors to E+F" at 20% speed; on the MBC Blocks website and in Pybricks it is "drive base: left wheel E, right wheel F".
- Read the nearest distance and direction (in the official App, the "nearest channel").
- If nearest distance > 60 → too far or nothing there → stop and wait.
- Else, if the thing is on the left (direction < -1; official App: channels 1 to 3) → turn left on the spot.
- Else, if the thing is on the right (direction > 1; official App: channels 6 to 8) → turn right on the spot.
- Otherwise (straight ahead) → stop.
What you should see when it runs: put your hand on the robot's left and it turns to face your hand; walk slowly around it and it keeps turning to follow you.
Common questions
- It overshoots and wobbles from side to side of my hand? → It is turning too fast. MBC Blocks website and Pybricks: make the "90" smaller (for example 60); official App: lower the 20% speed (for example 15%).
- It turns the wrong way and gets farther off? → Go back to Example 1 and confirm left and right; or the motors are mounted the other way round (see the common questions in Example 4).
- It never stops turning? → A nearby wall or table leg is closer than your hand, so it goes after the wall. Play in an open area.
Example 4: Avoid obstacles by heading for the most open side
What this example does: the robot keeps driving forward. When something is within 30 cm straight ahead, it stops, checks which side is more open, turns 45 degrees that way, then keeps going.
What you need: same as Example 3, plus an open floor area with a few boxes as obstacles.
How to connect: plug the Ranger 8-Way into port C, mounted at the front; left wheel motor on E, right wheel motor on F.
Download the program
| Pybricks |
|---|
| ex04_avoid_open_side.py + library |
Pybricks code
# 測距者 8 路 範例 4:避障。一直往前走;正前方(第 4、5 路)小於 30 公分就停下,往最空曠的那一邊轉 45 度
# 接線:測距者 8 路 → C 埠(裝在車頭);左輪馬達 → E 埠;右輪馬達 → F 埠
from pybricks.parameters import Direction, Port
from pybricks.pupdevices import Motor
from pybricks.robotics import DriveBase
from pybricks.tools import wait
from MBC_laser8_obj_Lib import MBC_LASER8

laser8 = MBC_LASER8(3)                                 # 3 = C 埠
left = Motor(Port.E, Direction.COUNTERCLOCKWISE)
right = Motor(Port.F)
robot = DriveBase(left, right, wheel_diameter=56, axle_track=112)

while True:
    if laser8.ch(4) < 30 or laser8.ch(5) < 30:   # 第 4、5 路都朝正前方,任何一個小於 30 公分 → 前面有東西
        robot.stop()
        if laser8.max_direction() < 0:           # 最空曠的方向在左邊(負的)
            robot.turn(-45)                      # 原地左轉 45 度
        else:
            robot.turn(45)                       # 原地右轉 45 度
    else:
        robot.drive(150, 0)                      # 每秒 150 mm 往前走
    wait(50)
Step by step: what the program does
- Set up the wheels and speed: 30% in the official App; 150 mm per second in the other two.
- Repeat forever: check whether channel 4 or channel 5, the ones pointing straight ahead, reads less than 30 cm.
- If yes → stop, then find the most open direction:
- The MBC Blocks website and Pybricks read "most open direction" directly: negative (the left is more open) → turn left 45 degrees, otherwise turn right 45 degrees.
- The official App uses the same "compare channel by channel" as Example 1, but looks for the farthest channel instead: channels 1 to 4 → turn left, channels 5 to 8 → turn right. The official App's 45-degree turn is "move 0.25 rotations with steering -100 (or 100)", which is roughly 45 degrees on the standard LEGO car.
- Else → drive forward.
What you should see when it runs: the car drives forward, stops just before hitting a box, turns toward the more open side, then carries on. In a corner it keeps turning until it finds a way out.
Common questions
- It only stops after bumping into the obstacle? → Too fast, or the obstacle is black/transparent. Lower the speed, or raise the "30".
- It clips things on the side? → This example only looks at the two front channels. For extra safety, add channels 3 and 6 to the "or" so they are checked as well.
- It turns toward the opposite side from the open one? → Go back to Example 1 and confirm left and right; if they are swapped, swap the left and right turns.
- The car drives backward / the direction is reversed? → The motors are mounted the opposite way from the standard LEGO car. Official App: mount the motors the way the LEGO "standard driving base" does; MBC Blocks website: in the "drive base" block, flip the "forward" direction of both the left and right wheel; Pybricks: change the left wheel to
Direction.CLOCKWISEand the right wheel toMotor(Port.F, Direction.COUNTERCLOCKWISE). - What happens if one channel is broken? → A broken channel always reads 120, so it gets treated as "the most open", and the robot may turn toward an obstacle. Check each channel using the common questions in Example 1.
Example 5: Follow your hand
What this example does: the robot follows your hand and keeps a distance of 15 to 25 cm: when your hand is a bit far (25 to 60 cm) it drives forward while steering toward your hand; at just the right distance it stops; too close (under 15 cm) it backs up; hand taken away (over 60 cm) it stops.
What you need: same as Example 3.
How to connect: plug the Ranger 8-Way into port C, mounted at the front; left wheel motor on E, right wheel motor on F.
Download the program
| Pybricks |
|---|
| ex05_follow_hand.py + library |
Pybricks code
# 測距者 8 路 範例 5:跟著手走。手在 25~60 公分:一邊往前走一邊轉向手;15~25 公分:停;太近:後退
# 接線:測距者 8 路 → C 埠(裝在車頭);左輪馬達 → E 埠;右輪馬達 → F 埠
from pybricks.parameters import Direction, Port
from pybricks.pupdevices import Motor
from pybricks.robotics import DriveBase
from pybricks.tools import wait
from MBC_laser8_obj_Lib import MBC_LASER8

laser8 = MBC_LASER8(3)                                 # 3 = C 埠
left = Motor(Port.E, Direction.COUNTERCLOCKWISE)
right = Motor(Port.F)
robot = DriveBase(left, right, wheel_diameter=56, axle_track=112)

while True:
    dist = laser8.min_distance()            # 手(最近的東西)有多遠
    direction = laser8.min_direction()      # 手在哪個方向:-7 ~ 7
    if dist > 60:                           # 看不到手 → 停
        robot.stop()
    elif dist < 15:                         # 太近了 → 每秒 80 mm 往後退
        robot.drive(-80, 0)
    elif dist > 25:                         # 有點遠 → 往前走,手偏多少就轉多少
        robot.drive(100, direction * 15)    # 方向 × 15 = 每秒轉幾度(左負右正)
    else:                                   # 15 ~ 25 公分:剛剛好 → 停
        robot.stop()
    wait(50)
Step by step: what the program does
- Read the distance and direction of your hand (the nearest thing) (the official App uses the blocks from Example 1).
- Split it into 4 cases by distance, checked from top to bottom:
- > 60 cm → can't see the hand → stop.
- < 15 cm → too close → back up (MBC Blocks website and Pybricks: 80 mm per second).
- > 25 cm → a bit far → drive forward, and steer as much as the hand is off center: the MBC Blocks website and Pybricks turn at "direction × 15" degrees per second; the official App's steering is "direction × 10" (direction is still channel × 2 − 9).
- Everything else (15 to 25 cm) → just right → stop.
What you should see when it runs: put your hand 40 cm in front of the robot and it drives forward; move your hand to the left and it turns left while driving; hold your hand still and it stops about 20 cm away; push your hand toward it and it backs up.
Common questions
- It keeps jittering back and forth? → The "just right" range is too narrow. Change 15 to 12 and 25 to 30.
- It steers too sharply / too slowly? → Change the "× 15" number (the official App uses "× 10"): bigger turns faster, smaller turns slower.
- It follows the wall instead of my hand? → Something nearby is closer than your hand. Play in an open area where your hand is the nearest thing.
- The official App version doesn't back up? → Make sure the direction on the "start moving" block is the "backward" arrow.
Example 6 (advanced): How many millimeters away is the nearest thing
Note
This example comes in a Pybricks version only. The "millimeter distance" it uses lives in sensor mode 6, which the official LEGO App and the MBC Blocks website cannot read (they only read centimeters). The sensor firmware must be from 2026-10 or later; older firmware returns different numbers in that mode. The code itself is the example, so there are no screenshots.
What this example does: the hub display scrolls how many millimeters away the nearest thing is (for example 300), and the light has three levels: red within 10 cm, yellow from 10 to 30 cm, green farther away; nothing around shows ✕. The computer screen also prints which direction it is in and how many millimeters are straight ahead.
What you need: same as Example 1 (hub + Ranger 8-Way + a hand or a book).
How to connect: plug the Ranger 8-Way into port C.
Download the program
| Pybricks |
|---|
| ex06_nearest_mm.py + library |
Pybricks code
# 測距者 8 路 範例 6(進階):最近的東西有幾毫米(螢幕捲動顯示毫米、燈號分三段)
# 接線:測距者 8 路 → C 埠
# 只有 Pybricks 版:毫米距離放在感應器的「模式 6」,官方 App 和積木網站讀不到;感應器韌體要 2026-10 以後
from pybricks.hubs import PrimeHub
from pybricks.parameters import Color, Icon
from pybricks.tools import wait
from MBC_laser8_obj_Lib import MBC_LASER8

hub = PrimeHub()
laser8 = MBC_LASER8(3)                       # 3 = C 埠

while True:
    mm = laser8.nearest_mm()                 # 最近的東西有幾毫米(0~1200;1200 = 四周沒東西)
    direction = laser8.nearest_dir()         # 它在哪個方向:-8 ~ 8(0 = 正前方,負 = 左)
    front = laser8.front_mm()                # 正前方(第 4、5 顆平均)有幾毫米
    if mm >= 1200:                           # 四周沒東西
        hub.display.icon(Icon.FALSE)
        hub.light.on(Color.GREEN)
    else:
        hub.display.text(str(mm))            # 螢幕捲動顯示毫米,例如「300」
        if mm < 100:                         # 10 公分以內:紅燈
            hub.light.on(Color.RED)
        elif mm < 300:                       # 10~30 公分:黃燈
            hub.light.on(Color.YELLOW)
        else:                                # 更遠:綠燈
            hub.light.on(Color.GREEN)
    print('最近', mm, 'mm  方向', direction, '  正前方', front, 'mm')
    wait(200)
Step by step: what the program does
laser8.nearest_mm(): how many millimeters away the nearest thing is (0 to 1200; 1200 = nothing around), 10 times finer than centimeters.laser8.nearest_dir(): which direction it is in (-8 to 8, 0 = straight ahead, negative = left), the same direction as in Example 1.laser8.front_mm(): how many millimeters straight ahead (the average of channels 4 and 5), for programs that "only look forward".- If ≥ 1200 → show ✕ and green light; else show the millimeters, then split into red, yellow and green at 100 and 300.
- Reading these three numbers together only reads the hardware once; the library also has
laser8.device_id()andlaser8.firmware_version().
What you should see when it runs: hand 30 cm to the left: the display scrolls "300", green light, and the computer prints "direction -5"; move your hand to 25 cm straight ahead: "250", yellow light, "direction 0"; bring your hand in to 8 cm: "80", red light.
Common questions
- The millimeter value jumps around? → That's normal. Each laser reading varies by 10 to 20 mm; for a steadier value, take several readings and average them.
- Want to use centimeters and millimeters at the same time? → You can, but don't mix them in the same loop: every mode switch costs the sensor a few dozen ms.
- It always shows ✕? → Nothing within 120 cm in any direction; or the sensor firmware is too old (before 2026-10) and has no millimeter mode, so please update the firmware.
More questions
- The hub does not detect the sensor? Unplug and replug, wait 2 s, try another port. The official app shows it as a colour sensor — that is expected.
- Can I use the official app and Pybricks on the same hub? One firmware at a time: Pybricks and the MBC Blocks website need Pybricks firmware, the official app needs LEGO firmware; you can switch back any time with the SPIKE app.
Still stuck? Contact us with your software and a screenshot of the program.
Downloads
- Pybricks library MBC_laser8_obj_Lib.py
- Shared library (for new projects, one file for every MBC sensor) MBC_sensors.py
- tof8_pybricks_spike_v4.x.zip
- MBC_TOF8_Pybricks_Lib.zip
- Download centre (libraries, firmware, catalogue for every product)
Sources
- Host and software list:
_build/guides.json - Values and commands:
_build/protocol/tof8.json(single source of truth) - Setup:
_build/guides/software/spike-pybricks.en.md、_build/guides/product/tof8/spike-pybricks.en.md - Examples:
sensors/tof8/spike-examples.md