
EV3 beginner examples: TOF8 eight-direction laser
Back to the TOF8 eight-direction laser product page
This page has 6 examples for people who have never written a program: every example comes with a ready-made program file you can download and run, plus a plain-language step-by-step explanation. Start with example 1 and work through in order.
Before you start
- Use the EV3 edition of the sensor (RJ12 plug), plugged into port 1 of the EV3.
- Turn the EV3 on first, then plug in the sensor. If the number never changes, unplug the sensor and plug it back in.
- Examples that drive use the LEGO Education base robot: left wheel motor on B, right wheel motor on C.
- The sensor shows up on the EV3 as an "Infrared Sensor". That is normal: read its values with the infrared sensor blocks.
Every example comes in 5 software versions; pick the one you use: (examples marked "Pybricks / EV3 MicroPython / clev3r only" come in those 3 versions only, because the EV3-G and Classroom blocks cannot read that mode)
| Software | Who it suits | How to open the example file |
|---|---|---|
| EV3-G (official software) | School computer labs, WRO teams (the most common in Taiwan) | Download the .ev3 file, choose "File → Open Project" in the EV3 software, then "Download and Run" at the bottom right. |
| EV3 Classroom | First time with EV3, want the same blocks as SPIKE | Download the .lmsp file, choose "Open" on the EV3 Classroom home screen, connect the EV3 and press "Download and Run" at the bottom right. |
| Pybricks v4 | Want to learn typed code, works in the browser | Open code.pybricks.com in Chrome; the EV3 needs the Pybricks firmware first (currently Beta). Drag the .py file into the editor and press Run. |
| EV3 MicroPython v2.0 | Already using the official LEGO EV3 MicroPython | Use the official LEGO "EV3 MicroPython" microSD boot card + the VS Code extension; paste the program into main.py and press F5 to download and run. |
| clev3r | Already using clev3r (EV3 Basic) | Open the .bp file in clev3r, press "Compile and download", then run it from the MBC_ folder in the EV3 file browser. |
The 13 values used on this page
| Name | Range | Where it comes from |
|---|---|---|
| Straight-ahead distance (average of lasers 4 and 5) | 0 ~ 100 (1 unit = 1.2 cm, 100 = nothing ahead) | Mode 0 |
| Distance of laser 1 | 0 ~ 100 (1 unit = 1.2 cm) | Mode 1, value 1 |
| Distance of laser 2 | 0 ~ 100 (1 unit = 1.2 cm) | Mode 1, value 2 |
| Distance of laser 3 | 0 ~ 100 (1 unit = 1.2 cm) | Mode 1, value 3 |
| Distance of laser 4 | 0 ~ 100 (1 unit = 1.2 cm) | Mode 1, value 4 |
| Distance of laser 5 | 0 ~ 100 (1 unit = 1.2 cm) | Mode 1, value 5 |
| Distance of laser 6 | 0 ~ 100 (1 unit = 1.2 cm) | Mode 1, value 6 |
| Distance of laser 7 | 0 ~ 100 (1 unit = 1.2 cm) | Mode 1, value 7 |
| Distance of laser 8 | 0 ~ 100 (1 unit = 1.2 cm) | Mode 1, value 8 |
| Distance of the nearest object | 0 ~ 100 | Mode 2, value 2 |
| Direction of the nearest object | -7 ~ +7 (negative = left, positive = right, around 0 = straight ahead; ±8 = nothing) | Mode 2, value 1 |
| Most open direction | -7 ~ +7 (negative = left, positive = right) | Mode 2, value 3 |
| Distance of the nearest object (mm) | 0 ~ 1200 mm | Mode 5, value 1 (Pybricks / EV3 MicroPython / clev3r only) |
Example list:
- Measure the distance straight ahead
- Stop 30 cm before the wall
- See all 8 directions at once
- Sumo chaser: turn towards the nearest object and charge
- Drive towards the most open direction
- Where is the nearest object, and how many millimetres away (Pybricks / EV3 MicroPython / clev3r only)
Example 1: Measure the distance straight ahead
What this example does: Mode 0 of the eight-direction laser gives the average distance straight ahead (the middle two lasers): the simplest value to use.
What you need:
- TOF8 eight-direction laser (EV3 edition)
- EV3 brick
How to connect: TOF8 eight-direction laser in port 1.
Download the program (pick your software):
⬇ EV3-G (official software) | ⬇ EV3 Classroom | ⬇ Pybricks v4 | ⬇ EV3 MicroPython v2.0 | ⬇ clev3r
EV3-G (official software) blocks

(Too small? Click the picture to open it full size.)
EV3 Classroom blocks
(Too small? Click the picture to open it full size.)
Pybricks v4 code
# ============================================================
# TOF8 八方位雷射測距感應器 EV3 新手範例 01:量量看正前方有多遠
# 軟體:Pybricks v4(用 Chrome 打開 https://code.pybricks.com ,EV3 版目前是 Beta)
# 接法:TOF8 八方位雷射插 1 號孔
# 這個範例會做什麼:八方位雷射的模式 0 會給你正前方(中間兩顆)的平均距離,最簡單好用。
# ============================================================

from pybricks.hubs import EV3Brick
from pybricks.iodevices import LUMPDevice
from pybricks.parameters import Port, Color
from pybricks.tools import wait

ev3 = EV3Brick()
sensor = LUMPDevice(Port.S1)       # TOF8 八方位雷射插 1 號孔


def read_front():
    # 正前方(第 4、5 顆平均)距離:0 ~ 100(1 格=1.2 公分,100=前面沒東西)
    return sensor.read(0)[0]


# ---------- 程式從這裡開始 ----------
# 清除螢幕
ev3.screen.clear()
# 一直重複
while True:
    # 第 1 行顯示正前方距離(0~100)
    ev3.screen.draw_text(0, 0, "FRONT " + str(read_front()) + "      ", Color.BLACK, Color.WHITE)
    # 第 2 行換算成公分:× 1.2
    ev3.screen.draw_text(0, 16, "CM " + str(read_front() * 1.2) + "      ", Color.BLACK, Color.WHITE)
    # 等 0.1 秒
    wait(100)
EV3 MicroPython v2.0 code
#!/usr/bin/env pybricks-micropython
# ============================================================
# TOF8 八方位雷射測距感應器 EV3 新手範例 01:量量看正前方有多遠
# 軟體:樂高官方 EV3 MicroPython v2.0(microSD 開機卡+VS Code「LEGO MINDSTORMS EV3 MicroPython」擴充套件)
# 接法:TOF8 八方位雷射插 1 號孔
# 這個範例會做什麼:八方位雷射的模式 0 會給你正前方(中間兩顆)的平均距離,最簡單好用。
# ============================================================

from pybricks.hubs import EV3Brick
from pybricks.iodevices import Ev3devSensor
from pybricks.parameters import Port, Color
from pybricks.tools import wait

ev3 = EV3Brick()
sensor = Ev3devSensor(Port.S1)     # TOF8 八方位雷射插 1 號孔


def read_front():
    # 正前方(第 4、5 顆平均)距離:0 ~ 100(1 格=1.2 公分,100=前面沒東西)
    return sensor.read('IR-PROX')[0]


# ---------- 程式從這裡開始 ----------
# 清除螢幕
ev3.screen.clear()
# 一直重複
while True:
    # 第 1 行顯示正前方距離(0~100)
    ev3.screen.draw_text(0, 0, "FRONT " + str(read_front()) + "      ", Color.BLACK, Color.WHITE)
    # 第 2 行換算成公分:× 1.2
    ev3.screen.draw_text(0, 16, "CM " + str(read_front() * 1.2) + "      ", Color.BLACK, Color.WHITE)
    # 等 0.1 秒
    wait(100)
clev3r code
' ============================================================
' TOF8 八方位雷射測距感應器 EV3 新手範例 01:量量看正前方有多遠
' 軟體:clev3r
' 接法:TOF8 八方位雷射插 1 號孔;左輪馬達接 B、右輪馬達接 C
' 這個範例會做什麼:八方位雷射的模式 0 會給你正前方(中間兩顆)的平均距離,最簡單好用。
' 讀值:front=正前方(第 4、5 顆平均)距離(0 ~ 100(1 格=1.2 公分,100=前面沒東西))
' ============================================================
folder "prjs" "MBC_tof8_ex01"

' TOF8 八方位雷射插 1 號孔,使用模式 0
Sensor.SetMode(1, 0)
LCD.Clear()

' 清除螢幕
LCD.Clear()
' 一直重複
While "True"
  ' 第 1 行顯示正前方距離(0~100)
  LCD.Text(1, 0, 0, 1, "FRONT " + Sensor.ReadRawValue(1, 0) + "      ")
  ' 第 2 行換算成公分:× 1.2
  LCD.Text(1, 0, 16, 1, "CM " + Sensor.ReadRawValue(1, 0) * 1.2 + "      ")
  ' 等 0.1 秒
  Program.Delay(100)
EndWhile
Step by step:
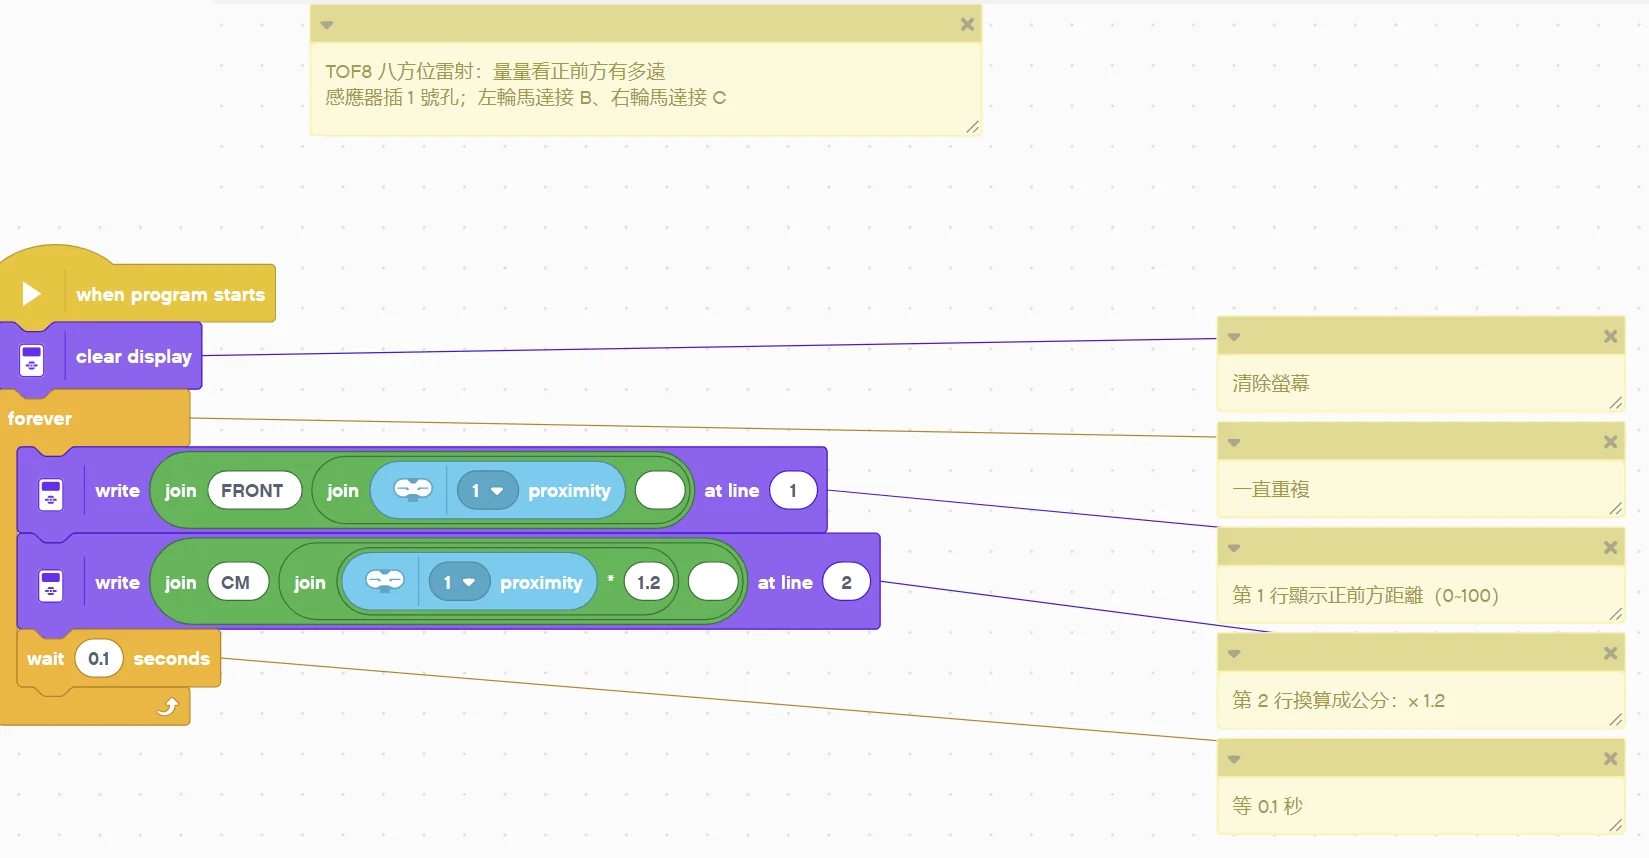
- Clear the screen
- Repeat forever
- Row 1 shows the straight-ahead distance (0~100)
- Row 2 converts to centimetres: × 1.2
- Wait 0.1 s
What you should see: Move your hand in front and the number follows; with nothing ahead it reads 100.
FAQ:
- The number does not match a ruler? On EV3, 1 unit = 1.2 cm (for example 25 = 30 cm); 100 means nothing within 120 cm ahead.
- The number stays at 0 or never changes? Turn the EV3 on before plugging in the sensor, or unplug and plug it back in; make sure there is no protective film over the laser.
Example 2: Stop 30 cm before the wall
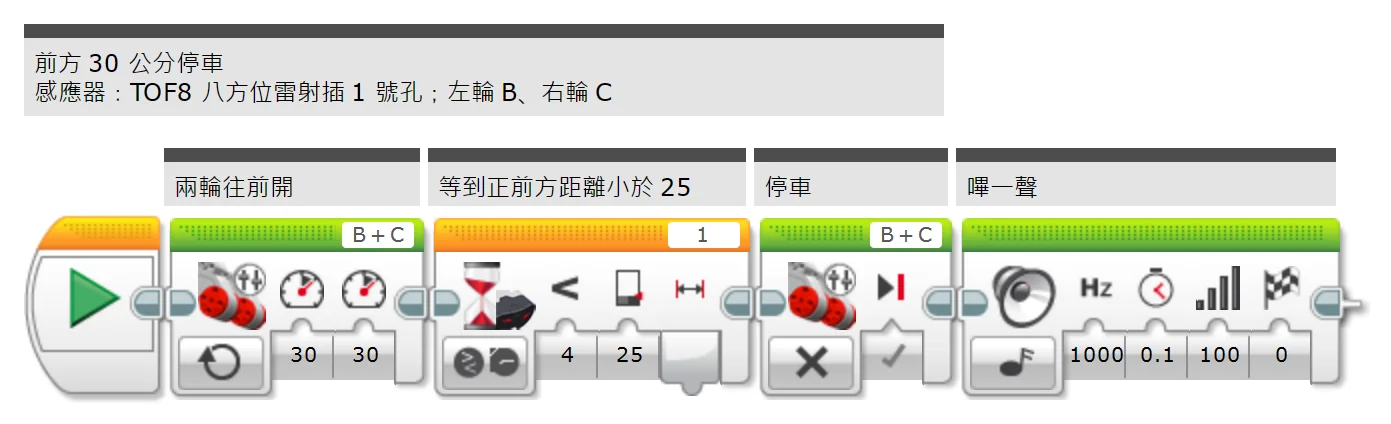
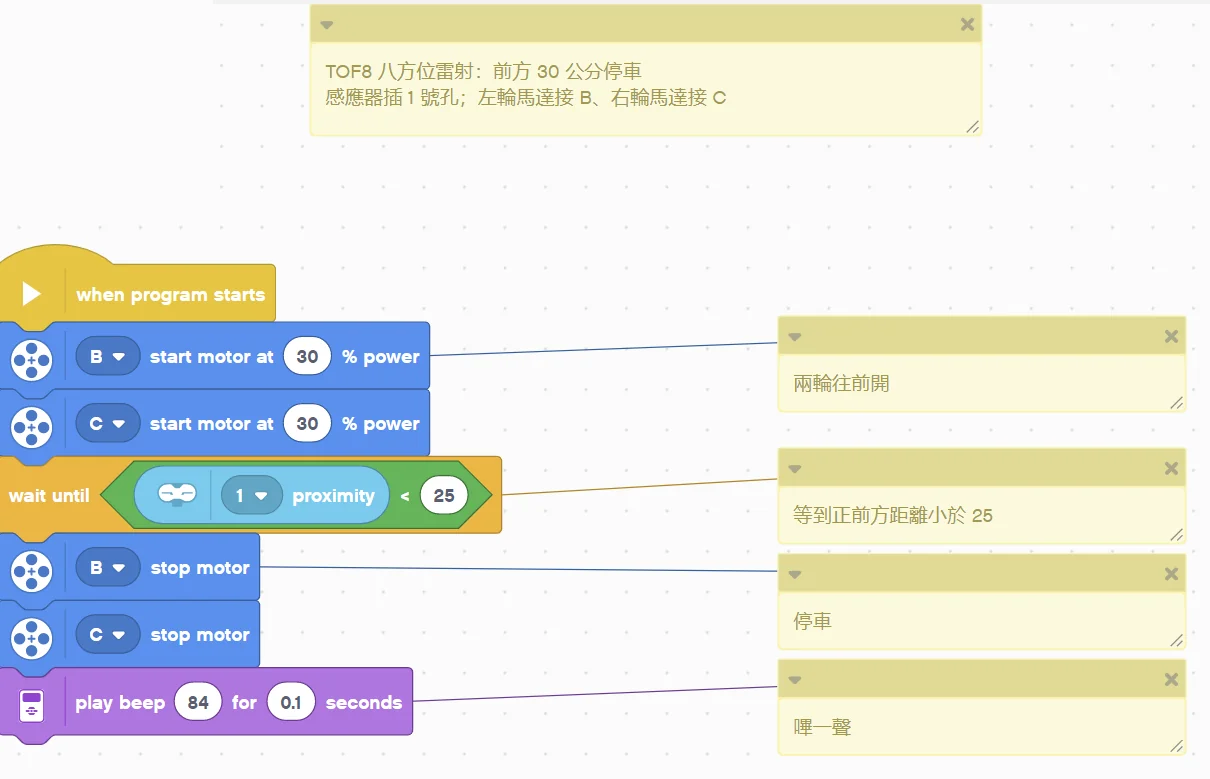
What this example does: The robot drives forward and stops when something is within 30 cm (value 25) straight ahead.
What you need:
- EV3 brick + Education base robot (left wheel on B, right wheel on C)
- TOF8 eight-direction laser (EV3 edition)
- A few boxes as obstacles
How to connect: TOF8 eight-direction laser in port 1, mounted at the front with lasers 4 and 5 facing straight ahead, about 5 cm above the ground.
Download the program (pick your software):
⬇ EV3-G (official software) | ⬇ EV3 Classroom | ⬇ Pybricks v4 | ⬇ EV3 MicroPython v2.0 | ⬇ clev3r
EV3-G (official software) blocks
(Too small? Click the picture to open it full size.)
EV3 Classroom blocks
(Too small? Click the picture to open it full size.)
Pybricks v4 code
# ============================================================
# TOF8 八方位雷射測距感應器 EV3 新手範例 02:前方 30 公分停車
# 軟體:Pybricks v4(用 Chrome 打開 https://code.pybricks.com ,EV3 版目前是 Beta)
# 接法:TOF8 八方位雷射插 1 號孔;左輪馬達接 B、右輪馬達接 C
# 這個範例會做什麼:車子往前開,正前方 30 公分(數字 25)以內有東西就停下來。
# ============================================================

from pybricks.hubs import EV3Brick
from pybricks.ev3devices import Motor
from pybricks.iodevices import LUMPDevice
from pybricks.parameters import Port
from pybricks.tools import wait

ev3 = EV3Brick()
sensor = LUMPDevice(Port.S1)       # TOF8 八方位雷射插 1 號孔
left_motor = Motor(Port.B)        # 左輪
right_motor = Motor(Port.C)       # 右輪


def read_front():
    # 正前方(第 4、5 顆平均)距離:0 ~ 100(1 格=1.2 公分,100=前面沒東西)
    return sensor.read(0)[0]


# ---------- 程式從這裡開始 ----------
# 兩輪往前開
left_motor.dc(30)
right_motor.dc(30)
# 等到正前方距離小於 25
while not (read_front() < 25):
    wait(10)
# 停車
left_motor.brake()
right_motor.brake()
# 嗶一聲
ev3.speaker.beep()
EV3 MicroPython v2.0 code
#!/usr/bin/env pybricks-micropython
# ============================================================
# TOF8 八方位雷射測距感應器 EV3 新手範例 02:前方 30 公分停車
# 軟體:樂高官方 EV3 MicroPython v2.0(microSD 開機卡+VS Code「LEGO MINDSTORMS EV3 MicroPython」擴充套件)
# 接法:TOF8 八方位雷射插 1 號孔;左輪馬達接 B、右輪馬達接 C
# 這個範例會做什麼:車子往前開,正前方 30 公分(數字 25)以內有東西就停下來。
# ============================================================

from pybricks.hubs import EV3Brick
from pybricks.ev3devices import Motor
from pybricks.iodevices import Ev3devSensor
from pybricks.parameters import Port
from pybricks.tools import wait

ev3 = EV3Brick()
sensor = Ev3devSensor(Port.S1)     # TOF8 八方位雷射插 1 號孔
left_motor = Motor(Port.B)        # 左輪
right_motor = Motor(Port.C)       # 右輪


def read_front():
    # 正前方(第 4、5 顆平均)距離:0 ~ 100(1 格=1.2 公分,100=前面沒東西)
    return sensor.read('IR-PROX')[0]


# ---------- 程式從這裡開始 ----------
# 兩輪往前開
left_motor.dc(30)
right_motor.dc(30)
# 等到正前方距離小於 25
while not (read_front() < 25):
    wait(10)
# 停車
left_motor.brake()
right_motor.brake()
# 嗶一聲
ev3.speaker.beep()
clev3r code
' ============================================================
' TOF8 八方位雷射測距感應器 EV3 新手範例 02:前方 30 公分停車
' 軟體:clev3r
' 接法:TOF8 八方位雷射插 1 號孔;左輪馬達接 B、右輪馬達接 C
' 這個範例會做什麼:車子往前開,正前方 30 公分(數字 25)以內有東西就停下來。
' 讀值:front=正前方(第 4、5 顆平均)距離(0 ~ 100(1 格=1.2 公分,100=前面沒東西))
' ============================================================
folder "prjs" "MBC_tof8_ex02"

' TOF8 八方位雷射插 1 號孔,使用模式 0
Sensor.SetMode(1, 0)
LCD.Clear()

' 兩輪往前開
Motor.StartPower("B", 30)
Motor.StartPower("C", 30)
' 等到正前方距離小於 25
While Sensor.ReadRawValue(1, 0) >= 25
  Program.Delay(10)
EndWhile
' 停車
Motor.Stop("BC", "True")
' 嗶一聲
Speaker.Tone(50, 1000, 100)
Speaker.Wait()
Step by step:
- Both wheels drive forward
- Wait until the straight-ahead distance is less than 25
- Stop
- Beep
What you should see: The robot stops about 30 cm from the obstacle and beeps.
FAQ:
- The number does not match a ruler? On EV3, 1 unit = 1.2 cm (for example 25 = 30 cm); 100 means nothing within 120 cm ahead.
Example 3: See all 8 directions at once
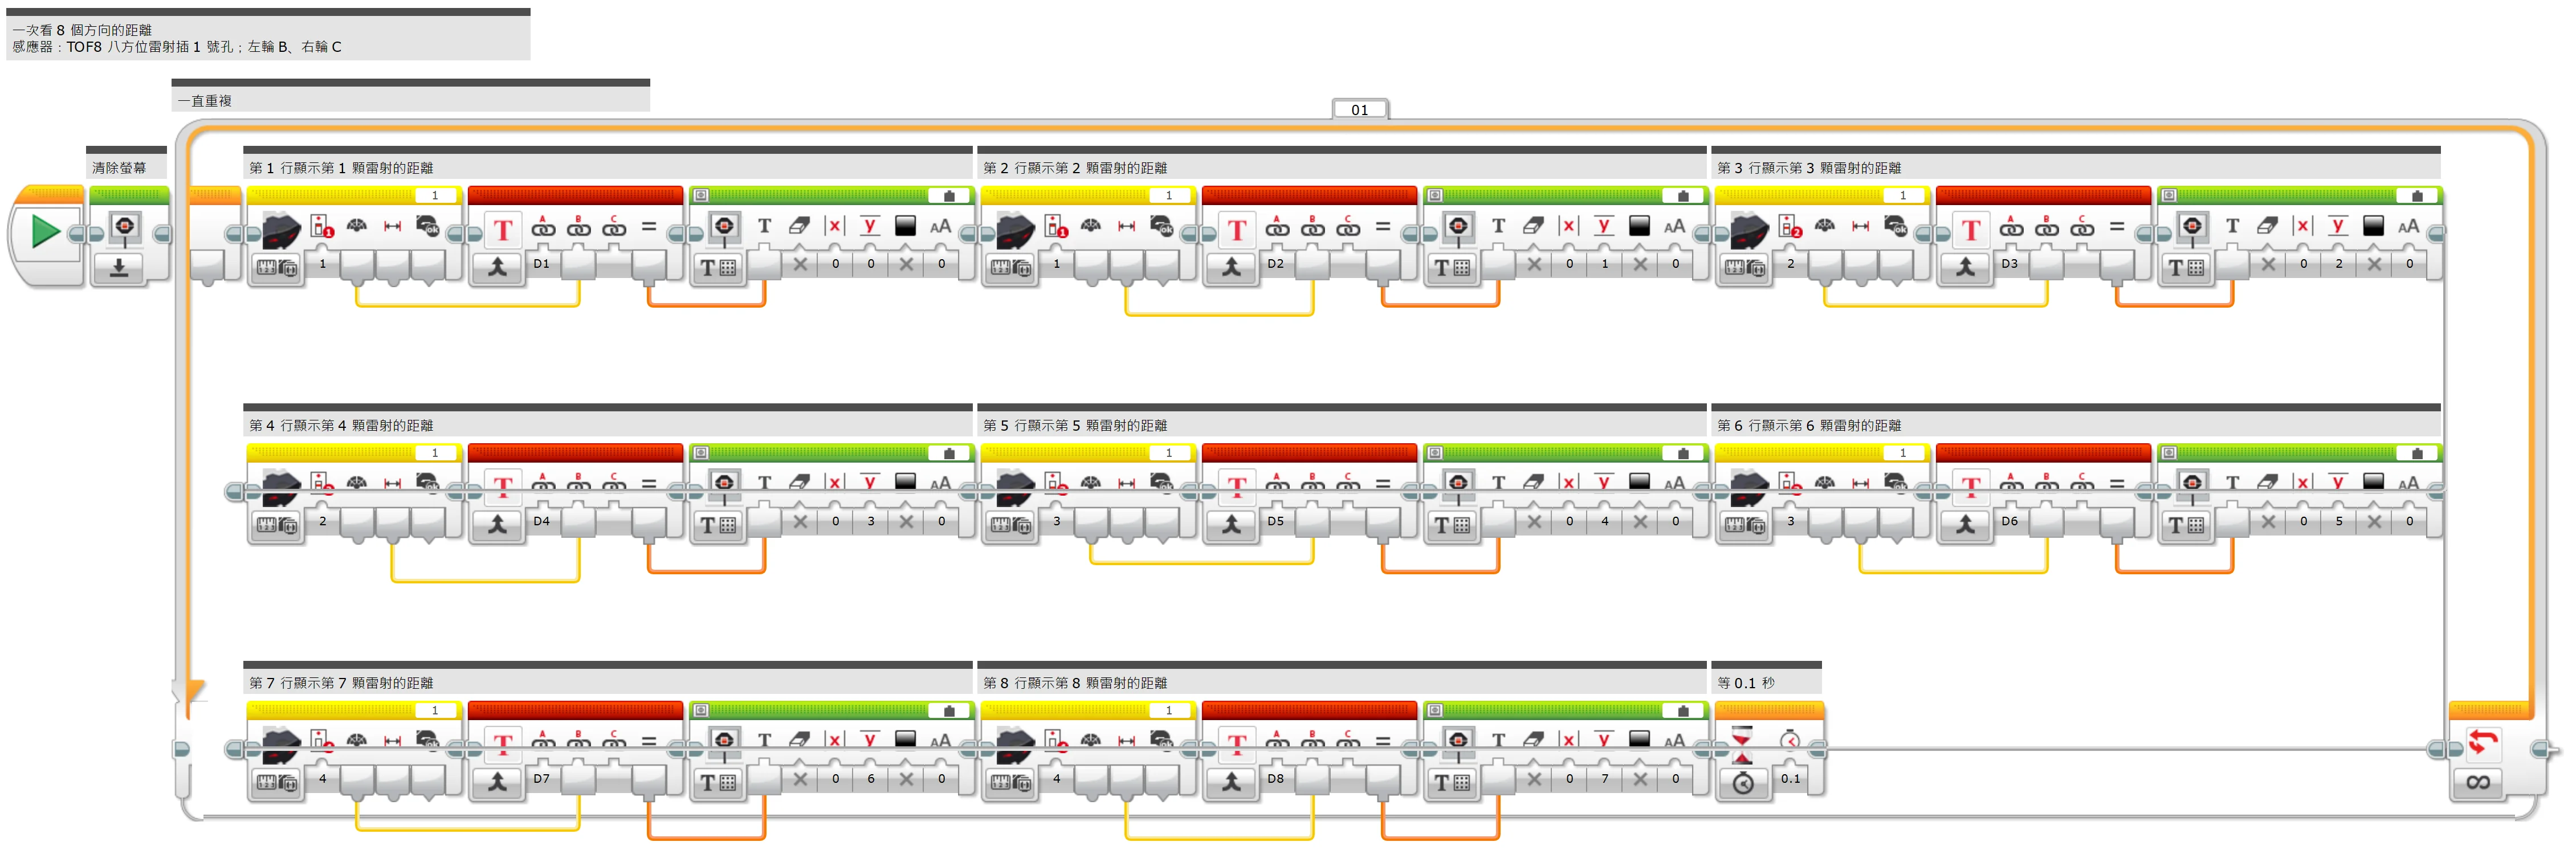
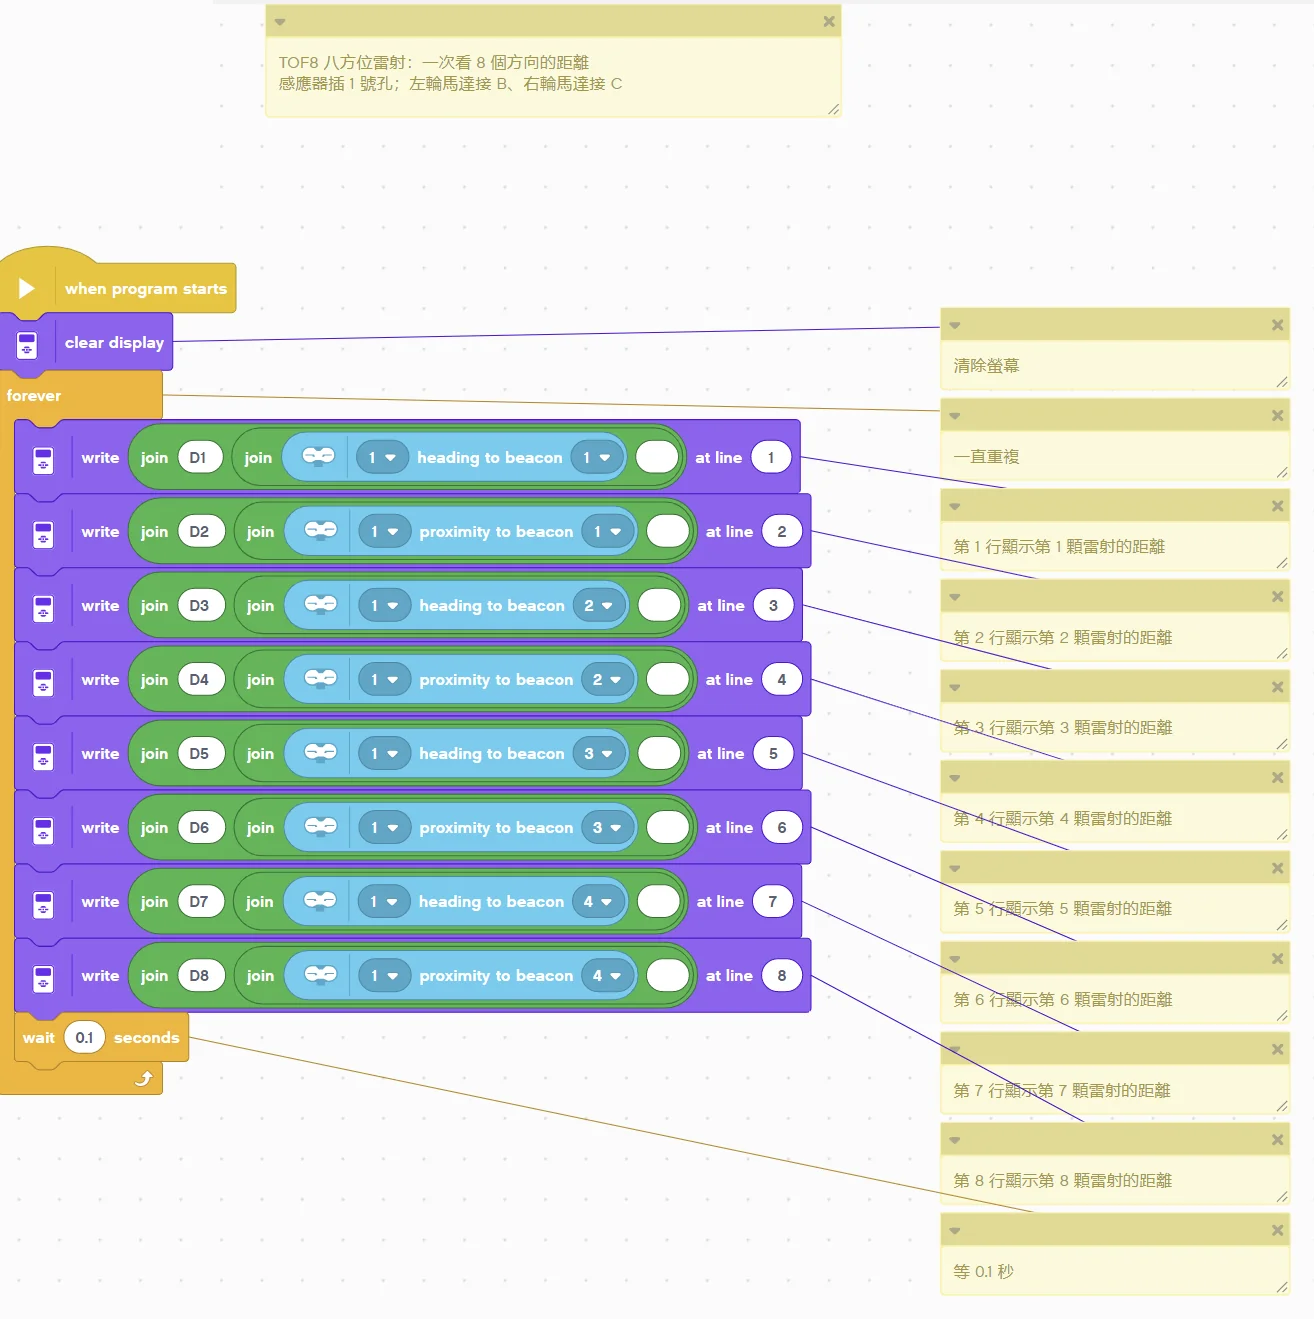
What this example does: Mode 1 sends the distance of each of the 8 lasers. This example shows all 8 numbers on the screen; wave your hand around and you will know which laser points where.
What you need:
- TOF8 eight-direction laser (EV3 edition)
- EV3 brick
How to connect: TOF8 eight-direction laser in port 1.
Download the program (pick your software):
⬇ EV3-G (official software) | ⬇ EV3 Classroom | ⬇ Pybricks v4 | ⬇ EV3 MicroPython v2.0 | ⬇ clev3r
EV3-G (official software) blocks
(Too small? Click the picture to open it full size.)
EV3 Classroom blocks
(Too small? Click the picture to open it full size.)
Pybricks v4 code
# ============================================================
# TOF8 八方位雷射測距感應器 EV3 新手範例 03:一次看 8 個方向的距離
# 軟體:Pybricks v4(用 Chrome 打開 https://code.pybricks.com ,EV3 版目前是 Beta)
# 接法:TOF8 八方位雷射插 1 號孔
# 這個範例會做什麼:模式 1 會一次送出 8 顆雷射各自的距離。這個範例把 8 個數字都顯示在螢幕上,拿手在四周晃一晃,就知道每顆雷射對應哪個方向。
# ============================================================

from pybricks.hubs import EV3Brick
from pybricks.iodevices import LUMPDevice
from pybricks.parameters import Port, Color
from pybricks.tools import wait

ev3 = EV3Brick()
sensor = LUMPDevice(Port.S1)       # TOF8 八方位雷射插 1 號孔


def read_d1():
    # 第 1 顆雷射的距離:0 ~ 100(1 格=1.2 公分)
    return sensor.read(1)[0]


def read_d2():
    # 第 2 顆雷射的距離:0 ~ 100(1 格=1.2 公分)
    return sensor.read(1)[1]


def read_d3():
    # 第 3 顆雷射的距離:0 ~ 100(1 格=1.2 公分)
    return sensor.read(1)[2]


def read_d4():
    # 第 4 顆雷射的距離:0 ~ 100(1 格=1.2 公分)
    return sensor.read(1)[3]


def read_d5():
    # 第 5 顆雷射的距離:0 ~ 100(1 格=1.2 公分)
    return sensor.read(1)[4]


def read_d6():
    # 第 6 顆雷射的距離:0 ~ 100(1 格=1.2 公分)
    return sensor.read(1)[5]


def read_d7():
    # 第 7 顆雷射的距離:0 ~ 100(1 格=1.2 公分)
    return sensor.read(1)[6]


def read_d8():
    # 第 8 顆雷射的距離:0 ~ 100(1 格=1.2 公分)
    return sensor.read(1)[7]


# ---------- 程式從這裡開始 ----------
# 清除螢幕
ev3.screen.clear()
# 一直重複
while True:
    # 第 1 行顯示第 1 顆雷射的距離
    ev3.screen.draw_text(0, 0, "D1 " + str(read_d1()) + "      ", Color.BLACK, Color.WHITE)
    # 第 2 行顯示第 2 顆雷射的距離
    ev3.screen.draw_text(0, 16, "D2 " + str(read_d2()) + "      ", Color.BLACK, Color.WHITE)
    # 第 3 行顯示第 3 顆雷射的距離
    ev3.screen.draw_text(0, 32, "D3 " + str(read_d3()) + "      ", Color.BLACK, Color.WHITE)
    # 第 4 行顯示第 4 顆雷射的距離
    ev3.screen.draw_text(0, 48, "D4 " + str(read_d4()) + "      ", Color.BLACK, Color.WHITE)
    # 第 5 行顯示第 5 顆雷射的距離
    ev3.screen.draw_text(0, 64, "D5 " + str(read_d5()) + "      ", Color.BLACK, Color.WHITE)
    # 第 6 行顯示第 6 顆雷射的距離
    ev3.screen.draw_text(0, 80, "D6 " + str(read_d6()) + "      ", Color.BLACK, Color.WHITE)
    # 第 7 行顯示第 7 顆雷射的距離
    ev3.screen.draw_text(0, 96, "D7 " + str(read_d7()) + "      ", Color.BLACK, Color.WHITE)
    # 第 8 行顯示第 8 顆雷射的距離
    ev3.screen.draw_text(0, 112, "D8 " + str(read_d8()) + "      ", Color.BLACK, Color.WHITE)
    # 等 0.1 秒
    wait(100)
EV3 MicroPython v2.0 code
#!/usr/bin/env pybricks-micropython
# ============================================================
# TOF8 八方位雷射測距感應器 EV3 新手範例 03:一次看 8 個方向的距離
# 軟體:樂高官方 EV3 MicroPython v2.0(microSD 開機卡+VS Code「LEGO MINDSTORMS EV3 MicroPython」擴充套件)
# 接法:TOF8 八方位雷射插 1 號孔
# 這個範例會做什麼:模式 1 會一次送出 8 顆雷射各自的距離。這個範例把 8 個數字都顯示在螢幕上,拿手在四周晃一晃,就知道每顆雷射對應哪個方向。
# ============================================================

from pybricks.hubs import EV3Brick
from pybricks.iodevices import Ev3devSensor
from pybricks.parameters import Port, Color
from pybricks.tools import wait

ev3 = EV3Brick()
sensor = Ev3devSensor(Port.S1)     # TOF8 八方位雷射插 1 號孔


def read_d1():
    # 第 1 顆雷射的距離:0 ~ 100(1 格=1.2 公分)
    return sensor.read('IR-SEEK')[0]


def read_d2():
    # 第 2 顆雷射的距離:0 ~ 100(1 格=1.2 公分)
    return sensor.read('IR-SEEK')[1]


def read_d3():
    # 第 3 顆雷射的距離:0 ~ 100(1 格=1.2 公分)
    return sensor.read('IR-SEEK')[2]


def read_d4():
    # 第 4 顆雷射的距離:0 ~ 100(1 格=1.2 公分)
    return sensor.read('IR-SEEK')[3]


def read_d5():
    # 第 5 顆雷射的距離:0 ~ 100(1 格=1.2 公分)
    return sensor.read('IR-SEEK')[4]


def read_d6():
    # 第 6 顆雷射的距離:0 ~ 100(1 格=1.2 公分)
    return sensor.read('IR-SEEK')[5]


def read_d7():
    # 第 7 顆雷射的距離:0 ~ 100(1 格=1.2 公分)
    return sensor.read('IR-SEEK')[6]


def read_d8():
    # 第 8 顆雷射的距離:0 ~ 100(1 格=1.2 公分)
    return sensor.read('IR-SEEK')[7]


# ---------- 程式從這裡開始 ----------
# 清除螢幕
ev3.screen.clear()
# 一直重複
while True:
    # 第 1 行顯示第 1 顆雷射的距離
    ev3.screen.draw_text(0, 0, "D1 " + str(read_d1()) + "      ", Color.BLACK, Color.WHITE)
    # 第 2 行顯示第 2 顆雷射的距離
    ev3.screen.draw_text(0, 16, "D2 " + str(read_d2()) + "      ", Color.BLACK, Color.WHITE)
    # 第 3 行顯示第 3 顆雷射的距離
    ev3.screen.draw_text(0, 32, "D3 " + str(read_d3()) + "      ", Color.BLACK, Color.WHITE)
    # 第 4 行顯示第 4 顆雷射的距離
    ev3.screen.draw_text(0, 48, "D4 " + str(read_d4()) + "      ", Color.BLACK, Color.WHITE)
    # 第 5 行顯示第 5 顆雷射的距離
    ev3.screen.draw_text(0, 64, "D5 " + str(read_d5()) + "      ", Color.BLACK, Color.WHITE)
    # 第 6 行顯示第 6 顆雷射的距離
    ev3.screen.draw_text(0, 80, "D6 " + str(read_d6()) + "      ", Color.BLACK, Color.WHITE)
    # 第 7 行顯示第 7 顆雷射的距離
    ev3.screen.draw_text(0, 96, "D7 " + str(read_d7()) + "      ", Color.BLACK, Color.WHITE)
    # 第 8 行顯示第 8 顆雷射的距離
    ev3.screen.draw_text(0, 112, "D8 " + str(read_d8()) + "      ", Color.BLACK, Color.WHITE)
    # 等 0.1 秒
    wait(100)
clev3r code
' ============================================================
' TOF8 八方位雷射測距感應器 EV3 新手範例 03:一次看 8 個方向的距離
' 軟體:clev3r
' 接法:TOF8 八方位雷射插 1 號孔;左輪馬達接 B、右輪馬達接 C
' 這個範例會做什麼:模式 1 會一次送出 8 顆雷射各自的距離。這個範例把 8 個數字都顯示在螢幕上,拿手在四周晃一晃,就知道每顆雷射對應哪個方向。
' 讀值:d1=第 1 顆雷射的距離(0 ~ 100(1 格=1.2 公分));d2=第 2 顆雷射的距離(0 ~ 100(1 格=1.2 公分));d3=第 3 顆雷射的距離(0 ~ 100(1 格=1.2 公分));d4=第 4 顆雷射的距離(0 ~ 100(1 格=1.2 公分));d5=第 5 顆雷射的距離(0 ~ 100(1 格=1.2 公分));d6=第 6 顆雷射的距離(0 ~ 100(1 格=1.2 公分));d7=第 7 顆雷射的距離(0 ~ 100(1 格=1.2 公分));d8=第 8 顆雷射的距離(0 ~ 100(1 格=1.2 公分))
' ============================================================
folder "prjs" "MBC_tof8_ex03"

' TOF8 八方位雷射插 1 號孔,使用模式 1
Sensor.SetMode(1, 1)
LCD.Clear()

' 清除螢幕
LCD.Clear()
' 一直重複
While "True"
  ' 第 1 行顯示第 1 顆雷射的距離
  LCD.Text(1, 0, 0, 1, "D1 " + Sensor.ReadRawValue(1, 0) + "      ")
  ' 第 2 行顯示第 2 顆雷射的距離
  LCD.Text(1, 0, 16, 1, "D2 " + Sensor.ReadRawValue(1, 1) + "      ")
  ' 第 3 行顯示第 3 顆雷射的距離
  LCD.Text(1, 0, 32, 1, "D3 " + Sensor.ReadRawValue(1, 2) + "      ")
  ' 第 4 行顯示第 4 顆雷射的距離
  LCD.Text(1, 0, 48, 1, "D4 " + Sensor.ReadRawValue(1, 3) + "      ")
  ' 第 5 行顯示第 5 顆雷射的距離
  LCD.Text(1, 0, 64, 1, "D5 " + Sensor.ReadRawValue(1, 4) + "      ")
  ' 第 6 行顯示第 6 顆雷射的距離
  LCD.Text(1, 0, 80, 1, "D6 " + Sensor.ReadRawValue(1, 5) + "      ")
  ' 第 7 行顯示第 7 顆雷射的距離
  LCD.Text(1, 0, 96, 1, "D7 " + Sensor.ReadRawValue(1, 6) + "      ")
  ' 第 8 行顯示第 8 顆雷射的距離
  LCD.Text(1, 0, 112, 1, "D8 " + Sensor.ReadRawValue(1, 7) + "      ")
  ' 等 0.1 秒
  Program.Delay(100)
EndWhile
Step by step:
- Clear the screen
- Repeat forever
- Row 1 shows the distance of laser 1
- Row 2 shows the distance of laser 2
- Row 3 shows the distance of laser 3
- Row 4 shows the distance of laser 4
- Row 5 shows the distance of laser 5
- Row 6 shows the distance of laser 6
- Row 7 shows the distance of laser 7
- Row 8 shows the distance of laser 8
- Wait 0.1 s
What you should see: 8 rows of numbers, one per laser; bring your hand near a laser and that row gets smaller.
FAQ:
- The number does not match a ruler? On EV3, 1 unit = 1.2 cm (for example 25 = 30 cm); 100 means nothing within 120 cm ahead.
- Is laser 1 on the left or the right? Try it with your hand and write it down; you will need it when programming.
Example 4: Sumo chaser: turn towards the nearest object and charge
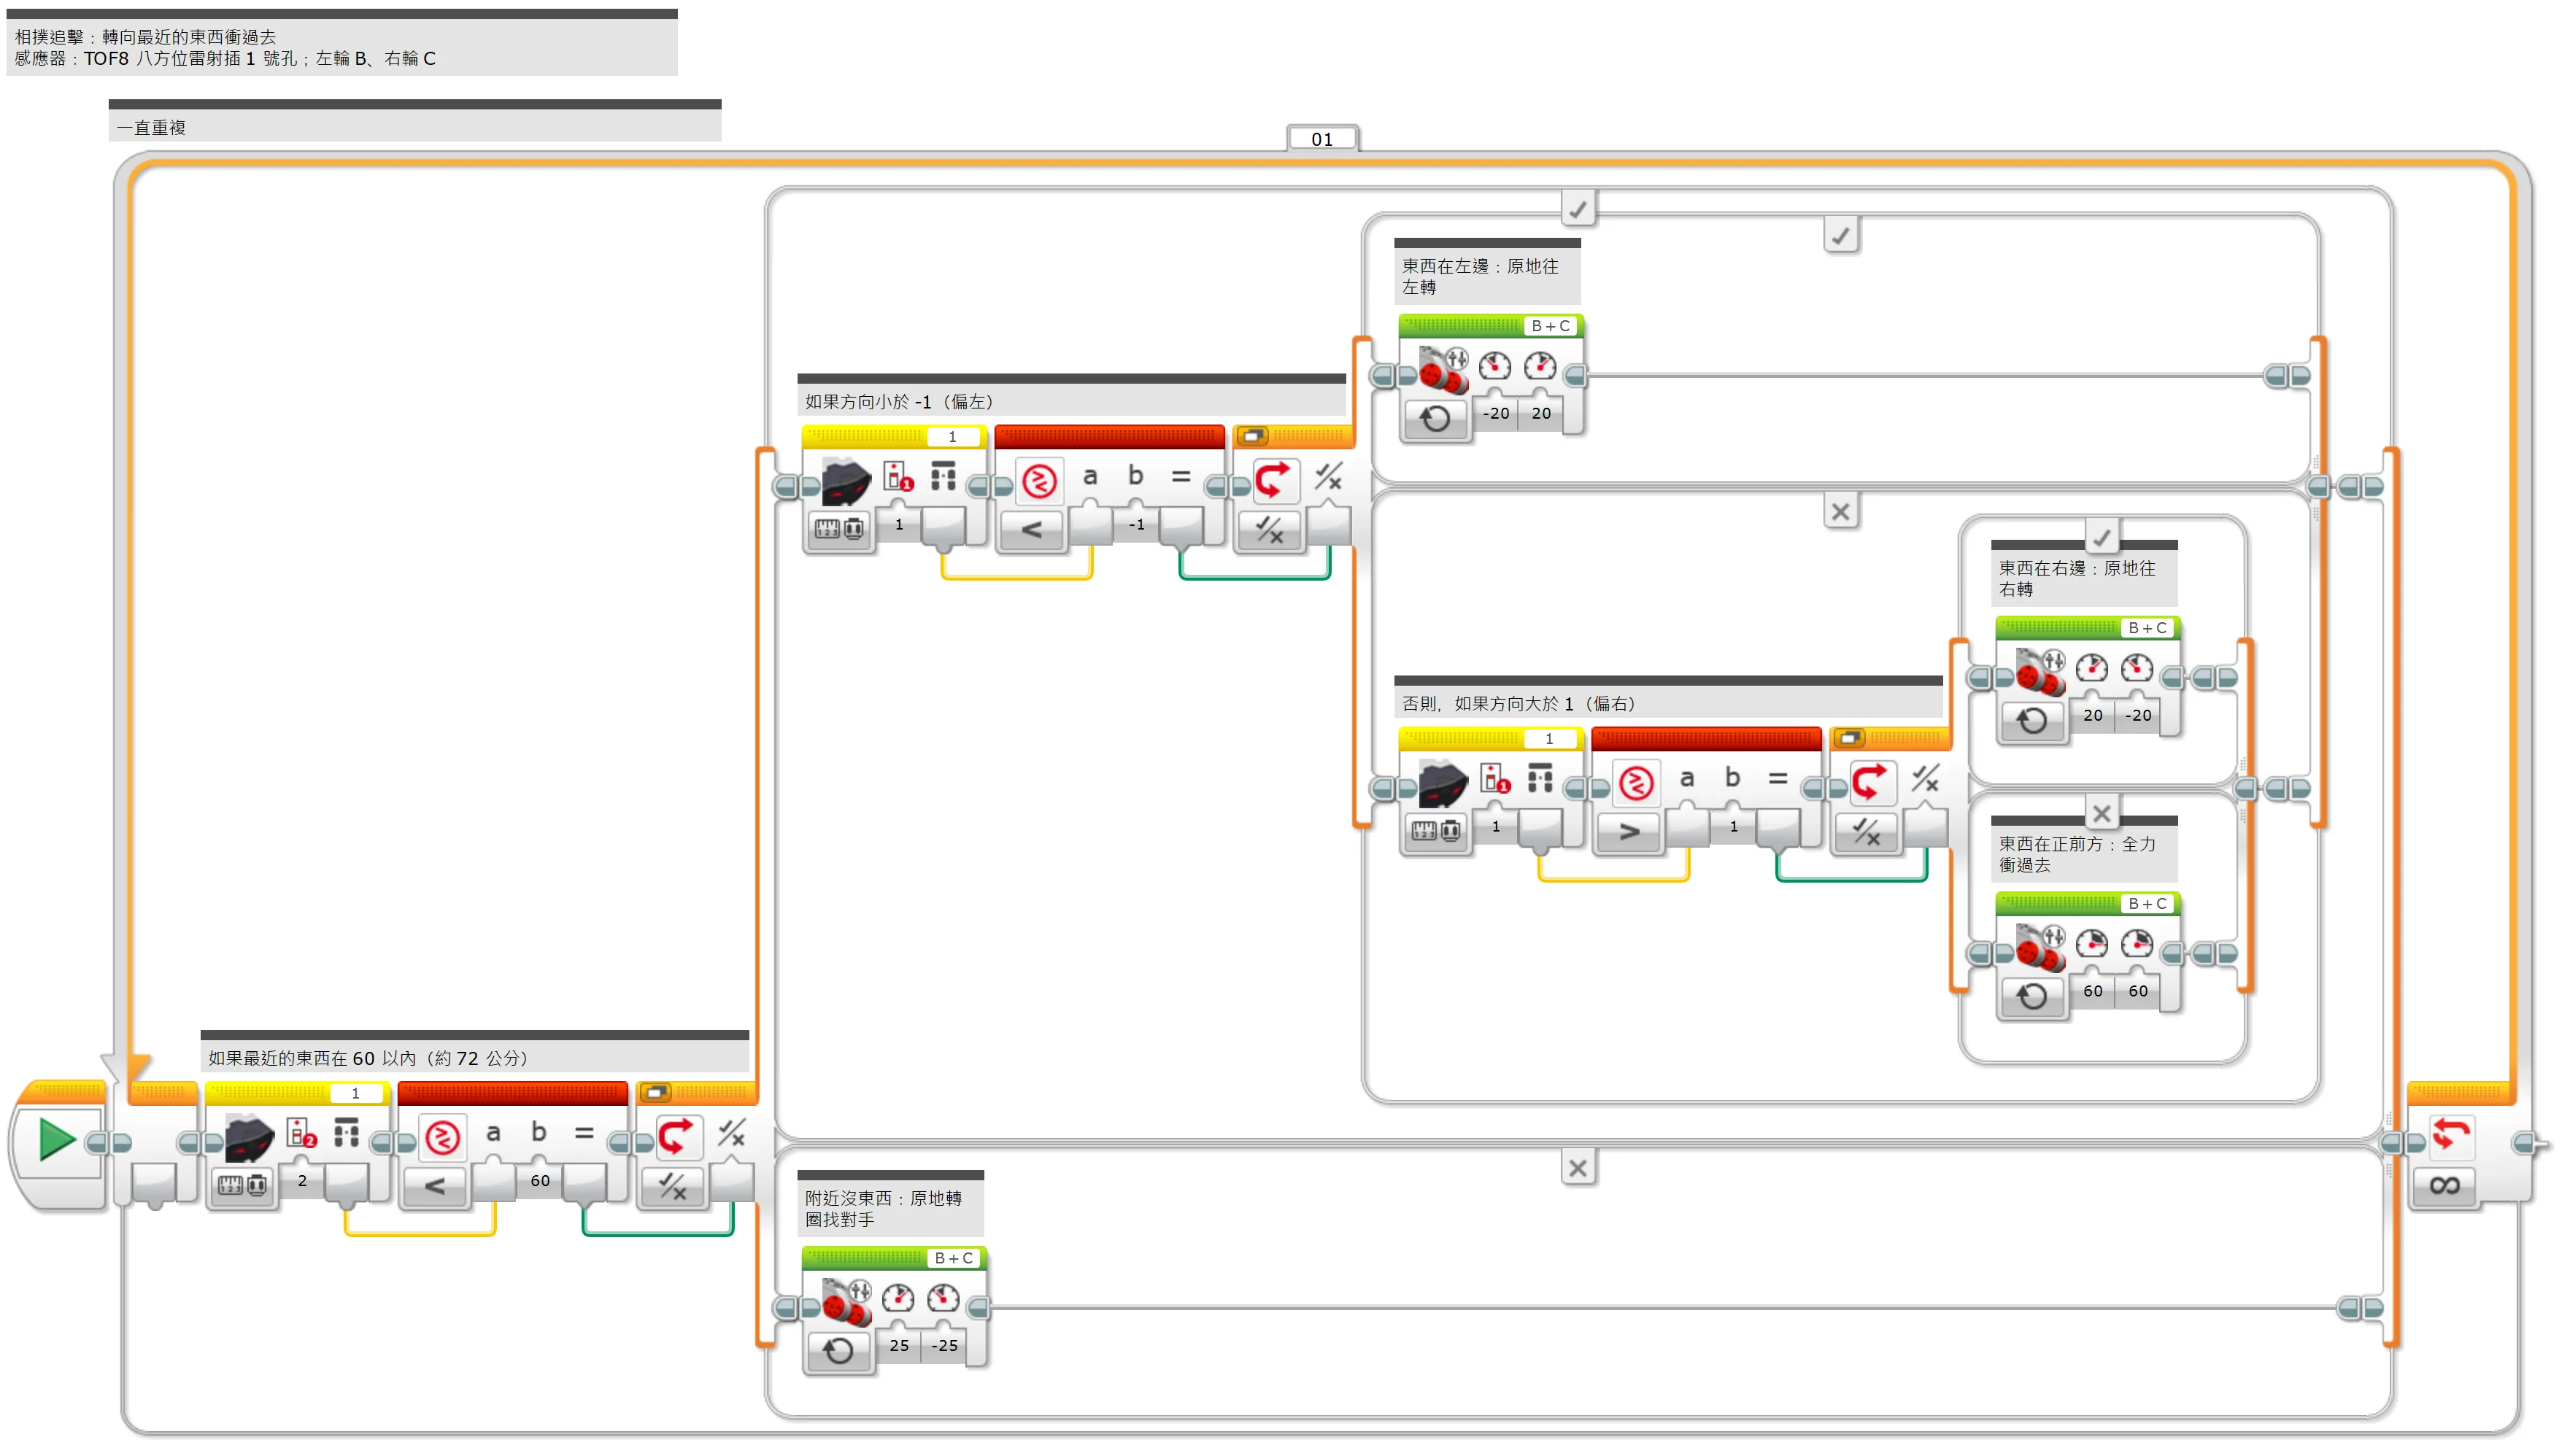
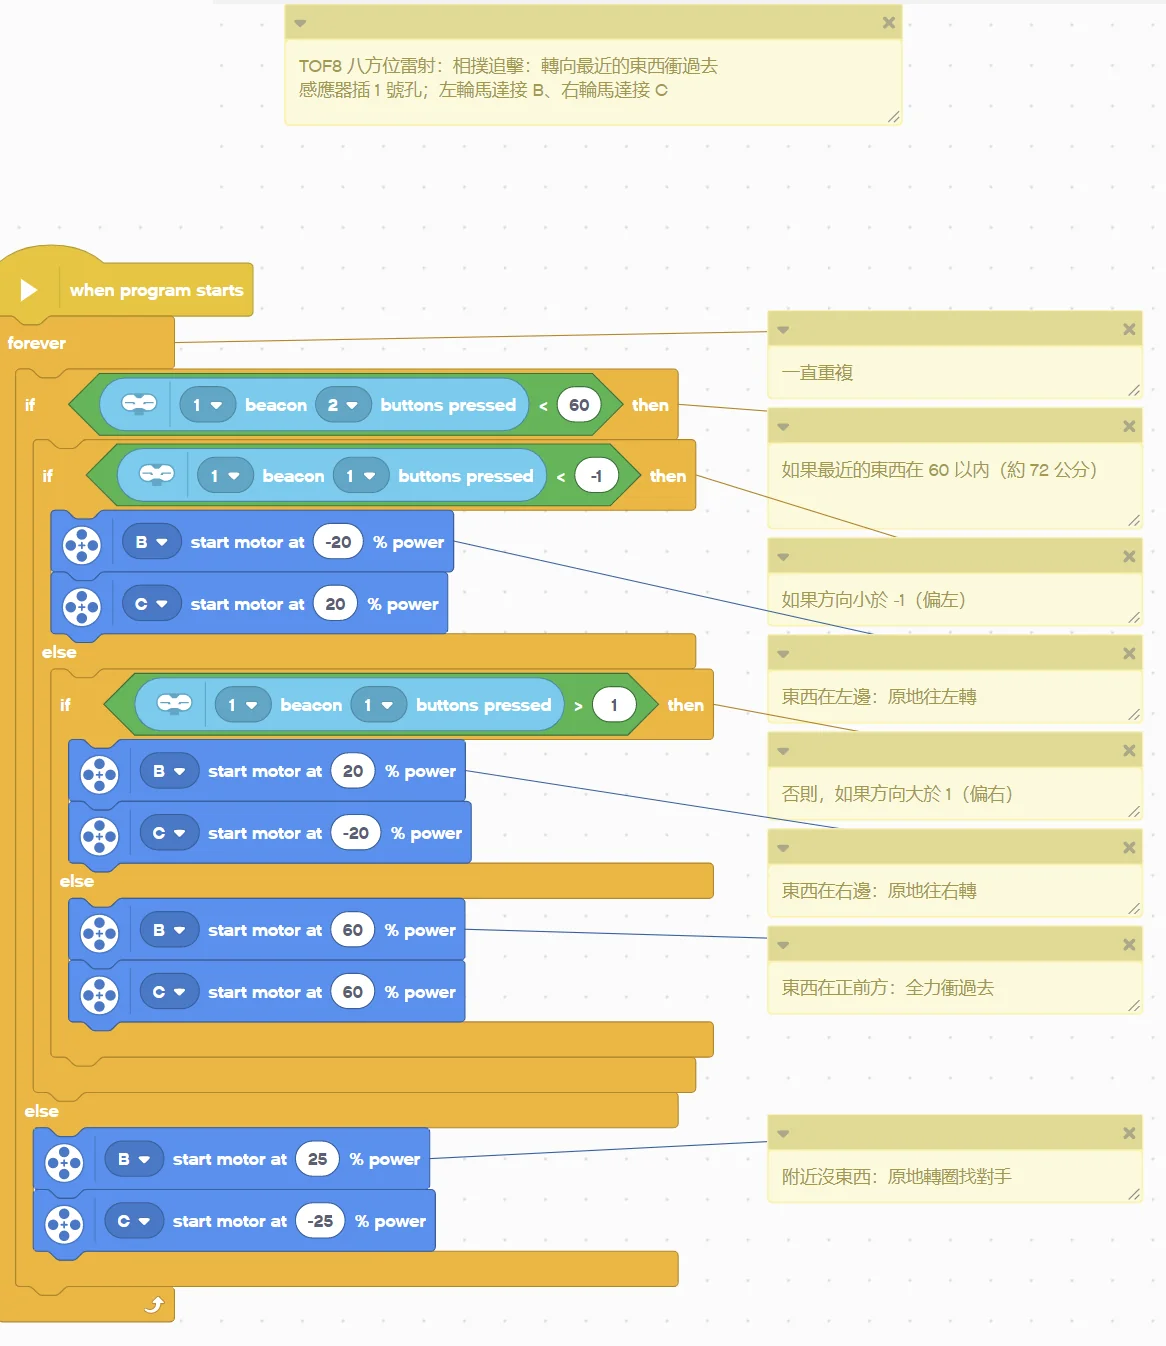
What this example does: Mode 2 tells you directly "where the nearest object is and how far", so you do not have to compare 8 numbers yourself. The robot turns towards the nearest object and charges; when it sees nothing it spins to search.
What you need:
- EV3 brick + Education base robot (left wheel on B, right wheel on C)
- TOF8 eight-direction laser (EV3 edition)
- A can as the opponent
How to connect: TOF8 eight-direction laser in port 1, mounted at the front with lasers 4 and 5 facing straight ahead, about 5 cm above the ground.
Download the program (pick your software):
⬇ EV3-G (official software) | ⬇ EV3 Classroom | ⬇ Pybricks v4 | ⬇ EV3 MicroPython v2.0 | ⬇ clev3r
EV3-G (official software) blocks
(Too small? Click the picture to open it full size.)
EV3 Classroom blocks
(Too small? Click the picture to open it full size.)
Pybricks v4 code
# ============================================================
# TOF8 八方位雷射測距感應器 EV3 新手範例 04:相撲追擊:轉向最近的東西衝過去
# 軟體:Pybricks v4(用 Chrome 打開 https://code.pybricks.com ,EV3 版目前是 Beta)
# 接法:TOF8 八方位雷射插 1 號孔;左輪馬達接 B、右輪馬達接 C
# 這個範例會做什麼:模式 2 會直接告訴你「最近的東西在哪個方向、有多遠」,不用自己比 8 個數字。車子轉向最近的東西衝過去,看不到東西時原地轉圈找。
# ============================================================

from pybricks.hubs import EV3Brick
from pybricks.ev3devices import Motor
from pybricks.iodevices import LUMPDevice
from pybricks.parameters import Port
from pybricks.tools import wait

ev3 = EV3Brick()
sensor = LUMPDevice(Port.S1)       # TOF8 八方位雷射插 1 號孔
left_motor = Motor(Port.B)        # 左輪
right_motor = Motor(Port.C)       # 右輪


def read_nearDist():
    # 最近的東西有多遠:0 ~ 100
    return sensor.read(2)[1]


def read_nearDir():
    # 最近的東西在哪個方向:-7 ~ +7(負=左、正=右、0 附近=正前方;±8=沒有東西)
    return sensor.read(2)[0]


# ---------- 程式從這裡開始 ----------
# 一直重複
while True:
    # 如果最近的東西在 60 以內(約 72 公分)
    if read_nearDist() < 60:
        # 如果方向小於 -1(偏左)
        if read_nearDir() < (-1):
            # 東西在左邊:原地往左轉
            left_motor.dc(-20)
            right_motor.dc(20)
        # 否則,如果方向大於 1(偏右)
        elif read_nearDir() > 1:
            # 東西在右邊:原地往右轉
            left_motor.dc(20)
            right_motor.dc(-20)
        else:
            # 東西在正前方:全力衝過去
            left_motor.dc(60)
            right_motor.dc(60)
    else:
        # 附近沒東西:原地轉圈找對手
        left_motor.dc(25)
        right_motor.dc(-25)
EV3 MicroPython v2.0 code
#!/usr/bin/env pybricks-micropython
# ============================================================
# TOF8 八方位雷射測距感應器 EV3 新手範例 04:相撲追擊:轉向最近的東西衝過去
# 軟體:樂高官方 EV3 MicroPython v2.0(microSD 開機卡+VS Code「LEGO MINDSTORMS EV3 MicroPython」擴充套件)
# 接法:TOF8 八方位雷射插 1 號孔;左輪馬達接 B、右輪馬達接 C
# 這個範例會做什麼:模式 2 會直接告訴你「最近的東西在哪個方向、有多遠」,不用自己比 8 個數字。車子轉向最近的東西衝過去,看不到東西時原地轉圈找。
# ============================================================

from pybricks.hubs import EV3Brick
from pybricks.ev3devices import Motor
from pybricks.iodevices import Ev3devSensor
from pybricks.parameters import Port
from pybricks.tools import wait

ev3 = EV3Brick()
sensor = Ev3devSensor(Port.S1)     # TOF8 八方位雷射插 1 號孔
left_motor = Motor(Port.B)        # 左輪
right_motor = Motor(Port.C)       # 右輪


def read_nearDist():
    # 最近的東西有多遠:0 ~ 100
    return sensor.read('IR-REMOTE')[1]


def read_nearDir():
    # 最近的東西在哪個方向:-7 ~ +7(負=左、正=右、0 附近=正前方;±8=沒有東西)
    return sensor.read('IR-REMOTE')[0]


# ---------- 程式從這裡開始 ----------
# 一直重複
while True:
    # 如果最近的東西在 60 以內(約 72 公分)
    if read_nearDist() < 60:
        # 如果方向小於 -1(偏左)
        if read_nearDir() < (-1):
            # 東西在左邊:原地往左轉
            left_motor.dc(-20)
            right_motor.dc(20)
        # 否則,如果方向大於 1(偏右)
        elif read_nearDir() > 1:
            # 東西在右邊:原地往右轉
            left_motor.dc(20)
            right_motor.dc(-20)
        else:
            # 東西在正前方:全力衝過去
            left_motor.dc(60)
            right_motor.dc(60)
    else:
        # 附近沒東西:原地轉圈找對手
        left_motor.dc(25)
        right_motor.dc(-25)
clev3r code
' ============================================================
' TOF8 八方位雷射測距感應器 EV3 新手範例 04:相撲追擊:轉向最近的東西衝過去
' 軟體:clev3r
' 接法:TOF8 八方位雷射插 1 號孔;左輪馬達接 B、右輪馬達接 C
' 這個範例會做什麼:模式 2 會直接告訴你「最近的東西在哪個方向、有多遠」,不用自己比 8 個數字。車子轉向最近的東西衝過去,看不到東西時原地轉圈找。
' 讀值:nearDist=最近的東西有多遠(0 ~ 100);nearDir=最近的東西在哪個方向(-7 ~ +7(負=左、正=右、0 附近=正前方;±8=沒有東西))
' ============================================================
folder "prjs" "MBC_tof8_ex04"

' TOF8 八方位雷射插 1 號孔,使用模式 2
Sensor.SetMode(1, 2)
LCD.Clear()

' 一直重複
While "True"
  ' 如果最近的東西在 60 以內(約 72 公分)
  If Sensor.ReadRawValue(1, 1) < 60 Then
    ' 如果方向小於 -1(偏左)
    If Sensor.ReadRawValue(1, 0) < (-1) Then
      ' 東西在左邊:原地往左轉
      Motor.StartPower("B", -20)
      Motor.StartPower("C", 20)
    ' 否則,如果方向大於 1(偏右)
    ElseIf Sensor.ReadRawValue(1, 0) > 1 Then
      ' 東西在右邊:原地往右轉
      Motor.StartPower("B", 20)
      Motor.StartPower("C", -20)
    Else
      ' 東西在正前方:全力衝過去
      Motor.StartPower("B", 60)
      Motor.StartPower("C", 60)
    EndIf
  Else
    ' 附近沒東西:原地轉圈找對手
    Motor.StartPower("B", 25)
    Motor.StartPower("C", -25)
  EndIf
EndWhile
Step by step:
- Repeat forever
- If the nearest object is within 60 (about 72 cm)
- If the direction is less than -1 (to the left)
- Object on the left: spin left on the spot
- Otherwise:
- Otherwise, if the direction is greater than 1 (to the right)
- Object on the right: spin right on the spot
- Otherwise:
- Object straight ahead: charge at full power
- Otherwise, if the direction is greater than 1 (to the right)
- Otherwise:
- Nothing nearby: spin on the spot to look for the opponent
- If the direction is less than -1 (to the left)
- If the nearest object is within 60 (about 72 cm)
What you should see: Put the can anywhere around the robot: it turns towards the can and pushes it.
FAQ:
- The direction reads 8 or -8? ±8 means nothing within 120 cm in that direction, not "far left" or "far right".
- It overshoots and swings back and forth? Lower the turning power 20, or change -1 and 1 to -2 and 2.
Example 5: Drive towards the most open direction
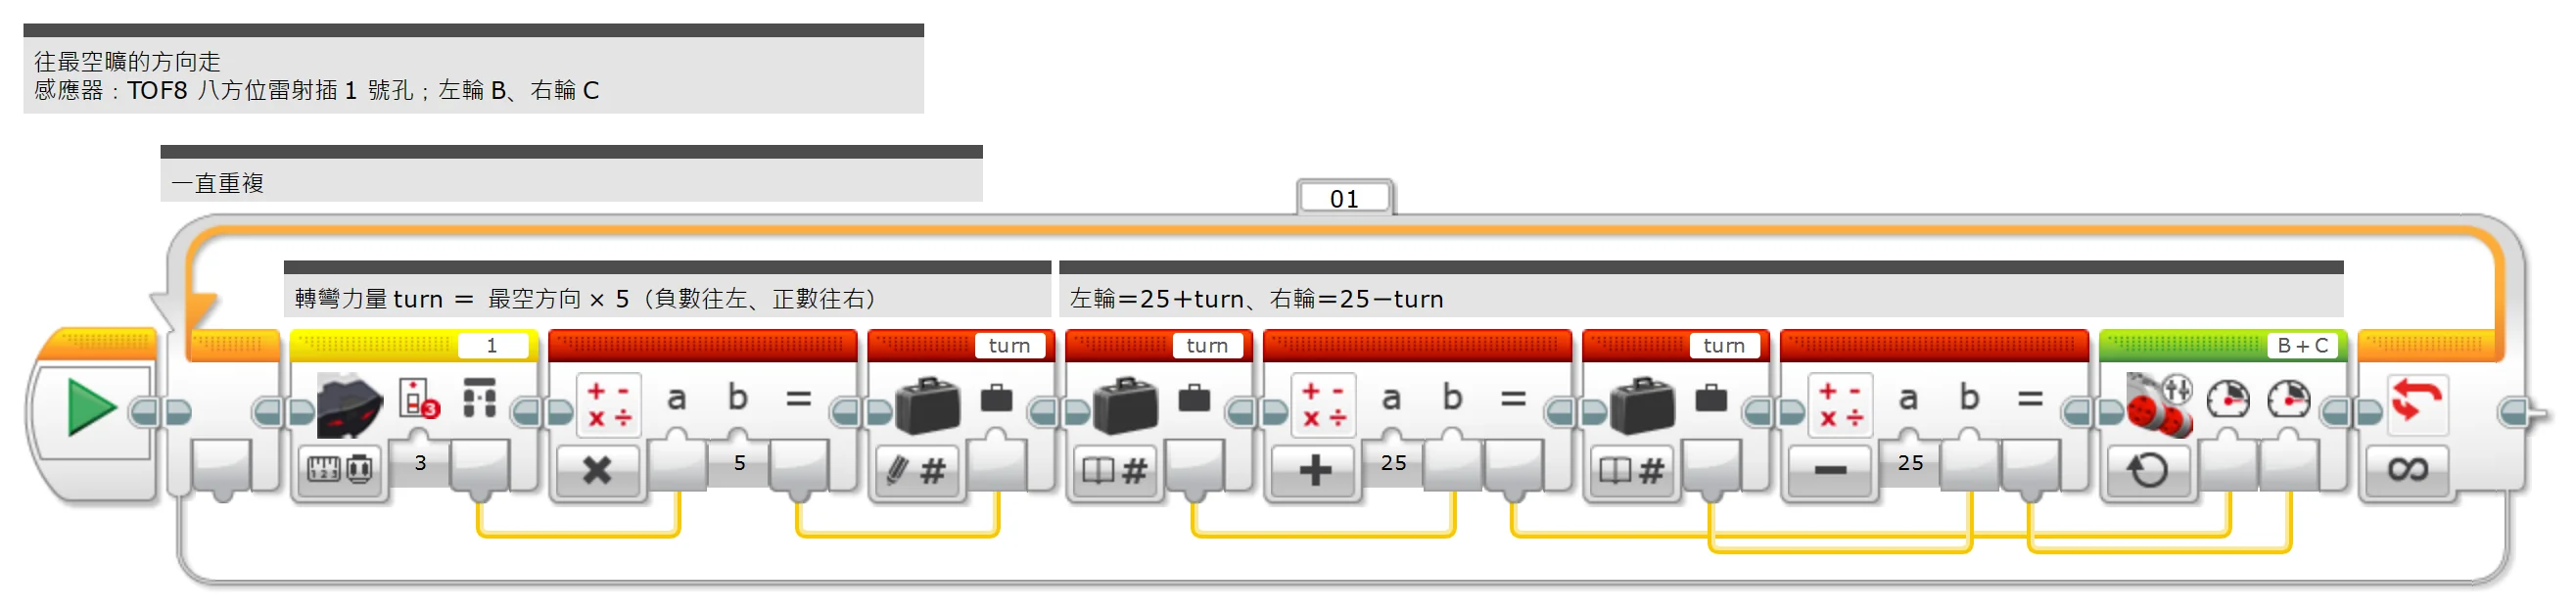
What this example does: Mode 2 also tells you "the most open direction". With proportional control the robot keeps heading for open space and finds its way out of a box maze.
What you need:
- EV3 brick + Education base robot (left wheel on B, right wheel on C)
- TOF8 eight-direction laser (EV3 edition)
- A few boxes as obstacles
How to connect: TOF8 eight-direction laser in port 1, mounted at the front with lasers 4 and 5 facing straight ahead, about 5 cm above the ground.
Download the program (pick your software):
⬇ EV3-G (official software) | ⬇ EV3 Classroom | ⬇ Pybricks v4 | ⬇ EV3 MicroPython v2.0 | ⬇ clev3r
EV3-G (official software) blocks
(Too small? Click the picture to open it full size.)
EV3 Classroom blocks
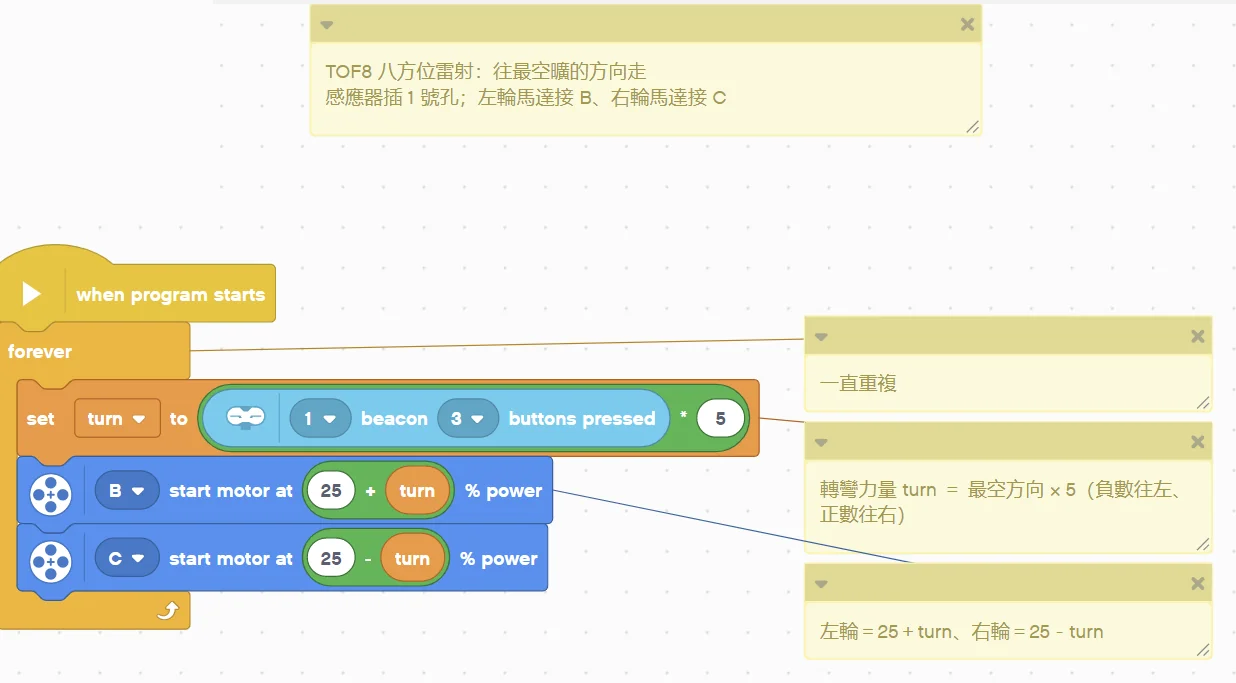
(Too small? Click the picture to open it full size.)
Pybricks v4 code
# ============================================================
# TOF8 八方位雷射測距感應器 EV3 新手範例 05:往最空曠的方向走
# 軟體:Pybricks v4(用 Chrome 打開 https://code.pybricks.com ,EV3 版目前是 Beta)
# 接法:TOF8 八方位雷射插 1 號孔;左輪馬達接 B、右輪馬達接 C
# 這個範例會做什麼:模式 2 也會告訴你「最空曠的方向」。車子用比例控制一直往最空的地方開,在箱子陣裡會自己找出口。
# ============================================================

from pybricks.hubs import EV3Brick
from pybricks.ev3devices import Motor
from pybricks.iodevices import LUMPDevice
from pybricks.parameters import Port
from pybricks.tools import wait

ev3 = EV3Brick()
sensor = LUMPDevice(Port.S1)       # TOF8 八方位雷射插 1 號孔
left_motor = Motor(Port.B)        # 左輪
right_motor = Motor(Port.C)       # 右輪


def read_farDir():
    # 最空曠的方向:-7 ~ +7(負=左、正=右)
    return sensor.read(2)[2]


# ---------- 程式從這裡開始 ----------
# 一直重複
while True:
    # 轉彎力量 turn = 最空方向 × 5(負數往左、正數往右)
    turn = read_farDir() * 5
    # 左輪=25+turn、右輪=25-turn
    left_motor.dc(25 + turn)
    right_motor.dc(25 - turn)
EV3 MicroPython v2.0 code
#!/usr/bin/env pybricks-micropython
# ============================================================
# TOF8 八方位雷射測距感應器 EV3 新手範例 05:往最空曠的方向走
# 軟體:樂高官方 EV3 MicroPython v2.0(microSD 開機卡+VS Code「LEGO MINDSTORMS EV3 MicroPython」擴充套件)
# 接法:TOF8 八方位雷射插 1 號孔;左輪馬達接 B、右輪馬達接 C
# 這個範例會做什麼:模式 2 也會告訴你「最空曠的方向」。車子用比例控制一直往最空的地方開,在箱子陣裡會自己找出口。
# ============================================================

from pybricks.hubs import EV3Brick
from pybricks.ev3devices import Motor
from pybricks.iodevices import Ev3devSensor
from pybricks.parameters import Port
from pybricks.tools import wait

ev3 = EV3Brick()
sensor = Ev3devSensor(Port.S1)     # TOF8 八方位雷射插 1 號孔
left_motor = Motor(Port.B)        # 左輪
right_motor = Motor(Port.C)       # 右輪


def read_farDir():
    # 最空曠的方向:-7 ~ +7(負=左、正=右)
    return sensor.read('IR-REMOTE')[2]


# ---------- 程式從這裡開始 ----------
# 一直重複
while True:
    # 轉彎力量 turn = 最空方向 × 5(負數往左、正數往右)
    turn = read_farDir() * 5
    # 左輪=25+turn、右輪=25-turn
    left_motor.dc(25 + turn)
    right_motor.dc(25 - turn)
clev3r code
' ============================================================
' TOF8 八方位雷射測距感應器 EV3 新手範例 05:往最空曠的方向走
' 軟體:clev3r
' 接法:TOF8 八方位雷射插 1 號孔;左輪馬達接 B、右輪馬達接 C
' 這個範例會做什麼:模式 2 也會告訴你「最空曠的方向」。車子用比例控制一直往最空的地方開,在箱子陣裡會自己找出口。
' 讀值:farDir=最空曠的方向(-7 ~ +7(負=左、正=右))
' ============================================================
folder "prjs" "MBC_tof8_ex05"

' TOF8 八方位雷射插 1 號孔,使用模式 2
Sensor.SetMode(1, 2)
LCD.Clear()

' 一直重複
While "True"
  ' 轉彎力量 turn = 最空方向 × 5(負數往左、正數往右)
  turn = Sensor.ReadRawValue(1, 2) * 5
  ' 左輪=25+turn、右輪=25-turn
  Motor.StartPower("B", 25 + turn)
  Motor.StartPower("C", 25 - turn)
EndWhile
Step by step:
- Repeat forever
- Steering power turn = most open direction × 5 (negative = left, positive = right)
- Left wheel = 25 + turn, right wheel = 25 − turn
What you should see: The robot avoids the boxes and drives towards open space.
FAQ:
- The direction reads 8 or -8? ±8 means nothing within 120 cm in that direction, not "far left" or "far right".
- It keeps driving into walls? The sign of the direction may be opposite to your robot: swap "+turn" and "−turn" in the program.
Example 6: Where is the nearest object, and how many millimetres away
Pybricks v4 / EV3 MicroPython v2.0 / clev3r only (the EV3-G and Classroom blocks cannot read this mode)
What this example does: Mode 5 gives two numbers at once: how many millimetres away the nearest object is, and in which direction (-7~+7). That is 12 times finer than the 1.2 cm units of mode 2. This example shows both numbers and beeps when something comes within 15 cm.
What you need:
- TOF8 eight-direction laser (EV3 edition, firmware v4.0 or later)
- EV3 brick
How to connect: TOF8 eight-direction laser in port 1.
Download the program (pick your software):
⬇ Pybricks v4 | ⬇ EV3 MicroPython v2.0 | ⬇ clev3r
(The code is the example; no screenshot needed.)
Pybricks v4 code
# ============================================================
# TOF8 八方位雷射測距感應器 EV3 新手範例 06:最近的東西在哪、幾公釐
# 軟體:Pybricks v4(用 Chrome 打開 https://code.pybricks.com ,EV3 版目前是 Beta)
# 接法:TOF8 八方位雷射插 1 號孔
# 這個範例會做什麼:模式 5 一次給兩個數字:最近的東西有幾公釐、在哪個方向(-7~+7)。比模式 2 的 1.2 公分一格準 12 倍。這個範例把兩個數字顯示在螢幕上,東西靠到 15 公分內就嗶一聲。
# ============================================================

from pybricks.hubs import EV3Brick
from pybricks.iodevices import LUMPDevice
from pybricks.parameters import Port, Color
from pybricks.tools import wait

ev3 = EV3Brick()
sensor = LUMPDevice(Port.S1)       # TOF8 八方位雷射插 1 號孔


def read_nearMm():
    # 最近的東西有多遠(公釐):0 ~ 1200 mm
    return sensor.read(5)[0]


def read_nearDir5():
    # 最近的東西在哪個方向:-7 ~ +7(負=左、正=右、0 附近=正前方;±8=沒有東西)
    return sensor.read(5)[1]


# ---------- 程式從這裡開始 ----------
# 清除螢幕
ev3.screen.clear()
# 一直重複
while True:
    # 第 1 行顯示最近的東西有幾公釐
    ev3.screen.draw_text(0, 0, "NEARMM " + str(read_nearMm()) + "      ", Color.BLACK, Color.WHITE)
    # 第 2 行顯示它在哪個方向(負=左、正=右、0=正前方)
    ev3.screen.draw_text(0, 16, "DIR " + str(read_nearDir5()) + "      ", Color.BLACK, Color.WHITE)
    # 如果最近的東西不到 150 公釐(15 公分)
    if read_nearMm() < 150:
        # 不到 15 公分:嗶一聲
        ev3.speaker.beep()
    # 等 0.1 秒
    wait(100)
EV3 MicroPython v2.0 code
#!/usr/bin/env pybricks-micropython
# ============================================================
# TOF8 八方位雷射測距感應器 EV3 新手範例 06:最近的東西在哪、幾公釐
# 軟體:樂高官方 EV3 MicroPython v2.0(microSD 開機卡+VS Code「LEGO MINDSTORMS EV3 MicroPython」擴充套件)
# 接法:TOF8 八方位雷射插 1 號孔
# 這個範例會做什麼:模式 5 一次給兩個數字:最近的東西有幾公釐、在哪個方向(-7~+7)。比模式 2 的 1.2 公分一格準 12 倍。這個範例把兩個數字顯示在螢幕上,東西靠到 15 公分內就嗶一聲。
# ============================================================

from pybricks.hubs import EV3Brick
from pybricks.iodevices import Ev3devSensor
from pybricks.parameters import Port, Color
from pybricks.tools import wait

ev3 = EV3Brick()
sensor = Ev3devSensor(Port.S1)     # TOF8 八方位雷射插 1 號孔


def read_nearMm():
    # 最近的東西有多遠(公釐):0 ~ 1200 mm
    return sensor.read('IR-CAL')[0]


def read_nearDir5():
    # 最近的東西在哪個方向:-7 ~ +7(負=左、正=右、0 附近=正前方;±8=沒有東西)
    return sensor.read('IR-CAL')[1]


# ---------- 程式從這裡開始 ----------
# 清除螢幕
ev3.screen.clear()
# 一直重複
while True:
    # 第 1 行顯示最近的東西有幾公釐
    ev3.screen.draw_text(0, 0, "NEARMM " + str(read_nearMm()) + "      ", Color.BLACK, Color.WHITE)
    # 第 2 行顯示它在哪個方向(負=左、正=右、0=正前方)
    ev3.screen.draw_text(0, 16, "DIR " + str(read_nearDir5()) + "      ", Color.BLACK, Color.WHITE)
    # 如果最近的東西不到 150 公釐(15 公分)
    if read_nearMm() < 150:
        # 不到 15 公分:嗶一聲
        ev3.speaker.beep()
    # 等 0.1 秒
    wait(100)
clev3r code
' ============================================================
' TOF8 八方位雷射測距感應器 EV3 新手範例 06:最近的東西在哪、幾公釐
' 軟體:clev3r
' 接法:TOF8 八方位雷射插 1 號孔;左輪馬達接 B、右輪馬達接 C
' 這個範例會做什麼:模式 5 一次給兩個數字:最近的東西有幾公釐、在哪個方向(-7~+7)。比模式 2 的 1.2 公分一格準 12 倍。這個範例把兩個數字顯示在螢幕上,東西靠到 15 公分內就嗶一聲。
' 讀值:nearMm=最近的東西有多遠(公釐)(0 ~ 1200 mm);nearDir5=最近的東西在哪個方向(-7 ~ +7(負=左、正=右、0 附近=正前方;±8=沒有東西))
' ============================================================
folder "prjs" "MBC_tof8_ex06"

' TOF8 八方位雷射插 1 號孔,使用模式 5
Sensor.SetMode(1, 5)
LCD.Clear()

' 清除螢幕
LCD.Clear()
' 一直重複
While "True"
  ' 第 1 行顯示最近的東西有幾公釐
  LCD.Text(1, 0, 0, 1, "NEARMM " + Sensor.ReadRawValue(1, 0) + "      ")
  ' 第 2 行顯示它在哪個方向(負=左、正=右、0=正前方)
  LCD.Text(1, 0, 16, 1, "DIR " + Sensor.ReadRawValue(1, 1) + "      ")
  ' 如果最近的東西不到 150 公釐(15 公分)
  If Sensor.ReadRawValue(1, 0) < 150 Then
    ' 不到 15 公分:嗶一聲
    Speaker.Tone(50, 1000, 100)
    Speaker.Wait()
  EndIf
  ' 等 0.1 秒
  Program.Delay(100)
EndWhile
Step by step:
- Clear the screen
- Repeat forever
- Row 1 shows the nearest distance in mm
- Row 2 shows its direction (negative = left, positive = right, 0 = straight ahead)
- If the nearest object is closer than 150 mm (15 cm)
- Closer than 15 cm: beep
- Wait 0.1 s
What you should see: Move your hand around the sensor: row 1 follows in millimetres and row 2 tells you whether your hand is on the left (negative) or right (positive); within 15 cm the EV3 keeps beeping.
FAQ:
- The direction reads 8 or -8? ±8 means nothing within 120 cm in that direction, not "far left" or "far right".
- The number stays at 0 or never changes? This mode needs sensor firmware v4.0 (2026-10) or later; update older firmware first.
- Why is there no EV3-G / Classroom version? This example uses a new mode (firmware v4, 2026-10). The EV3-G and Classroom infrared blocks cannot read it; only Pybricks, EV3 MicroPython and clev3r can.
Still stuck? Leave a message on Contact us with the software you use and a screenshot of your program, and we will help.