
Ranger 2-Way (TOF2) × EV3 × EV3 Classroom
Interactive tutorialEV3
First time? Try the interactive tutorial in your browser first, then follow the steps below with your hub.
This page covers EV3 Classroom (Scratch blocks) only: how to set it up for the Ranger 2-Way (TOF2) on MINDSTORMS EV3, how to read every value, the commands it supports and examples. Use the switcher above to change product, host or software.
Setup
What you need
- Sensor: Ranger 2-Way (TOF2) (EV3 edition, RJ12 plug). A SPIKE edition is not recognised on an EV3.
- Brick: LEGO MINDSTORMS EV3.
- Cable: the standard cable in the box, or an original LEGO EV3 cable.
- Software: LEGO MINDSTORMS EV3 Classroom (Scratch-style blocks, the same as SPIKE). The easiest start for first-time EV3 users.
Install the software
- Install EV3 Classroom from the LEGO Education download page.
- To open an example: download the
.lmspfile → "Open" on the EV3 Classroom home screen → connect the EV3 → "Download and Run" at the bottom right.
Make the software see the sensor
No extension and no driver needed. On the EV3 the sensor emulates an original LEGO sensor (most products show up as an "Infrared Sensor"); use the built-in sensor blocks.
- Classroom blocks look like Scratch, but the modes are exactly the same as in the official EV3 software: Proximity / Beacon / Remote, with the same ranges. See the readings below.
- Some products come with MBC My Blocks. They are already inside the example projects; open an example and they are there.
Important
Do not switch modes in the middle of a program. Every time the EV3 switches a sensor mode it stalls for about 1 s. Pick one mode at the start and use it for the whole run.
Wiring
- Plug the sensor into EV3 port 1 with the cable (any of 1~4 works; choose the same port in the blocks).
- Turn the EV3 on first, then plug in the sensor.
- Latch up, push the plug in gently.
Which side is left
Left and right are as seen from behind the sensor, looking the way it faces (left = J5, right = J3). Facing the sensor, they are the other way round, so when you test with your hand, stand behind the sensor and look the same way it does. "Left is closer" and "turn left" in the examples follow this direction.
EV3 test results and tips
Passed hardware testing on the stock EV3 firmware (2026-11-02): the EV3 sees the Ranger 2-Way as an EV3 infrared sensor (type 33), all 6 modes have the same structure as the LEGO infrared sensor, and it is recognised both when plugged in before power-on and when plugged in later (about 1.4 s after plugging in). The infrared sensor blocks in EV3 Classroom work as they are.
- Push the plug all the way in, in one go.
- The EV3 needs about 1.1 s to change infrared mode (the LEGO infrared sensor does too). Keep to blocks of one mode in a program: use the proximity block for the average distance and the beacon blocks for the left and right distances.
- On the stock firmware the "Remote" mode sometimes reads 0 right after switching to it; use Beacon for the left and right distances.
First test
- Download the
.lmspof example 1 on this page, open it, connect the EV3 and press "Download and Run". - If the number on the EV3 screen changes with what is in front of the sensor, everything is connected.
FAQ
- The number never changes? Unplug the sensor and plug it back in (the EV3 must be on first).
- Some examples have no Classroom version? Examples marked "Pybricks / EV3 MicroPython / clev3r only" use a mode the Classroom blocks cannot read.
- The program hiccups now and then? It switches sensor modes; each switch costs about 1 s. Use one mode only.
Reading values
The EV3 sees a stock LEGO sensor; read it with the stock Classroom sensor blocks.
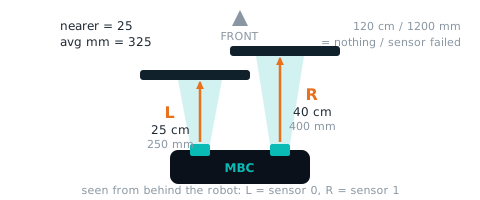
left distance (cm) leftCm
| Range | Meaning |
|---|---|
0~120 cm (EV3 mode 1, mode 2, mode 4 give a scaled value: cm×100/120 (0~100)) |
distance from the left sensor, 0~120 cm (left = sensor 0 seen from behind the robot); 120 = nothing in range / sensor failed |
| Value | Block | Decode | Mode |
|---|---|---|---|
| left distance (cm) | Infrared Sensor → Beacon heading, channel 1 | the value | mode 1 |
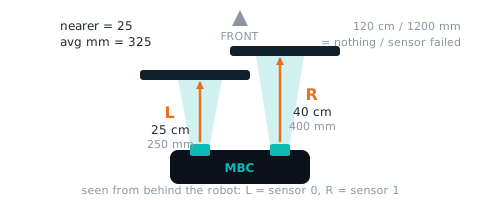
right distance (cm) rightCm
| Range | Meaning |
|---|---|
0~120 cm (EV3 mode 1, mode 2, mode 4 give a scaled value: cm×100/120 (0~100)) |
distance from the right sensor, 0~120 cm (right = sensor 1); 120 = nothing in range / sensor failed |
| Value | Block | Decode | Mode |
|---|---|---|---|
| right distance (cm) | Infrared Sensor → Beacon proximity, channel 1 | the value | mode 1 |
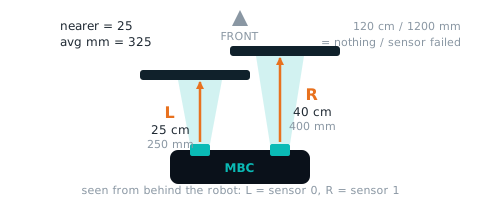
average distance (mm) avgMm
| Range | Meaning |
|---|---|
0~1200 mm (EV3 mode 0 gives a scaled value: cm average ×100/120 (0~100)) |
(left mm + right mm) / 2, 0~1200; same number as EV3 mode 3 and the 3rd value of SPIKE mode 6 |
| Value | Block | Decode | Mode |
|---|---|---|---|
| average distance (mm) | Infrared Sensor → Proximity | the value | mode 0 |
Not readable here:nearer distance (cm), left distance (mm), right distance (mm), init bitmap, fault bitmap. Use Pybricks / clev3r for these.
Examples
Example 1: Measure how far away something is
What this example does: Move your hand back and forth in front of the sensor and the EV3 screen shows the distance. This example shows both the "raw sensor number" and the value "converted to centimetres".
What you need:
- TOF2 dual-eye laser (EV3 edition)
- A box or wall as an obstacle
- EV3 brick
How to connect: TOF2 dual-eye laser in port 1, lasers facing forward.
Download the program (pick your software):
EV3 Classroom blocks
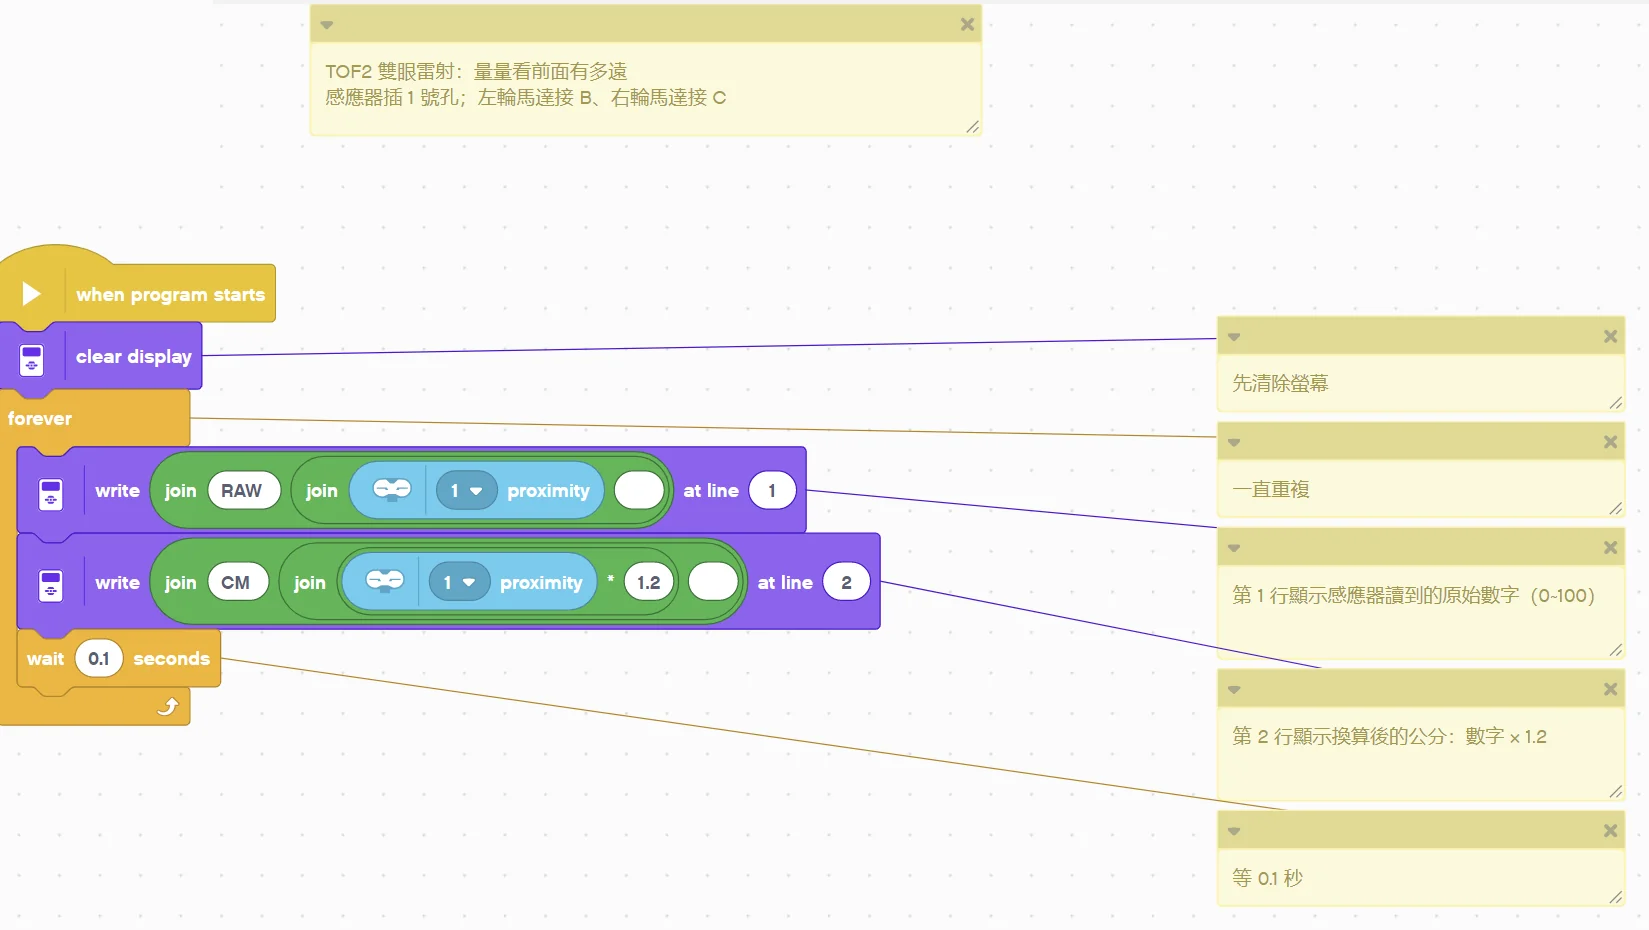
(Too small? Click the picture to open it full size.)
Step by step:
- Clear the screen first
- Repeat forever
- Row 1 shows the raw sensor value (0~100)
- Row 2 shows centimetres: value × 1.2
- Wait 0.1 s
What you should see: The closer your hand, the smaller the number; with your hand away (nothing within 120 cm) RAW reads 100.
FAQ:
- The number does not match a ruler? On EV3, 1 unit = 1.2 cm (for example 25 = 30 cm); 100 means nothing within 120 cm ahead.
- The number stays at 0 or never changes? Turn the EV3 on before plugging in the sensor, or unplug and plug it back in; make sure there is no protective film over the laser.
Example 2: Stop 30 cm before the wall
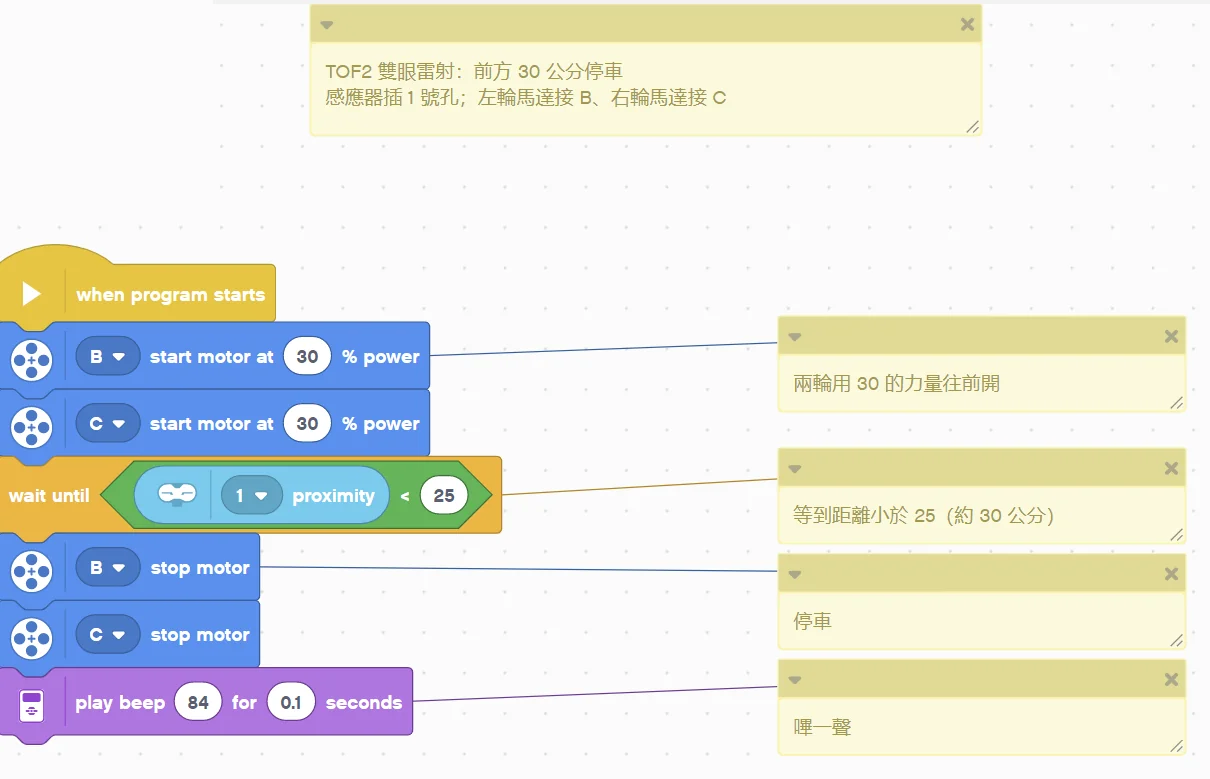
What this example does: The robot drives forward and stops when something is within 30 cm (sensor value 25).
What you need:
- EV3 brick + Education base robot (left wheel on B, right wheel on C)
- TOF2 dual-eye laser (EV3 edition)
- A box or wall as an obstacle
How to connect: TOF2 dual-eye laser in port 1, mounted at the front with the lasers facing straight ahead, about 5 cm above the ground.
Download the program (pick your software):
EV3 Classroom blocks
(Too small? Click the picture to open it full size.)
Step by step:
- Both wheels drive forward at power 30
- Wait until the distance is less than 25 (about 30 cm)
- Stop
- Beep
What you should see: The robot drives forward, stops about 30 cm from the obstacle and beeps.
FAQ:
- It stops too late or hits the wall? A faster robot needs more braking distance: lower 30 or raise 25.
- The number does not match a ruler? On EV3, 1 unit = 1.2 cm (for example 25 = 30 cm); 100 means nothing within 120 cm ahead.
Example 3: Obstacle avoider: back up and turn
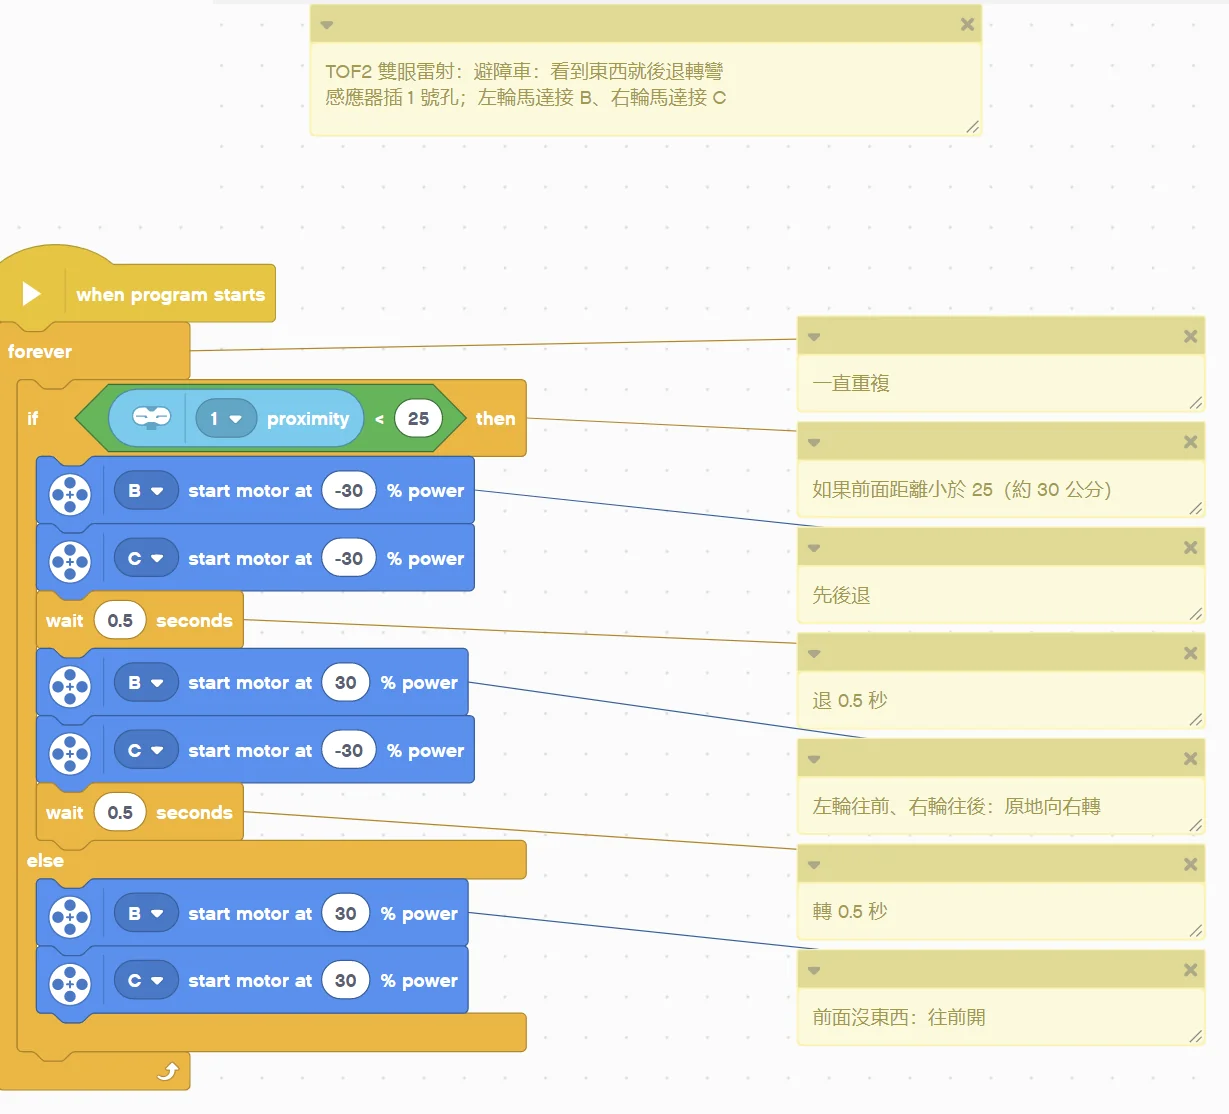
What this example does: The robot keeps driving forward; when something is too close it backs up a little, spins a little, then carries on. Put it on the floor with some boxes and it finds its own way around.
What you need:
- EV3 brick + Education base robot (left wheel on B, right wheel on C)
- TOF2 dual-eye laser (EV3 edition)
- A box or wall as an obstacle
How to connect: TOF2 dual-eye laser in port 1, mounted at the front with the lasers facing straight ahead, about 5 cm above the ground.
Download the program (pick your software):
EV3 Classroom blocks
(Too small? Click the picture to open it full size.)
Step by step:
- Repeat forever
- If the distance ahead is less than 25 (about 30 cm)
- Back up first
- Back up for 0.5 s
- Left wheel forward, right wheel backward: spin right on the spot
- Turn for 0.5 s
- Otherwise:
- Nothing ahead: drive forward
- If the distance ahead is less than 25 (about 30 cm)
What you should see: The robot backs up and turns right when it meets an obstacle, then keeps going.
FAQ:
- It does not turn enough and keeps hitting the same box? Make the 0.5 s turn longer (for example 0.8).
- The number does not match a ruler? On EV3, 1 unit = 1.2 cm (for example 25 = 30 cm); 100 means nothing within 120 cm ahead.
Example 4: Follow the leader: keep a fixed distance
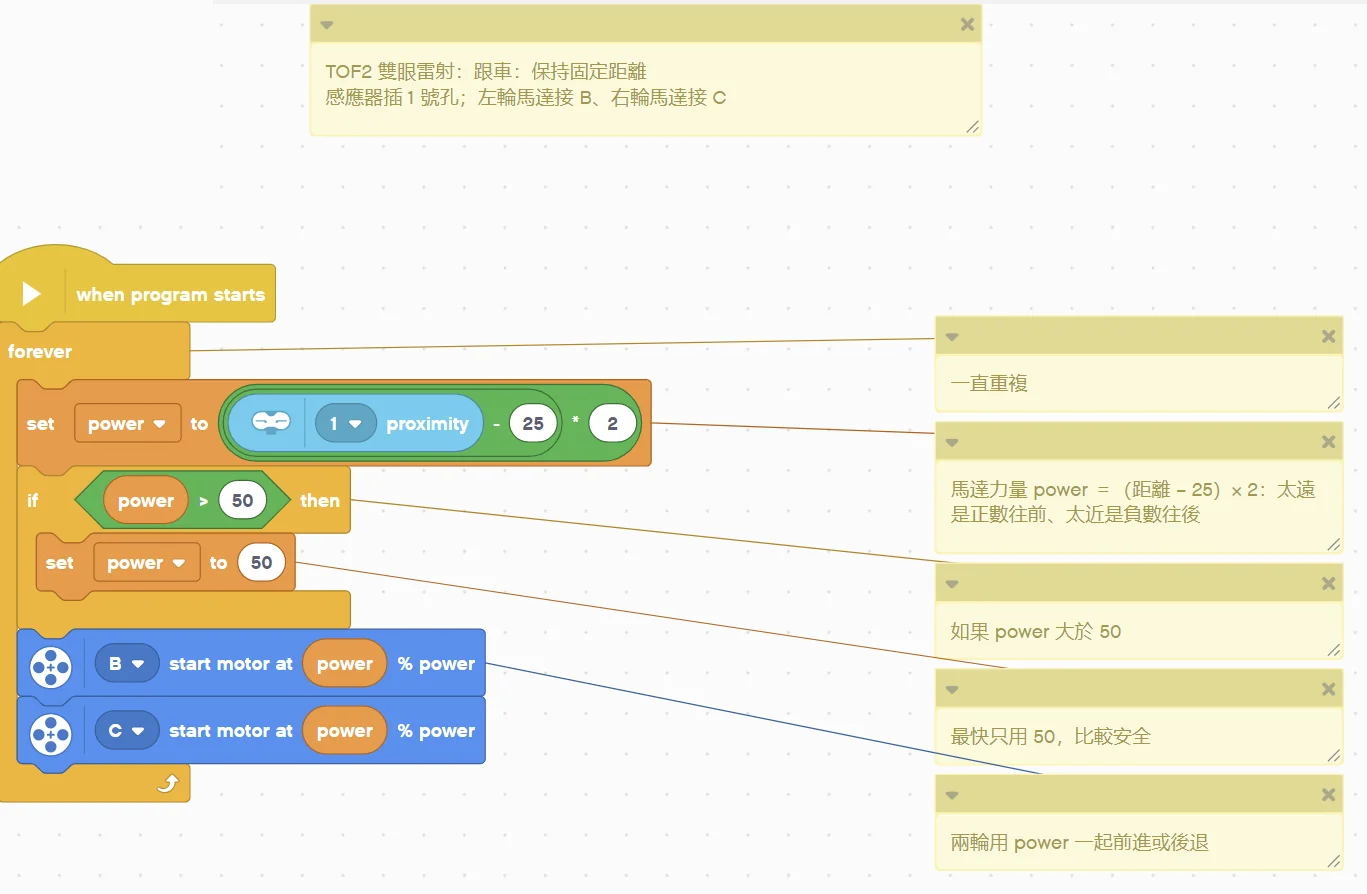
What this example does: Hold a book in front of the robot: move it forward and the robot follows, push it back and the robot reverses, always keeping about 30 cm. This is proportional control: "correct by as much as the error".
What you need:
- EV3 brick + Education base robot (left wheel on B, right wheel on C)
- TOF2 dual-eye laser (EV3 edition)
- A book or a board
How to connect: TOF2 dual-eye laser in port 1, mounted at the front with the lasers facing straight ahead, about 5 cm above the ground.
Download the program (pick your software):
EV3 Classroom blocks
(Too small? Click the picture to open it full size.)
Step by step:
- Repeat forever
- Motor power = (distance − 25) × 2: too far is positive (forward), too close is negative (backward)
- If power is greater than 50
- Limit it to 50 to be safe
- Both wheels drive forward or backward with power
What you should see: Book forward, robot follows; book back, robot reverses; book still, robot stops at about 30 cm. With nothing ahead the robot drives forward at power 50.
FAQ:
- The robot shakes back and forth around the target? Lower × 2 (for example × 1).
- The number does not match a ruler? On EV3, 1 unit = 1.2 cm (for example 25 = 30 cm); 100 means nothing within 120 cm ahead.
Example 5: Left eye, right eye: dodge obstacles on both sides
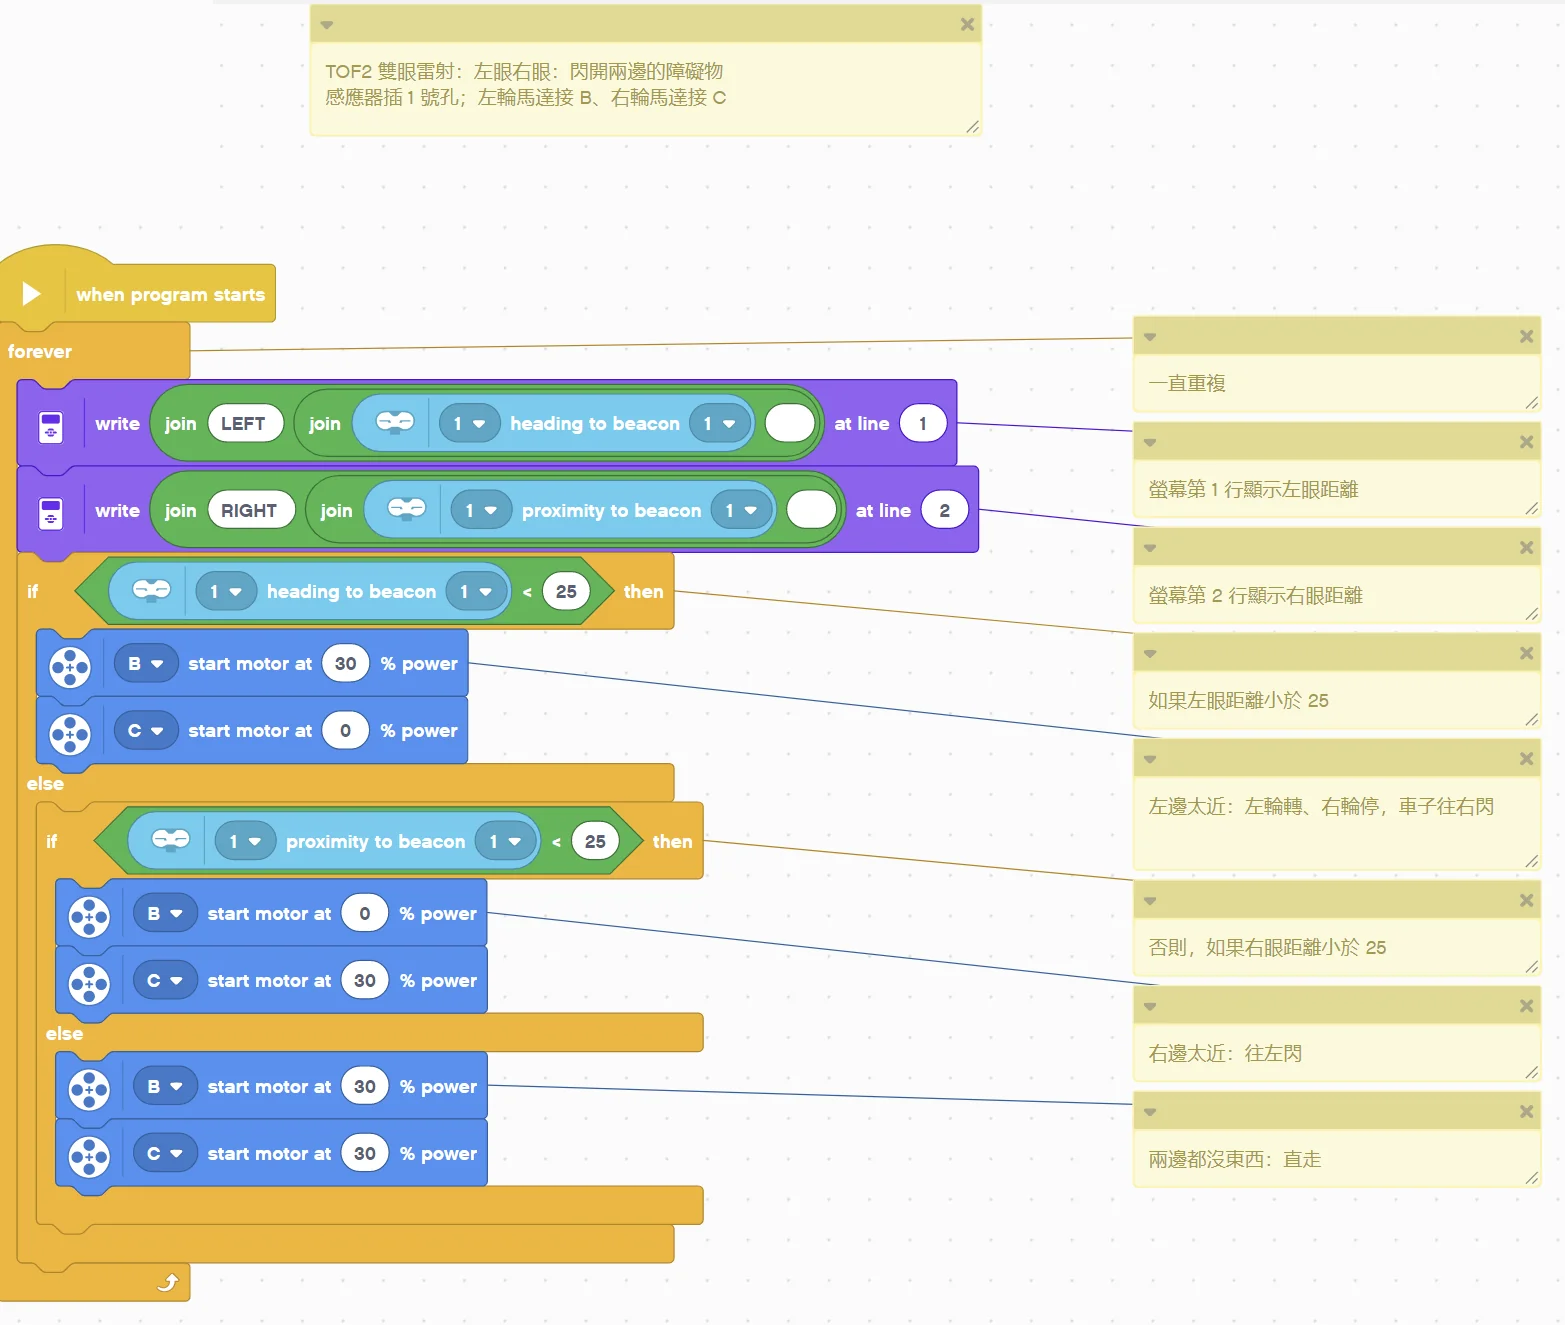
What this example does: The dual-eye laser reads the left and right eyes separately. Too close on the left means swerve right, too close on the right means swerve left, nothing means go straight.
What you need:
- EV3 brick + Education base robot (left wheel on B, right wheel on C)
- TOF2 dual-eye laser (EV3 edition)
- A box or wall as an obstacle
How to connect: TOF2 dual-eye laser in port 1, mounted at the front with the lasers facing straight ahead, about 5 cm above the ground. Left and right are as seen from behind the sensor, looking the way it faces (left = J5, right = J3).
Download the program (pick your software):
EV3 Classroom blocks
(Too small? Click the picture to open it full size.)
Step by step:
- Repeat forever
- Screen row 1 shows the left eye distance
- Screen row 2 shows the right eye distance
- If the left eye distance is less than 25
- Too close on the left: left wheel runs, right wheel stops, the robot swerves right
- Otherwise:
- Otherwise, if the right eye distance is less than 25
- Too close on the right: swerve left
- Otherwise:
- Nothing on either side: go straight
- Otherwise, if the right eye distance is less than 25
What you should see: Cover the left eye with your hand and the robot turns right; cover the right eye and it turns left; cover nothing and it goes straight.
FAQ:
- Left and right are swapped? Left and right are as seen from behind the robot, looking the same way as the sensor (left = J5, right = J3); facing the sensor, they are the other way round. If they are still swapped, the sensor may be mounted backwards (lasers facing back or upside down), or swap the numbers in the two tank steps.
- The number does not match a ruler? On EV3, 1 unit = 1.2 cm (for example 25 = 30 cm); 100 means nothing within 120 cm ahead.
Note
These examples have no version for this software: Example 6: Stop precisely in millimetres: stop 20 cm before the wall
More questions
- The EV3 shows an infrared sensor? Expected: the sensor emulates a LEGO sensor so the stock blocks can read it.
- A short freeze when switching modes? The EV3 needs about 1 s per mode change. Stick to one mode during a run.
Still stuck? Contact us with your software and a screenshot of the program.
Downloads
Sources
- Host and software list:
_build/guides.json - Values and commands:
_build/protocol/tof2.json(single source of truth) - Setup:
_build/guides/software/ev3-classroom.en.md、_build/guides/product/tof2/ev3-classroom.en.md - Examples:
sensors/tof2/ev3-examples.md