
Pathfinder 16-Way (Line16) × EV3 × EV3 Classroom
Interactive tutorialEV3
First time? Try the interactive tutorial in your browser first, then follow the steps below with your hub.
This page covers EV3 Classroom (Scratch blocks) only: how to set it up for the Pathfinder 16-Way (Line16) on MINDSTORMS EV3, how to read every value, the commands it supports and examples. Use the switcher above to change product, host or software.
Setup
What you need
- Sensor: Pathfinder 16-Way (Line16) (EV3 edition, RJ12 plug). A SPIKE edition is not recognised on an EV3.
- Brick: LEGO MINDSTORMS EV3.
- Cable: the standard cable in the box, or an original LEGO EV3 cable.
- Software: LEGO MINDSTORMS EV3 Classroom (Scratch-style blocks, the same as SPIKE). The easiest start for first-time EV3 users.
Install the software
- Install EV3 Classroom from the LEGO Education download page.
- To open an example: download the
.lmspfile → "Open" on the EV3 Classroom home screen → connect the EV3 → "Download and Run" at the bottom right.
Make the software see the sensor
No extension and no driver needed. On the EV3 the sensor emulates an original LEGO sensor (most products show up as an "Infrared Sensor"); use the built-in sensor blocks.
- Classroom blocks look like Scratch, but the modes are exactly the same as in the official EV3 software: Proximity / Beacon / Remote, with the same ranges. See the readings below.
- Some products come with MBC My Blocks. They are already inside the example projects; open an example and they are there.
Important
Do not switch modes in the middle of a program. Every time the EV3 switches a sensor mode it stalls for about 1 s. Pick one mode at the start and use it for the whole run.
Wiring
- Plug the sensor into EV3 port 1 with the cable (any of 1~4 works; choose the same port in the blocks).
- Turn the EV3 on first, then plug in the sensor.
- Latch up, push the plug in gently.
Calibrate first (only once)
The Pathfinder has to "learn" the black and white of your mat before its numbers are right. Calibration is stored in the sensor and survives power-off (until you change mats).
- Plug in the sensor and turn the hub on (the sensor lights come on).
- Hold the calibration button for about 0.5 s, then release it (do not keep holding it; holding it keeps restarting calibration).
- When the green calibration LED (next to the button) lights up, sweep the sensor back and forth between the black line and the white floor within 5 seconds. All 16 sensing points must pass over the darkest black line and the brightest white area.
- Keep the sensor 3~12 mm above the surface while sweeping; higher reads poorly.
- The green LED goes off = calibration done, saved in the sensor automatically.
How do I know it worked? On the white floor the "line width" is 0; on a normal black line it is 3~5.
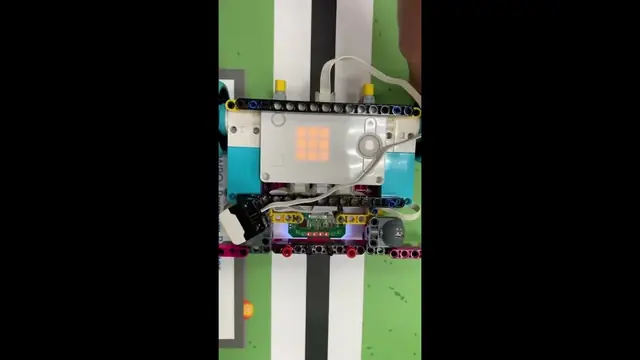
Proximity mode: line position
| Value | Range | Meaning |
|---|---|---|
| Line position | -16 ~ +16 |
0 = black line in the centre, negative left, positive right; ±16 = line at the very edge |
Beacon mode: 16 reflected-light values
Read the "value list" (8 bytes). Each channel is quantised to 19 (1 = darkest, 9 = brightest) and two channels are combined into one two-digit number (1199), getting around the EV3 limit of 100.
| Byte | Content | Range | Decoding |
|---|---|---|---|
| 0 | Channels 0+1 | 11 ~ 99 | tens = channel 0, units = channel 1 |
| 1 | Channels 2+3 | 11 ~ 99 | tens = channel 2, units = channel 3 |
| 2 | Channels 4+5 | 11 ~ 99 | tens = channel 4, units = channel 5 |
| 3 | Channels 6+7 | 11 ~ 99 | tens = channel 6, units = channel 7 |
| 4 | Channels 8+9 | 11 ~ 99 | tens = channel 8, units = channel 9 |
| 5 | Channels 10+11 | 11 ~ 99 | tens = channel 10, units = channel 11 |
| 6 | Channels 12+13 | 11 ~ 99 | tens = channel 12, units = channel 13 |
| 7 | Channels 14+15 | 11 ~ 99 | tens = channel 14, units = channel 15 |
Example: a byte reads 83; the tens digit 8 is the even channel (e.g. channel 0), the units digit 3 is the odd channel (e.g. channel 1).
Remote mode: position + width + edges (recommended for competition)
Read the "value list" (4 bytes):
| Byte | Content | Range | Meaning |
|---|---|---|---|
| 0 | High-resolution position | -100 ~ +100 |
0 centre, negative left, positive right; the best PID error input |
| 1 | Line width | 0 ~ 16 |
Sensors triggered; detects crossings and T-junctions |
| 2 | Left edge light | 0 ~ 100 |
Reflection of channel 1 (far left), 0 pure black, 100 pure white |
| 3 | Right edge light | 0 ~ 100 |
Reflection of channel 16 (far right), 0 pure black, 100 pure white |
Tip
When bytes 2 and 3 are both below 20, the front of the robot is fully on the cross line of a junction; a sudden change on one side means a fork is coming. Useful to avoid losing the line.
MBC My Blocks
The example project contains three My Blocks; no extension pack to install. Each one decodes the data in the background and stores it in its own variables. Put them inside a "forever" loop to always have the latest data:
LinePos16_dataUpdate: basic line following; updates0_LinePos16(-16 ~ +16, left negative, right positive). Good for beginners.LinePos100_dataUpdate: high precision (needs a proper calibration); updates0_LinePos100(-100 ~ +100),0_LineWidth16(0 ~ 16) and the far-left / far-right edge light values.LineCh16_dataUpdate: full array; updatess1tos16, 16 variables matching each sensor from left to right.
Example program
- Classroom example (.lmsp): open with EV3 Classroom.
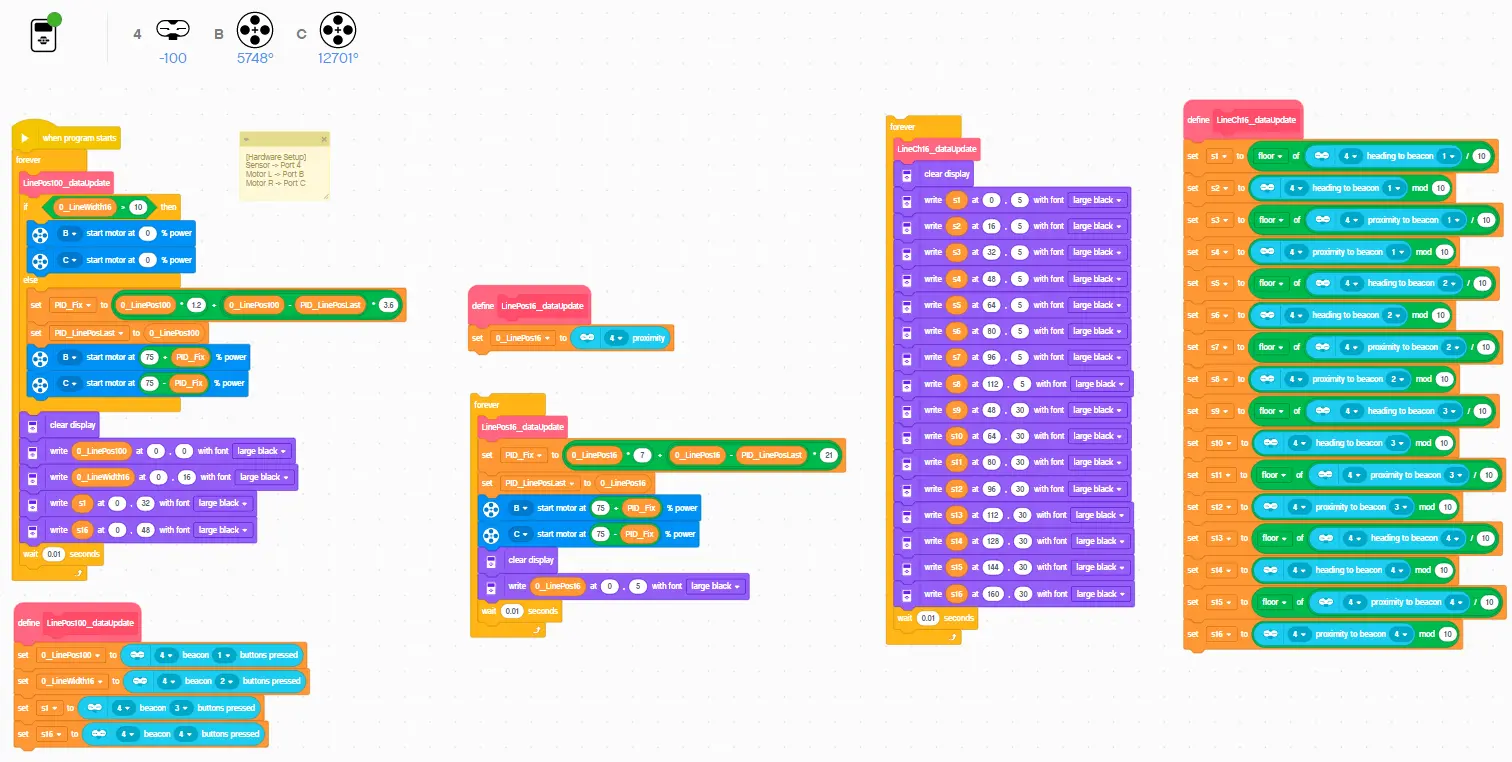
Want to learn more advanced line following?
These coaches have plenty of competition and teaching experience: Coach LegoLauXiao (demo video), Coach legolaumo (demo video).
First test
- Download the
.lmspof example 1 on this page, open it, connect the EV3 and press "Download and Run". - If the number on the EV3 screen changes with what is in front of the sensor, everything is connected.
FAQ
- The number never changes? Unplug the sensor and plug it back in (the EV3 must be on first).
- Some examples have no Classroom version? Examples marked "Pybricks / EV3 MicroPython / clev3r only" use a mode the Classroom blocks cannot read.
- The program hiccups now and then? It switches sensor modes; each switch costs about 1 s. Use one mode only.
Reading values
The EV3 sees a stock LEGO sensor; read it with the stock Classroom sensor blocks.
line position linePos
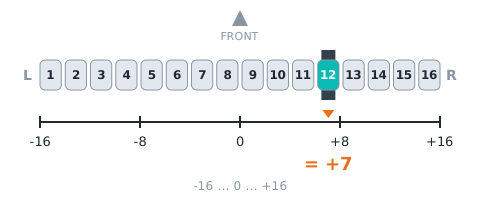
| Range | Meaning |
|---|---|
-16~+16 |
which channel the line is under: −16 (far left) to +16 (far right), 0 = centre; seen from behind the robot, negative = left (normally ±15; ±16 only for 200 ms after the line leaves the outermost channel) |
| Value | Block | Decode | Mode |
|---|---|---|---|
| line position | Infrared Sensor → Proximity | the value | mode 0 |
fine position linePosFine
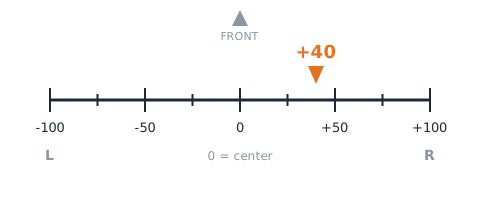
| Range | Meaning |
|---|---|
-100~+100 |
sub-channel position: −100 to +100, 0 = centre, negative = left (same sign as line position) |
| Value | Block | Decode | Mode |
|---|---|---|---|
| fine position | Infrared Sensor → Remote, channel 1 | the value | mode 2 |
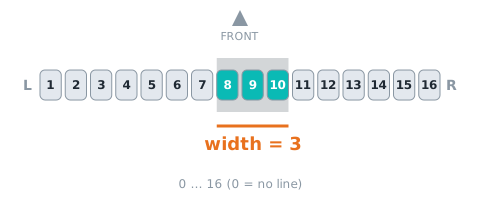
line width lineWidth
| Range | Meaning |
|---|---|
0~16 路 |
number of channels on the line, 0~16; 0 = no line |
| Value | Block | Decode | Mode |
|---|---|---|---|
| line width | Infrared Sensor → Remote, channel 2 | the value | mode 2 |
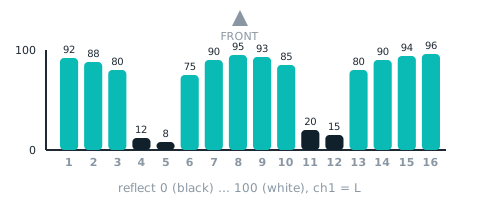
channel 1~16 reflect light
| Range | Meaning |
|---|---|
0~100 |
calibrated reflect of channel 1 |
| Value | Block | Decode | Mode |
|---|---|---|---|
| #1 | Infrared Sensor → Beacon heading, channel 1 | the value | mode 1 |
| #2 | Infrared Sensor → Beacon proximity, channel 1 | the value | mode 1 |
| #3 | Infrared Sensor → Beacon heading, channel 2 | the value | mode 1 |
| #4 | Infrared Sensor → Beacon proximity, channel 2 | the value | mode 1 |
| #5 | Infrared Sensor → Beacon heading, channel 3 | the value | mode 1 |
| #6 | Infrared Sensor → Beacon proximity, channel 3 | the value | mode 1 |
| #7 | Infrared Sensor → Beacon heading, channel 4 | the value | mode 1 |
| #8 | Infrared Sensor → Beacon proximity, channel 4 | the value | mode 1 |
Not readable here:line segments, line bitmap, last exit direction, threshold, calibrations done. Use Pybricks / clev3r for these.
Commands
The EV3 port is read-only, so this software cannot send commands: calibrate with the button on the sensor and change settings over Arduino I2C, mBlock or micro:bit.
Examples
Example 1: See where the line is
What this example does: Put the sensor over the black line and the EV3 screen shows a number telling you where the line is. This is step one of every line-following program: learn to "read the number".
What you need:
- EV3 brick + Education base robot (left wheel on B, right wheel on C)
- Pathfinder 16-way (EV3 edition, RJ12 plug)
- A white mat with a black line (about 2 cm wide)
How to connect: Pathfinder 16-way in port 1, mounted under the front of the robot about 1 cm above the ground, facing straight down.
Download the program (pick your software):
EV3 Classroom blocks
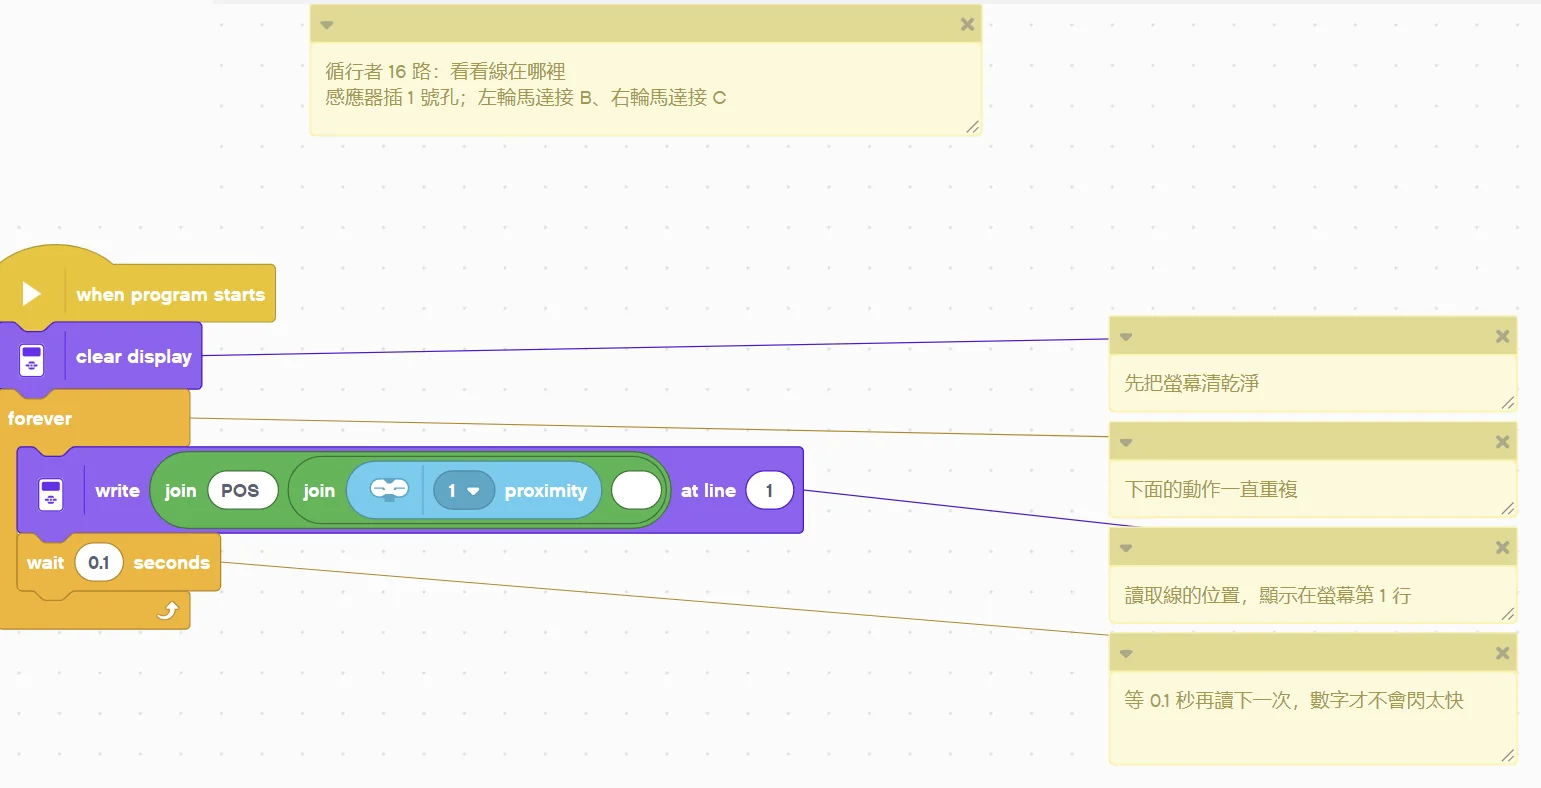
(Too small? Click the picture to open it full size.)
Step by step:
- Clear the screen first
- Repeat the steps below forever
- Read the line position and show it on screen row 1
- Wait 0.1 s before the next read so the number does not flicker
What you should see: With the black line in the middle of the sensor the screen shows 0; move the line left and the number goes negative, move it right and it goes positive, up to ±16 at the edges (left/right as seen standing behind the robot, facing forward).
FAQ:
- The line is gone but the number stays at the last value? That is normal: when the line leaves the sensor, the position stays where it was last seen. To detect "line lost", use the line width from example 4 (width = 0).
- The number never changes? Check that the sensor light is on and the cable is seated. Turn the EV3 on before plugging in the sensor, or unplug and plug it back in.
- The robot steers the wrong way and gets worse? Swap the "+" and "−" in the program (swap the left/right wheel corrections), or check that the left wheel is on B and the right wheel on C.
Example 2: Three-way line following: left, right, straight
What this example does: Use "if … then … else" to make the robot follow the black line: turn left when the line is to the left, turn right when it is to the right, go straight when it is in the middle.
What you need:
- EV3 brick + Education base robot (left wheel on B, right wheel on C)
- Pathfinder 16-way (EV3 edition, RJ12 plug)
- A white mat with a black line (about 2 cm wide)
How to connect: Pathfinder 16-way in port 1, mounted under the front of the robot about 1 cm above the ground, facing straight down.
Download the program (pick your software):
EV3 Classroom blocks
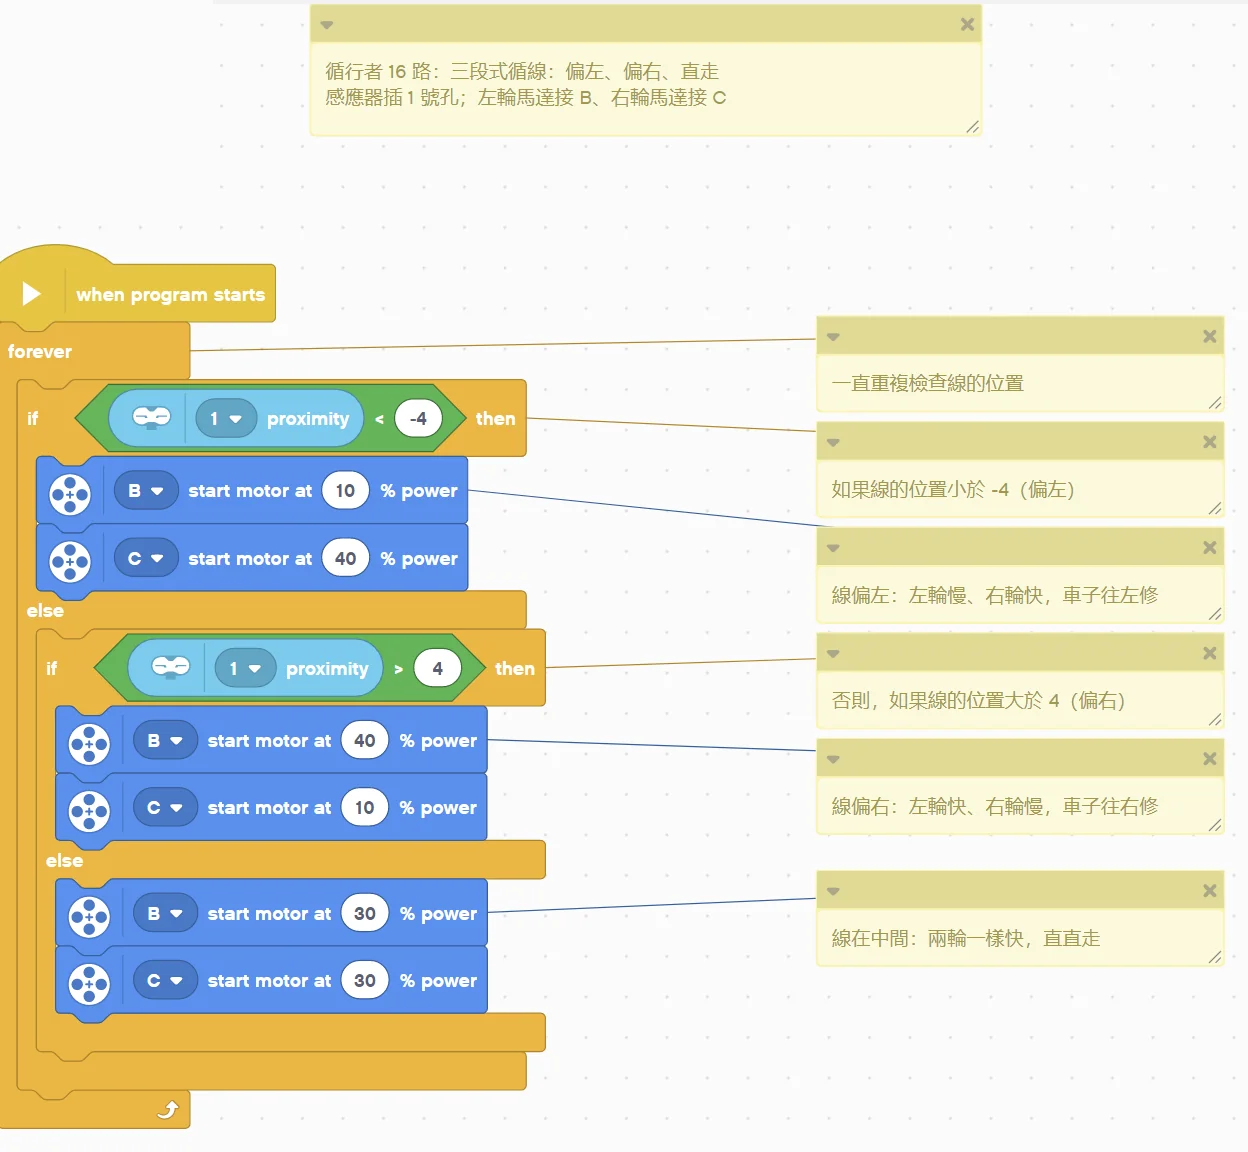
(Too small? Click the picture to open it full size.)
Step by step:
- Keep checking the line position
- If the line position is less than -4 (line is to the left)
- Line to the left: left wheel slow, right wheel fast, the robot steers left
- Otherwise:
- Otherwise, if the line position is greater than 4 (line is to the right)
- Line to the right: left wheel fast, right wheel slow, the robot steers right
- Otherwise:
- Line in the centre: both wheels the same speed, go straight
- Otherwise, if the line position is greater than 4 (line is to the right)
- If the line position is less than -4 (line is to the left)
What you should see: The robot wobbles left and right along the black line. On sharp bends it may run off; try lowering 40 and changing 10 to 0.
FAQ:
- The number never changes? Check that the sensor light is on and the cable is seated. Turn the EV3 on before plugging in the sensor, or unplug and plug it back in.
- The robot steers the wrong way and gets worse? Swap the "+" and "−" in the program (swap the left/right wheel corrections), or check that the left wheel is on B and the right wheel on C.
Example 3: Proportional line following: the further off, the harder it turns
What this example does: Three-way line following keeps wobbling. This example uses "line position × a number" as the steering power: a little off means a little turn, a lot off means a big turn, so the robot drives more smoothly.
What you need:
- EV3 brick + Education base robot (left wheel on B, right wheel on C)
- Pathfinder 16-way (EV3 edition, RJ12 plug)
- A white mat with a black line (about 2 cm wide)
How to connect: Pathfinder 16-way in port 1, mounted under the front of the robot about 1 cm above the ground, facing straight down.
Download the program (pick your software):
EV3 Classroom blocks
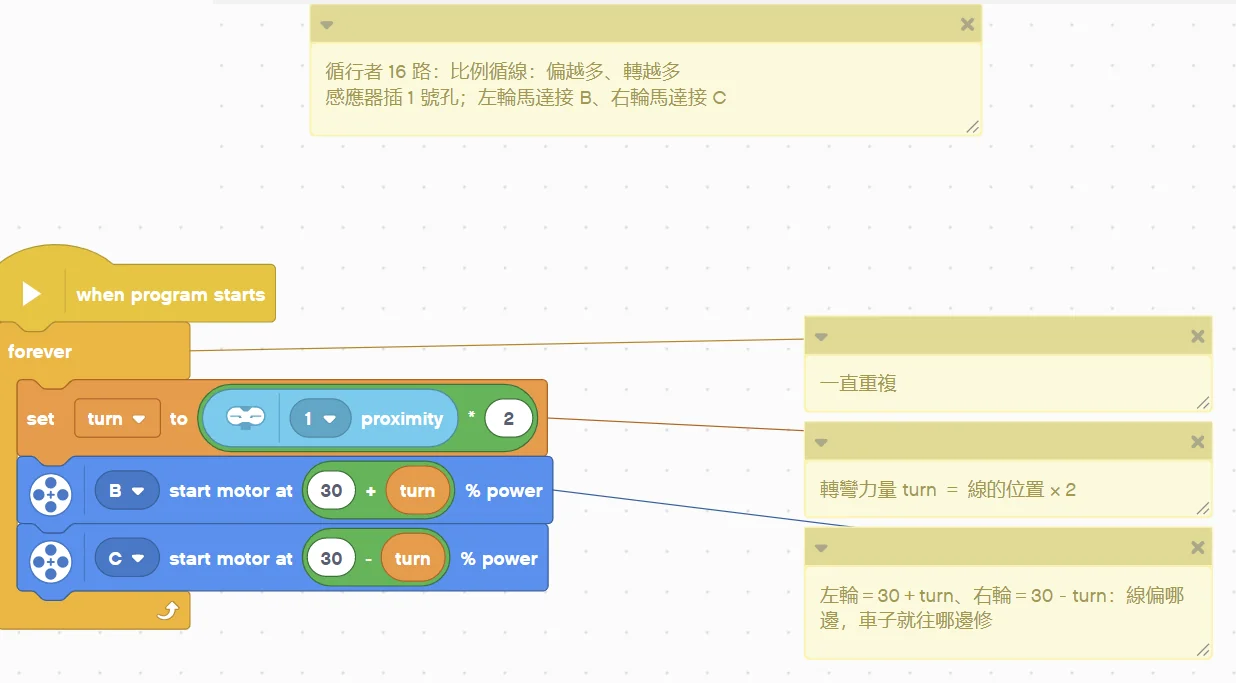
(Too small? Click the picture to open it full size.)
Step by step:
- Repeat forever
- Steering power turn = line position × 2
- Left wheel = 30 + turn, right wheel = 30 − turn: the robot steers towards the line
What you should see: The robot follows the black line more smoothly than in example 2. The number 2 is the "proportional gain": too big and it swings left and right, too small and it cannot make the bends. Tune it yourself.
FAQ:
- It keeps swinging even on a straight line? Lower 2 a little (for example 1).
- The number never changes? Check that the sensor light is on and the cable is seated. Turn the EV3 on before plugging in the sensor, or unplug and plug it back in.
- The robot steers the wrong way and gets worse? Swap the "+" and "−" in the program (swap the left/right wheel corrections), or check that the left wheel is on B and the right wheel on C.
Example 4: Stop at a crossing
What this example does: The sensor also tells you "how many channels see the black line" (line width). Normally that is 2~3; at a crossing it suddenly jumps. This example follows the line while watching the width, and stops with a beep when it is 10 or more.
What you need:
- EV3 brick + Education base robot (left wheel on B, right wheel on C)
- Pathfinder 16-way (EV3 edition, RJ12 plug)
- A black-line mat with crossings
How to connect: Pathfinder 16-way in port 1, mounted under the front of the robot about 1 cm above the ground, facing straight down.
Download the program (pick your software):
EV3 Classroom blocks
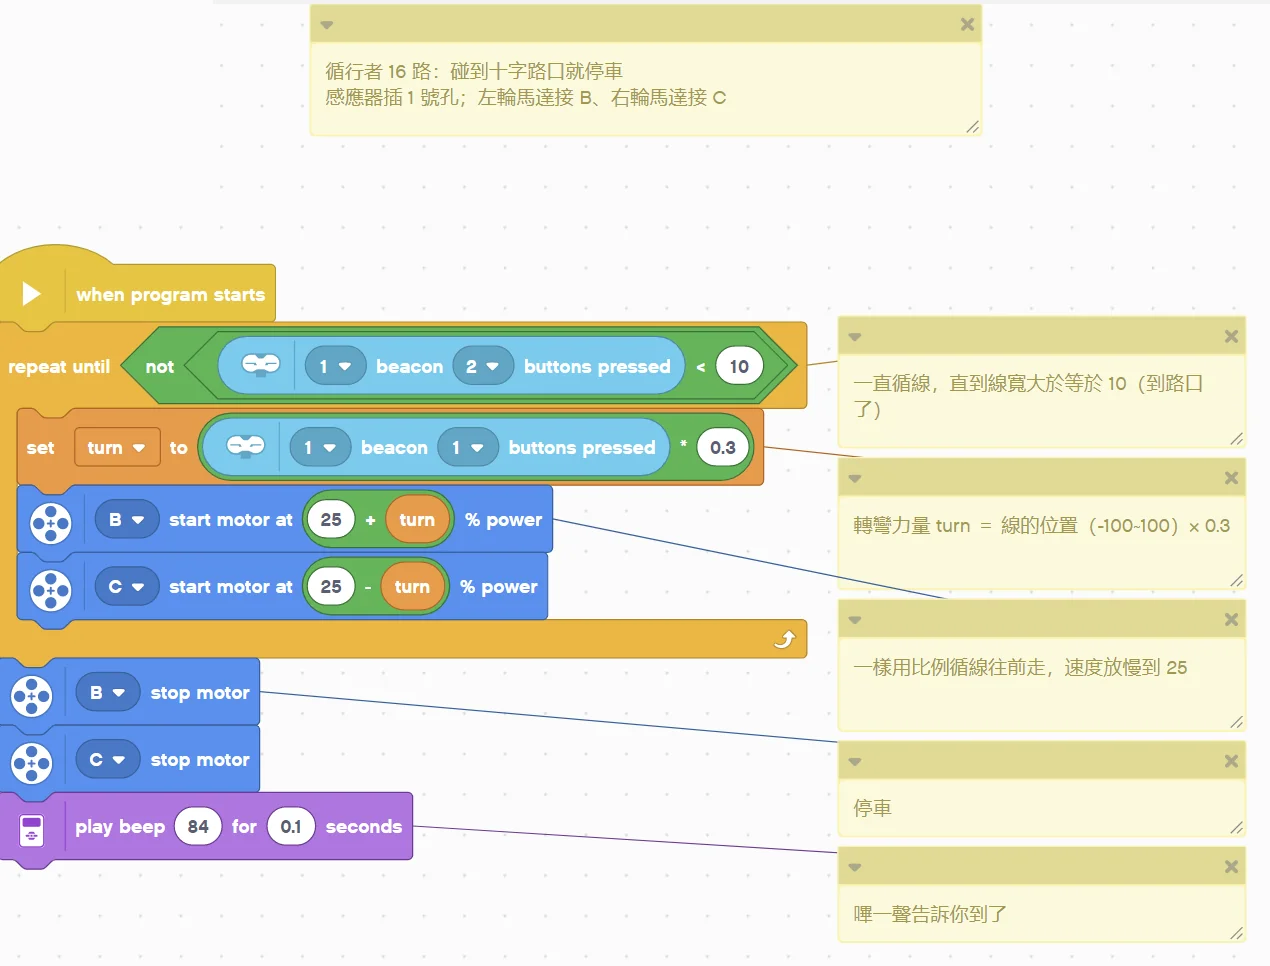
(Too small? Click the picture to open it full size.)
Step by step:
- Keep following the line until the line width is 10 or more (reached a crossing)
- Steering power turn = line position (-100~100) × 0.3
- Same proportional line following, slowed down to 25
- Stop
- Beep to tell you it arrived
What you should see: The robot follows the line and stops with a beep when it reaches a crossing.
FAQ:
- It stops before the crossing? Bends can also widen the line; raise 10 a little.
- It does not stop at the crossing? Show the line width the way example 1 does, read the real value at the crossing, then change 10 in the program.
- The number never changes? Check that the sensor light is on and the cable is seated. Turn the EV3 on before plugging in the sensor, or unplug and plug it back in.
- The robot steers the wrong way and gets worse? Swap the "+" and "−" in the program (swap the left/right wheel corrections), or check that the left wheel is on B and the right wheel on C.
Example 5: Count crossings: stop at the 3rd one
What this example does: Competitions often say "drive to the Nth crossing". This example counts crossings with a variable count and uses another variable onCross to remember "am I on a crossing right now", so one crossing is not counted many times.
What you need:
- EV3 brick + Education base robot (left wheel on B, right wheel on C)
- Pathfinder 16-way (EV3 edition, RJ12 plug)
- A black-line mat with 3 or more crossings
How to connect: Pathfinder 16-way in port 1, mounted under the front of the robot about 1 cm above the ground, facing straight down.
Download the program (pick your software):
EV3 Classroom blocks
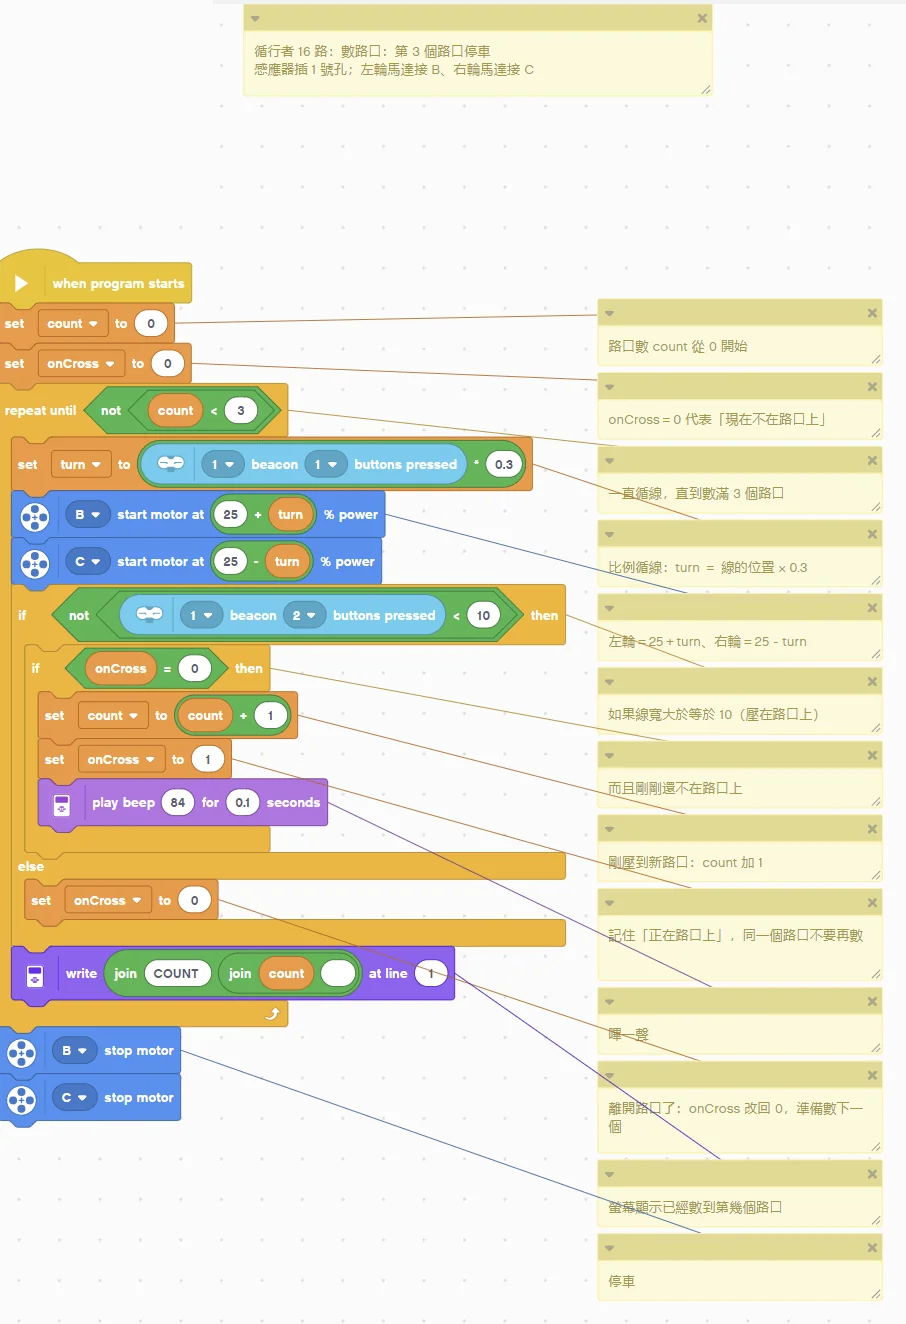
(Too small? Click the picture to open it full size.)
Step by step:
- Crossing counter count starts at 0
- onCross = 0 means "not on a crossing right now"
- Keep following the line until 3 crossings have been counted
- Proportional line following: turn = line position × 0.3
- Left wheel = 25 + turn, right wheel = 25 − turn
- If the line width is 10 or more (on a crossing)
- and we were not on a crossing a moment ago
- Just reached a new crossing: add 1 to count
- Remember "on a crossing" so the same crossing is not counted again
- Beep
- Otherwise:
- Left the crossing: set onCross back to 0, ready for the next one
- and we were not on a crossing a moment ago
- Show how many crossings have been counted
- Stop
What you should see: Every crossing beeps once and adds 1 on the screen; the robot stops at the 3rd crossing. Change the 3 to stop at a different crossing.
FAQ:
- One crossing is counted twice? Happens when the black line at the crossing is damaged or shiny. Slow the speed 25 down or raise the width threshold.
- The number never changes? Check that the sensor light is on and the cable is seated. Turn the EV3 on before plugging in the sensor, or unplug and plug it back in.
- The robot steers the wrong way and gets worse? Swap the "+" and "−" in the program (swap the left/right wheel corrections), or check that the left wheel is on B and the right wheel on C.
Note
These examples have no version for this software: Example 6: Line bitmap: draw an LED ruler on the screen
More questions
- The EV3 shows an infrared sensor? Expected: the sensor emulates a LEGO sensor so the stock blocks can read it.
- A short freeze when switching modes? The EV3 needs about 1 s per mode change. Stick to one mode during a run.
Still stuck? Contact us with your software and a screenshot of the program.
Downloads
Sources
- Host and software list:
_build/guides.json - Values and commands:
_build/protocol/line16.json(single source of truth) - Setup:
_build/guides/software/ev3-classroom.en.md、_build/guides/product/line16/ev3-classroom.en.md - Examples:
sensors/line16/ev3-examples.md