
Ranger 2-Way (TOF2) × EV3 × clev3r
Interactive tutorialEV3
First time? Try the interactive tutorial in your browser first, then follow the steps below with your hub.
This page covers clev3r (EV3 BASIC) only: how to set it up for the Ranger 2-Way (TOF2) on MINDSTORMS EV3, how to read every value, the commands it supports and examples. Use the switcher above to change product, host or software.
Setup
What you need
- Sensor: Ranger 2-Way (TOF2) (EV3 edition, RJ12 plug).
- Brick: LEGO MINDSTORMS EV3.
- Software: clev3r (a BASIC programming environment for the EV3, also called EV3 Basic). The version tested for this site is v1.7.1.0. Pick this if you already use clev3r.
Install the software
- Install clev3r (v1.7.1.0 recommended).
- To open an example: open the
.bpfile in clev3r → "Compile and download" → run it from the folder starting withMBC_in the EV3 file browser.
Make the software see the sensor
No extension needed. On the EV3 the sensor emulates an original LEGO sensor (most products are an "Infrared Sensor"), with exactly the same modes as the official EV3 software: Proximity / Beacon / Remote, with the same ranges.
- Read them with BASIC commands such as
IR_PROXIMITY/IR_BEACON/IR_REMOTE. See the readings below. - clev3r can also read modes that EV3-G and Classroom cannot, so examples marked "Pybricks / EV3 MicroPython / clev3r only" run here too.
- Some products come with MBC subroutines. They are already inside the example files.
Important
Do not switch modes in the middle of a program. Every time the EV3 switches a sensor mode it stalls (about 1 s). Pick one mode at the start and use it for the whole run.
Wiring
- Plug the sensor into EV3 port 1 with the cable (any of 1~4 works; use the same port in the program).
- Turn the EV3 on first, then plug in the sensor.
- Latch up, push the plug in gently.
Which side is left
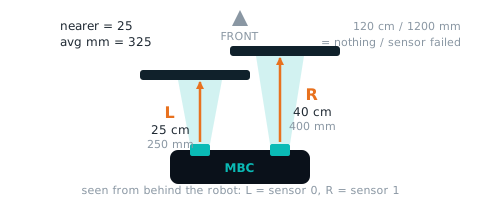
Left and right are as seen from behind the sensor, looking the way it faces (left = J5, right = J3). Facing the sensor, they are the other way round, so when you test with your hand, stand behind the sensor and look the same way it does. "Left is closer" and "turn left" in the examples follow this direction.
EV3 test results and tips
Passed hardware testing on the stock EV3 firmware (2026-11-02): clev3r programs run on the stock EV3 firmware, which sees the Ranger 2-Way as an EV3 infrared sensor (Sensor.GetType = 33). All 6 modes have the same structure as the LEGO infrared sensor, and it is recognised both when plugged in before power-on and when plugged in later. clev3r can be used as it is.
- Push the plug all the way in, in one go.
- The EV3 needs about 1.1 s to change infrared mode (the LEGO infrared sensor does too). Call
Sensor.SetModeonce at the start and keep reading the same mode: mode 5 for left / right mm, mode 0 for the average distance. - On the stock firmware, switching to mode 3 (average of left and right in mm) sometimes does not take (you get mode 0 numbers until you switch again). For the average in millimetres, read mode 5 and work out (left + right) ÷ 2 yourself.
First test
- Open the
.bpof example 1 on this page and press "Compile and download". - Run it from the folder starting with
MBC_in the EV3 file browser. - If the number on the EV3 screen changes with what is in front of the sensor, everything is connected.
FAQ
- Cannot find the program on the EV3? Look in the EV3 file browser for the folder starting with
MBC_. - The number never changes? Unplug the sensor and plug it back in (the EV3 must be on first).
- The program hiccups now and then? It switches sensor modes. Use one mode only.
Reading values
Code assumes port 1: Sensor.SetMode picks the mode, Sensor.ReadRawValue reads the n-th value.
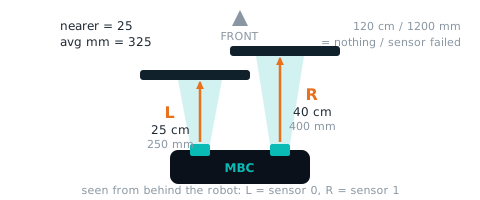
left distance (cm) leftCm
| Range | Meaning |
|---|---|
0~120 cm (EV3 mode 1, mode 2, mode 4 give a scaled value: cm×100/120 (0~100)) |
distance from the left sensor, 0~120 cm (left = sensor 0 seen from behind the robot); 120 = nothing in range / sensor failed |
' clev3r (BASIC)
Sensor.SetMode(1, 1)
leftCm = Sensor.ReadRawValue(1, 0)
Sensor.SetMode(1, 2)
leftCm = Sensor.ReadRawValue(1, 0)
Sensor.SetMode(1, 4)
leftCm = Sensor.ReadRawValue(1, 0)
mode 1 · int8 · #67 新:IR-SEEK 8×int8 = [左, 右, 左, 右, 左, 右, 左, 右](index 0/2/4/6 = 左;原本 index 2~7 = 0); mode 2 · int8 · IR-REMOTE [左, 右, 0, 0](INO:137-139); mode 4 · int8 · IR-S-ALT 同模式 2 (locked mode: firmware and hosts will not change it)
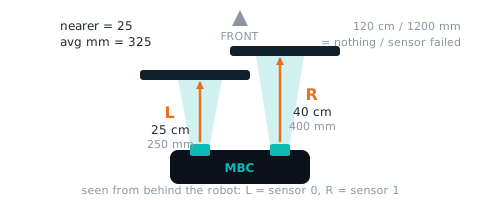
right distance (cm) rightCm
| Range | Meaning |
|---|---|
0~120 cm (EV3 mode 1, mode 2, mode 4 give a scaled value: cm×100/120 (0~100)) |
distance from the right sensor, 0~120 cm (right = sensor 1); 120 = nothing in range / sensor failed |
' clev3r (BASIC)
Sensor.SetMode(1, 1)
rightCm = Sensor.ReadRawValue(1, 1)
Sensor.SetMode(1, 2)
rightCm = Sensor.ReadRawValue(1, 1)
Sensor.SetMode(1, 4)
rightCm = Sensor.ReadRawValue(1, 1)
mode 1 · int8 · #67 新:index 1/3/5/7 = 右; mode 2 · int8; mode 4 · int8 (locked mode: firmware and hosts will not change it)
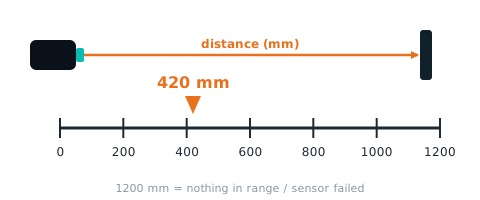
left distance (mm) leftMm
| Range | Meaning |
|---|---|
0~1200 mm |
left sensor distance 0~1200 mm; 1200 = nothing in range / sensor failed |
' clev3r (BASIC)
Sensor.SetMode(1, 5)
leftMm = Sensor.ReadRawValue(1, 0)
mode 5 · int16 · #67 新:IR-CAL 2×int16 = [左 mm, 右 mm](原本 word0 = 左'+256×右')
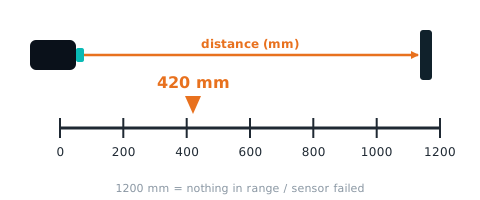
right distance (mm) rightMm
| Range | Meaning |
|---|---|
0~1200 mm |
right sensor distance 0~1200 mm; 1200 = nothing in range / sensor failed |
' clev3r (BASIC)
Sensor.SetMode(1, 5)
rightMm = Sensor.ReadRawValue(1, 1)
mode 5 · int16 · #67 新
average distance (mm) avgMm
| Range | Meaning |
|---|---|
0~1200 mm (EV3 mode 0 gives a scaled value: cm average ×100/120 (0~100)) |
(left mm + right mm) / 2, 0~1200; same number as EV3 mode 3 and the 3rd value of SPIKE mode 6 |
' clev3r (BASIC)
Sensor.SetMode(1, 0)
avgMm = Sensor.ReadRawValue(1, 0)
Sensor.SetMode(1, 3)
avgMm = Sensor.ReadRawValue(1, 0)
mode 0 · int8 · IR-PROX = (左'+右')>>1,cm 縮放後平均(鎖住,INO:131-133); mode 3 · int16 · #67 新:IR-REM-A 1×int16 = 左右平均 mm(原本 = 左 0~100) (locked mode: firmware and hosts will not change it)
Not readable here:nearer distance (cm), init bitmap, fault bitmap. Use Arduino / mBlock / micro:bit for these.
Examples
Example 1: Measure how far away something is
What this example does: Move your hand back and forth in front of the sensor and the EV3 screen shows the distance. This example shows both the "raw sensor number" and the value "converted to centimetres".
What you need:
- TOF2 dual-eye laser (EV3 edition)
- A box or wall as an obstacle
- EV3 brick
How to connect: TOF2 dual-eye laser in port 1, lasers facing forward.
Download the program (pick your software):
clev3r code
' ============================================================
' TOF2 雙眼雷射測距感應器 EV3 新手範例 01:量量看前面有多遠
' 軟體:clev3r
' 接法:TOF2 雙眼雷射插 1 號孔;左輪馬達接 B、右輪馬達接 C
' 這個範例會做什麼:用手在感應器前面前後移動,EV3 螢幕會顯示距離。這個範例同時顯示「感應器原始數字」和「換算成公分」。
' 讀值:dist=左右兩眼的平均距離(0 ~ 100(1 格=1.2 公分,100=前面沒東西))
' ============================================================
folder "prjs" "MBC_tof2_ex01"

' TOF2 雙眼雷射插 1 號孔,使用模式 0
Sensor.SetMode(1, 0)
LCD.Clear()

' 先清除螢幕
LCD.Clear()
' 一直重複
While "True"
  ' 第 1 行顯示感應器讀到的原始數字(0~100)
  LCD.Text(1, 0, 0, 1, "RAW " + Sensor.ReadRawValue(1, 0) + "      ")
  ' 第 2 行顯示換算後的公分:數字 × 1.2
  LCD.Text(1, 0, 16, 1, "CM " + Sensor.ReadRawValue(1, 0) * 1.2 + "      ")
  ' 等 0.1 秒
  Program.Delay(100)
EndWhile
Step by step:
- Clear the screen first
- Repeat forever
- Row 1 shows the raw sensor value (0~100)
- Row 2 shows centimetres: value × 1.2
- Wait 0.1 s
What you should see: The closer your hand, the smaller the number; with your hand away (nothing within 120 cm) RAW reads 100.
FAQ:
- The number does not match a ruler? On EV3, 1 unit = 1.2 cm (for example 25 = 30 cm); 100 means nothing within 120 cm ahead.
- The number stays at 0 or never changes? Turn the EV3 on before plugging in the sensor, or unplug and plug it back in; make sure there is no protective film over the laser.
Example 2: Stop 30 cm before the wall
What this example does: The robot drives forward and stops when something is within 30 cm (sensor value 25).
What you need:
- EV3 brick + Education base robot (left wheel on B, right wheel on C)
- TOF2 dual-eye laser (EV3 edition)
- A box or wall as an obstacle
How to connect: TOF2 dual-eye laser in port 1, mounted at the front with the lasers facing straight ahead, about 5 cm above the ground.
Download the program (pick your software):
clev3r code
' ============================================================
' TOF2 雙眼雷射測距感應器 EV3 新手範例 02:前方 30 公分停車
' 軟體:clev3r
' 接法:TOF2 雙眼雷射插 1 號孔;左輪馬達接 B、右輪馬達接 C
' 這個範例會做什麼:車子往前開,看到前面 30 公分(感應器數字 25)以內有東西就停下來。
' 讀值:dist=左右兩眼的平均距離(0 ~ 100(1 格=1.2 公分,100=前面沒東西))
' ============================================================
folder "prjs" "MBC_tof2_ex02"

' TOF2 雙眼雷射插 1 號孔,使用模式 0
Sensor.SetMode(1, 0)
LCD.Clear()

' 兩輪用 30 的力量往前開
Motor.StartPower("B", 30)
Motor.StartPower("C", 30)
' 等到距離小於 25(約 30 公分)
While Sensor.ReadRawValue(1, 0) >= 25
  Program.Delay(10)
EndWhile
' 停車
Motor.Stop("BC", "True")
' 嗶一聲
Speaker.Tone(50, 1000, 100)
Speaker.Wait()
Step by step:
- Both wheels drive forward at power 30
- Wait until the distance is less than 25 (about 30 cm)
- Stop
- Beep
What you should see: The robot drives forward, stops about 30 cm from the obstacle and beeps.
FAQ:
- It stops too late or hits the wall? A faster robot needs more braking distance: lower 30 or raise 25.
- The number does not match a ruler? On EV3, 1 unit = 1.2 cm (for example 25 = 30 cm); 100 means nothing within 120 cm ahead.
Example 3: Obstacle avoider: back up and turn
What this example does: The robot keeps driving forward; when something is too close it backs up a little, spins a little, then carries on. Put it on the floor with some boxes and it finds its own way around.
What you need:
- EV3 brick + Education base robot (left wheel on B, right wheel on C)
- TOF2 dual-eye laser (EV3 edition)
- A box or wall as an obstacle
How to connect: TOF2 dual-eye laser in port 1, mounted at the front with the lasers facing straight ahead, about 5 cm above the ground.
Download the program (pick your software):
clev3r code
' ============================================================
' TOF2 雙眼雷射測距感應器 EV3 新手範例 03:避障車:看到東西就後退轉彎
' 軟體:clev3r
' 接法:TOF2 雙眼雷射插 1 號孔;左輪馬達接 B、右輪馬達接 C
' 這個範例會做什麼:車子一直往前開,前面太近就後退一點、原地轉一下,再繼續往前。放在有箱子的地上,它會自己繞開。
' 讀值:dist=左右兩眼的平均距離(0 ~ 100(1 格=1.2 公分,100=前面沒東西))
' ============================================================
folder "prjs" "MBC_tof2_ex03"

' TOF2 雙眼雷射插 1 號孔,使用模式 0
Sensor.SetMode(1, 0)
LCD.Clear()

' 一直重複
While "True"
  ' 如果前面距離小於 25(約 30 公分)
  If Sensor.ReadRawValue(1, 0) < 25 Then
    ' 先後退
    Motor.StartPower("B", -30)
    Motor.StartPower("C", -30)
    ' 退 0.5 秒
    Program.Delay(500)
    ' 左輪往前、右輪往後:原地向右轉
    Motor.StartPower("B", 30)
    Motor.StartPower("C", -30)
    ' 轉 0.5 秒
    Program.Delay(500)
  Else
    ' 前面沒東西:往前開
    Motor.StartPower("B", 30)
    Motor.StartPower("C", 30)
  EndIf
EndWhile
Step by step:
- Repeat forever
- If the distance ahead is less than 25 (about 30 cm)
- Back up first
- Back up for 0.5 s
- Left wheel forward, right wheel backward: spin right on the spot
- Turn for 0.5 s
- Otherwise:
- Nothing ahead: drive forward
- If the distance ahead is less than 25 (about 30 cm)
What you should see: The robot backs up and turns right when it meets an obstacle, then keeps going.
FAQ:
- It does not turn enough and keeps hitting the same box? Make the 0.5 s turn longer (for example 0.8).
- The number does not match a ruler? On EV3, 1 unit = 1.2 cm (for example 25 = 30 cm); 100 means nothing within 120 cm ahead.
Example 4: Follow the leader: keep a fixed distance
What this example does: Hold a book in front of the robot: move it forward and the robot follows, push it back and the robot reverses, always keeping about 30 cm. This is proportional control: "correct by as much as the error".
What you need:
- EV3 brick + Education base robot (left wheel on B, right wheel on C)
- TOF2 dual-eye laser (EV3 edition)
- A book or a board
How to connect: TOF2 dual-eye laser in port 1, mounted at the front with the lasers facing straight ahead, about 5 cm above the ground.
Download the program (pick your software):
clev3r code
' ============================================================
' TOF2 雙眼雷射測距感應器 EV3 新手範例 04:跟車:保持固定距離
' 軟體:clev3r
' 接法:TOF2 雙眼雷射插 1 號孔;左輪馬達接 B、右輪馬達接 C
' 這個範例會做什麼:拿一本書放在車子前面,往前移車子就跟上、往後推車子就退後,一直保持約 30 公分。用的是「差多少就補多少」的比例控制。
' 讀值:dist=左右兩眼的平均距離(0 ~ 100(1 格=1.2 公分,100=前面沒東西))
' ============================================================
folder "prjs" "MBC_tof2_ex04"

' TOF2 雙眼雷射插 1 號孔,使用模式 0
Sensor.SetMode(1, 0)
LCD.Clear()

' 一直重複
While "True"
  ' 馬達力量 power =(距離 − 25)× 2:太遠是正數往前、太近是負數往後
  power = (Sensor.ReadRawValue(1, 0) - 25) * 2
  ' 如果 power 大於 50
  If power > 50 Then
    ' 最快只用 50,比較安全
    power = 50
  EndIf
  ' 兩輪用 power 一起前進或後退
  Motor.StartPower("B", power)
  Motor.StartPower("C", power)
EndWhile
Step by step:
- Repeat forever
- Motor power = (distance − 25) × 2: too far is positive (forward), too close is negative (backward)
- If power is greater than 50
- Limit it to 50 to be safe
- Both wheels drive forward or backward with power
What you should see: Book forward, robot follows; book back, robot reverses; book still, robot stops at about 30 cm. With nothing ahead the robot drives forward at power 50.
FAQ:
- The robot shakes back and forth around the target? Lower × 2 (for example × 1).
- The number does not match a ruler? On EV3, 1 unit = 1.2 cm (for example 25 = 30 cm); 100 means nothing within 120 cm ahead.
Example 5: Left eye, right eye: dodge obstacles on both sides
What this example does: The dual-eye laser reads the left and right eyes separately. Too close on the left means swerve right, too close on the right means swerve left, nothing means go straight.
What you need:
- EV3 brick + Education base robot (left wheel on B, right wheel on C)
- TOF2 dual-eye laser (EV3 edition)
- A box or wall as an obstacle
How to connect: TOF2 dual-eye laser in port 1, mounted at the front with the lasers facing straight ahead, about 5 cm above the ground. Left and right are as seen from behind the sensor, looking the way it faces (left = J5, right = J3).
Download the program (pick your software):
clev3r code
' ============================================================
' TOF2 雙眼雷射測距感應器 EV3 新手範例 05:左眼右眼:閃開兩邊的障礙物
' 軟體:clev3r
' 接法:TOF2 雙眼雷射插 1 號孔;左輪馬達接 B、右輪馬達接 C
' 這個範例會做什麼:雙眼雷射可以分別讀左眼和右眼。左邊太近就往右閃,右邊太近就往左閃,都沒東西就直走。
' 讀值:left=左眼距離(0 ~ 100(1 格=1.2 公分));right=右眼距離(0 ~ 100(1 格=1.2 公分))
' ============================================================
folder "prjs" "MBC_tof2_ex05"

' TOF2 雙眼雷射插 1 號孔,使用模式 1
Sensor.SetMode(1, 1)
LCD.Clear()

' 一直重複
While "True"
  ' 螢幕第 1 行顯示左眼距離
  LCD.Text(1, 0, 0, 1, "LEFT " + Sensor.ReadRawValue(1, 0) + "      ")
  ' 螢幕第 2 行顯示右眼距離
  LCD.Text(1, 0, 16, 1, "RIGHT " + Sensor.ReadRawValue(1, 1) + "      ")
  ' 如果左眼距離小於 25
  If Sensor.ReadRawValue(1, 0) < 25 Then
    ' 左邊太近:左輪轉、右輪停,車子往右閃
    Motor.StartPower("B", 30)
    Motor.StartPower("C", 0)
  ' 否則,如果右眼距離小於 25
  ElseIf Sensor.ReadRawValue(1, 1) < 25 Then
    ' 右邊太近:往左閃
    Motor.StartPower("B", 0)
    Motor.StartPower("C", 30)
  Else
    ' 兩邊都沒東西:直走
    Motor.StartPower("B", 30)
    Motor.StartPower("C", 30)
  EndIf
EndWhile
Step by step:
- Repeat forever
- Screen row 1 shows the left eye distance
- Screen row 2 shows the right eye distance
- If the left eye distance is less than 25
- Too close on the left: left wheel runs, right wheel stops, the robot swerves right
- Otherwise:
- Otherwise, if the right eye distance is less than 25
- Too close on the right: swerve left
- Otherwise:
- Nothing on either side: go straight
- Otherwise, if the right eye distance is less than 25
What you should see: Cover the left eye with your hand and the robot turns right; cover the right eye and it turns left; cover nothing and it goes straight.
FAQ:
- Left and right are swapped? Left and right are as seen from behind the robot, looking the same way as the sensor (left = J5, right = J3); facing the sensor, they are the other way round. If they are still swapped, the sensor may be mounted backwards (lasers facing back or upside down), or swap the numbers in the two tank steps.
- The number does not match a ruler? On EV3, 1 unit = 1.2 cm (for example 25 = 30 cm); 100 means nothing within 120 cm ahead.
Example 6: Stop precisely in millimetres: stop 20 cm before the wall
Pybricks v4 / EV3 MicroPython v2.0 / clev3r only (the EV3-G and Classroom blocks cannot read this mode)
What this example does: In mode 0 one unit is 1.2 cm, not precise enough to stop at "exactly 20 cm". Mode 5 gives the left and right eye in millimetres (1 unit = 1 mm): this example averages the two (the same as mode 3), drives forward showing millimetres and stops below 200 mm. It uses mode 5 because on the stock EV3 firmware switching to mode 3 sometimes fails, while mode 5 always switches.
What you need:
- EV3 brick + Education base robot (left wheel on B, right wheel on C)
- TOF2 dual-eye laser (EV3 edition, firmware v4.0 or later)
- A box or wall as an obstacle
How to connect: TOF2 dual-eye laser in port 1, mounted at the front with the lasers facing straight ahead, about 5 cm above the ground.
Download the program (pick your software):
(The code is the example; no screenshot needed.)
clev3r code
' ============================================================
' TOF2 雙眼雷射測距感應器 EV3 新手範例 06:用公釐精準停車:20 公分前停
' 軟體:clev3r
' 接法:TOF2 雙眼雷射插 1 號孔;左輪馬達接 B、右輪馬達接 C
' 這個範例會做什麼:模式 0 的距離 1 格=1.2 公分,比賽要停在「剛好 20 公分」不夠準。模式 5 直接給左右兩眼的公釐(1 格=1 公釐),這個範例把兩眼平均(跟模式 3 一樣),一邊往前開一邊顯示公釐,小於 200 公釐就停。用模式 5 是因為 EV3 原廠韌體切到模式 3 偶爾切不過去,模式 5 每次都切得過去。
' 讀值:leftMm=左眼距離(公釐)(0 ~ 1200 mm);rightMm=右眼距離(公釐)(0 ~ 1200 mm)
' ============================================================
folder "prjs" "MBC_tof2_ex06"

' TOF2 雙眼雷射插 1 號孔,使用模式 5
Sensor.SetMode(1, 5)
LCD.Clear()

' 清除螢幕
LCD.Clear()
' 兩輪用 30 的力量往前開
Motor.StartPower("B", 30)
Motor.StartPower("C", 30)
' mm = 左右兩眼公釐的平均(跟模式 3 一樣)
mm = (Sensor.ReadRawValue(1, 0) + Sensor.ReadRawValue(1, 1)) / 2
' 一直往前,直到距離小於 200 公釐(20 公分)
While mm >= 200
  ' 第 1 行顯示目前距離(公釐)
  LCD.Text(1, 0, 0, 1, "MM " + mm + "      ")
  ' 再讀一次左右兩眼,重新算平均
  mm = (Sensor.ReadRawValue(1, 0) + Sensor.ReadRawValue(1, 1)) / 2
EndWhile
' 停車
Motor.Stop("BC", "True")
' 嗶一聲
Speaker.Tone(50, 1000, 100)
Speaker.Wait()
' 停下來後再讀一次
mm = (Sensor.ReadRawValue(1, 0) + Sensor.ReadRawValue(1, 1)) / 2
' 停下來後再顯示一次距離,看停得準不準
LCD.Text(1, 0, 0, 1, "MM " + mm + "      ")
Step by step:
- Clear the screen
- Both wheels drive forward at power 30
- mm = average of the left and right eye in mm (the same as mode 3)
- Keep driving until the distance is less than 200 mm (20 cm)
- Row 1 shows the current distance (mm)
- Read both eyes again and recompute the average
- Stop
- Beep
- Read once more after stopping
- Show the distance once more after stopping to check the accuracy
What you should see: The robot drives forward with the millimetre value falling, stops about 20 cm before the obstacle and beeps; the number shown after stopping should be close to 200.
FAQ:
- The number after stopping is much lower than 200? A faster robot needs more braking distance: lower 30 or raise 200 (for example 230).
- The number stays at 0 or never changes? This mode needs sensor firmware v4.0 (2026-10) or later; update older firmware first.
- Why is there no EV3-G / Classroom version? This example uses a new mode (firmware v4, 2026-10). The EV3-G and Classroom infrared blocks cannot read it; only Pybricks, EV3 MicroPython and clev3r can.
Still stuck? Leave a message on Contact us with the software you use and a screenshot of your program, and we will help.
More questions
- The EV3 shows an infrared sensor? Expected: the sensor emulates a LEGO sensor so the stock blocks can read it.
- A short freeze when switching modes? The EV3 needs about 1 s per mode change. Stick to one mode during a run.
Still stuck? Contact us with your software and a screenshot of the program.
Downloads
Sources
- Host and software list:
_build/guides.json - Values and commands:
_build/protocol/tof2.json(single source of truth) - Setup:
_build/guides/software/ev3-clev3r.en.md、_build/guides/product/tof2/ev3-clev3r.en.md - Examples:
sensors/tof2/ev3-examples.md