
Controller 2.4G (PS2) × EV3 × clev3r
Interactive tutorialEV3
First time? Try the interactive tutorial in your browser first, then follow the steps below with your hub.
This page covers clev3r (EV3 BASIC) only: how to set it up for the Controller 2.4G (PS2) on MINDSTORMS EV3, how to read every value, the commands it supports and examples. Use the switcher above to change product, host or software.
Setup
What you need
- Sensor: Controller 2.4G (PS2) (EV3 edition, RJ12 plug).
- Brick: LEGO MINDSTORMS EV3.
- Software: clev3r (a BASIC programming environment for the EV3, also called EV3 Basic). The version tested for this site is v1.7.1.0. Pick this if you already use clev3r.
Install the software
- Install clev3r (v1.7.1.0 recommended).
- To open an example: open the
.bpfile in clev3r → "Compile and download" → run it from the folder starting withMBC_in the EV3 file browser.
Make the software see the sensor
No extension needed. On the EV3 the sensor emulates an original LEGO sensor (most products are an "Infrared Sensor"), with exactly the same modes as the official EV3 software: Proximity / Beacon / Remote, with the same ranges.
- Read them with BASIC commands such as
IR_PROXIMITY/IR_BEACON/IR_REMOTE. See the readings below. - clev3r can also read modes that EV3-G and Classroom cannot, so examples marked "Pybricks / EV3 MicroPython / clev3r only" run here too.
- Some products come with MBC subroutines. They are already inside the example files.
Important
Do not switch modes in the middle of a program. Every time the EV3 switches a sensor mode it stalls (about 1 s). Pick one mode at the start and use it for the whole run.
Wiring
- Plug the sensor into EV3 port 1 with the cable (any of 1~4 works; use the same port in the program).
- Turn the EV3 on first, then plug in the sensor.
- Latch up, push the plug in gently.
Connect the gamepad to the receiver
The PS2 2.4G gamepad and its receiver are paired at the factory; no pairing button needed.
- Connect the receiver and turn the controller on.
- Switch the gamepad on; it connects by itself.
- Watch the green LED on the receiver: on = no gamepad yet; off = gamepad connected.
- The ANALOG (or MODE) light on the gamepad must be on for the sticks to give values. The receiver switches to this mode on connect; if the light is off, press the ANALOG button in the middle of the gamepad.
Caution
2.4 GHz is a shared band (Wi-Fi, microwave ovens). With 12 or more sets in use at one venue they may interfere; in that case use the Bluetooth version (PS4 / PS5).
Tip
How to use the Controller PS2 with EV3, the SPIKE App and Pybricks blocks is also summarised in the command guide (PDF).
First test
- Open the
.bpof example 1 on this page and press "Compile and download". - Run it from the folder starting with
MBC_in the EV3 file browser. - If the number on the EV3 screen changes with what is in front of the sensor, everything is connected.
FAQ
- Cannot find the program on the EV3? Look in the EV3 file browser for the folder starting with
MBC_. - The number never changes? Unplug the sensor and plug it back in (the EV3 must be on first).
- The program hiccups now and then? It switches sensor modes. Use one mode only.
Reading values
Code assumes port 1: Sensor.SetMode picks the mode, Sensor.ReadRawValue reads the n-th value.
d-pad dpad
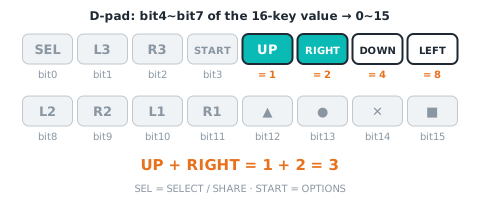
| Range | Meaning |
|---|---|
0~15 bit |
Up 1, Right 2, Down 4, Left 8 (added when pressed together), 0~15; 0 when not connected |
' clev3r (BASIC)
Sensor.SetMode(1, 0)
dpad = Sensor.ReadRawValue(1, 0)
Sensor.SetMode(1, 1)
dpad = Sensor.ReadRawValue(1, 0)
Sensor.SetMode(1, 3)
w = Sensor.ReadRawValue(1, 0)
dpad = Math.Remainder(w, 16)   ' bits 0~3
Sensor.SetMode(1, 4)
dpad = Sensor.ReadRawValue(1, 0)
mode 0 · int8 · IR-PROX = 方向鍵(.ino:130-132); mode 1 · int8 · IR-SEEK [方向, LX, 形狀, LY, 肩, RX, 功能, RY](按鍵與搖桿交錯); mode 3 · int16 · #67 改:IR-REM-A 1×int16 = 方向 | 形狀<<4 | 已連線<<8(bit0-3 = 方向); mode 4 · int8 · IR-S-ALT [方向, LX, 形狀, LY] (locked mode: firmware and hosts will not change it)
shape buttons shape
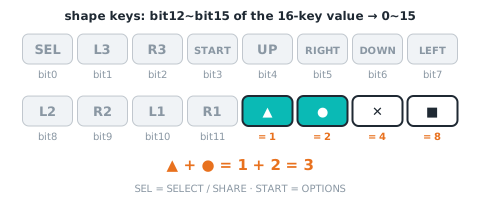
| Range | Meaning |
|---|---|
0~15 bit |
Triangle 1, Circle 2, Cross 4, Square 8 (added when pressed together), 0~15; 0 when not connected; high nibble of 0x22 'R' |
' clev3r (BASIC)
Sensor.SetMode(1, 1)
shape = Sensor.ReadRawValue(1, 2)
Sensor.SetMode(1, 3)
w = Sensor.ReadRawValue(1, 0)
shape = Math.Remainder(Math.Floor(w / 16), 16)   ' bits 4~7
Sensor.SetMode(1, 4)
shape = Sensor.ReadRawValue(1, 2)
mode 1 · int8; mode 3 · int16 · #67 改:bit4-7 = 形狀(同一個 int16); mode 4 · int8 (locked mode: firmware and hosts will not change it)
shoulder buttons shoulder
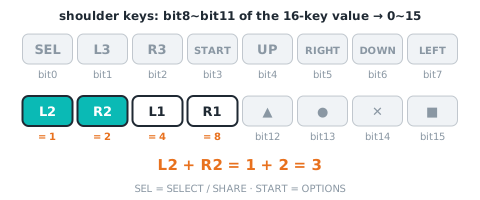
| Range | Meaning |
|---|---|
0~15 bit |
L2 1, R2 2, L1 4, R1 8 (added when pressed together), 0~15; 0 when not connected |
' clev3r (BASIC)
Sensor.SetMode(1, 1)
shoulder = Sensor.ReadRawValue(1, 4)
mode 1 · int8 (locked mode: firmware and hosts will not change it)
function buttons func
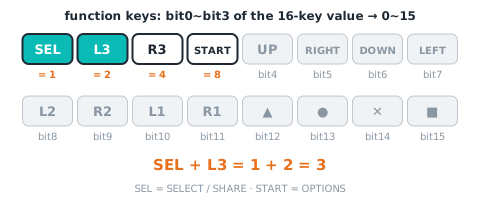
| Range | Meaning |
|---|---|
0~15 bit |
SELECT 1, L3 2, R3 4, START 8 (added when pressed together), 0~15; 0 when not connected; high nibble of 0x22 'G' |
' clev3r (BASIC)
Sensor.SetMode(1, 1)
func = Sensor.ReadRawValue(1, 6)
mode 1 · int8 (locked mode: firmware and hosts will not change it)
connected connected
| Range | Meaning |
|---|---|
0~1 |
1 = gamepad connected (psx.read() succeeds), 0 = not; while disconnected all buttons read 0 and sticks are centred |
' clev3r (BASIC)
Sensor.SetMode(1, 3)
w = Sensor.ReadRawValue(1, 0)
connected = Math.Remainder(Math.Floor(w / 256), 2)   ' bit 8
mode 3 · int16 · #67 改:bit8 = 已連線(+256)
stick LX / LY / RX / RY stick
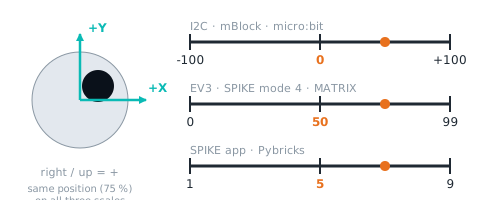
| Range | Meaning |
|---|---|
-100~+100 (EV3 mode 1, mode 2, mode 4 give a scaled value: 0~99 (50 = centre)) |
10 LX, 11 LY, 12 RX, 13 RY: −100 to +100, 0 = centre, right / up positive (raw 0 |
' clev3r (BASIC)
Sensor.SetMode(1, 1)
stick1 = Sensor.ReadRawValue(1, 1)   ' first; the N-th is at index 1 + 2×(N − 1) (1, 3, 5, 7)
Sensor.SetMode(1, 2)
stick1 = Sensor.ReadRawValue(1, 0)   ' first; for the N-th use 0 + N - 1
Sensor.SetMode(1, 4)
stick1 = Sensor.ReadRawValue(1, 1)   ' first; the N-th is at index 1 + 2×(N − 1) (1, 3)
mode 1 · int8 · 交錯:index 1 = LX、3 = LY、5 = RX、7 = RY(偶數 index 是按鍵); mode 2 · int8 · IR-REMOTE [LX, LY, RX, RY](描述表宣告 0~10,實送 0~99); mode 4 · int8 · index 1 = LX、3 = LY(只到左搖桿) (locked mode: firmware and hosts will not change it)
Not readable here:16 buttons, battery, L2 analog, R2 analog, system keys, gamepad type. Use Arduino / mBlock / micro:bit for these.
Commands
The EV3 port is read-only, so this software cannot send commands: calibrate with the button on the sensor and change settings over Arduino I2C, mBlock or micro:bit.
Examples
Example 1: Button tester: see the number of every button
What this example does: Mode 1 sends 8 numbers at once: 4 button groups and 4 stick values. This example shows them all on the screen; press and push everything and you will know each value.
What you need:
- Controller PS2 2.4G receiver (EV3 edition) + gamepad
- EV3 brick
How to connect: 2.4G receiver in port 1. Turn the PS2 gamepad on; a steady light on the receiver means it is paired.
Download the program (pick your software):
clev3r code
' ============================================================
' 掌控者 PS2 2.4G 遙控接收器 EV3 新手範例 01:按鍵測試器:看看每個按鍵的數字
' 軟體:clev3r
' 接法:掌控者 PS2插 1 號孔;左輪馬達接 B、右輪馬達接 C
' 這個範例會做什麼:模式 1 一次送出 8 個數字:4 組按鍵和 4 個搖桿值。這個範例把它們全部顯示在螢幕上,按按看、推推看,就知道每個按鍵是多少。
' 讀值:dpad1=方向鍵(上 1、右 2、下 4、左 8)(0 ~ 15);shape=形狀鍵(▲1、●2、✕4、■8)(0 ~ 15);shoulder=肩鍵(L2 1、R2 2、L1 4、R1 8)(0 ~ 15);func=功能鍵(SELECT 1、L3 2、R3 4、START 8)(0 ~ 15);lx=左搖桿左右(0 ~ 99,50=中間,往右變大);ly=左搖桿上下(0 ~ 99,50=中間,往上變大);rx=右搖桿左右(0 ~ 99,50=中間,往右變大);ry=右搖桿上下(0 ~ 99,50=中間,往上變大)
' ============================================================
folder "prjs" "MBC_ps2_ex01"

' 掌控者 PS2插 1 號孔,使用模式 1
Sensor.SetMode(1, 1)
LCD.Clear()

' 清除螢幕
LCD.Clear()
' 一直重複
While "True"
  ' 方向鍵:上 1、右 2、下 4、左 8
  LCD.Text(1, 0, 0, 1, "DPAD " + Sensor.ReadRawValue(1, 0) + "      ")
  ' 形狀鍵:▲1、●2、✕4、■8
  LCD.Text(1, 0, 16, 1, "SHAPE " + Sensor.ReadRawValue(1, 2) + "      ")
  ' 肩鍵:L2 1、R2 2、L1 4、R1 8
  LCD.Text(1, 0, 32, 1, "SHLD " + Sensor.ReadRawValue(1, 4) + "      ")
  ' 功能鍵:SELECT 1、L3 2、R3 4、START 8
  LCD.Text(1, 0, 48, 1, "FUNC " + Sensor.ReadRawValue(1, 6) + "      ")
  ' 左搖桿左右(50=中間)
  LCD.Text(1, 0, 64, 1, "LX " + Sensor.ReadRawValue(1, 1) + "      ")
  ' 左搖桿上下(50=中間)
  LCD.Text(1, 0, 80, 1, "LY " + Sensor.ReadRawValue(1, 3) + "      ")
  ' 右搖桿左右
  LCD.Text(1, 0, 96, 1, "RX " + Sensor.ReadRawValue(1, 5) + "      ")
  ' 右搖桿上下
  LCD.Text(1, 0, 112, 1, "RY " + Sensor.ReadRawValue(1, 7) + "      ")
  ' 等 0.1 秒
  Program.Delay(100)
EndWhile
Step by step:
- Clear the screen
- Repeat forever
- D-pad: up 1, right 2, down 4, left 8
- Shape buttons: ▲1, ●2, ✕4, ■8
- Shoulder buttons: L2 1, R2 2, L1 4, R1 8
- Function buttons: SELECT 1, L3 2, R3 4, START 8
- Left stick left/right (50 = centre)
- Left stick up/down (50 = centre)
- Right stick left/right
- Right stick up/down
- Wait 0.1 s
What you should see: With nothing pressed the buttons read 0 and the sticks 50. Pressing two buttons adds the numbers, for example up + right = 3.
FAQ:
- The buttons do nothing? Run example 1 first to see if the numbers change. If not, the gamepad is not connected: power-cycle the gamepad, or turn the EV3 on before plugging in the receiver.
- The robot keeps creeping after you release the stick? The stick centre is not always exactly 50: lower the × 2 in the program, or add a rule "treat 45~55 as 50".
Example 2: Drive with the D-pad
What this example does: Mode 0 reads only the D-pad: up = forward, down = backward, left/right = spin on the spot, release = stop.
What you need:
- EV3 brick + Education base robot (left wheel on B, right wheel on C)
- Controller PS2 2.4G receiver (EV3 edition) + gamepad
How to connect: 2.4G receiver in port 1. Turn the PS2 gamepad on; a steady light on the receiver means it is paired.
Download the program (pick your software):
clev3r code
' ============================================================
' 掌控者 PS2 2.4G 遙控接收器 EV3 新手範例 02:方向鍵開車
' 軟體:clev3r
' 接法:掌控者 PS2插 1 號孔;左輪馬達接 B、右輪馬達接 C
' 這個範例會做什麼:用模式 0 只讀方向鍵,上前進、下後退、左右原地轉,放開就停。
' 讀值:dpad=方向鍵(上 1、右 2、下 4、左 8,同時按會相加)(0 ~ 15)
' ============================================================
folder "prjs" "MBC_ps2_ex02"

' 掌控者 PS2插 1 號孔,使用模式 0
Sensor.SetMode(1, 0)
LCD.Clear()

' 一直重複
While "True"
  ' 如果方向鍵=1(上)
  If Sensor.ReadRawValue(1, 0) = 1 Then
    ' 按上:前進
    Motor.StartPower("B", 50)
    Motor.StartPower("C", 50)
  ' 否則,如果方向鍵=4(下)
  ElseIf Sensor.ReadRawValue(1, 0) = 4 Then
    ' 按下:後退
    Motor.StartPower("B", -50)
    Motor.StartPower("C", -50)
  ' 否則,如果方向鍵=8(左)
  ElseIf Sensor.ReadRawValue(1, 0) = 8 Then
    ' 按左:原地左轉
    Motor.StartPower("B", -30)
    Motor.StartPower("C", 30)
  ' 否則,如果方向鍵=2(右)
  ElseIf Sensor.ReadRawValue(1, 0) = 2 Then
    ' 按右:原地右轉
    Motor.StartPower("B", 30)
    Motor.StartPower("C", -30)
  Else
    ' 都沒按:停車
    Motor.Stop("BC", "True")
  EndIf
EndWhile
Step by step:
- Repeat forever
- If D-pad = 1 (up)
- Up pressed: forward
- Otherwise:
- Otherwise, if D-pad = 4 (down)
- Down pressed: backward
- Otherwise:
- Otherwise, if D-pad = 8 (left)
- Left pressed: spin left
- Otherwise:
- Otherwise, if D-pad = 2 (right)
- Right pressed: spin right
- Otherwise:
- Nothing pressed: stop
- Otherwise, if D-pad = 2 (right)
- Otherwise, if D-pad = 8 (left)
- Otherwise, if D-pad = 4 (down)
- If D-pad = 1 (up)
What you should see: Hold a D-pad button and the robot moves; release it and the robot stops.
FAQ:
- The buttons do nothing? Run example 1 first to see if the numbers change. If not, the gamepad is not connected: power-cycle the gamepad, or turn the EV3 on before plugging in the receiver.
- The robot keeps creeping after you release the stick? The stick centre is not always exactly 50: lower the × 2 in the program, or add a rule "treat 45~55 as 50".
Example 3: Left stick controls one motor speed
What this example does: A stick reads 099 with 50 in the middle. Subtract 50 and multiply by 2 to get the -100+100 a motor wants: push further to go faster, push down to reverse.
What you need:
- EV3 brick
- One large motor on B
- Controller PS2 2.4G receiver (EV3 edition) + gamepad
How to connect: 2.4G receiver in port 1. Turn the PS2 gamepad on; a steady light on the receiver means it is paired.
Download the program (pick your software):
clev3r code
' ============================================================
' 掌控者 PS2 2.4G 遙控接收器 EV3 新手範例 03:左搖桿控制一顆馬達的快慢
' 軟體:clev3r
' 接法:掌控者 PS2插 1 號孔;左輪馬達接 B、右輪馬達接 C
' 這個範例會做什麼:搖桿的數字是 0~99、中間 50。把它減 50 再乘 2,就變成馬達要的 -100~+100:推越多轉越快,往下推就倒轉。
' 讀值:ly=左搖桿上下(0 ~ 99,50=中間,往上變大)
' ============================================================
folder "prjs" "MBC_ps2_ex03"

' 掌控者 PS2插 1 號孔,使用模式 1
Sensor.SetMode(1, 1)
LCD.Clear()

' 一直重複
While "True"
  ' 力量 power =(左搖桿上下 − 50)× 2
  power = (Sensor.ReadRawValue(1, 3) - 50) * 2
  ' B 馬達用 power 的力量轉
  Motor.StartPower("B", power)
  ' 螢幕顯示現在的力量
  LCD.Text(1, 0, 0, 1, "POWER " + power + "      ")
EndWhile
Step by step:
- Repeat forever
- Power = (left stick up/down − 50) × 2
- Motor B runs with power
- Show the current power on screen
What you should see: Push the left stick up and motor B runs forward, faster the further you push; push down to reverse; release to stop, the screen shows about 0.
FAQ:
- The buttons do nothing? Run example 1 first to see if the numbers change. If not, the gamepad is not connected: power-cycle the gamepad, or turn the EV3 on before plugging in the receiver.
- The robot keeps creeping after you release the stick? The stick centre is not always exactly 50: lower the × 2 in the program, or add a rule "treat 45~55 as 50".
Example 4: Two-stick tank drive
What this example does: Left stick drives the left wheel, right stick drives the right wheel, like a tank: push both forward to go forward, one forward and one back to spin.
What you need:
- EV3 brick + Education base robot (left wheel on B, right wheel on C)
- Controller PS2 2.4G receiver (EV3 edition) + gamepad
How to connect: 2.4G receiver in port 1. Turn the PS2 gamepad on; a steady light on the receiver means it is paired.
Download the program (pick your software):
clev3r code
' ============================================================
' 掌控者 PS2 2.4G 遙控接收器 EV3 新手範例 04:雙搖桿坦克車
' 軟體:clev3r
' 接法:掌控者 PS2插 1 號孔;左輪馬達接 B、右輪馬達接 C
' 這個範例會做什麼:左搖桿管左輪、右搖桿管右輪,跟開坦克一樣:兩個都往前推就前進,一前一後就原地轉。
' 讀值:ly=左搖桿上下(0 ~ 99,50=中間,往上變大);ry=右搖桿上下(0 ~ 99,50=中間,往上變大)
' ============================================================
folder "prjs" "MBC_ps2_ex04"

' 掌控者 PS2插 1 號孔,使用模式 1
Sensor.SetMode(1, 1)
LCD.Clear()

' 一直重複
While "True"
  ' 左輪力量 =(左搖桿上下 − 50)× 2
  left = (Sensor.ReadRawValue(1, 3) - 50) * 2
  ' 右輪力量 =(右搖桿上下 − 50)× 2
  right = (Sensor.ReadRawValue(1, 7) - 50) * 2
  ' 兩輪各自用自己的力量轉
  Motor.StartPower("B", left)
  Motor.StartPower("C", right)
EndWhile
Step by step:
- Repeat forever
- Left wheel power = (left stick up/down − 50) × 2
- Right wheel power = (right stick up/down − 50) × 2
- Each wheel runs with its own power
What you should see: Push both sticks forward and the robot drives forward; left forward and right back and it spins right.
FAQ:
- The buttons do nothing? Run example 1 first to see if the numbers change. If not, the gamepad is not connected: power-cycle the gamepad, or turn the EV3 on before plugging in the receiver.
- The robot keeps creeping after you release the stick? The stick centre is not always exactly 50: lower the × 2 in the program, or add a rule "treat 45~55 as 50".
Example 5: ✕ to grab, ● to release: control a gripper
What this example does: Use the shape buttons to control a medium motor (gripper) on port A: ✕ closes, ● opens, nothing pressed stops.
What you need:
- EV3 brick
- Medium motor on A (built as a gripper)
- Controller PS2 2.4G receiver (EV3 edition) + gamepad
How to connect: 2.4G receiver in port 1. Turn the PS2 gamepad on; a steady light on the receiver means it is paired.
Download the program (pick your software):
clev3r code
' ============================================================
' 掌控者 PS2 2.4G 遙控接收器 EV3 新手範例 05:✕ 夾、● 放:控制夾爪
' 軟體:clev3r
' 接法:掌控者 PS2插 1 號孔;左輪馬達接 B、右輪馬達接 C
' 這個範例會做什麼:用形狀鍵控制接在 A 埠的中馬達(夾爪):按 ✕ 夾緊、按 ● 放開,都不按就停。
' 讀值:shape=形狀鍵(▲1、●2、✕4、■8)(0 ~ 15)
' ============================================================
folder "prjs" "MBC_ps2_ex05"

' 掌控者 PS2插 1 號孔,使用模式 1
Sensor.SetMode(1, 1)
LCD.Clear()

' 一直重複
While "True"
  ' 如果形狀鍵=4(✕)
  If Sensor.ReadRawValue(1, 2) = 4 Then
    ' 按 ✕:夾爪往夾緊的方向轉
    Motor.StartPower("A", 40)
  ' 否則,如果形狀鍵=2(●)
  ElseIf Sensor.ReadRawValue(1, 2) = 2 Then
    ' 按 ●:夾爪往放開的方向轉
    Motor.StartPower("A", -40)
  Else
    ' 都沒按:夾爪停住
    Motor.Stop("A", "True")
  EndIf
EndWhile
Step by step:
- Repeat forever
- If shape buttons = 4 (✕)
- ✕ pressed: gripper turns to close
- Otherwise:
- Otherwise, if shape buttons = 2 (●)
- ● pressed: gripper turns to open
- Otherwise:
- Nothing pressed: gripper stops
- Otherwise, if shape buttons = 2 (●)
- If shape buttons = 4 (✕)
What you should see: Hold ✕ and the gripper closes, hold ● and it opens, release and it stops.
FAQ:
- Close and open are swapped? Swap 40 and -40.
- The buttons do nothing? Run example 1 first to see if the numbers change. If not, the gamepad is not connected: power-cycle the gamepad, or turn the EV3 on before plugging in the receiver.
- The robot keeps creeping after you release the stick? The stick centre is not always exactly 50: lower the × 2 in the program, or add a rule "treat 45~55 as 50".
Example 6: Start only when the gamepad is connected
Pybricks v4 / EV3 MicroPython v2.0 / clev3r only (the EV3-G and Classroom blocks cannot read this mode)
What this example does: Before the gamepad connects, the sticks read centre and the buttons 0, so a program cannot tell "nothing pressed" from "not connected". The mode 3 value includes "connected": 256 or more means the gamepad is connected. This example waits for the connection, beeps and starts; then D-pad up (256 + 1) drives forward, down (256 + 4) backward, and it stops at once if the gamepad disconnects.
What you need:
- EV3 brick + Education base robot (left wheel on B, right wheel on C)
- Controller PS2 2.4G receiver (EV3 edition, firmware v4.0 or later) + gamepad
How to connect: 2.4G receiver in port 1. Leave the gamepad off until the program is running, so you can watch "waiting → connected".
Download the program (pick your software):
(The code is the example; no screenshot needed.)
clev3r code
' ============================================================
' 掌控者 PS2 2.4G 遙控接收器 EV3 新手範例 06:手把連上才出發
' 軟體:clev3r
' 接法:掌控者 PS2插 1 號孔;左輪馬達接 B、右輪馬達接 C
' 這個範例會做什麼:手把還沒連上時搖桿是中間、按鍵是 0,程式分不出「沒按」和「沒連上」。模式 3 的數字加了「已連線」:大於等於 256 就是手把連上了。這個範例等手把連上才嗶一聲出發,之後用方向鍵上(256+1)前進、下(256+4)後退,手把斷線就馬上停車。
' 讀值:status3=方向鍵+形狀鍵+連線狀態(0 ~ 511:方向鍵(0~15)+ 形狀鍵 × 16 + 已連線 × 256,大於等於 256=手把已連上)
' ============================================================
folder "prjs" "MBC_ps2_ex06"

' 掌控者 PS2插 1 號孔,使用模式 3
Sensor.SetMode(1, 3)
LCD.Clear()

' 清除螢幕
LCD.Clear()
' 螢幕顯示 WAIT PAD:等手把
LCD.Text(1, 0, 0, 1, "WAIT PAD      ")
' 等到狀態值大於等於 256(手把已連上)
While Sensor.ReadRawValue(1, 0) < 256
  Program.Delay(10)
EndWhile
' 連上了:嗶一聲
Speaker.Tone(50, 1000, 100)
Speaker.Wait()
' 一直重複
While "True"
  ' 第 2 行顯示狀態值
  LCD.Text(1, 0, 16, 1, "STATUS " + Sensor.ReadRawValue(1, 0) + "      ")
  ' 如果狀態值小於 256(手把斷線了)
  If Sensor.ReadRawValue(1, 0) < 256 Then
    ' 手把斷線:馬上停車
    Motor.Stop("BC", "True")
    ' 螢幕顯示 PAD LOST
    LCD.Text(1, 0, 0, 1, "PAD LOST      ")
  Else
    ' 螢幕顯示 PAD OK
    LCD.Text(1, 0, 0, 1, "PAD OK      ")
    ' 如果狀態值=257(已連上+方向鍵上)
    If Sensor.ReadRawValue(1, 0) = 257 Then
      ' 已連上+方向鍵上(256+1):前進
      Motor.StartPower("B", 40)
      Motor.StartPower("C", 40)
    ' 否則,如果狀態值=260(已連上+方向鍵下)
    ElseIf Sensor.ReadRawValue(1, 0) = 260 Then
      ' 已連上+方向鍵下(256+4):後退
      Motor.StartPower("B", -40)
      Motor.StartPower("C", -40)
    Else
      ' 連上但沒按:停車
      Motor.Stop("BC", "True")
    EndIf
  EndIf
EndWhile
Step by step:
- Clear the screen
- Show WAIT PAD: waiting for the gamepad
- Wait until the status value is 256 or more (gamepad connected)
- Connected: beep
- Repeat forever
- Row 2 shows the status value
- If the status value is less than 256 (gamepad disconnected)
- Gamepad lost: stop at once
- Show PAD LOST
- Otherwise:
- Show PAD OK
- If the status value = 257 (connected + D-pad up)
- Connected + D-pad up (256 + 1): forward
- Otherwise:
- Otherwise, if the status value = 260 (connected + D-pad down)
- Connected + D-pad down (256 + 4): backward
- Otherwise:
- Connected but nothing pressed: stop
- Otherwise, if the status value = 260 (connected + D-pad down)
What you should see: The program first shows WAIT PAD with a value below 256; turn the gamepad on and the EV3 beeps, shows PAD OK and the value becomes 256. Hold D-pad up to drive forward (257), down to reverse (260); switch the gamepad off and the robot stops at once and shows PAD LOST.
FAQ:
- Pressing up does not give 257? A shape button pressed at the same time adds more (shape × 16), for example up + ✕ = 256 + 1 + 64 = 321. Release the other buttons first.
- The buttons do nothing? Run example 1 first to see if the numbers change. If not, the gamepad is not connected: power-cycle the gamepad, or turn the EV3 on before plugging in the receiver.
- The number stays at 0 or never changes? This mode needs sensor firmware v4.0 (2026-10) or later; update older firmware first.
- Why is there no EV3-G / Classroom version? This example uses a new mode (firmware v4, 2026-10). The EV3-G and Classroom infrared blocks cannot read it; only Pybricks, EV3 MicroPython and clev3r can.
Still stuck? Leave a message on Contact us with the software you use and a screenshot of your program, and we will help.
More questions
- The EV3 shows an infrared sensor? Expected: the sensor emulates a LEGO sensor so the stock blocks can read it.
- A short freeze when switching modes? The EV3 needs about 1 s per mode change. Stick to one mode during a run.
Still stuck? Contact us with your software and a screenshot of the program.
Downloads
Sources
- Host and software list:
_build/guides.json - Values and commands:
_build/protocol/ps2.json(single source of truth) - Setup:
_build/guides/software/ev3-clev3r.en.md、_build/guides/product/ps2/ev3-clev3r.en.md - Examples:
sensors/ps2/ev3-examples.md