
Ranger 8-Way (TOF8) × EV3 × clev3r
Interactive tutorialEV3
First time? Try the interactive tutorial in your browser first, then follow the steps below with your hub.
This page covers clev3r (EV3 BASIC) only: how to set it up for the Ranger 8-Way (TOF8) on MINDSTORMS EV3, how to read every value, the commands it supports and examples. Use the switcher above to change product, host or software.
Setup
What you need
- Sensor: Ranger 8-Way (TOF8) (EV3 edition, RJ12 plug).
- Brick: LEGO MINDSTORMS EV3.
- Software: clev3r (a BASIC programming environment for the EV3, also called EV3 Basic). The version tested for this site is v1.7.1.0. Pick this if you already use clev3r.
Install the software
- Install clev3r (v1.7.1.0 recommended).
- To open an example: open the
.bpfile in clev3r → "Compile and download" → run it from the folder starting withMBC_in the EV3 file browser.
Make the software see the sensor
No extension needed. On the EV3 the sensor emulates an original LEGO sensor (most products are an "Infrared Sensor"), with exactly the same modes as the official EV3 software: Proximity / Beacon / Remote, with the same ranges.
- Read them with BASIC commands such as
IR_PROXIMITY/IR_BEACON/IR_REMOTE. See the readings below. - clev3r can also read modes that EV3-G and Classroom cannot, so examples marked "Pybricks / EV3 MicroPython / clev3r only" run here too.
- Some products come with MBC subroutines. They are already inside the example files.
Important
Do not switch modes in the middle of a program. Every time the EV3 switches a sensor mode it stalls (about 1 s). Pick one mode at the start and use it for the whole run.
Wiring
- Plug the sensor into EV3 port 1 with the cable (any of 1~4 works; use the same port in the program).
- Turn the EV3 on first, then plug in the sensor.
- Latch up, push the plug in gently.
Wait 2~4 seconds after power-on
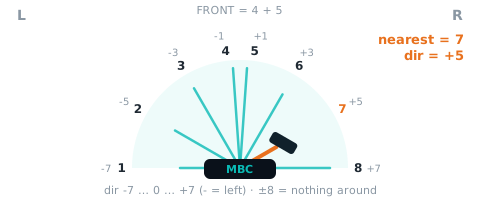
The Ranger 8-Way needs no calibration; plug it in and go. After power-on, wait 2~4 seconds for the 8 lasers to get ready; meanwhile everything reads 120 (cm). Start your program with a short wait before reading distances.
| Channel | 1 | 2 | 3 | 4 | 5 | 6 | 7 | 8 |
|---|---|---|---|---|---|---|---|---|
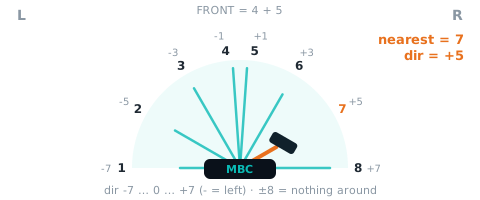
| Facing | left | left-front 60° | left-front 30° | front | front | right-front 30° | right-front 60° | right |
The table assumes the sensor faces forward with the components up. Put your hand on the robot's left: example 1 should show a negative direction. If it shows a positive one, the sensor is mounted the other way, and "turn left" / "turn right" in the examples must be swapped too.
First test
- Open the
.bpof example 1 on this page and press "Compile and download". - Run it from the folder starting with
MBC_in the EV3 file browser. - If the number on the EV3 screen changes with what is in front of the sensor, everything is connected.
FAQ
- Cannot find the program on the EV3? Look in the EV3 file browser for the folder starting with
MBC_. - The number never changes? Unplug the sensor and plug it back in (the EV3 must be on first).
- The program hiccups now and then? It switches sensor modes. Use one mode only.
Reading values
Code assumes port 1: Sensor.SetMode picks the mode, Sensor.ReadRawValue reads the n-th value.
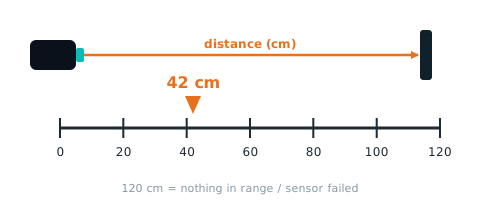
nearest distance (cm) nearCm
| Range | Meaning |
|---|---|
0~120 cm (EV3 mode 2 gives a scaled value: cm×100/120 (0~100)) |
smallest of the 8 distances, 0~120 cm (a failed sensor counts as 120); 120 = nothing around |
' clev3r (BASIC)
Sensor.SetMode(1, 2)
nearCm = Sensor.ReadRawValue(1, 1)
mode 2 · int8 · IR-REMOTE [最近方向−8, 最近', 最空曠方向−8, 最空曠'](INO:154-159) (locked mode: firmware and hosts will not change it)
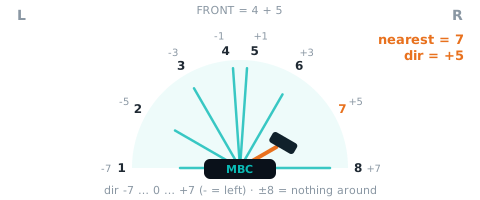
nearest direction nearDir
| Range | Meaning |
|---|---|
-8~+8 |
direction of the nearest object: −7 (left) to +7 (right), 0 = straight ahead, negative = left; ±8 = nothing around (keeps the last side) |
' clev3r (BASIC)
Sensor.SetMode(1, 2)
nearDir = Sensor.ReadRawValue(1, 0)
Sensor.SetMode(1, 5)
nearDir = Sensor.ReadRawValue(1, 1)
mode 2 · int8 · int8 二補數(方位−8); mode 5 · int16 · #67 新:IR-CAL 2×int16 = [最近 mm, 最近方向 −8~+8](原本 = 前 4 顆兩兩合併) (locked mode: firmware and hosts will not change it)
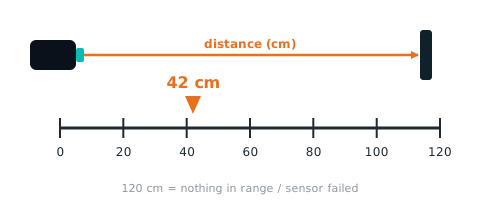
farthest distance (cm) farCm
| Range | Meaning |
|---|---|
0~120 cm (EV3 mode 2 gives a scaled value: cm×100/120 (0~100)) |
largest of the 8 distances, 0~120 cm (a failed sensor always reads 120 and looks 'farthest') |
' clev3r (BASIC)
Sensor.SetMode(1, 2)
farCm = Sensor.ReadRawValue(1, 3)
mode 2 · int8 (locked mode: firmware and hosts will not change it)
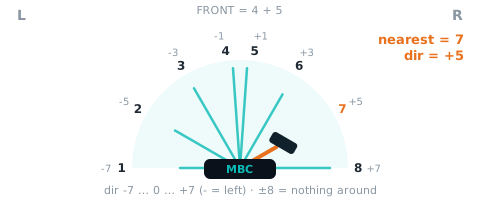
farthest direction farDir
| Range | Meaning |
|---|---|
-7~+7 |
direction of the most open side: −7 to +7, 0 = straight ahead, negative = left; 0 when all 8 read 120 |
' clev3r (BASIC)
Sensor.SetMode(1, 2)
farDir = Sensor.ReadRawValue(1, 2)
mode 2 · int8 · int8 二補數(方位−8) (locked mode: firmware and hosts will not change it)
front distance (cm) frontCm
| Range | Meaning |
|---|---|
0~120 cm (EV3 mode 0 gives a scaled value: cm×100/120 (0~100)) |
average of sensors 4 and 5 (both facing forward), 0~120 cm; EV3 mode 3 and SPIKE mode 6 carry the same thing in mm; 0x22 'C' is min(4, 5), not the average (see 10) |
' clev3r (BASIC)
Sensor.SetMode(1, 0)
frontCm = Sensor.ReadRawValue(1, 0)
mode 0 · int8 · IR-PROX = (第 4'+第 5')>>1(鎖住,INO:148-150) (locked mode: firmware and hosts will not change it)
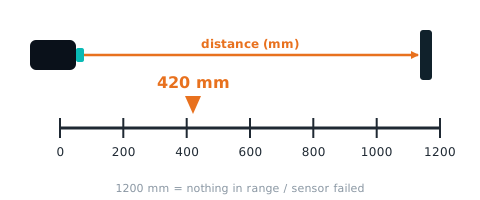
nearest distance (mm) nearMm
| Range | Meaning |
|---|---|
0~1200 mm |
smallest of the 8 mm readings, 0~1200 (failed sensor counts as 1200); 1200 = nothing around |
' clev3r (BASIC)
Sensor.SetMode(1, 5)
nearMm = Sensor.ReadRawValue(1, 0)
mode 5 · int16 · #67 新:[最近 mm, 最近方向]
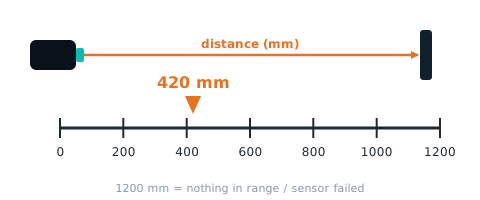
front distance (mm) frontMm
| Range | Meaning |
|---|---|
0~1200 mm (EV3 mode 3 gives a scaled value: mm (0~1200)) |
average of sensors 4 and 5 (the two facing forward), 0~1200 mm; 1200 = nothing ahead. cm version is 05 |
' clev3r (BASIC)
Sensor.SetMode(1, 3)
frontMm = Sensor.ReadRawValue(1, 0)
mode 3 · int16 · #67 新:IR-REM-A 1×int16 = 正前方(第 4、5 顆平均)mm(原本 = 第 1 顆 0~100)
sensor 1~8 distance (cm) distCm
| Range | Meaning |
|---|---|
0~120 cm (EV3 mode 1, mode 4 give a scaled value: cm×100/120 (0~100)) |
distance of each sensor 1 |
' clev3r (BASIC)
Sensor.SetMode(1, 1)
distCm1 = Sensor.ReadRawValue(1, 0)   ' first; for the N-th use 0 + N - 1
Sensor.SetMode(1, 4)
distCm1 = Sensor.ReadRawValue(1, 0)   ' first; for the N-th use 0 + N - 1
mode 1 · int8 · IR-SEEK 8×int8 = 第 1~8 顆(EV3 視為頻道 1~4 的〈方位,距離〉); mode 4 · int8 · IR-S-ALT = 前 4 顆 (locked mode: firmware and hosts will not change it)
Not readable here:init bitmap, fault bitmap, sensor 1~8 distance (mm). Use Arduino / mBlock / micro:bit for these.
Examples
Example 1: Measure the distance straight ahead
What this example does: Mode 0 of the eight-direction laser gives the average distance straight ahead (the middle two lasers): the simplest value to use.
What you need:
- TOF8 eight-direction laser (EV3 edition)
- EV3 brick
How to connect: TOF8 eight-direction laser in port 1.
Download the program (pick your software):
clev3r code
' ============================================================
' TOF8 八方位雷射測距感應器 EV3 新手範例 01:量量看正前方有多遠
' 軟體:clev3r
' 接法:TOF8 八方位雷射插 1 號孔;左輪馬達接 B、右輪馬達接 C
' 這個範例會做什麼:八方位雷射的模式 0 會給你正前方(中間兩顆)的平均距離,最簡單好用。
' 讀值:front=正前方(第 4、5 顆平均)距離(0 ~ 100(1 格=1.2 公分,100=前面沒東西))
' ============================================================
folder "prjs" "MBC_tof8_ex01"

' TOF8 八方位雷射插 1 號孔,使用模式 0
Sensor.SetMode(1, 0)
LCD.Clear()

' 清除螢幕
LCD.Clear()
' 一直重複
While "True"
  ' 第 1 行顯示正前方距離(0~100)
  LCD.Text(1, 0, 0, 1, "FRONT " + Sensor.ReadRawValue(1, 0) + "      ")
  ' 第 2 行換算成公分:× 1.2
  LCD.Text(1, 0, 16, 1, "CM " + Sensor.ReadRawValue(1, 0) * 1.2 + "      ")
  ' 等 0.1 秒
  Program.Delay(100)
EndWhile
Step by step:
- Clear the screen
- Repeat forever
- Row 1 shows the straight-ahead distance (0~100)
- Row 2 converts to centimetres: × 1.2
- Wait 0.1 s
What you should see: Move your hand in front and the number follows; with nothing ahead it reads 100.
FAQ:
- The number does not match a ruler? On EV3, 1 unit = 1.2 cm (for example 25 = 30 cm); 100 means nothing within 120 cm ahead.
- The number stays at 0 or never changes? Turn the EV3 on before plugging in the sensor, or unplug and plug it back in; make sure there is no protective film over the laser.
Example 2: Stop 30 cm before the wall
What this example does: The robot drives forward and stops when something is within 30 cm (value 25) straight ahead.
What you need:
- EV3 brick + Education base robot (left wheel on B, right wheel on C)
- TOF8 eight-direction laser (EV3 edition)
- A few boxes as obstacles
How to connect: TOF8 eight-direction laser in port 1, mounted at the front with lasers 4 and 5 facing straight ahead, about 5 cm above the ground.
Download the program (pick your software):
clev3r code
' ============================================================
' TOF8 八方位雷射測距感應器 EV3 新手範例 02:前方 30 公分停車
' 軟體:clev3r
' 接法:TOF8 八方位雷射插 1 號孔;左輪馬達接 B、右輪馬達接 C
' 這個範例會做什麼:車子往前開,正前方 30 公分(數字 25)以內有東西就停下來。
' 讀值:front=正前方(第 4、5 顆平均)距離(0 ~ 100(1 格=1.2 公分,100=前面沒東西))
' ============================================================
folder "prjs" "MBC_tof8_ex02"

' TOF8 八方位雷射插 1 號孔,使用模式 0
Sensor.SetMode(1, 0)
LCD.Clear()

' 兩輪往前開
Motor.StartPower("B", 30)
Motor.StartPower("C", 30)
' 等到正前方距離小於 25
While Sensor.ReadRawValue(1, 0) >= 25
  Program.Delay(10)
EndWhile
' 停車
Motor.Stop("BC", "True")
' 嗶一聲
Speaker.Tone(50, 1000, 100)
Speaker.Wait()
Step by step:
- Both wheels drive forward
- Wait until the straight-ahead distance is less than 25
- Stop
- Beep
What you should see: The robot stops about 30 cm from the obstacle and beeps.
FAQ:
- The number does not match a ruler? On EV3, 1 unit = 1.2 cm (for example 25 = 30 cm); 100 means nothing within 120 cm ahead.
Example 3: See all 8 directions at once
What this example does: Mode 1 sends the distance of each of the 8 lasers. This example shows all 8 numbers on the screen; wave your hand around and you will know which laser points where.
What you need:
- TOF8 eight-direction laser (EV3 edition)
- EV3 brick
How to connect: TOF8 eight-direction laser in port 1.
Download the program (pick your software):
clev3r code
' ============================================================
' TOF8 八方位雷射測距感應器 EV3 新手範例 03:一次看 8 個方向的距離
' 軟體:clev3r
' 接法:TOF8 八方位雷射插 1 號孔;左輪馬達接 B、右輪馬達接 C
' 這個範例會做什麼:模式 1 會一次送出 8 顆雷射各自的距離。這個範例把 8 個數字都顯示在螢幕上,拿手在四周晃一晃,就知道每顆雷射對應哪個方向。
' 讀值:d1=第 1 顆雷射的距離(0 ~ 100(1 格=1.2 公分));d2=第 2 顆雷射的距離(0 ~ 100(1 格=1.2 公分));d3=第 3 顆雷射的距離(0 ~ 100(1 格=1.2 公分));d4=第 4 顆雷射的距離(0 ~ 100(1 格=1.2 公分));d5=第 5 顆雷射的距離(0 ~ 100(1 格=1.2 公分));d6=第 6 顆雷射的距離(0 ~ 100(1 格=1.2 公分));d7=第 7 顆雷射的距離(0 ~ 100(1 格=1.2 公分));d8=第 8 顆雷射的距離(0 ~ 100(1 格=1.2 公分))
' ============================================================
folder "prjs" "MBC_tof8_ex03"

' TOF8 八方位雷射插 1 號孔,使用模式 1
Sensor.SetMode(1, 1)
LCD.Clear()

' 清除螢幕
LCD.Clear()
' 一直重複
While "True"
  ' 第 1 行顯示第 1 顆雷射的距離
  LCD.Text(1, 0, 0, 1, "D1 " + Sensor.ReadRawValue(1, 0) + "      ")
  ' 第 2 行顯示第 2 顆雷射的距離
  LCD.Text(1, 0, 16, 1, "D2 " + Sensor.ReadRawValue(1, 1) + "      ")
  ' 第 3 行顯示第 3 顆雷射的距離
  LCD.Text(1, 0, 32, 1, "D3 " + Sensor.ReadRawValue(1, 2) + "      ")
  ' 第 4 行顯示第 4 顆雷射的距離
  LCD.Text(1, 0, 48, 1, "D4 " + Sensor.ReadRawValue(1, 3) + "      ")
  ' 第 5 行顯示第 5 顆雷射的距離
  LCD.Text(1, 0, 64, 1, "D5 " + Sensor.ReadRawValue(1, 4) + "      ")
  ' 第 6 行顯示第 6 顆雷射的距離
  LCD.Text(1, 0, 80, 1, "D6 " + Sensor.ReadRawValue(1, 5) + "      ")
  ' 第 7 行顯示第 7 顆雷射的距離
  LCD.Text(1, 0, 96, 1, "D7 " + Sensor.ReadRawValue(1, 6) + "      ")
  ' 第 8 行顯示第 8 顆雷射的距離
  LCD.Text(1, 0, 112, 1, "D8 " + Sensor.ReadRawValue(1, 7) + "      ")
  ' 等 0.1 秒
  Program.Delay(100)
EndWhile
Step by step:
- Clear the screen
- Repeat forever
- Row 1 shows the distance of laser 1
- Row 2 shows the distance of laser 2
- Row 3 shows the distance of laser 3
- Row 4 shows the distance of laser 4
- Row 5 shows the distance of laser 5
- Row 6 shows the distance of laser 6
- Row 7 shows the distance of laser 7
- Row 8 shows the distance of laser 8
- Wait 0.1 s
What you should see: 8 rows of numbers, one per laser; bring your hand near a laser and that row gets smaller.
FAQ:
- The number does not match a ruler? On EV3, 1 unit = 1.2 cm (for example 25 = 30 cm); 100 means nothing within 120 cm ahead.
- Is laser 1 on the left or the right? Try it with your hand and write it down; you will need it when programming.
Example 4: Sumo chaser: turn towards the nearest object and charge
What this example does: Mode 2 tells you directly "where the nearest object is and how far", so you do not have to compare 8 numbers yourself. The robot turns towards the nearest object and charges; when it sees nothing it spins to search.
What you need:
- EV3 brick + Education base robot (left wheel on B, right wheel on C)
- TOF8 eight-direction laser (EV3 edition)
- A can as the opponent
How to connect: TOF8 eight-direction laser in port 1, mounted at the front with lasers 4 and 5 facing straight ahead, about 5 cm above the ground.
Download the program (pick your software):
clev3r code
' ============================================================
' TOF8 八方位雷射測距感應器 EV3 新手範例 04:相撲追擊:轉向最近的東西衝過去
' 軟體:clev3r
' 接法:TOF8 八方位雷射插 1 號孔;左輪馬達接 B、右輪馬達接 C
' 這個範例會做什麼:模式 2 會直接告訴你「最近的東西在哪個方向、有多遠」,不用自己比 8 個數字。車子轉向最近的東西衝過去,看不到東西時原地轉圈找。
' 讀值:nearDist=最近的東西有多遠(0 ~ 100);nearDir=最近的東西在哪個方向(-7 ~ +7(負=左、正=右、0 附近=正前方;±8=沒有東西))
' ============================================================
folder "prjs" "MBC_tof8_ex04"

' TOF8 八方位雷射插 1 號孔,使用模式 2
Sensor.SetMode(1, 2)
LCD.Clear()

' 一直重複
While "True"
  ' 如果最近的東西在 60 以內(約 72 公分)
  If Sensor.ReadRawValue(1, 1) < 60 Then
    ' 如果方向小於 -1(偏左)
    If Sensor.ReadRawValue(1, 0) < (-1) Then
      ' 東西在左邊:原地往左轉
      Motor.StartPower("B", -20)
      Motor.StartPower("C", 20)
    ' 否則,如果方向大於 1(偏右)
    ElseIf Sensor.ReadRawValue(1, 0) > 1 Then
      ' 東西在右邊:原地往右轉
      Motor.StartPower("B", 20)
      Motor.StartPower("C", -20)
    Else
      ' 東西在正前方:全力衝過去
      Motor.StartPower("B", 60)
      Motor.StartPower("C", 60)
    EndIf
  Else
    ' 附近沒東西:原地轉圈找對手
    Motor.StartPower("B", 25)
    Motor.StartPower("C", -25)
  EndIf
EndWhile
Step by step:
- Repeat forever
- If the nearest object is within 60 (about 72 cm)
- If the direction is less than -1 (to the left)
- Object on the left: spin left on the spot
- Otherwise:
- Otherwise, if the direction is greater than 1 (to the right)
- Object on the right: spin right on the spot
- Otherwise:
- Object straight ahead: charge at full power
- Otherwise, if the direction is greater than 1 (to the right)
- Otherwise:
- Nothing nearby: spin on the spot to look for the opponent
- If the direction is less than -1 (to the left)
- If the nearest object is within 60 (about 72 cm)
What you should see: Put the can anywhere around the robot: it turns towards the can and pushes it.
FAQ:
- The direction reads 8 or -8? ±8 means nothing within 120 cm in that direction, not "far left" or "far right".
- It overshoots and swings back and forth? Lower the turning power 20, or change -1 and 1 to -2 and 2.
Example 5: Drive towards the most open direction
What this example does: Mode 2 also tells you "the most open direction". With proportional control the robot keeps heading for open space and finds its way out of a box maze.
What you need:
- EV3 brick + Education base robot (left wheel on B, right wheel on C)
- TOF8 eight-direction laser (EV3 edition)
- A few boxes as obstacles
How to connect: TOF8 eight-direction laser in port 1, mounted at the front with lasers 4 and 5 facing straight ahead, about 5 cm above the ground.
Download the program (pick your software):
clev3r code
' ============================================================
' TOF8 八方位雷射測距感應器 EV3 新手範例 05:往最空曠的方向走
' 軟體:clev3r
' 接法:TOF8 八方位雷射插 1 號孔;左輪馬達接 B、右輪馬達接 C
' 這個範例會做什麼:模式 2 也會告訴你「最空曠的方向」。車子用比例控制一直往最空的地方開,在箱子陣裡會自己找出口。
' 讀值:farDir=最空曠的方向(-7 ~ +7(負=左、正=右))
' ============================================================
folder "prjs" "MBC_tof8_ex05"

' TOF8 八方位雷射插 1 號孔,使用模式 2
Sensor.SetMode(1, 2)
LCD.Clear()

' 一直重複
While "True"
  ' 轉彎力量 turn = 最空方向 × 5(負數往左、正數往右)
  turn = Sensor.ReadRawValue(1, 2) * 5
  ' 左輪=25+turn、右輪=25-turn
  Motor.StartPower("B", 25 + turn)
  Motor.StartPower("C", 25 - turn)
EndWhile
Step by step:
- Repeat forever
- Steering power turn = most open direction × 5 (negative = left, positive = right)
- Left wheel = 25 + turn, right wheel = 25 − turn
What you should see: The robot avoids the boxes and drives towards open space.
FAQ:
- The direction reads 8 or -8? ±8 means nothing within 120 cm in that direction, not "far left" or "far right".
- It keeps driving into walls? The sign of the direction may be opposite to your robot: swap "+turn" and "−turn" in the program.
Example 6: Where is the nearest object, and how many millimetres away
Pybricks v4 / EV3 MicroPython v2.0 / clev3r only (the EV3-G and Classroom blocks cannot read this mode)
What this example does: Mode 5 gives two numbers at once: how many millimetres away the nearest object is, and in which direction (-7~+7). That is 12 times finer than the 1.2 cm units of mode 2. This example shows both numbers and beeps when something comes within 15 cm.
What you need:
- TOF8 eight-direction laser (EV3 edition, firmware v4.0 or later)
- EV3 brick
How to connect: TOF8 eight-direction laser in port 1.
Download the program (pick your software):
(The code is the example; no screenshot needed.)
clev3r code
' ============================================================
' TOF8 八方位雷射測距感應器 EV3 新手範例 06:最近的東西在哪、幾公釐
' 軟體:clev3r
' 接法:TOF8 八方位雷射插 1 號孔;左輪馬達接 B、右輪馬達接 C
' 這個範例會做什麼:模式 5 一次給兩個數字:最近的東西有幾公釐、在哪個方向(-7~+7)。比模式 2 的 1.2 公分一格準 12 倍。這個範例把兩個數字顯示在螢幕上,東西靠到 15 公分內就嗶一聲。
' 讀值:nearMm=最近的東西有多遠(公釐)(0 ~ 1200 mm);nearDir5=最近的東西在哪個方向(-7 ~ +7(負=左、正=右、0 附近=正前方;±8=沒有東西))
' ============================================================
folder "prjs" "MBC_tof8_ex06"

' TOF8 八方位雷射插 1 號孔,使用模式 5
Sensor.SetMode(1, 5)
LCD.Clear()

' 清除螢幕
LCD.Clear()
' 一直重複
While "True"
  ' 第 1 行顯示最近的東西有幾公釐
  LCD.Text(1, 0, 0, 1, "NEARMM " + Sensor.ReadRawValue(1, 0) + "      ")
  ' 第 2 行顯示它在哪個方向(負=左、正=右、0=正前方)
  LCD.Text(1, 0, 16, 1, "DIR " + Sensor.ReadRawValue(1, 1) + "      ")
  ' 如果最近的東西不到 150 公釐(15 公分)
  If Sensor.ReadRawValue(1, 0) < 150 Then
    ' 不到 15 公分:嗶一聲
    Speaker.Tone(50, 1000, 100)
    Speaker.Wait()
  EndIf
  ' 等 0.1 秒
  Program.Delay(100)
EndWhile
Step by step:
- Clear the screen
- Repeat forever
- Row 1 shows the nearest distance in mm
- Row 2 shows its direction (negative = left, positive = right, 0 = straight ahead)
- If the nearest object is closer than 150 mm (15 cm)
- Closer than 15 cm: beep
- Wait 0.1 s
What you should see: Move your hand around the sensor: row 1 follows in millimetres and row 2 tells you whether your hand is on the left (negative) or right (positive); within 15 cm the EV3 keeps beeping.
FAQ:
- The direction reads 8 or -8? ±8 means nothing within 120 cm in that direction, not "far left" or "far right".
- The number stays at 0 or never changes? This mode needs sensor firmware v4.0 (2026-10) or later; update older firmware first.
- Why is there no EV3-G / Classroom version? This example uses a new mode (firmware v4, 2026-10). The EV3-G and Classroom infrared blocks cannot read it; only Pybricks, EV3 MicroPython and clev3r can.
Still stuck? Leave a message on Contact us with the software you use and a screenshot of your program, and we will help.
More questions
- The EV3 shows an infrared sensor? Expected: the sensor emulates a LEGO sensor so the stock blocks can read it.
- A short freeze when switching modes? The EV3 needs about 1 s per mode change. Stick to one mode during a run.
Still stuck? Contact us with your software and a screenshot of the program.
Downloads
Sources
- Host and software list:
_build/guides.json - Values and commands:
_build/protocol/tof8.json(single source of truth) - Setup:
_build/guides/software/ev3-clev3r.en.md、_build/guides/product/tof8/ev3-clev3r.en.md - Examples:
sensors/tof8/ev3-examples.md