
SPIKE beginner examples: Ranger 2-Way (TOF2)
Back to the Ranger 2-Way product page
Note
The Pybricks programs below are the same files as on the Chinese page, so the comments inside the code are in Chinese. The English explanation under each example tells you what every line does.
This page is written for people who have never written a program before. The 5 examples start with "see the distance as a number" and build up step by step to "the robot drives up to a wall and squares itself up on its own". Every example comes in 3 versions. Just pick the one you have on hand:
| Version | Who it's for | How to open the example file |
|---|---|---|
| 🟨 The official LEGO SPIKE App (blocks) | Schools, first-time SPIKE users | Download the .llsp3 → open the SPIKE App → top-left "File" → "Open" → pick the file |
| 🟦 The MBC Blocks website (block-based, Chinese UI) | People who want Chinese blocks or need to read more sensor data | Open the MBC SPIKE Blocks website → top menu "File → Open" (or press Ctrl+O) → pick the downloaded .abp |
| 🐍 Pybricks (Python text code) | People who want to learn typed programming | Open code.pybricks.com → "Import a file" in the file panel on the left → import both the example file and MBC_laser2_obj_Lib.py → open the example → press ▶ to run |
Important
- For the MBC Blocks website and Pybricks, you first need to flash the hub with the Pybricks firmware (on the MBC Blocks website, use the top menu "SPIKE Hub → Install/Update Pybricks firmware"; it takes about 3 minutes, and you can switch back to the original LEGO firmware later with the SPIKE App). The official LEGO App does not need this.
- The official LEGO App examples here use the Education edition (SPIKE 3).
Note
The last one, Example 6, is an advanced bonus and comes in a Pybricks version only: the values it uses live in a new mode of the sensor firmware released 2026-10 or later, which the blocks in the official LEGO App and the MBC Blocks website cannot read.
Before you start: meet the Ranger 2-Way
The Ranger 2-Way has two lasers side by side on the front, both pointing straight ahead. They measure how far away the thing in front of the "left one" and the "right one" is. Left and right are as seen from behind the sensor, looking the way it faces (left = J5, right = J3); facing the sensor, they are the other way round. No calibration needed, just plug it in and go; after power-on, wait 1 to 2 seconds for the lasers to get ready.
Values used on this page
| Name | Range | Meaning |
|---|---|---|
| Left distance, right distance | 0 to 120 cm | The distance measured by the left laser and the right laser. 120 = nothing in front (or farther than 120 cm) |
| Nearer distance | 0 to 120 cm | The smaller of the left and right values. Used to tell "is something getting close in front" |
| Average distance | 0 to 120 cm | (left + right) ÷ 2 |
| Left minus right | -120 to 120 | Left distance minus right distance. Negative = the left side is closer, positive = the right side is closer, 0 = both the same |
Tip
A reading of 120 can mean 4 things: there really is nothing in front, the object is farther than 120 cm, the laser is not ready yet right after power-on, or that laser is broken. Black, shiny and transparent objects (glass, acrylic) are harder to measure. Black objects usually cannot be seen beyond about 30 to 50 cm, so every threshold in these examples is kept within 60 cm.
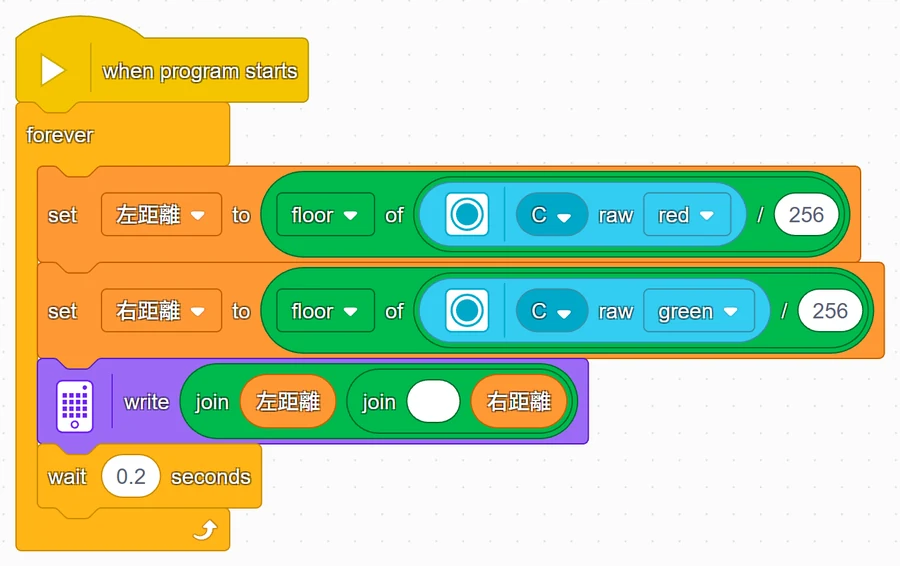
How do you read it in the official App? In the official LEGO App, the Ranger shows up as a "Color Sensor". We read it with the raw red / green / blue blocks under "More Sensors", and the number you get has to be divided by 256 and rounded down (floor):
| Official block | What it gives you | Conversion |
|---|---|---|
| raw red | left distance × 256 | ÷ 256, rounded down (the floor block) = left distance |
| raw green | right distance × 256 | ÷ 256, rounded down = right distance |
| raw blue | average distance × 256 | ÷ 256, rounded down = average distance |
Note
The official App is verified on hardware (2026-11-03): on SPIKE Prime (Education, SPIKE App 3) Examples 1~4 pass on the real hub and the ÷ 256 reading above is correct; "color" = left distance and "reflected light" = right distance, and the App does not clip them to 10 / 100 (nothing ahead = 120). Robot Inventor blocks convert differently: raw red / green / blue must be ÷ 64 (not ÷ 256) = left / right / average; "reflected light" = left distance (the opposite of Education), "ambient light" = left distance (max 100), and "color" always returns −1. Robot Inventor Python
get_rgb_intensity()is the same as Education, ÷ 256. See reading it in the official App.
Example 1: See the distance
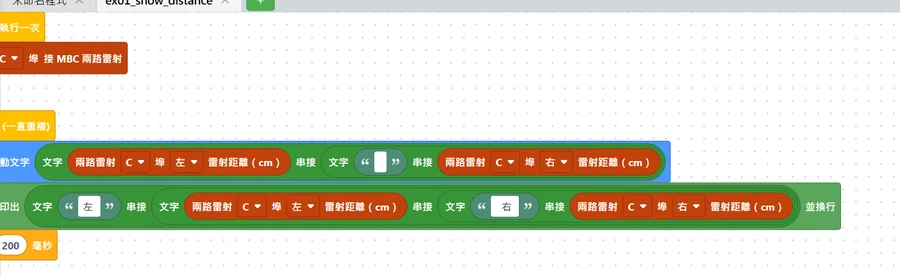
What this example does: the hub display keeps scrolling two numbers, "left distance right distance" (in cm), for example "40 80".
What you need
- 1 SPIKE hub
- 1 Ranger 2-Way
- A book or a box to use as an "obstacle"
How to connect: plug the Ranger 2-Way into port C.
Download the program
| Official LEGO App | MBC Blocks website | Pybricks |
|---|---|---|
| ex01_show_distance.llsp3 | ex01_show_distance.abp | ex01_show_distance.py + library |
🟨 Blocks in the official LEGO App
🟦 Blocks on the MBC Blocks website
Pybricks code
# 測距者 2 路 範例 1:看見距離(螢幕捲動顯示「左距離 右距離」)
# 接線:測距者 2 路 → C 埠
from pybricks.hubs import PrimeHub
from pybricks.tools import wait
from MBC_laser2_obj_Lib import MBC_LASER2

hub = PrimeHub()
laser2 = MBC_LASER2(3)              # 3 = C 埠(1=A、2=B、3=C、4=D、5=E、6=F)

while True:
    left = laser2.left()            # 左邊雷射量到的距離(公分,0~120;120 = 前面沒東西)
    right = laser2.right()          # 右邊雷射量到的距離
    hub.display.text(str(left) + ' ' + str(right))   # 主機螢幕捲動顯示,例如「40 80」
    print('左', left, '  右', right)                  # 電腦畫面也印出來
    wait(200)                       # 等 0.2 秒再讀下一次
Step by step: what the program does
- Repeat forever: the blocks inside keep running until you press stop.
- Read the left and right distance: in the official App that is "raw red ÷ 256, rounded down" and "raw green ÷ 256, rounded down", stored in two "variables" (a variable is a box with a name that holds one number). The MBC Blocks website and Pybricks have "left laser distance" and "right laser distance" directly.
- Show it on the display: join "left distance", a space and "right distance" into one piece of text and scroll it on the hub display. The MBC Blocks website and Pybricks also print it on the computer screen.
- Wait 0.2 seconds, then read again.
What you should see when it runs
- Nothing in front: it shows 120 120.
- Put a book 30 cm in front: both numbers go to about 30.
- Cover only the left laser with your hand: the first number drops, the second one stays the same.
Important
Use this example to confirm left and right first. With the sensor facing forward and the component side up, stand behind it looking the same way and cover only the left laser (J5): the first number should drop. If the second number drops instead, your sensor is mounted the opposite way from the examples (for example upside down), and you will need to swap "left" and "right" in the later examples too.
Common questions
- It always shows 120 120? → There really is nothing in front, or the object is too far away, or it is black/transparent. Try a white book 20 cm in front. It also shows 120 for the first 1 to 2 seconds after power-on.
- Only one side is stuck at 120? → That laser may be blocked, dirty or broken. You can check it with the "laser OK" block on the MBC Blocks website or
laser2.is_ok(1)in Pybricks. - The numbers keep jumping? → That's normal. The lasers measure a dozen or more times per second and have an error of 1 to 2 cm.
- The official App shows numbers in the thousands? → You forgot the "÷ 256, rounded down" step.
Example 2: Beep when too close
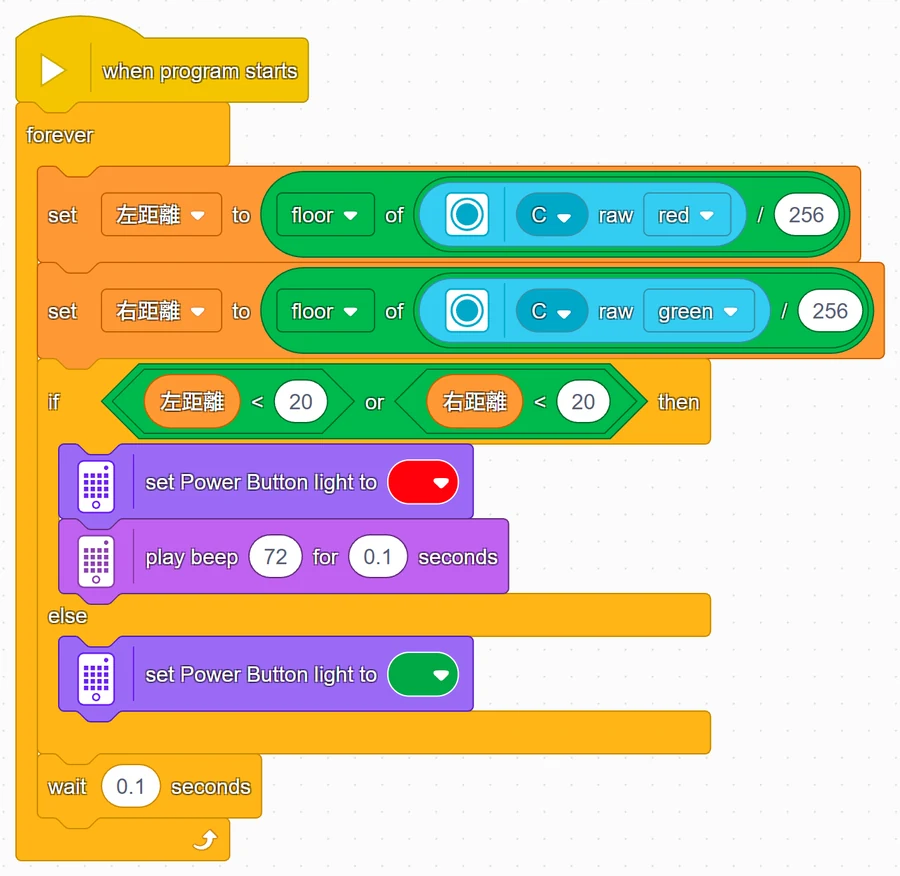
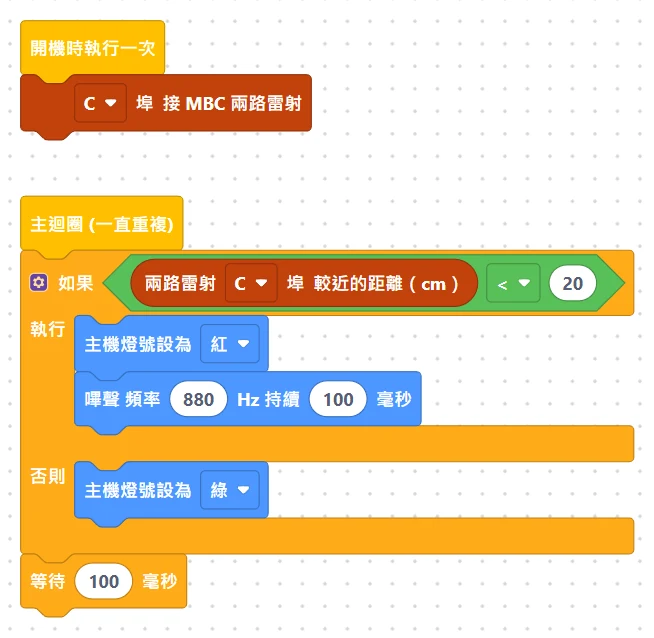
What this example does: if either side sees something closer than 20 cm, the hub light turns red and the hub beeps; otherwise it stays green.
What you need: same as Example 1.
How to connect: plug the Ranger 2-Way into port C.
Download the program
| Official LEGO App | MBC Blocks website | Pybricks |
|---|---|---|
| ex02_too_close_beep.llsp3 | ex02_too_close_beep.abp | ex02_too_close_beep.py + library |
🟨 Blocks in the official LEGO App
🟦 Blocks on the MBC Blocks website
Pybricks code
# 測距者 2 路 範例 2:太近就嗶(任何一邊小於 20 公分:紅燈+嗶聲;否則綠燈)
# 接線:測距者 2 路 → C 埠
from pybricks.hubs import PrimeHub
from pybricks.parameters import Color
from pybricks.tools import wait
from MBC_laser2_obj_Lib import MBC_LASER2

hub = PrimeHub()
laser2 = MBC_LASER2(3)                  # 3 = C 埠

while True:
    if laser2.min_distance() < 20:      # 左右兩邊比較近的那個距離,小於 20 公分
        hub.light.on(Color.RED)
        hub.speaker.beep(880, 100)      # 頻率 880 Hz,響 0.1 秒
    else:
        hub.light.on(Color.GREEN)
    wait(100)
Step by step: what the program does
- Read the distance: the official App reads the left and right distances; the MBC Blocks website and Pybricks read the "nearer distance" (the smaller of the two) directly.
- If too close then…: the official App writes it as "left < 20 or right < 20", which means the same as "nearer distance < 20" → red light and a beep.
- Else…: green light.
- Wait 0.1 seconds, then check again.
What you should see when it runs
- Nothing in front: green light.
- Move your hand in slowly; once it is within 20 cm: red light and constant beeping. Take your hand away and it goes back to green.
Common questions
- It goes quiet when my hand touches the sensor? → When something is extremely close (within a few cm), the laser may not be able to measure it and reads 120. That is just how the laser works; leave a little gap.
- Want it to beep at 30 cm instead? → Change "20" to "30" (in the official App there are two 20s, change both).
Example 3: Which side is closer
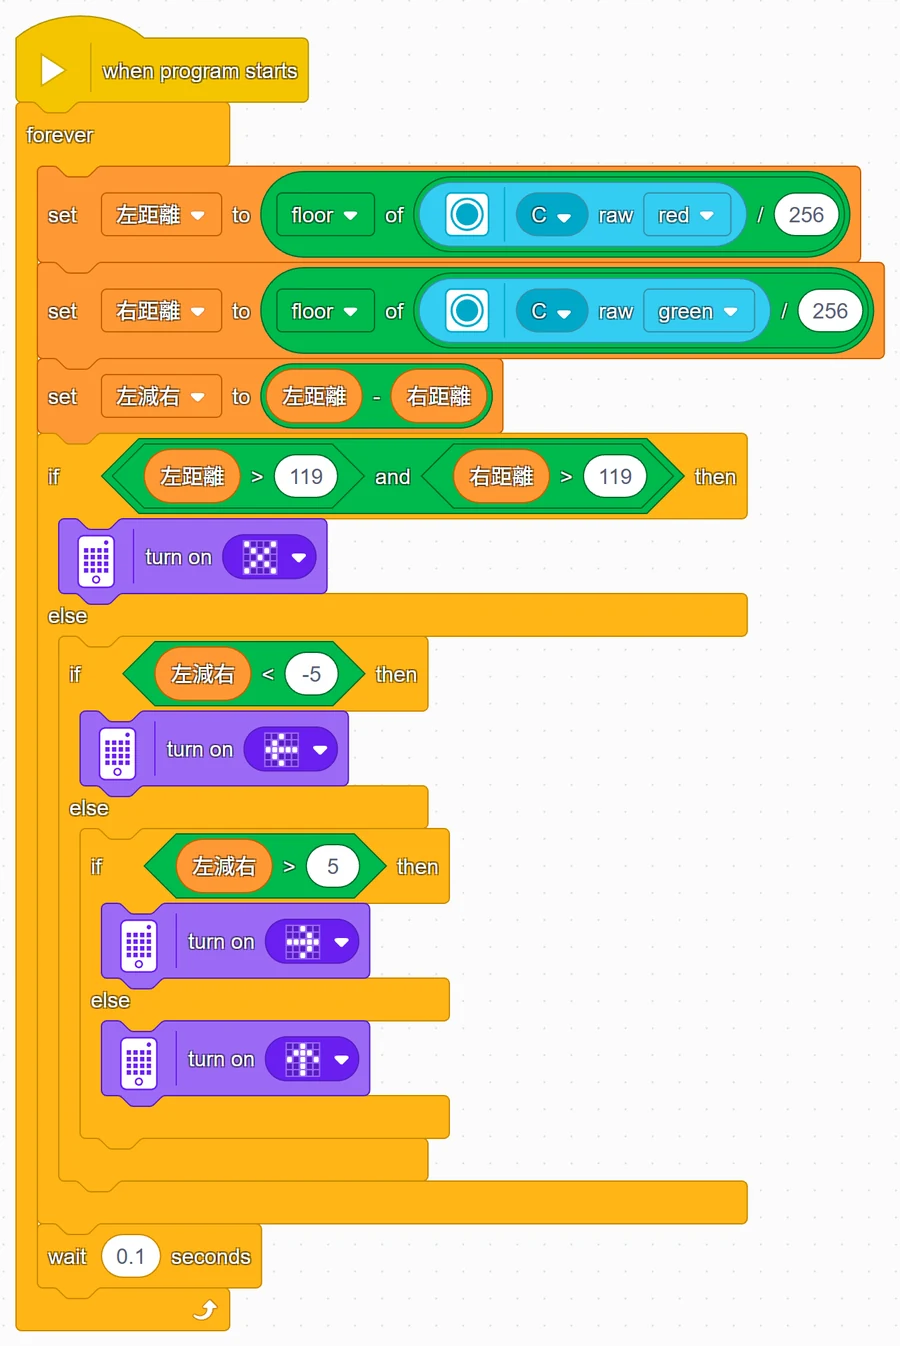
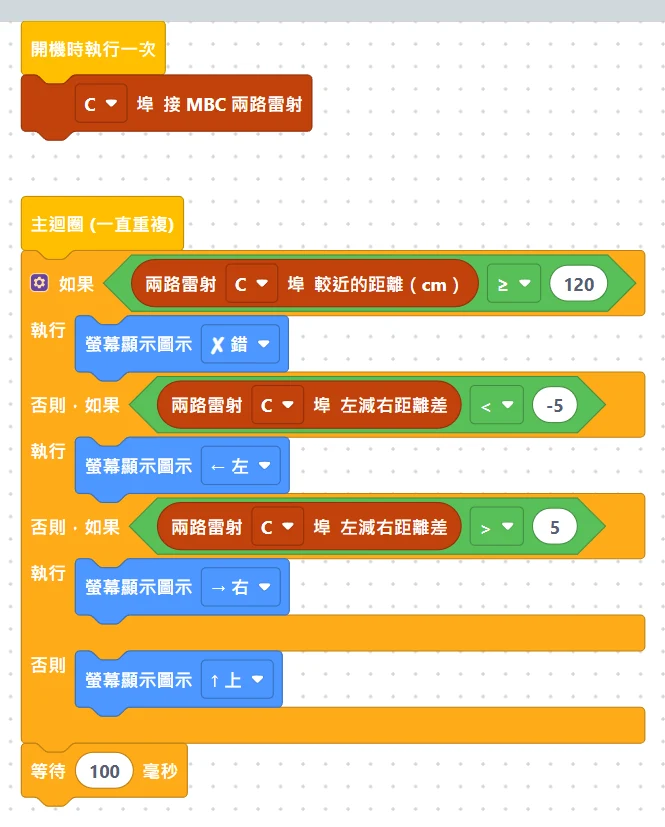
What this example does: the hub display uses an arrow to tell you where the object is: left side closer → ⬅, right side closer → ➡, about the same → ⬆, nothing there → ✕.
What you need: same as Example 1.
How to connect: plug the Ranger 2-Way into port C.
Download the program
| Official LEGO App | MBC Blocks website | Pybricks |
|---|---|---|
| ex03_which_closer.llsp3 | ex03_which_closer.abp | ex03_which_closer.py + library |
🟨 Blocks in the official LEGO App
🟦 Blocks on the MBC Blocks website
Pybricks code
# 測距者 2 路 範例 3:哪一邊比較近(主機螢幕顯示箭頭)
# 接線:測距者 2 路 → C 埠
from pybricks.hubs import PrimeHub
from pybricks.parameters import Icon
from pybricks.tools import wait
from MBC_laser2_obj_Lib import MBC_LASER2

hub = PrimeHub()
laser2 = MBC_LASER2(3)                      # 3 = C 埠

while True:
    diff = laser2.diff()                    # 左距離 減 右距離:負的 = 左邊比較近,正的 = 右邊比較近
    if laser2.min_distance() >= 120:        # 兩邊都是 120 → 前面什麼都沒有
        hub.display.icon(Icon.FALSE)        # 顯示 ✕
    elif diff < -5:                         # 左邊近了 5 公分以上
        hub.display.icon(Icon.ARROW_LEFT)
    elif diff > 5:                          # 右邊近了 5 公分以上
        hub.display.icon(Icon.ARROW_RIGHT)
    else:                                   # 兩邊差不多 → 東西在正前方
        hub.display.icon(Icon.ARROW_UP)
    wait(100)
Step by step: what the program does
- First work out left minus right = left distance minus right distance. When the left side is closer, the left distance is smaller, so the result is negative.
- If both sides are 120 → show ✕ (nothing in front; check this first). The official App writes it as "left > 119 and right > 119".
- Else, if left minus right < -5 → the left side is closer by more than 5 cm → left arrow.
- Else, if left minus right > 5 → the right side is closer by more than 5 cm → right arrow.
- Otherwise (less than 5 cm difference) → up arrow, meaning the object is straight ahead.
What you should see when it runs: move a book slowly from the left to the right (about 30 cm away). The arrow goes ⬅ → ⬆ → ➡; take the book away and it becomes ✕.
Common questions
- Why does it have to differ by more than 5 cm? → The lasers themselves have an error of 1 to 2 cm. Leaving some room keeps the arrow from flickering back and forth.
- The left and right arrows are swapped? → Left and right are as seen from behind the sensor, looking the way it faces (left = J5, right = J3); facing the sensor, they are the other way round. If they are still swapped seen from behind, go back to Example 1 and confirm left and right; the sensor may be mounted the other way round.
- The arrow jumps around when the object is far away? → The two laser beams get wider with distance and overlap far away, so beyond 50 cm it is hard to tell left from right. Play with this example within 50 cm.
Example 4: Back up and turn when something is ahead
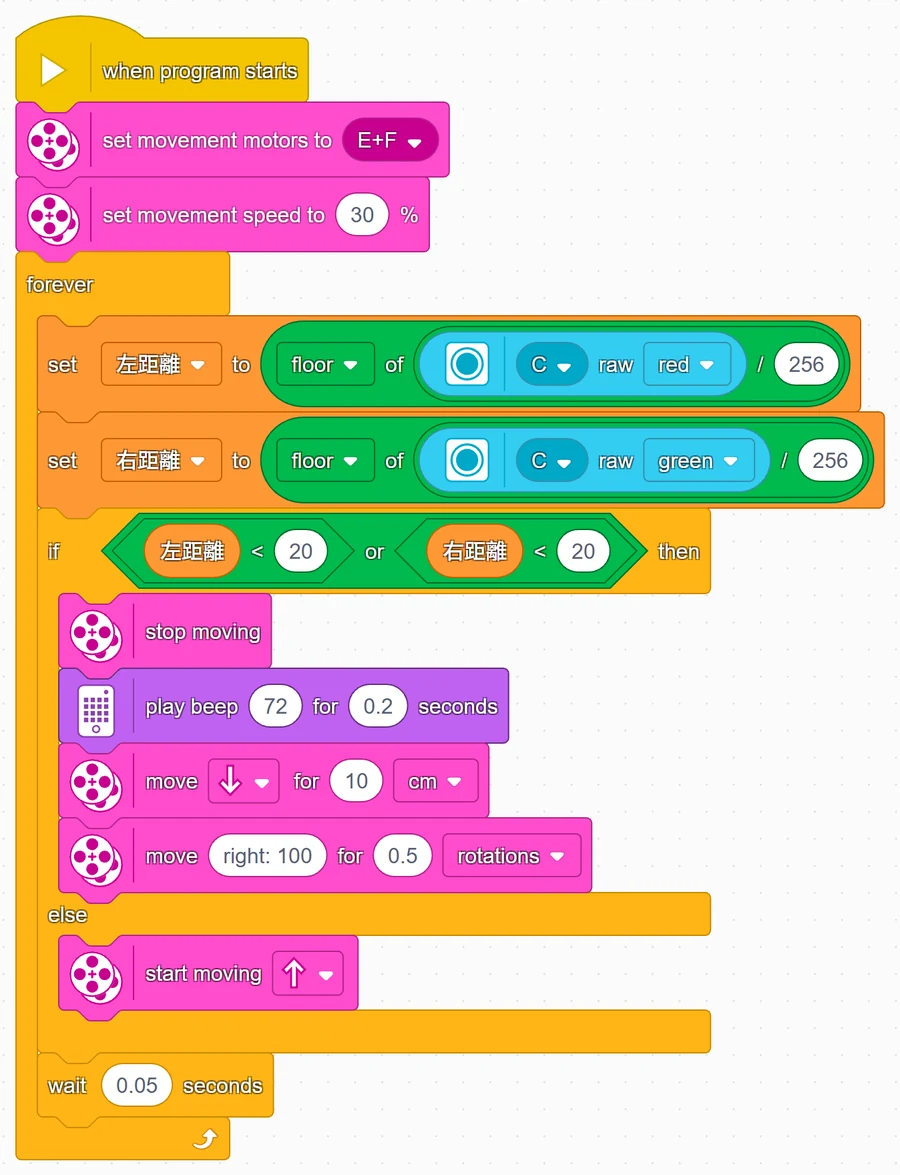
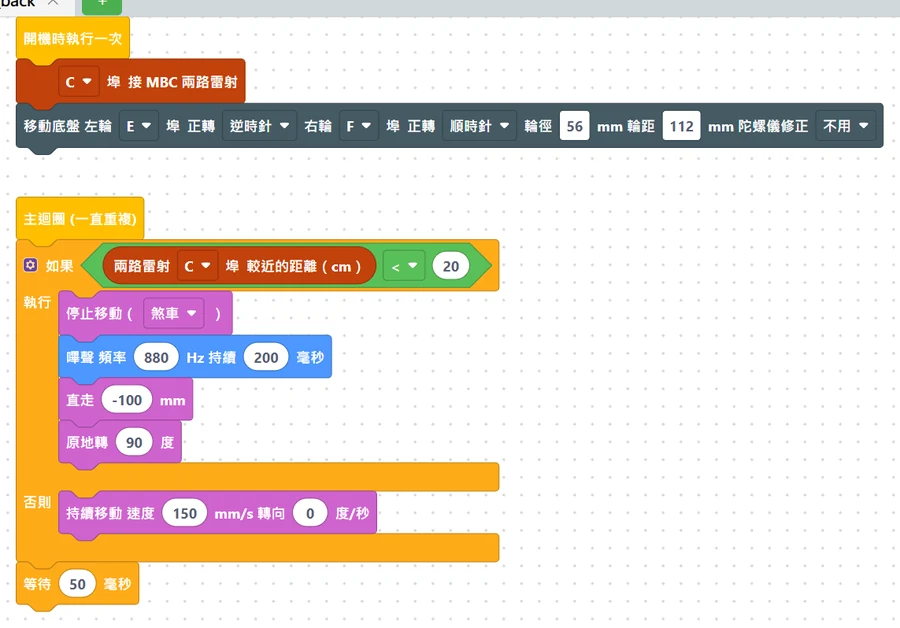
What this example does: the robot keeps driving forward. When something is in front (closer than 20 cm), it stops → beeps → backs up 10 cm → turns right 90 degrees, then keeps going.
What you need
- Everything from Example 1, plus
- A two-wheeled robot car (two motors as the wheels)
- An open floor area with a few boxes as obstacles
How to connect
- Plug the Ranger 2-Way into port C, mounted at the front of the car, pointing straight ahead, at least 5 cm off the floor (too low and it will measure the floor)
- Left wheel motor on E, right wheel motor on F
Download the program
| Official LEGO App | MBC Blocks website | Pybricks |
|---|---|---|
| ex04_obstacle_back.llsp3 | ex04_obstacle_back.abp | ex04_obstacle_back.py + library |
🟨 Blocks in the official LEGO App
🟦 Blocks on the MBC Blocks website
Pybricks code
# 測距者 2 路 範例 4:一直往前走,前面有東西(小於 20 公分)就停車、嗶一聲、後退、右轉
# 接線:測距者 2 路 → C 埠(裝在車頭、朝前);左輪馬達 → E 埠;右輪馬達 → F 埠
from pybricks.hubs import PrimeHub
from pybricks.parameters import Direction, Port
from pybricks.pupdevices import Motor
from pybricks.robotics import DriveBase
from pybricks.tools import wait
from MBC_laser2_obj_Lib import MBC_LASER2

hub = PrimeHub()
laser2 = MBC_LASER2(3)                                 # 3 = C 埠
left = Motor(Port.E, Direction.COUNTERCLOCKWISE)       # 左輪:反過來裝,所以設成逆時針才是往前
right = Motor(Port.F)                                  # 右輪
robot = DriveBase(left, right, wheel_diameter=56, axle_track=112)   # 輪子直徑 56 mm、兩輪距離 112 mm

while True:
    if laser2.min_distance() < 20:    # 左右任何一邊小於 20 公分 → 前面有東西
        robot.stop()                  # 先停車
        hub.speaker.beep(880, 200)
        robot.straight(-100)          # 後退 100 mm(10 公分)
        robot.turn(90)                # 原地右轉 90 度
    else:
        robot.drive(150, 0)           # 每秒 150 mm 直直往前走
    wait(50)
Step by step: what the program does
- Tell the hub where the wheels are: in the official App it is "set movement motors to E+F"; on the MBC Blocks website and in Pybricks it is "drive base: left wheel E, right wheel F".
- Set the speed: 30% in the official App; 150 mm per second in the other two.
- Repeat forever: read the distance.
- If nearer distance < 20 → stop → beep → back up 10 cm → turn right on the spot. The official App's "turn right" is "move 0.5 rotations with steering 100", which is roughly 90 degrees on the standard LEGO car.
- Else → drive forward.
What you should see when it runs: the car drives forward, stops just before hitting a box, beeps, backs up a little, turns right, then carries on.
Common questions
- It only stops after bumping into the obstacle? → It is driving too fast, or the obstacle is black/transparent (cannot be measured). Lower the speed, or raise the "20" a bit (for example 25).
- It turns less than 90 degrees / too much? → Official App: change the "0.5 rotations" number; MBC Blocks website and Pybricks: change the "90".
- The car drives backward / the direction is reversed? → The motors are mounted the opposite way from the standard LEGO car. Official App: mount the motors the way the LEGO "standard driving base" does; MBC Blocks website: in the "drive base" block, flip the "forward" direction of both the left and right wheel; Pybricks: change the left wheel to
Direction.CLOCKWISEand the right wheel toMotor(Port.F, Direction.COUNTERCLOCKWISE). - It keeps spinning on the spot and never moves forward? → The sensor is mounted too low and is measuring the floor. Raise the sensor a bit and tilt it slightly upward.
Example 5: Drive up to a wall and square up
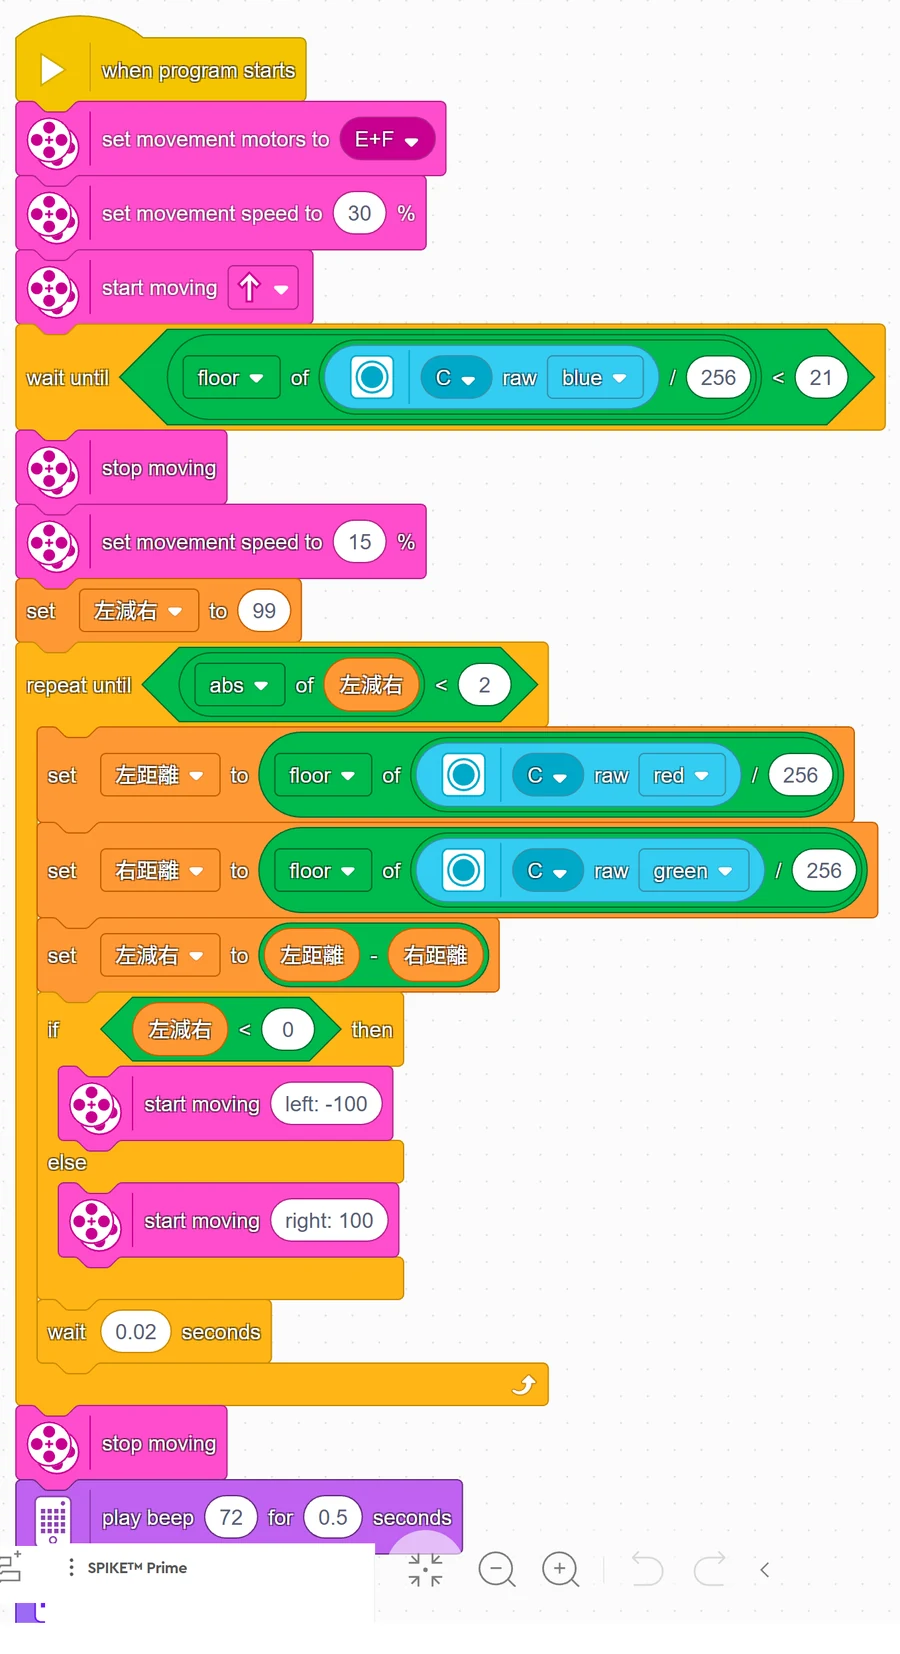
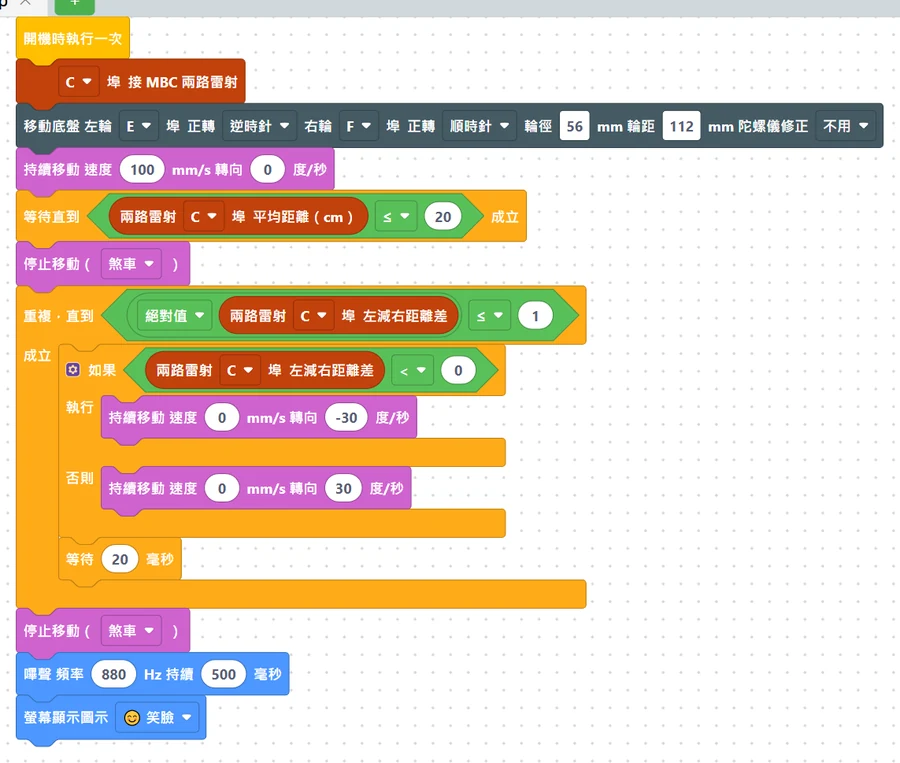
What this example does: the robot drives forward and stops 20 cm from the wall, then turns slowly on the spot until both lasers read the same distance (within 1 cm), which means the front of the car is facing the wall squarely. When done it beeps and shows a smiley face on the display. Teams often use this trick in competitions to "square up" the robot.
What you need: same as Example 4, plus a wall (or the flat side of a big cardboard box).
How to connect: plug the Ranger 2-Way into port C, mounted at the front pointing forward; left wheel motor on E, right wheel motor on F.
Download the program
| Official LEGO App | MBC Blocks website | Pybricks |
|---|---|---|
| ex05_square_up.llsp3 | ex05_square_up.abp | ex05_square_up.py + library |
🟨 Blocks in the official LEGO App
🟦 Blocks on the MBC Blocks website
Pybricks code
# 測距者 2 路 範例 5:往前開到離牆 20 公分停下,再原地轉到兩邊距離一樣(車頭對正牆面)
# 接線:測距者 2 路 → C 埠(裝在車頭、朝前);左輪馬達 → E 埠;右輪馬達 → F 埠
from pybricks.hubs import PrimeHub
from pybricks.parameters import Direction, Icon, Port
from pybricks.pupdevices import Motor
from pybricks.robotics import DriveBase
from pybricks.tools import wait
from MBC_laser2_obj_Lib import MBC_LASER2

hub = PrimeHub()
laser2 = MBC_LASER2(3)                                 # 3 = C 埠
left = Motor(Port.E, Direction.COUNTERCLOCKWISE)
right = Motor(Port.F)
robot = DriveBase(left, right, wheel_diameter=56, axle_track=112)

# 第 1 步:往前開,直到左右平均距離 ≤ 20 公分
robot.drive(100, 0)
while laser2.average() > 20:
    wait(20)
robot.stop()

# 第 2 步:原地轉,直到左右只差 1 公分以內
while abs(laser2.diff()) > 1:          # diff = 左 減 右
    if laser2.diff() < 0:              # 左邊比較近 → 車頭偏右了 → 往左轉
        robot.drive(0, -30)            # 速度 0(不前進),每秒左轉 30 度
    else:                              # 右邊比較近 → 往右轉
        robot.drive(0, 30)
    wait(20)
robot.stop()

# 第 3 步:完成!
hub.speaker.beep(880, 500)
hub.display.icon(Icon.HAPPY)
Step by step: what the program does (this example is not a "repeat forever"; it runs 3 steps in order and then ends)
- Step 1: drive forward, "wait until" the average distance ≤ 20 cm, then stop. In the official App the average distance is "raw blue ÷ 256, rounded down", written as "< 21", which means the same thing.
- Step 2: square up. "Repeat until" left and right differ by 1 cm or less:
- left minus right < 0 (left side closer) → the front is pointing to the right → turn left;
- else → turn right.
- The official App sets "left minus right" to 99 first, so that the "repeat until" checks at least once.
- Step 3: done: stop, beep, show a smiley face.
What you should see when it runs: place the car at a slight angle to the wall (front pointing a little off), then press run. The car drives forward, stops, wiggles left and right to square up, then beeps.
Common questions
- It keeps turning left and right and never stops? → The wall is not flat, or "within 1 cm" is too strict. Change the "1" to "2" (in the official App, change "< 2" to "< 3").
- It squares up the wrong way and gets more crooked? → Left and right are as seen from behind the sensor, looking the way it faces (left = J5, right = J3). Go back to Example 1 and confirm left and right; if they are swapped, swap "turn left" and "turn right".
- It cannot square up when the angle is too big (over 30 degrees)? → At a big angle one laser misses the wall completely (reads 120). Line the car up roughly first, then start.
- The wall is black? → Black walls read shorter and less accurately. Use a light-colored wall or stick white paper on it.
Example 6 (advanced): Park precisely using millimeters
Note
This example comes in a Pybricks version only. The "millimeter distance" it uses lives in sensor mode 6, which the official LEGO App and the MBC Blocks website cannot read (they only read centimeters). The sensor firmware must be from 2026-10 or later; older firmware returns different numbers in that mode. The code itself is the example, so there are no screenshots.
What this example does: the robot drives forward, slows down at 20 cm from the wall, stops at 15 cm (150 mm), beeps, and shows the stopping distance (in cm) on the display. Centimeters only resolve to 1 cm, millimeters resolve to 0.1 cm, so the stopping position is more precise.
What you need: same as Example 5 (the car plus a wall).
How to connect: plug the Ranger 2-Way into port C, mounted at the front pointing forward; left wheel motor on E, right wheel motor on F.
Download the program
| Pybricks |
|---|
| ex06_park_mm.py + library |
Pybricks code
# 測距者 2 路 範例 6(進階):用毫米精準停車(離牆 20 公分放慢、15 公分停)
# 接線:測距者 2 路 → C 埠(裝在車頭朝前);左輪馬達 → E 埠;右輪馬達 → F 埠
# 只有 Pybricks 版:毫米距離放在感應器的「模式 6」,官方 App 和積木網站讀不到;感應器韌體要 2026-10 以後
from pybricks.hubs import PrimeHub
from pybricks.parameters import Direction, Port
from pybricks.pupdevices import Motor
from pybricks.robotics import DriveBase
from pybricks.tools import wait
from MBC_laser2_obj_Lib import MBC_LASER2

hub = PrimeHub()
laser2 = MBC_LASER2(3)                                 # 3 = C 埠
left = Motor(Port.E, Direction.COUNTERCLOCKWISE)
right = Motor(Port.F)
robot = DriveBase(left, right, wheel_diameter=56, axle_track=112)

robot.drive(100, 0)                                    # 每秒 100 mm 往前開
while laser2.average_mm() > 200:                       # 左右平均距離(毫米)還大於 200 mm = 20 公分
    wait(10)
robot.drive(40, 0)                                     # 剩 20 公分:放慢到每秒 40 mm
while laser2.average_mm() > 150:                       # 到 150 mm = 15 公分
    wait(10)
robot.stop()                                           # 停車
hub.speaker.beep()
mm = laser2.average_mm()                               # 停下來之後再量一次
hub.display.number(mm // 10)                           # 螢幕顯示公分(15 或 14)
print('停在', mm, 'mm')
Step by step: what the program does
laser2.average_mm(): the average of left and right, in millimeters (0 to 1200; 1200 = nothing in front). The sensor works out the average itself, so you don't have to add them up.- Drive forward at 100 mm per second and wait until the average distance ≤ 200 mm (20 cm).
- Switch to a slow 40 mm per second and wait until ≤ 150 mm, then stop.
- Beep, and show the stopping distance ÷ 10 (in cm) on the display.
- The library also has
laser2.left_mm()andlaser2.right_mm()(left and right in millimeters), pluslaser2.device_id()andlaser2.firmware_version()(sensor model and firmware version).
What you should see when it runs: the car drives forward, slows down as it nears the wall, stops about 15 cm from it, beeps, and the display shows 15 or 14.
Common questions
- The stopping position is off by 1 to 2 cm each time? → The lasers themselves have an error of 1 to 2 cm, and the car has momentum. Make the "40" smaller (for example 25) to stop more precisely.
- Want to use centimeters and millimeters at the same time? → You can, but don't mix them in the same loop: every mode switch costs the sensor a few dozen ms.
- The number is stuck at 1200? → There really is nothing in front; or the sensor firmware is too old (before 2026-10) and has no millimeter mode, so please update the firmware.
About speed units
- Speed in the official App is a percentage (%): 30% is roughly 30% of the motor's top speed.
- Speed on the MBC Blocks website and in Pybricks is in mm per second, and turning is in degrees per second.
- So the numbers differ between the three versions, but the movements mean the same thing.
Next steps
- Product overview, specs and examples for other platforms: Ranger 2-Way product page
- Want to see 180 degrees from left to right, for sumo or all-around obstacle avoidance: Ranger 8-Way, Ranger 8-Way SPIKE beginner examples
- Everything the Pybricks library can do: open
MBC_laser2_obj_Lib.py; the notes at the top are in Chinese (for examplelaser2.is_ok(1)checks whether the left laser is working).