
Ranger 2-Way (TOF2) × SPIKE × Official LEGO App
Interactive tutorialSPIKE
First time? Try the interactive tutorial in your browser first, then follow the steps below with your hub.
This page covers Official LEGO App (SPIKE 3, Robot Inventor) only: how to set it up for the Ranger 2-Way (TOF2) on SPIKE Prime / Robot Inventor, how to read every value, the commands it supports and examples. Use the switcher above to change product, host or software.
Setup
What you need
- Sensor: Ranger 2-Way (TOF2) (SPIKE edition). Each platform is a different factory edition; an EV3 edition is not recognised on a SPIKE hub.
- Hub: SPIKE Prime (Education, yellow hub) or Robot Inventor (home edition, teal hub).
- Cable: the standard cable in the box, or an original LEGO cable.
- Software: Education uses the LEGO Education SPIKE App (the examples on this site use SPIKE 3); the home edition uses the LEGO MINDSTORMS Robot Inventor App.
- Hub firmware: the original LEGO firmware. No need to switch to Pybricks.
Install the software
- Education: install the SPIKE App from the LEGO Education download page.
- Home edition: install the LEGO MINDSTORMS Robot Inventor App.
- If the hub has been flashed with Pybricks, switch it back to the original LEGO firmware with the SPIKE App first, or the official App cannot connect.
Note
The Education and home editions read values differently: in the home-edition App some blocks are limited to
0 ~ 126, and "Color" only goes up to 10. Use the readings for the edition you have.
Make the software see the sensor
No extension and no driver needed. Plug the sensor into the hub and the official App treats it as an original LEGO sensor (for most products a SPIKE Color Sensor); just use that sensor's blocks.
- An official block returns one number at a time, so the product data is encoded into the "Color", "Reflected light" and "Raw red / green / blue" slots. See the readings below for what each slot means.
- To open an example: download the
.llsp3(home edition:.lms) → open the App → top-left "File" → "Open" → pick the file.
Wiring
- Plug the sensor into hub port C with the cable (any of A~F works; choose the same port in your program).
- The plug only goes in one way: latch up, push it in gently, do not force it.
- When the hub is on, the light on the sensor comes on.
Which side is left
Left and right are as seen from behind the sensor, looking the way it faces (left = J5, right = J3). Facing the sensor, they are the other way round, so when you test with your hand, stand behind the sensor and look the same way it does. "Left is closer" and "turn left" in the examples follow this direction.
Education and Robot Inventor read differently (tested 2026-11-03)
SPIKE Prime (Education, SPIKE App 3): blocks and Python both pass on the real hub.
- "Color" = left distance in cm, "reflected light" = right distance in cm; in Python
color()= left,reflection()= right. With nothing ahead both read 120; the app does not clip them to 10 or 100. - "Raw red / green / blue" ÷ 256 = left / right / average in cm.
Robot Inventor blocks: they do read the distances, but the conversion differs from Education.
| Block | What it reads | Convert |
|---|---|---|
| Raw color red / green / blue | left / right / average distance | ÷ 64 = cm (0~120); Education uses ÷ 256 |
| Reflected light | left distance in cm (0~120) | use as is; the opposite of Education (where reflection() = right) |
| Ambient light | left distance in cm | use as is, max 100 (120 = nothing ahead shows as 100) |
| Color | always −1 | cannot be used for distance |
Robot Inventor Python: get_rgb_intensity() = (left×256, right×256, average×256, 0), the same as the Education raw red / green / blue, so ÷ 256 (while Python runs the hub switches to the Education layout).
Note
LEGO ended support for the Robot Inventor App on 2026-10-01; for new projects use SPIKE Prime or Pybricks.
Commands
The official App cannot send commands. To change the ranging mode (long range 200 cm, etc.), filter, timing budget or max distance, use Pybricks + the MBC library (tested with SPIKE Pybricks).
First test
- Connect the hub to the App over USB or Bluetooth.
- Open example 1 on this page and press Run.
- Move your hand or the mat in front of the sensor: if the number changes, everything is connected.
FAQ
- Nothing happens when I plug it in? Check in order: both ends of the cable firmly in → another hub port → another cable → another hub.
- Different Apps give different numbers? The Education (yellow hub) and home (teal hub) editions use different formats. Check which edition you have and use its readings.
- Do I need an adapter or a driver? No. The connector and protocol are the same as a LEGO hub port; it is recognised automatically.
- Example 6 won't open in the official App? Examples marked "Pybricks only" use a new mode in firmware from 2026-10 on, which the official App blocks cannot read.
Reading values
The official app shows the sensor as a Color Sensor. Read it with the color, reflected light and raw red / green / blue blocks under More Sensors, then decode as shown.
left distance (cm) leftCm
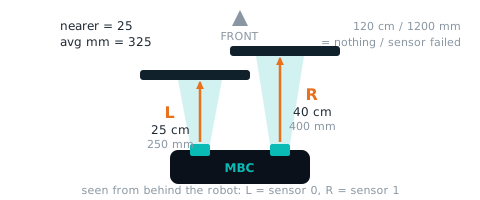
| Range | Meaning |
|---|---|
0~120 cm |
distance from the left sensor, 0~120 cm (left = sensor 0 seen from behind the robot); 120 = nothing in range / sensor failed |
| Hub | Value | Block (More Sensors → Color Sensor) | Decode |
|---|---|---|---|
| SPIKE Prime | left distance (cm) | 「color」 | the number it returns |
| Robot Inventor | left distance (cm) | 「reflected light」 | the number it returns (0~120) |
| Robot Inventor | left distance (cm) | 「raw red」 | the number ÷ 64 |
| Robot Inventor | left distance (cm) | 「ambient light」 | the number it returns (max 100: 120 = nothing ahead shows as 100) |
Firmware note: 16 B = [左, 右, 0, 左, 0, 右, 0, 平均, 0×8]:App 顏色 = 左、原始紅 = 256×左; 8 B 原樣(不壓縮)
right distance (cm) rightCm
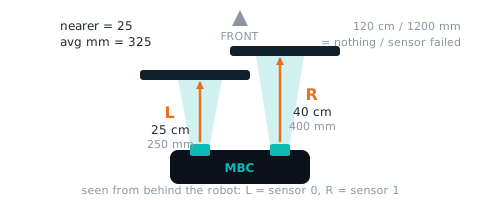
| Range | Meaning |
|---|---|
0~120 cm |
distance from the right sensor, 0~120 cm (right = sensor 1); 120 = nothing in range / sensor failed |
| Hub | Value | Block (More Sensors → Color Sensor) | Decode |
|---|---|---|---|
| SPIKE Prime | right distance (cm) | 「reflected light」 | the number it returns |
| Robot Inventor | right distance (cm) | 「raw green」 | the number ÷ 64 |
Firmware note: App 反射光 = 右、原始綠 = 256×右
average distance (mm) avgMm
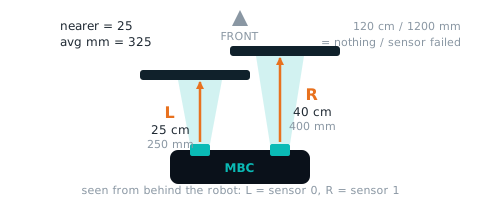
| Range | Meaning |
|---|---|
0~1200 mm |
(left mm + right mm) / 2, 0~1200; same number as EV3 mode 3 and the 3rd value of SPIKE mode 6 |
| Hub | Value | Block (More Sensors → Color Sensor) | Decode |
|---|---|---|---|
| SPIKE Prime | average distance (cm) | 「raw blue」 | floor(the number ÷ 256) = average in cm (×10 = mm) |
| Robot Inventor | average distance (cm) | 「raw blue」 | the number ÷ 64 = average in cm |
Firmware note: byte7 = (左 cm + 右 cm)>>1;App 原始藍 = 256×平均
Not readable here:nearer distance (cm), left distance (mm), right distance (mm), init bitmap, fault bitmap. Use MBC Blocks website / Pybricks for these.
Examples
Example 1: See the distance
What this example does: the hub display keeps scrolling two numbers, "left distance right distance" (in cm), for example "40 80".
What you need
- 1 SPIKE hub
- 1 Ranger 2-Way
- A book or a box to use as an "obstacle"
How to connect: plug the Ranger 2-Way into port C.
Download the program
| Official LEGO App |
|---|
| ex01_show_distance.llsp3 |
🟨 Blocks in the official LEGO App
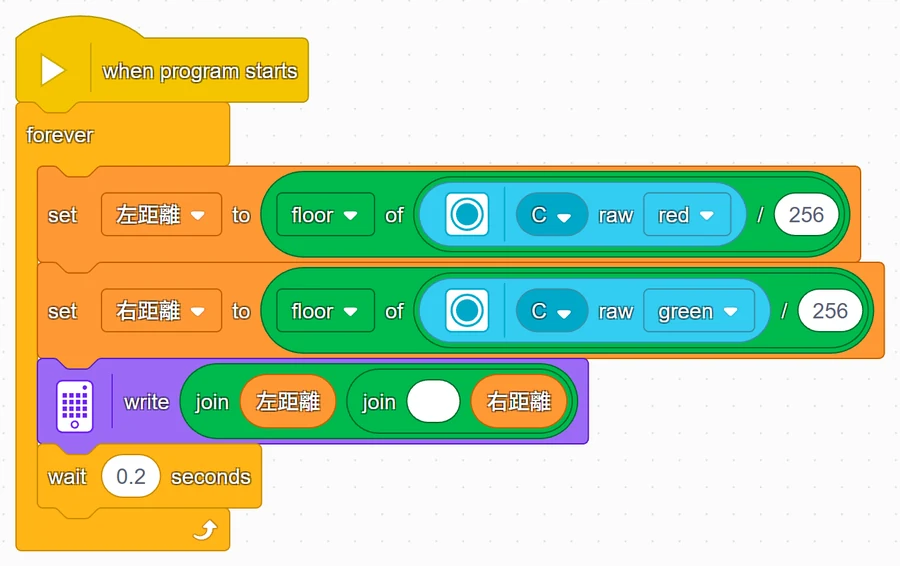
Step by step: what the program does
- Repeat forever: the blocks inside keep running until you press stop.
- Read the left and right distance: in the official App that is "raw red ÷ 256, rounded down" and "raw green ÷ 256, rounded down", stored in two "variables" (a variable is a box with a name that holds one number). The MBC Blocks website and Pybricks have "left laser distance" and "right laser distance" directly.
- Show it on the display: join "left distance", a space and "right distance" into one piece of text and scroll it on the hub display. The MBC Blocks website and Pybricks also print it on the computer screen.
- Wait 0.2 seconds, then read again.
What you should see when it runs
- Nothing in front: it shows 120 120.
- Put a book 30 cm in front: both numbers go to about 30.
- Cover only the left laser with your hand: the first number drops, the second one stays the same.
Important
Use this example to confirm left and right first. With the sensor facing forward and the component side up, stand behind it looking the same way and cover only the left laser (J5): the first number should drop. If the second number drops instead, your sensor is mounted the opposite way from the examples (for example upside down), and you will need to swap "left" and "right" in the later examples too.
Common questions
- It always shows 120 120? → There really is nothing in front, or the object is too far away, or it is black/transparent. Try a white book 20 cm in front. It also shows 120 for the first 1 to 2 seconds after power-on.
- Only one side is stuck at 120? → That laser may be blocked, dirty or broken. You can check it with the "laser OK" block on the MBC Blocks website or
laser2.is_ok(1)in Pybricks. - The numbers keep jumping? → That's normal. The lasers measure a dozen or more times per second and have an error of 1 to 2 cm.
- The official App shows numbers in the thousands? → You forgot the "÷ 256, rounded down" step.
Example 2: Beep when too close
What this example does: if either side sees something closer than 20 cm, the hub light turns red and the hub beeps; otherwise it stays green.
What you need: same as Example 1.
How to connect: plug the Ranger 2-Way into port C.
Download the program
| Official LEGO App |
|---|
| ex02_too_close_beep.llsp3 |
🟨 Blocks in the official LEGO App
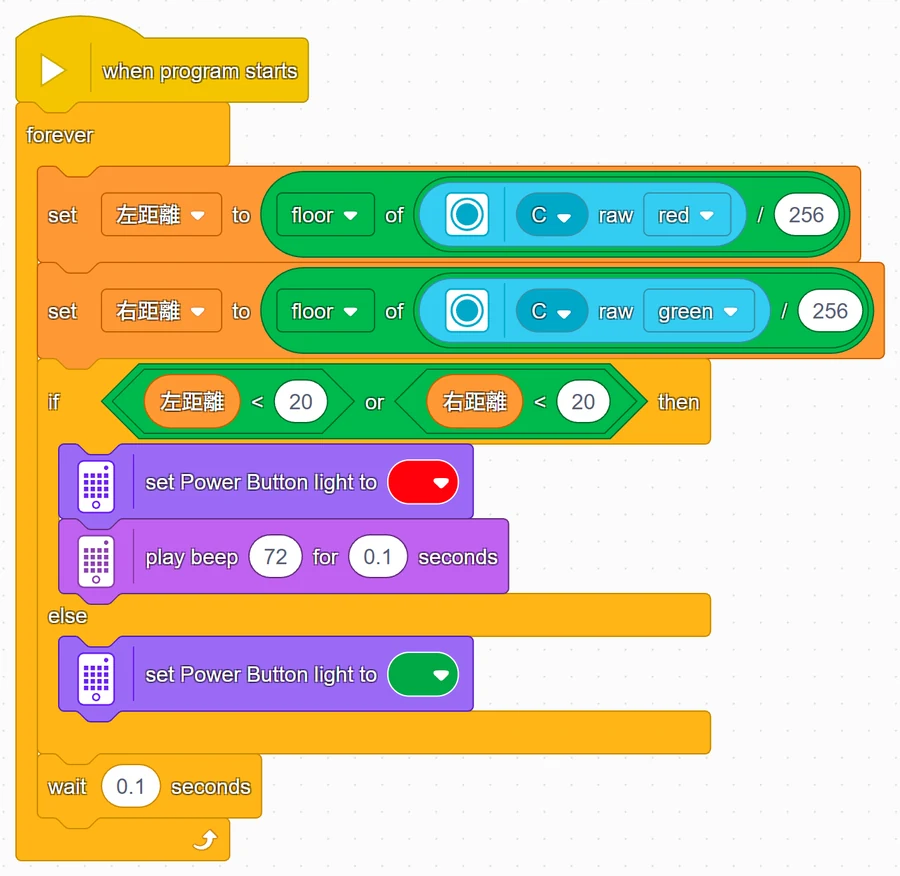
Step by step: what the program does
- Read the distance: the official App reads the left and right distances; the MBC Blocks website and Pybricks read the "nearer distance" (the smaller of the two) directly.
- If too close then…: the official App writes it as "left < 20 or right < 20", which means the same as "nearer distance < 20" → red light and a beep.
- Else…: green light.
- Wait 0.1 seconds, then check again.
What you should see when it runs
- Nothing in front: green light.
- Move your hand in slowly; once it is within 20 cm: red light and constant beeping. Take your hand away and it goes back to green.
Common questions
- It goes quiet when my hand touches the sensor? → When something is extremely close (within a few cm), the laser may not be able to measure it and reads 120. That is just how the laser works; leave a little gap.
- Want it to beep at 30 cm instead? → Change "20" to "30" (in the official App there are two 20s, change both).
Example 3: Which side is closer
What this example does: the hub display uses an arrow to tell you where the object is: left side closer → ⬅, right side closer → ➡, about the same → ⬆, nothing there → ✕.
What you need: same as Example 1.
How to connect: plug the Ranger 2-Way into port C.
Download the program
| Official LEGO App |
|---|
| ex03_which_closer.llsp3 |
🟨 Blocks in the official LEGO App
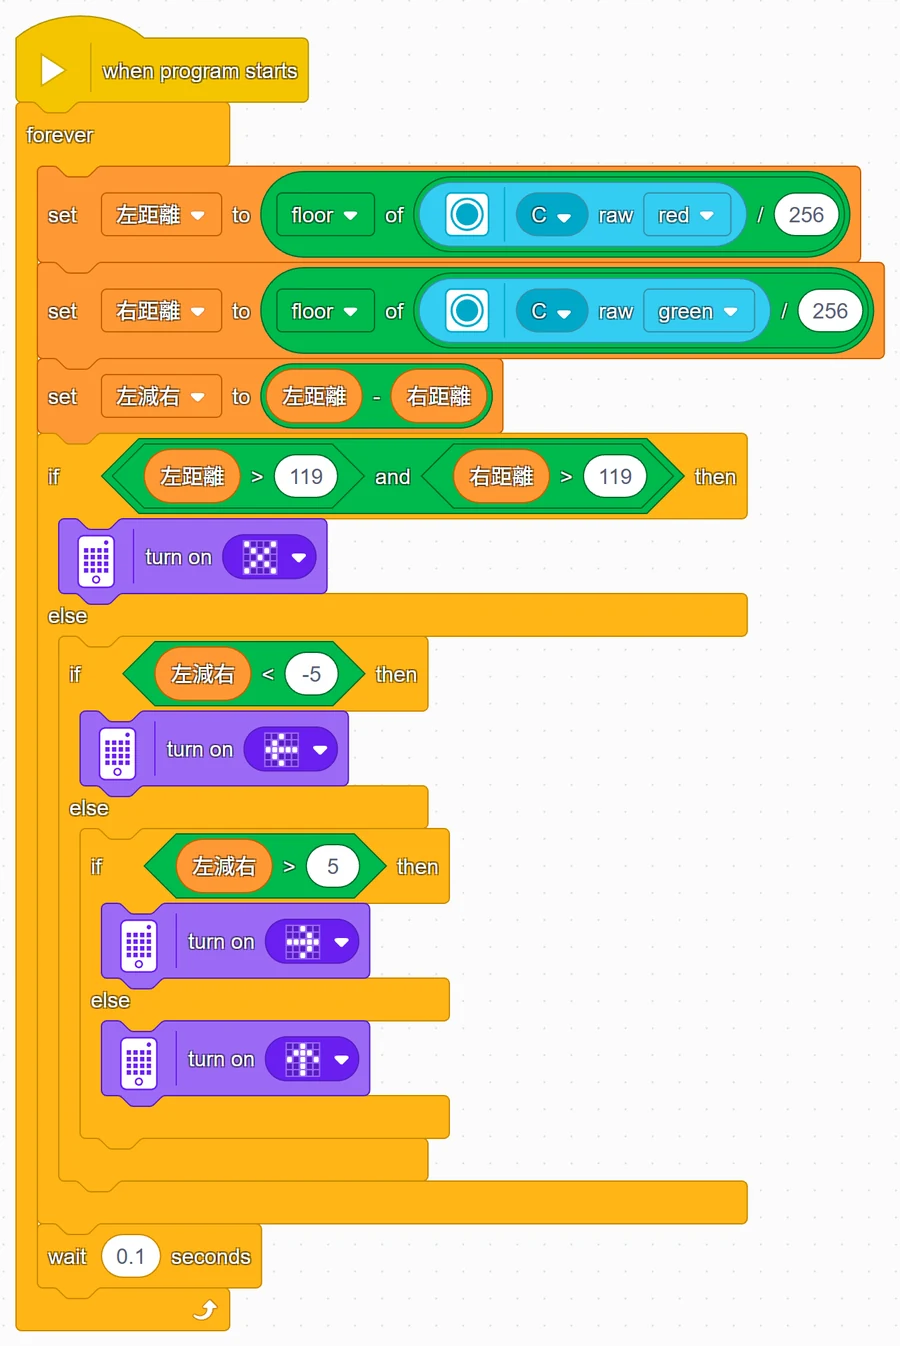
Step by step: what the program does
- First work out left minus right = left distance minus right distance. When the left side is closer, the left distance is smaller, so the result is negative.
- If both sides are 120 → show ✕ (nothing in front; check this first). The official App writes it as "left > 119 and right > 119".
- Else, if left minus right < -5 → the left side is closer by more than 5 cm → left arrow.
- Else, if left minus right > 5 → the right side is closer by more than 5 cm → right arrow.
- Otherwise (less than 5 cm difference) → up arrow, meaning the object is straight ahead.
What you should see when it runs: move a book slowly from the left to the right (about 30 cm away). The arrow goes ⬅ → ⬆ → ➡; take the book away and it becomes ✕.
Common questions
- Why does it have to differ by more than 5 cm? → The lasers themselves have an error of 1 to 2 cm. Leaving some room keeps the arrow from flickering back and forth.
- The left and right arrows are swapped? → Left and right are as seen from behind the sensor, looking the way it faces (left = J5, right = J3); facing the sensor, they are the other way round. If they are still swapped seen from behind, go back to Example 1 and confirm left and right; the sensor may be mounted the other way round.
- The arrow jumps around when the object is far away? → The two laser beams get wider with distance and overlap far away, so beyond 50 cm it is hard to tell left from right. Play with this example within 50 cm.
Example 4: Back up and turn when something is ahead
What this example does: the robot keeps driving forward. When something is in front (closer than 20 cm), it stops → beeps → backs up 10 cm → turns right 90 degrees, then keeps going.
What you need
- Everything from Example 1, plus
- A two-wheeled robot car (two motors as the wheels)
- An open floor area with a few boxes as obstacles
How to connect
- Plug the Ranger 2-Way into port C, mounted at the front of the car, pointing straight ahead, at least 5 cm off the floor (too low and it will measure the floor)
- Left wheel motor on E, right wheel motor on F
Download the program
| Official LEGO App |
|---|
| ex04_obstacle_back.llsp3 |
🟨 Blocks in the official LEGO App
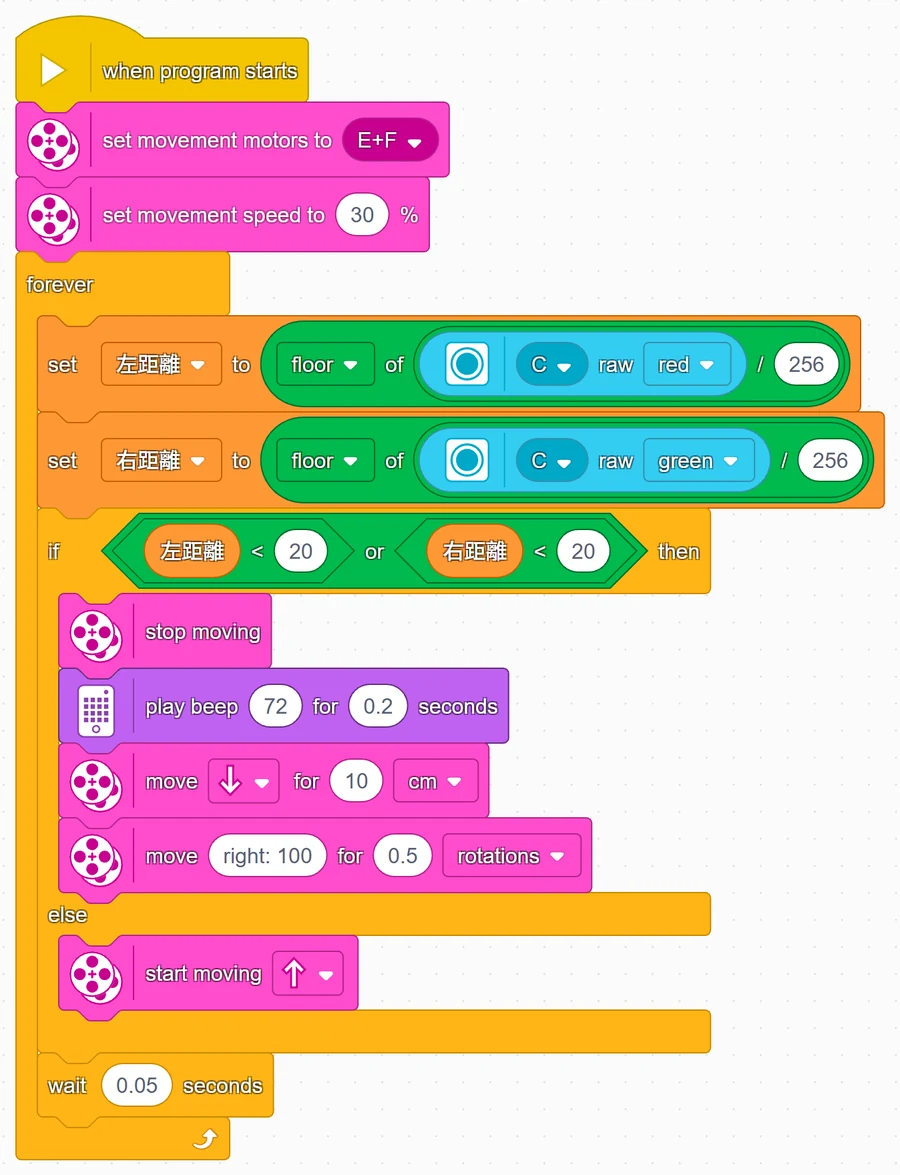
Step by step: what the program does
- Tell the hub where the wheels are: in the official App it is "set movement motors to E+F"; on the MBC Blocks website and in Pybricks it is "drive base: left wheel E, right wheel F".
- Set the speed: 30% in the official App; 150 mm per second in the other two.
- Repeat forever: read the distance.
- If nearer distance < 20 → stop → beep → back up 10 cm → turn right on the spot. The official App's "turn right" is "move 0.5 rotations with steering 100", which is roughly 90 degrees on the standard LEGO car.
- Else → drive forward.
What you should see when it runs: the car drives forward, stops just before hitting a box, beeps, backs up a little, turns right, then carries on.
Common questions
- It only stops after bumping into the obstacle? → It is driving too fast, or the obstacle is black/transparent (cannot be measured). Lower the speed, or raise the "20" a bit (for example 25).
- It turns less than 90 degrees / too much? → Official App: change the "0.5 rotations" number; MBC Blocks website and Pybricks: change the "90".
- The car drives backward / the direction is reversed? → The motors are mounted the opposite way from the standard LEGO car. Official App: mount the motors the way the LEGO "standard driving base" does; MBC Blocks website: in the "drive base" block, flip the "forward" direction of both the left and right wheel; Pybricks: change the left wheel to
Direction.CLOCKWISEand the right wheel toMotor(Port.F, Direction.COUNTERCLOCKWISE). - It keeps spinning on the spot and never moves forward? → The sensor is mounted too low and is measuring the floor. Raise the sensor a bit and tilt it slightly upward.
Example 5: Drive up to a wall and square up
What this example does: the robot drives forward and stops 20 cm from the wall, then turns slowly on the spot until both lasers read the same distance (within 1 cm), which means the front of the car is facing the wall squarely. When done it beeps and shows a smiley face on the display. Teams often use this trick in competitions to "square up" the robot.
What you need: same as Example 4, plus a wall (or the flat side of a big cardboard box).
How to connect: plug the Ranger 2-Way into port C, mounted at the front pointing forward; left wheel motor on E, right wheel motor on F.
Download the program
| Official LEGO App |
|---|
| ex05_square_up.llsp3 |
🟨 Blocks in the official LEGO App
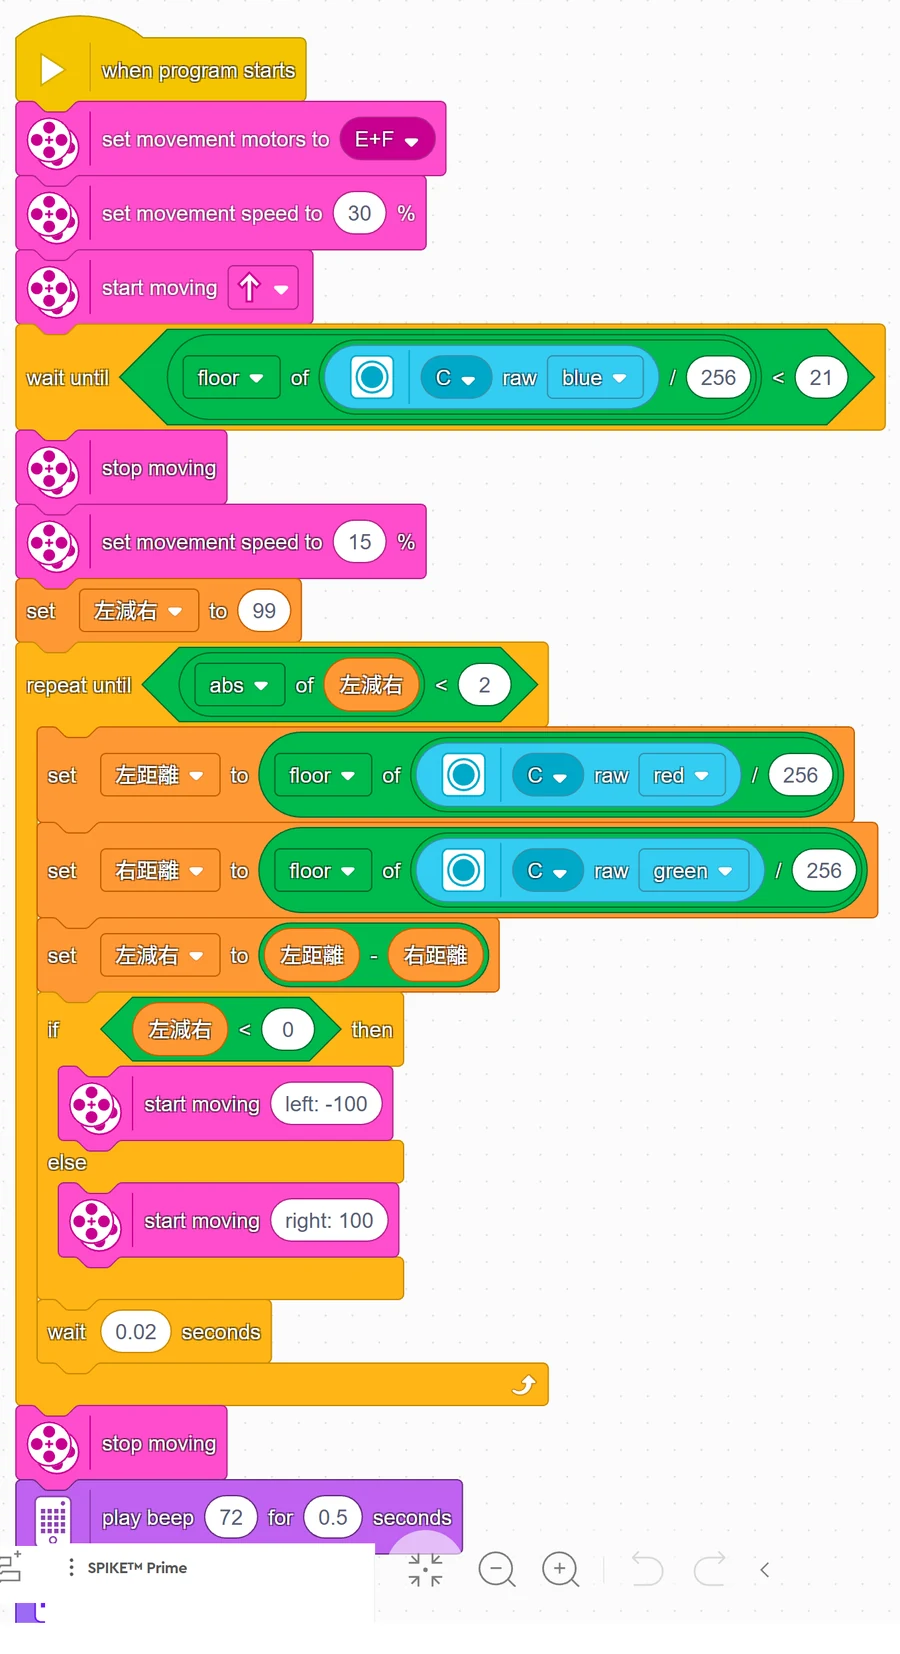
Step by step: what the program does (this example is not a "repeat forever"; it runs 3 steps in order and then ends)
- Step 1: drive forward, "wait until" the average distance ≤ 20 cm, then stop. In the official App the average distance is "raw blue ÷ 256, rounded down", written as "< 21", which means the same thing.
- Step 2: square up. "Repeat until" left and right differ by 1 cm or less:
- left minus right < 0 (left side closer) → the front is pointing to the right → turn left;
- else → turn right.
- The official App sets "left minus right" to 99 first, so that the "repeat until" checks at least once.
- Step 3: done: stop, beep, show a smiley face.
What you should see when it runs: place the car at a slight angle to the wall (front pointing a little off), then press run. The car drives forward, stops, wiggles left and right to square up, then beeps.
Common questions
- It keeps turning left and right and never stops? → The wall is not flat, or "within 1 cm" is too strict. Change the "1" to "2" (in the official App, change "< 2" to "< 3").
- It squares up the wrong way and gets more crooked? → Left and right are as seen from behind the sensor, looking the way it faces (left = J5, right = J3). Go back to Example 1 and confirm left and right; if they are swapped, swap "turn left" and "turn right".
- It cannot square up when the angle is too big (over 30 degrees)? → At a big angle one laser misses the wall completely (reads 120). Line the car up roughly first, then start.
- The wall is black? → Black walls read shorter and less accurately. Use a light-colored wall or stick white paper on it.
Note
These examples have no version for this software: Example 6 (advanced): Park precisely using millimeters
More questions
- The hub does not detect the sensor? Unplug and replug, wait 2 s, try another port. The official app shows it as a colour sensor — that is expected.
- Can I use the official app and Pybricks on the same hub? One firmware at a time: Pybricks and the MBC Blocks website need Pybricks firmware, the official app needs LEGO firmware; you can switch back any time with the SPIKE app.
Still stuck? Contact us with your software and a screenshot of the program.
Downloads
Sources
- Host and software list:
_build/guides.json - Values and commands:
_build/protocol/tof2.json(single source of truth) - Setup:
_build/guides/software/spike-official.en.md、_build/guides/product/tof2/spike-official.en.md - Examples:
sensors/tof2/spike-examples.md