
Controller 2.4G (PS2) × SPIKE × Official LEGO App
Interactive tutorialSPIKE
First time? Try the interactive tutorial in your browser first, then follow the steps below with your hub.
This page covers Official LEGO App (SPIKE 3, Robot Inventor) only: how to set it up for the Controller 2.4G (PS2) on SPIKE Prime / Robot Inventor, how to read every value, the commands it supports and examples. Use the switcher above to change product, host or software.
Setup
What you need
- Sensor: Controller 2.4G (PS2) (SPIKE edition). Each platform is a different factory edition; an EV3 edition is not recognised on a SPIKE hub.
- Hub: SPIKE Prime (Education, yellow hub) or Robot Inventor (home edition, teal hub).
- Cable: the standard cable in the box, or an original LEGO cable.
- Software: Education uses the LEGO Education SPIKE App (the examples on this site use SPIKE 3); the home edition uses the LEGO MINDSTORMS Robot Inventor App.
- Hub firmware: the original LEGO firmware. No need to switch to Pybricks.
Install the software
- Education: install the SPIKE App from the LEGO Education download page.
- Home edition: install the LEGO MINDSTORMS Robot Inventor App.
- If the hub has been flashed with Pybricks, switch it back to the original LEGO firmware with the SPIKE App first, or the official App cannot connect.
Note
The Education and home editions read values differently: in the home-edition App some blocks are limited to
0 ~ 126, and "Color" only goes up to 10. Use the readings for the edition you have.
Make the software see the sensor
No extension and no driver needed. Plug the sensor into the hub and the official App treats it as an original LEGO sensor (for most products a SPIKE Color Sensor); just use that sensor's blocks.
- An official block returns one number at a time, so the product data is encoded into the "Color", "Reflected light" and "Raw red / green / blue" slots. See the readings below for what each slot means.
- To open an example: download the
.llsp3(home edition:.lms) → open the App → top-left "File" → "Open" → pick the file.
Wiring
- Plug the sensor into hub port C with the cable (any of A~F works; choose the same port in your program).
- The plug only goes in one way: latch up, push it in gently, do not force it.
- When the hub is on, the light on the sensor comes on.
Connect the gamepad to the receiver
The PS2 2.4G gamepad and its receiver are paired at the factory; no pairing button needed.
- Connect the receiver and turn the controller on.
- Switch the gamepad on; it connects by itself.
- Watch the green LED on the receiver: on = no gamepad yet; off = gamepad connected.
- The ANALOG (or MODE) light on the gamepad must be on for the sticks to give values. The receiver switches to this mode on connect; if the light is off, press the ANALOG button in the middle of the gamepad.
Caution
2.4 GHz is a shared band (Wi-Fi, microwave ovens). With 12 or more sets in use at one venue they may interfere; in that case use the Bluetooth version (PS4 / PS5).
Note
The beginner examples on this page use the Education edition (SPIKE 3). The home edition (Robot Inventor) reads the "Color" block differently, so the beginner examples do not apply; see the command guide (PDF).
First test
- Connect the hub to the App over USB or Bluetooth.
- Open example 1 on this page and press Run.
- Move your hand or the mat in front of the sensor: if the number changes, everything is connected.
FAQ
- Nothing happens when I plug it in? Check in order: both ends of the cable firmly in → another hub port → another cable → another hub.
- Different Apps give different numbers? The Education (yellow hub) and home (teal hub) editions use different formats. Check which edition you have and use its readings.
- Do I need an adapter or a driver? No. The connector and protocol are the same as a LEGO hub port; it is recognised automatically.
- Example 6 won't open in the official App? Examples marked "Pybricks only" use a new mode in firmware from 2026-10 on, which the official App blocks cannot read.
Reading values
The official app shows the sensor as a Color Sensor. Read it with the color, reflected light and raw red / green / blue blocks under More Sensors, then decode as shown.
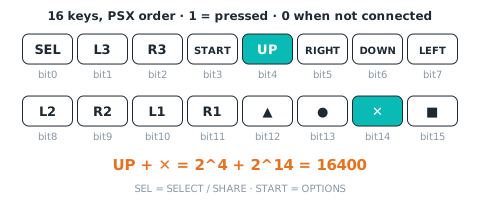
16 buttons buttons16
| Range | Meaning |
|---|---|
0~65535 bit |
all 16 buttons in one word (PSX order, 1 = pressed): bit0 SELECT, 1 L3, 2 R3, 3 START, 4 Up, 5 Right, 6 Down, 7 Left, 8 L2, 9 R2, 10 L1, 11 R1, 12 Triangle, 13 Circle, 14 Cross, 15 Square; 0 when not connected |
| Hub | Value | Block (More Sensors → Color Sensor) | Decode |
|---|---|---|---|
| SPIKE Prime | 16 buttons | 「raw blue」 | the number it returns (negative while ■ is held: add 65536 first) |
Firmware note: App 原始藍 = button16(.ino:201-211)
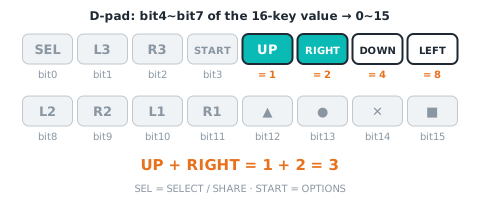
d-pad dpad
| Range | Meaning |
|---|---|
0~15 bit |
Up 1, Right 2, Down 4, Left 8 (added when pressed together), 0~15; 0 when not connected |
| Hub | Value | Block (More Sensors → Color Sensor) | Decode |
|---|---|---|---|
| SPIKE Prime | d-pad | 「reflected light」 | the number mod 16 |
| Robot Inventor | d-pad | 「reflected light」 | the number mod 16 (negative while ■ is held, ■ alone = −128: add 256 first) |
Firmware note: byte1 = 方向 | 形狀<<4(App 反射光):低 4 bit; byte0 = 方向 | 形狀<<4
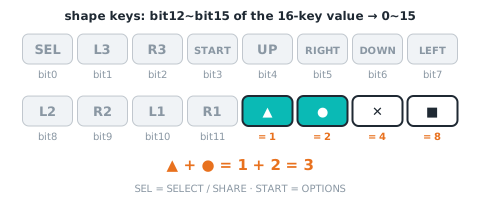
shape buttons shape
| Range | Meaning |
|---|---|
0~15 bit |
Triangle 1, Circle 2, Cross 4, Square 8 (added when pressed together), 0~15; 0 when not connected; high nibble of 0x22 'R' |
| Hub | Value | Block (More Sensors → Color Sensor) | Decode |
|---|---|---|---|
| SPIKE Prime | shape buttons | 「reflected light」 | floor(the number ÷ 16) |
| Robot Inventor | shape buttons | 「reflected light」 | floor(the number ÷ 16) (negative while ■ is held, ■ alone = −128: add 256 first) |
Firmware note: 高 4 bit; 高 4 bit
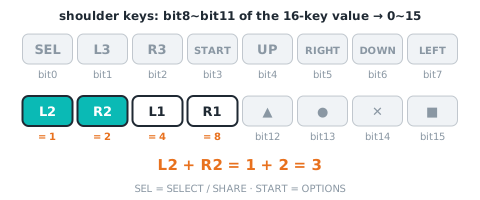
shoulder buttons shoulder
| Range | Meaning |
|---|---|
0~15 bit |
L2 1, R2 2, L1 4, R1 8 (added when pressed together), 0~15; 0 when not connected |
| Hub | Value | Block (More Sensors → Color Sensor) | Decode |
|---|---|---|---|
| SPIKE Prime | shoulder buttons | 「color」 | the number mod 16 (negative while START is held, START alone = −128: add 256 first) |
| Robot Inventor | shoulder buttons | 「raw blue」 | the number mod 16 |
| Robot Inventor | one-button code | 「color」 | the number = one-button code: L2 1, R2 2, L1 3, R1 4, SELECT 5, L3 6, R3 7, START 8, none 0 (with several held, only the smallest code) |
Firmware note: byte0 = 肩 | 功能<<4(App 顏色,START = −128):低 4 bit; 原始藍 = 肩 | 功能<<4(0~255); 單鍵編號(L2=1 R2=2 L1=3 R1=4 SELECT=5 L3=6 R3=7 START=8,沒按 0;同時按只回編號最小的那個)
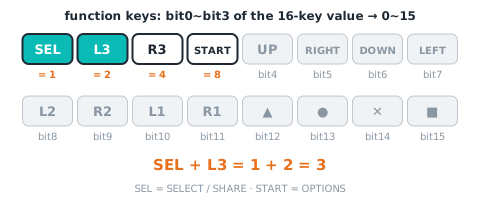
function buttons func
| Range | Meaning |
|---|---|
0~15 bit |
SELECT 1, L3 2, R3 4, START 8 (added when pressed together), 0~15; 0 when not connected; high nibble of 0x22 'G' |
| Hub | Value | Block (More Sensors → Color Sensor) | Decode |
|---|---|---|---|
| SPIKE Prime | function buttons | 「color」 | floor(the number ÷ 16) (negative while START is held, START alone = −128: add 256 first) |
| Robot Inventor | function buttons | 「raw blue」 | floor(the number ÷ 16) |
| Robot Inventor | one-button code | 「color」 | the number = one-button code: L2 1, R2 2, L1 3, R1 4, SELECT 5, L3 6, R3 7, START 8, none 0 (with several held, only the smallest code) |
Firmware note: 高 4 bit; 原始藍 = 肩 | 功能<<4(0~255); 單鍵編號(L2=1 R2=2 L1=3 R1=4 SELECT=5 L3=6 R3=7 START=8,沒按 0;同時按只回編號最小的那個)
stick LX / LY / RX / RY stick
| Range | Meaning |
|---|---|
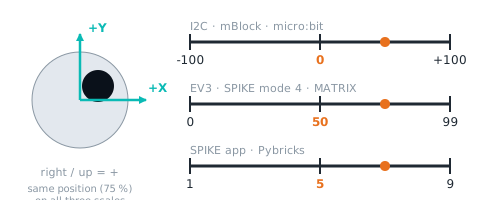
1~9 (5 = centre) |
SPIKE gives a scaled value, 1 |
| Hub | Value | Block (More Sensors → Color Sensor) | Decode |
|---|---|---|---|
| SPIKE Prime | left stick LX, LY | 「raw red」 | the number = LX×10 + LY: floor(number ÷ 10) = LX, number mod 10 = LY (1~9 each, 5 = centre) |
| SPIKE Prime | right stick RX, RY | 「raw green」 | the number = RX×10 + RY: floor(number ÷ 10) = RX, number mod 10 = RY (1~9 each, 5 = centre) |
| Robot Inventor | left stick LX, LY | 「raw red」 | the number = LX×10 + LY: floor(number ÷ 10) = LX, number mod 10 = LY (1~9 each, 5 = centre) |
| Robot Inventor | right stick RX, RY | 「raw green」 | the number = RX×10 + RY: floor(number ÷ 10) = RX, number mod 10 = RY (1~9 each, 5 = centre) |
Firmware note: byte2~3 = LX×10+LY、byte4~5 = RX×10+RY(11~99,中心 55;App 原始紅/綠); 原始紅 = LX×10+LY、原始綠 = RX×10+RY(各 1~9,5 = 中間)
Not readable here:connected, battery, L2 analog, R2 analog, system keys, gamepad type. Use Pybricks for these.
Commands
The SPIKE port is read-only, so this software cannot send commands: calibrate with the button on the sensor and change settings over Arduino I2C, mBlock or micro:bit.
Examples
Example 1: Button test
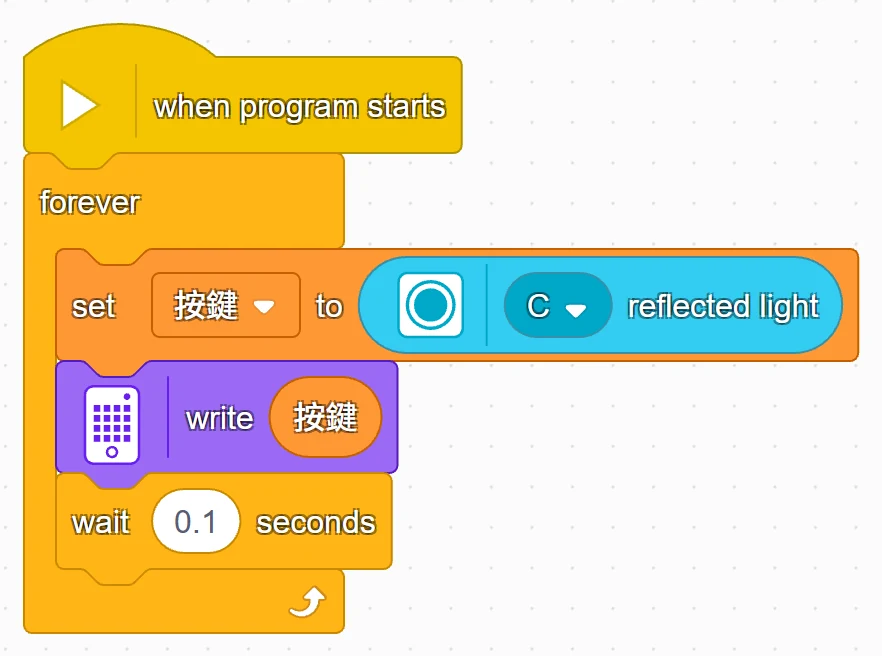
What this example does: the hub display keeps showing the "button number". Press different buttons and the number changes, so you can check that every button works.
What you need
- 1 SPIKE hub
- Controller PS2 receiver + 2.4G gamepad (already connected, see above)
How to wire it: plug the receiver into port C.
Download the program
| Official LEGO App |
|---|
| ex01_button_number.llsp3 |
🟨 Blocks in the official LEGO App
Step by step, what the program does
- Repeat forever: the blocks below keep running until you press stop.
- Read the buttons: the official App uses "reflected light", which reads the D-pad and the shape buttons; the MBC Blocks website and Pybricks use "all buttons", which reads all 16.
- Show it on the hub display: the number scrolls across the display (hold the button and wait for it to finish scrolling).
- Wait 0.1 second before reading again.
What you should see when it runs
Common questions
- Always 0, nothing happens no matter what I press? → The gamepad is not connected yet: check whether the green light on the receiver is still on, turn on the gamepad or change its batteries.
- The hub says it cannot find the sensor, or the numbers look strange? → The receiver may have the EV3 firmware. You need the SPIKE version.
Example 2: Joystick value
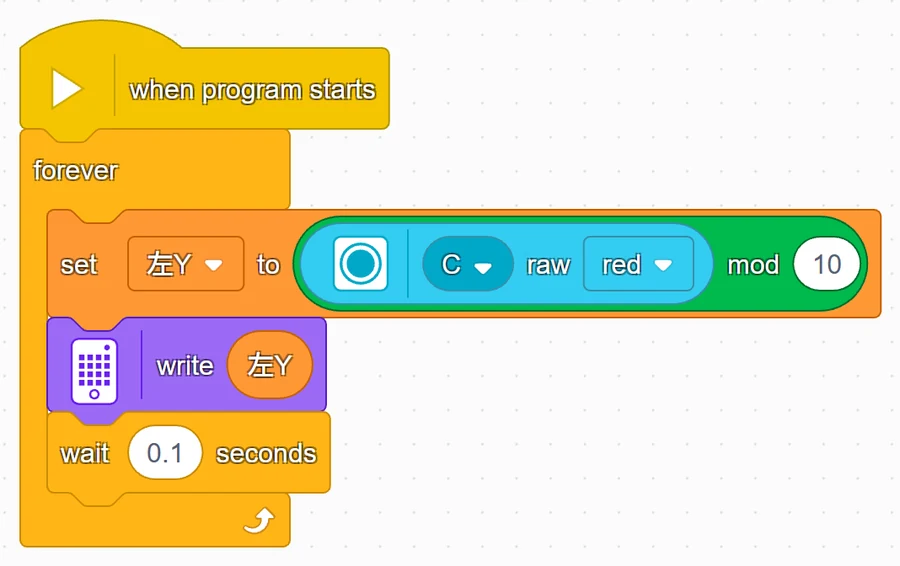
What this example does: the hub display shows the up-down position of the left stick (1 to 9). Released is 5; pushing up makes it bigger, pulling down makes it smaller.
What you need: same as Example 1.
How to wire it: plug the receiver into port C.
Download the program
| Official LEGO App |
|---|
| ex02_stick_value.llsp3 |
🟨 Blocks in the official LEGO App
Step by step, what the program does
- Read the left stick up-down:
- Official App: "raw red" reads X×10+Y (for example 59 = left-right centered at 5, pushed all the way up to 9), so use "remainder of dividing by 10" to pull out the Y (59 → 9).
- MBC Blocks website: just pick "left stick Y (1~9)".
- Pybricks:
pad.stick('LY').
- Show it on the hub display. The MBC Blocks website and Pybricks also print the number on the computer screen (Pybricks prints all 4 directions).
- Wait 0.1 second before reading again.
What you should see when it runs
- Stick released: 5.
- Slowly push up: 6, 7, 8, 9.
- Slowly pull down: 4, 3, 2, 1.
Common questions
- Always 5, even when I push the stick? → The gamepad is in "digital mode": press the ANALOG button on the gamepad once so the ANALOG light comes on.
- Shows 1 before I even turn on the gamepad? → On older receiver firmware, the sticks read 1 (same as pulled all the way down) while no gamepad is connected. Turn on the gamepad and it goes back to 5. Example 5 has a safety check so the car does not reverse right at startup because of this.
- Want the right stick, or the left-right direction? → MBC Blocks website: change the dropdown to "right stick Y" or "left stick X"; official App: use "raw green" for the right stick, and "whole part of dividing by 10" for left-right; Pybricks: change
'LY'to'RY','LX'or'RX'.
Example 3: Buttons control the light and sound
What this example does: press ▲ and the hub light turns green, ● red, ✕ blue, ■ pink (the same colors as on the gamepad); with nothing pressed the light turns off. Press L1 for a low beep, R1 for a high beep.
What you need: same as Example 1.
How to wire it: plug the receiver into port C.
Download the program
| Official LEGO App |
|---|
| ex03_light_sound.llsp3 |
🟨 Blocks in the official LEGO App
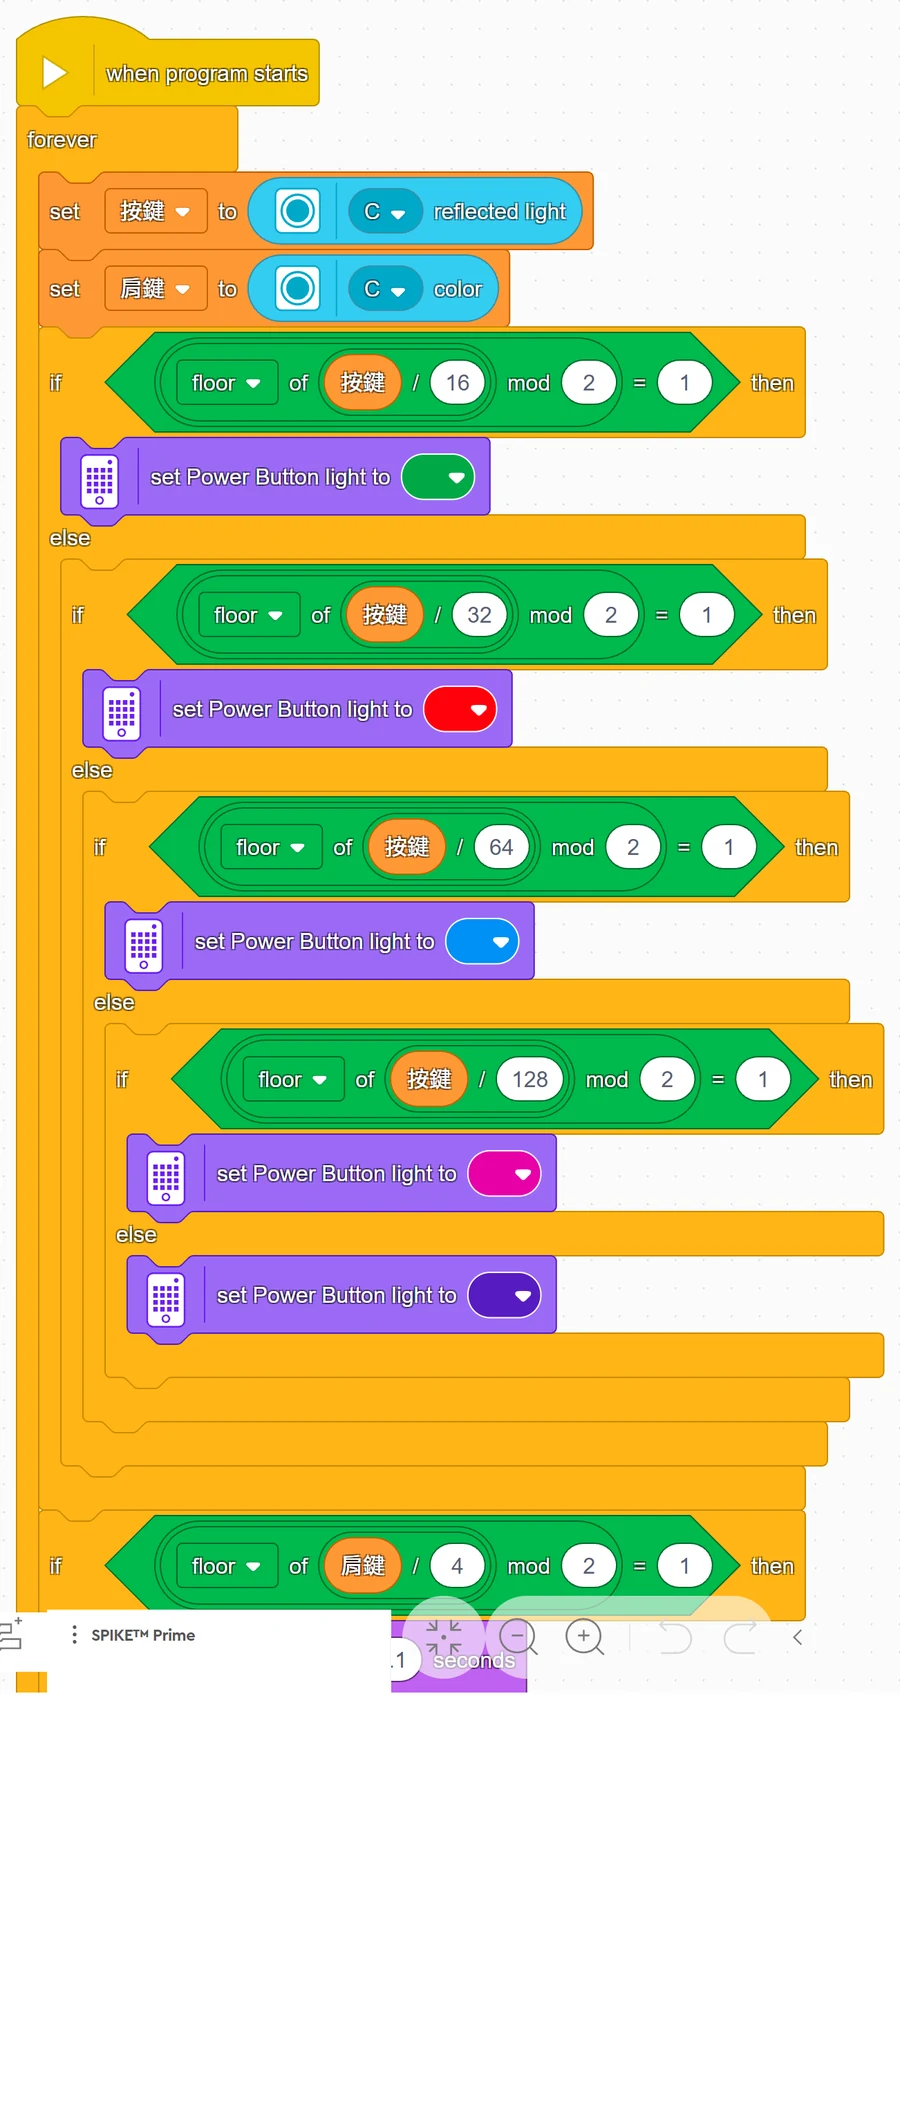
Step by step, what the program does
- First read the buttons into a "variable" (a variable = a box with a name that can hold one number): the official App uses two boxes, "buttons" holds reflected light (D-pad + shape buttons) and "shoulder" holds color (L1, R1, ...). The MBC Blocks website and Pybricks do not need to store anything; they just ask "is this button pressed?".
- If ▲ is pressed → green light.
- Else, if ● is pressed → red light; else if ✕ → blue light; else if ■ → pink light.
- None of them → light off.
- Two more "if"s: L1 pressed → low beep (note 60 in the official App, 262 Hz in the other two; both are a "Do"); R1 pressed → high beep (note 72 / 523 Hz, the Do one octave up).
- How the official App checks "▲ is pressed": whole part of (buttons ÷ 16), then remainder of dividing by 2 = 1. For ● use 32, ✕ 64, ■ 128; L1 is (shoulder ÷ 4), R1 is (shoulder ÷ 8).
What you should see when it runs
- Hold ▲: green light; release: light off.
- Press ▲ and ● together: green light (the first "if" that is true wins, the ones below are not checked).
- Hold L1: it keeps beeping the low note.
Common questions
- No sound for L1, R1 in the official App? → The shoulder buttons are read with the "color" block (this page was put together from the firmware and the official examples; it has not yet been checked one by one on real hardware). First run Example 1 to confirm the D-pad and shape buttons work; then change "reflected light" in Example 1 to "color", and pressing L1 should show 4, R1 should show 8.
- How do I change the light color? → Official App: click the color dot on the "set Power Button light to" block; MBC Blocks website: click the dropdown on the "set hub light to" block; Pybricks: change
Color.GREENto something likeColor.YELLOW.
Example 4: Drive with the D-pad
What this example does: hold a D-pad button and the car drives that way; release and it stops. Up = forward, Down = backward, Left = turn left in place, Right = turn right in place.
What you need
- Everything from Example 1, plus
- A two-wheel car (two motors as the wheels)
How to wire it
- Plug the receiver into port C
- Left wheel motor on E, right wheel motor on F
Download the program
| Official LEGO App |
|---|
| ex04_dpad_drive.llsp3 |
🟨 Blocks in the official LEGO App
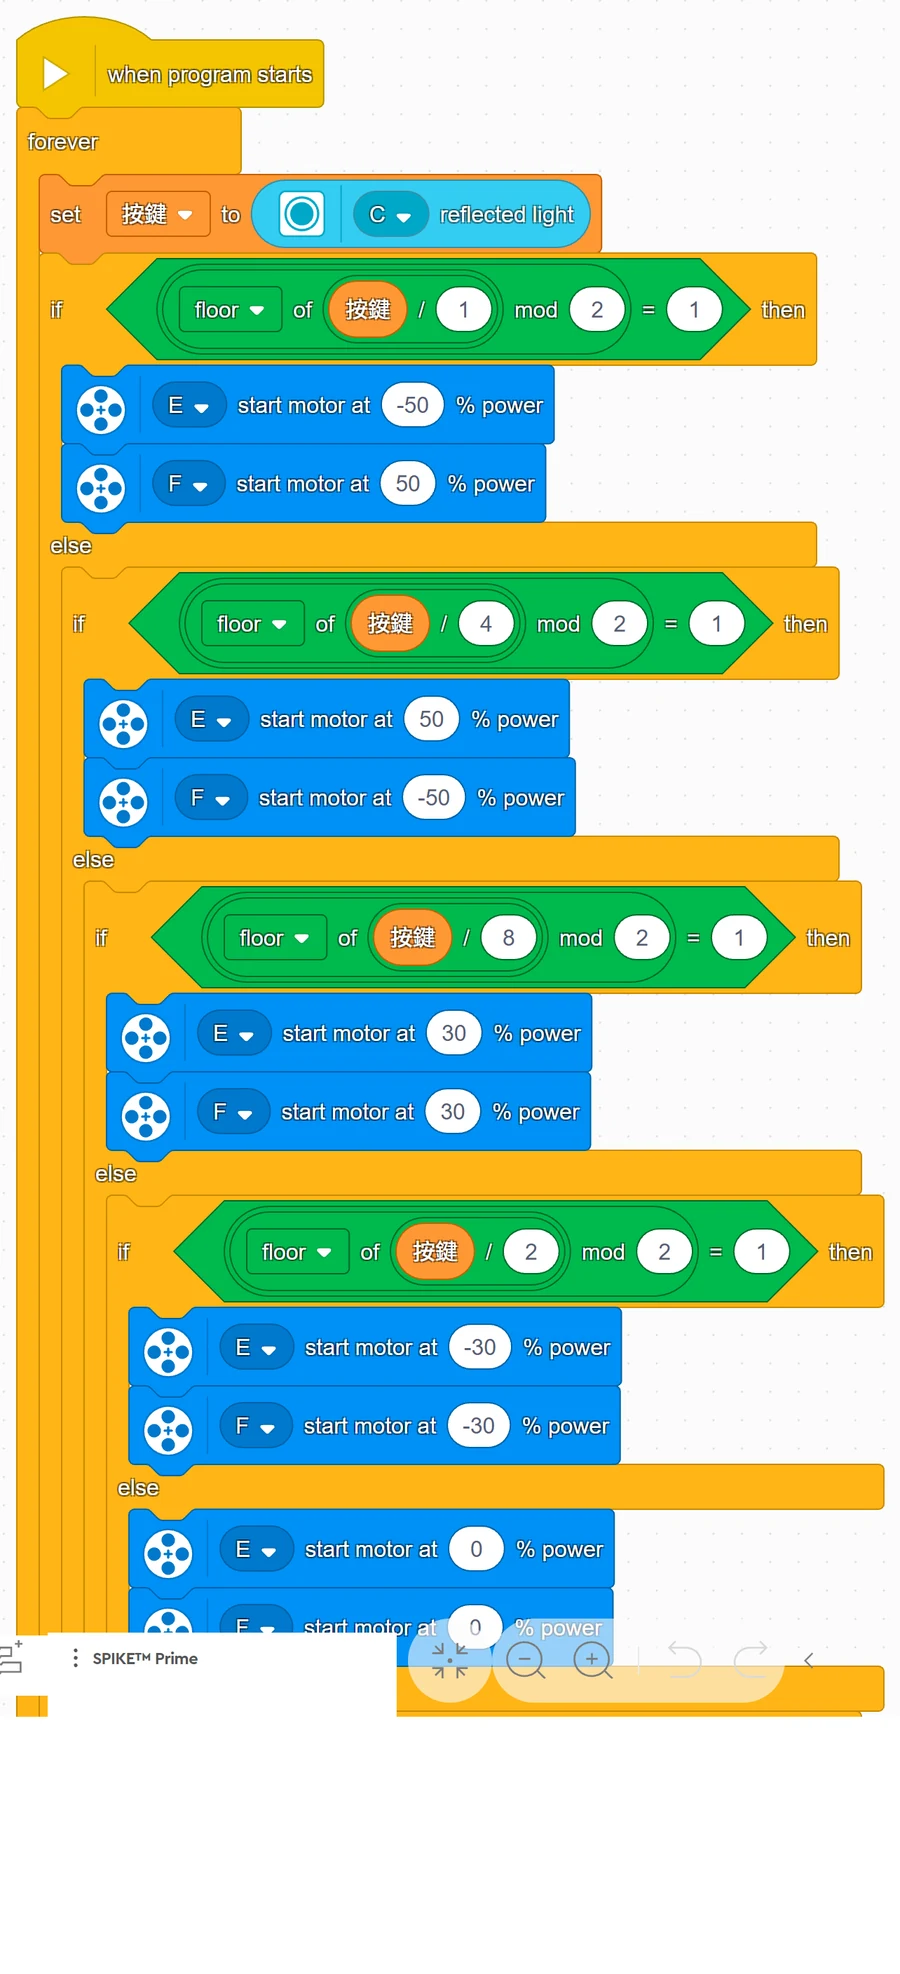
Step by step, what the program does
- Tell the hub how the wheels are mounted: the two motors face each other, so the left wheel has to "spin the other way" to go forward.
- MBC Blocks website: "E is a LEGO motor, forward = counterclockwise" (F is clockwise); Pybricks:
Direction.COUNTERCLOCKWISE. Once this is set, giving both wheels a positive number means forward. - The official App's motor blocks have no such setting, so the left wheel E gets a minus sign: forward is E -50, F 50.
- MBC Blocks website: "E is a LEGO motor, forward = counterclockwise" (F is clockwise); Pybricks:
- Repeat forever: read the buttons.
- If Up is pressed → both wheels forward (50% power).
- Else if Down → both wheels backward.
- Else if Left → left wheel backward, right wheel forward → turn left in place (30% power; turning slower is easier to control).
- Else if Right → turn right in place.
- Nothing pressed → both wheels power 0, stop.
| Holding | Official App (E, F) |
|---|---|
| Up | -50, 50 |
| Down | 50, -50 |
| Left | 30, 30 |
| Right | -30, -30 |
| Nothing | 0, 0 |
What you should see when it runs: hold Up and the car drives forward; release and the car stops.
Common questions
- Pressing Up drives backward? → The motors are mounted the opposite way from the standard LEGO car: MBC Blocks website: swap the "forward" directions of E and F; Pybricks: change the left wheel to
Direction.CLOCKWISEand the right wheel toMotor(Port.F, Direction.COUNTERCLOCKWISE); official App: flip the sign of every number. - Pressing Up spins in place? → Only one side is reversed: flip the sign (or forward direction) of that one motor only.
- The gamepad was turned off or ran out of battery, and the car keeps driving? → Press the center button on the hub first to stop the program, then check the gamepad batteries.
Example 5: Tank drive with two joysticks
What this example does: drive it like a tank: the left stick controls the left wheel, the right stick controls the right wheel. Push both forward = forward, pull both back = backward, one forward and one back = turn in place. The further you push, the faster it goes; release and it stops.
What you need: same as Example 4.
How to wire it: plug the receiver into port C; left wheel motor on E, right wheel motor on F.
Download the program
| Official LEGO App |
|---|
| ex05_tank_drive.llsp3 |
🟨 Blocks in the official LEGO App
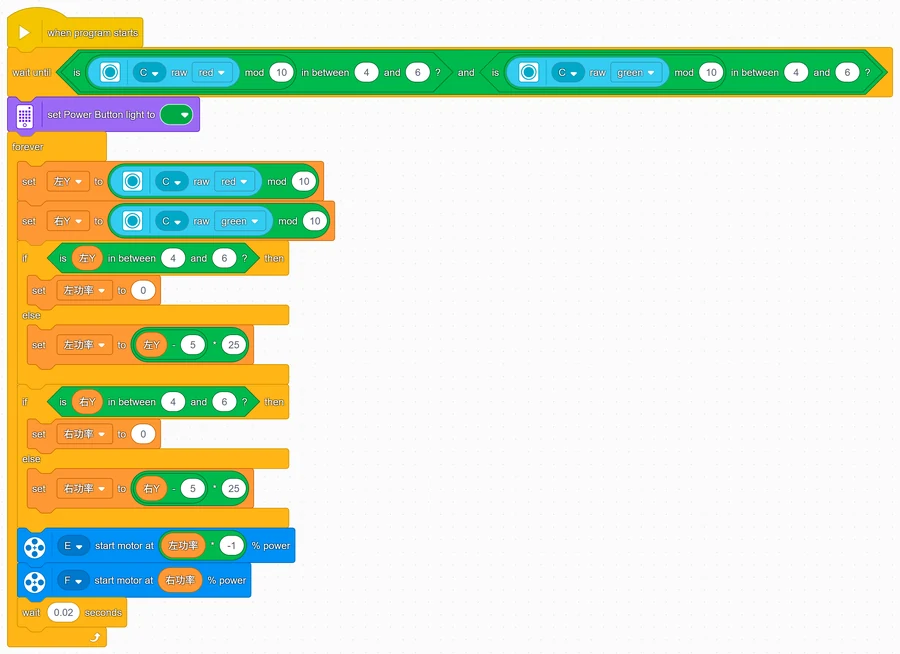
Step by step, what the program does
- Safety check before starting: first "wait until" both sticks are centered (4 to 6), then turn the light green. This way the car will not suddenly shoot off if the gamepad is not connected yet, or a stick gets bumped right at startup.
- Repeat forever: read the left stick up-down (Y) and the right stick up-down (Y). In the official App that is "raw red" and "raw green", remainder of dividing by 10.
- Dead zone: if the stick is between 4 and 6, set the power to 0. When you let go, the stick does not always land exactly on 5; the dead zone is what makes the car stop properly.
- Else: power = (stick − 5) × 25. Pushed to 7 is 50%, all the way to 9 is 100%; pulled to 3 is -50%, all the way to 1 is -100%.
- Send the power to the motors: left wheel E uses the left stick's power, right wheel F uses the right stick's power. In the official App the left wheel is × -1 (same reason as Example 4).
What you should see when it runs
- Right after the program starts: release the sticks and the light turns green; the car does not move.
- Push both sticks forward together: it drives forward, faster the further you push.
- Left stick forward, right stick back: it turns right in place.
- Release: the car stops.
Common questions
- I pressed run but the green light never comes on? → The sticks are not centered, or the gamepad is not connected yet (on older receiver firmware the sticks read 1 while no gamepad is connected). Release the sticks and turn on the gamepad; the green light comes on and it starts.
- A small push does not move the car? → That is the dead zone; it only moves at 7 or more (or 3 or less). For more sensitivity you can change "4 to 6" to "5 to 5", but the car may creep slowly when you let go.
- Too fast to control? → Change "× 25" to "× 15" (full push becomes 60%).
- Forward and backward are swapped, or it spins in place? → See the common questions in Example 4.
Note
These examples have no version for this software: Example 6 (advanced): Connection status and battery level
More questions
- The hub does not detect the sensor? Unplug and replug, wait 2 s, try another port. The official app shows it as a colour sensor — that is expected.
- Can I use the official app and Pybricks on the same hub? One firmware at a time: Pybricks and the MBC Blocks website need Pybricks firmware, the official app needs LEGO firmware; you can switch back any time with the SPIKE app.
Still stuck? Contact us with your software and a screenshot of the program.
Downloads
Sources
- Host and software list:
_build/guides.json - Values and commands:
_build/protocol/ps2.json(single source of truth) - Setup:
_build/guides/software/spike-official.en.md、_build/guides/product/ps2/spike-official.en.md - Examples:
sensors/ps2/spike-examples.md