
EV3 beginner examples: SharpShot (school edition)
Back to the SharpShot (school edition) product page
This page has 5 examples for people who have never written a program: every example comes with a ready-made program file you can download and run, plus a plain-language step-by-step explanation. Start with example 1 and work through in order.
Before you start
- Use the EV3 edition of the sensor (RJ12 plug), plugged into port 1 of the EV3.
- Turn the EV3 on first, then plug in the sensor. If the number never changes, unplug the sensor and plug it back in.
- Examples that drive use the LEGO Education base robot: left wheel motor on B, right wheel motor on C.
- The sensor shows up on the EV3 as an "Infrared Sensor". That is normal: read its values with the infrared sensor blocks.
Every example comes in 5 software versions; pick the one you use:
| Software | Who it suits | How to open the example file |
|---|---|---|
| EV3-G (official software) | School computer labs, WRO teams (the most common in Taiwan) | Download the .ev3 file, choose "File → Open Project" in the EV3 software, then "Download and Run" at the bottom right. |
| EV3 Classroom | First time with EV3, want the same blocks as SPIKE | Download the .lmsp file, choose "Open" on the EV3 Classroom home screen, connect the EV3 and press "Download and Run" at the bottom right. |
| Pybricks v4 | Want to learn typed code, works in the browser | Open code.pybricks.com in Chrome; the EV3 needs the Pybricks firmware first (currently Beta). Drag the .py file into the editor and press Run. |
| EV3 MicroPython v2.0 | Already using the official LEGO EV3 MicroPython | Use the official LEGO "EV3 MicroPython" microSD boot card + the VS Code extension; paste the program into main.py and press F5 to download and run. |
| clev3r | Already using clev3r (EV3 Basic) | Open the .bp file in clev3r, press "Compile and download", then run it from the MBC_ folder in the EV3 file browser. |
The 9 values used on this page
| Name | Range | Where it comes from |
|---|---|---|
| Colour (hue) | 0 ~ 100, -1 = black/white/grey | Mode 1, value 1 |
| Colour saturation | 0 ~ 100 | Mode 1, value 2 |
| Brightness | 0 ~ 100 | Mode 1, value 3 |
| How much the picture moved | 0 ~ 100 | Mode 1, value 4 |
| Blob horizontal position | 0 ~ 100 (left → right), 0 = not found | Mode 1, value 5 |
| Blob vertical position | 0 ~ 75 (bottom → top), 0 = not found | Mode 1, value 6 |
| Blob width | 0 ~ 100, 0 = not found | Mode 1, value 7 |
| Blob height (bigger when closer) | 0 ~ 75, 0 = not found | Mode 1, value 8 |
| Colour (hue) | 0 ~ 100 (red 0 or 100, yellow ≈17, green ≈33, blue ≈67), -1 = black/white/grey | Mode 0 |
Example list:
- What does the camera see? All 8 numbers at once
- Traffic-light robot: go on green only
- Burglar alarm: beep when something moves
- Turn to look at the ball
- Chase the ball: stop when close enough
Example 1: What does the camera see? All 8 numbers at once
What this example does: Mode 1 sends 8 numbers at once: colour, saturation, brightness, motion, and the X, Y, width and height of the colour blob. Show them all on the EV3 screen and compare with the camera picture to understand each one.
What you need:
- SharpShot (school edition) (EV3 edition)
- EV3 brick
How to connect: SharpShot (school edition) in port 1. Camera setup: short-press the side button for the menu → left/right to "2:TRACK" → confirm → aim the crosshair at the ball, set the position, tolerance and minimum area in turn → confirm to save.
Download the program (pick your software):
⬇ EV3-G (official software) | ⬇ EV3 Classroom | ⬇ Pybricks v4 | ⬇ EV3 MicroPython v2.0 | ⬇ clev3r
EV3-G (official software) blocks
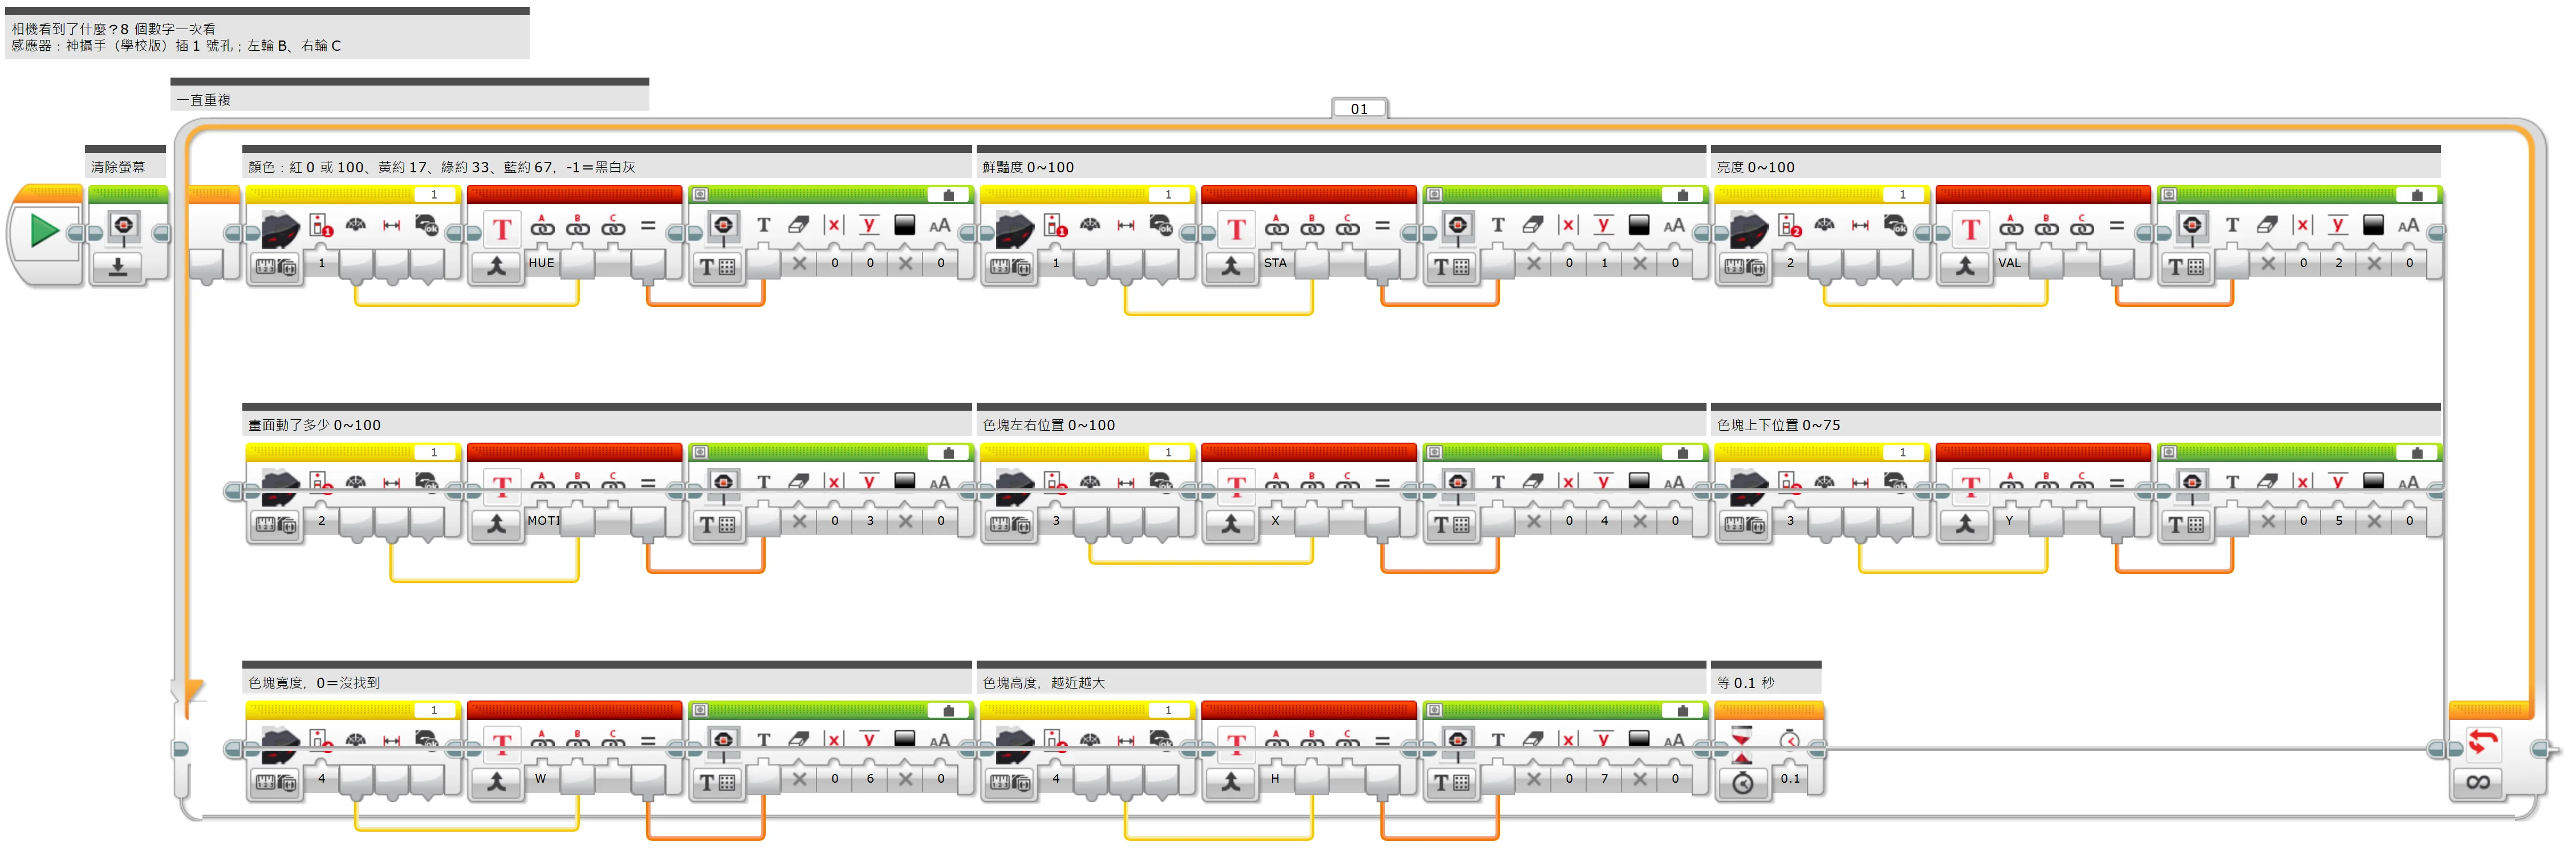
(Too small? Click the picture to open it full size.)
EV3 Classroom blocks
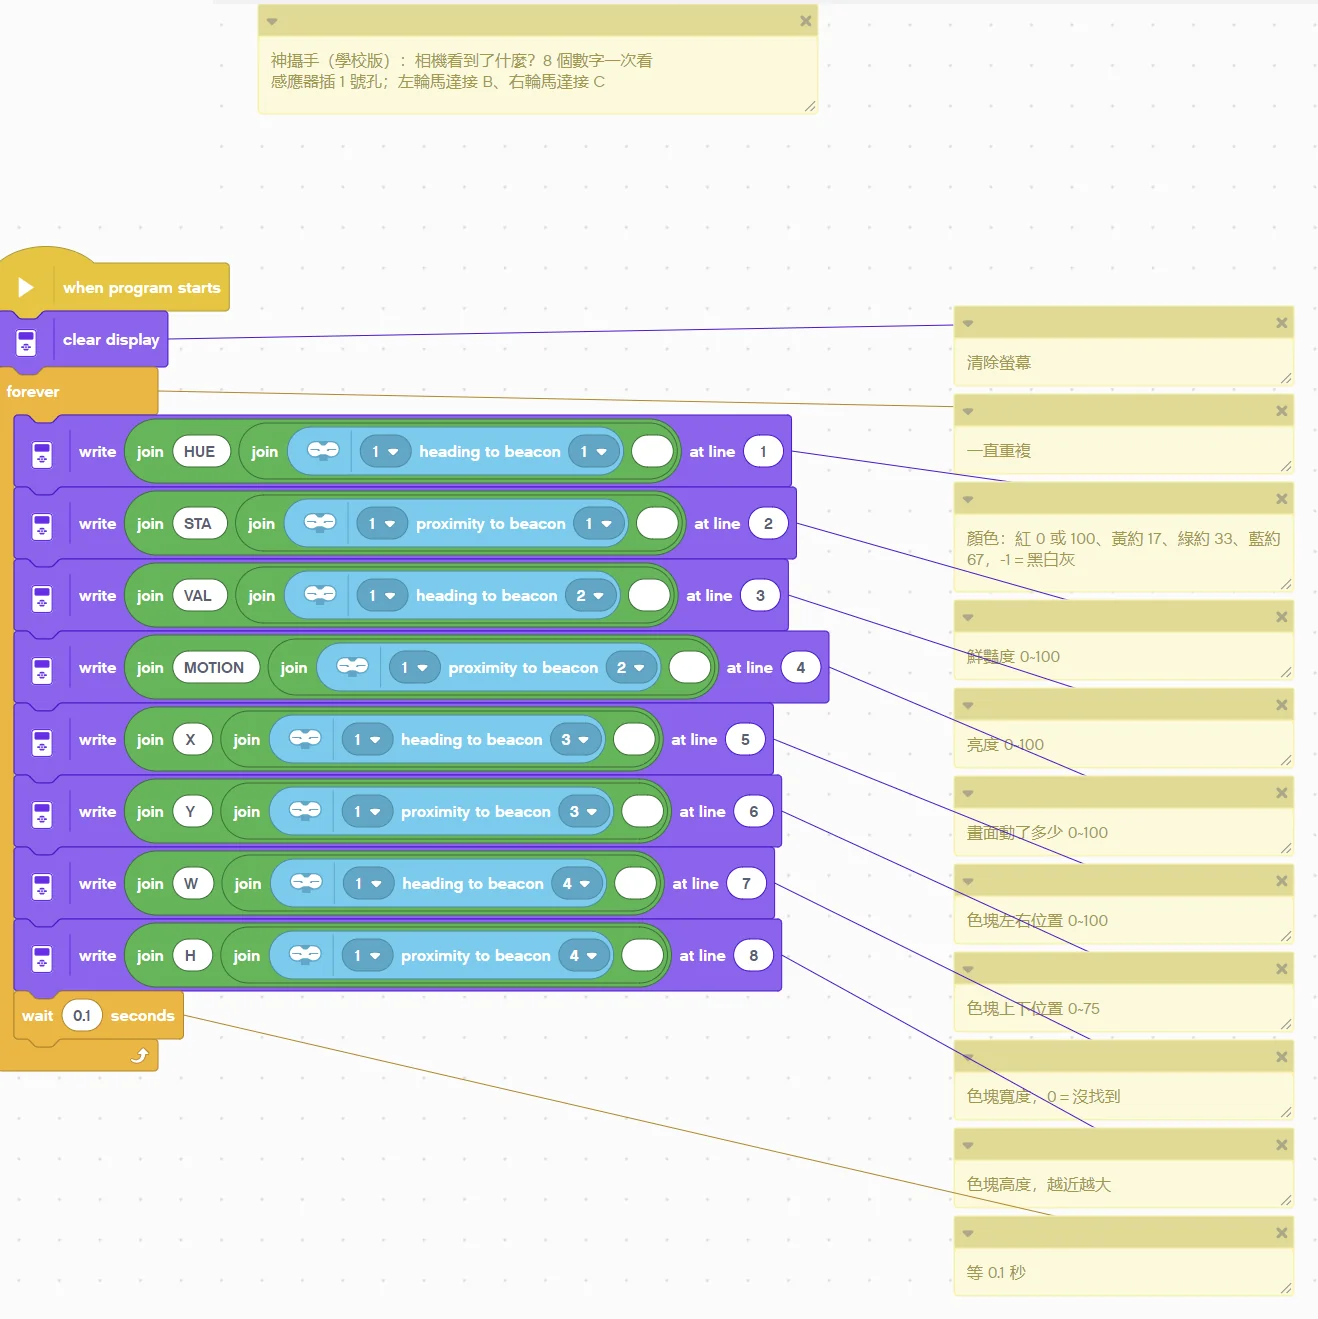
(Too small? Click the picture to open it full size.)
Pybricks v4 code
# ============================================================
# 神攝手 ESP32CAM 視覺感應器(學校老師創意賽版) EV3 新手範例 01:相機看到了什麼?8 個數字一次看
# 軟體:Pybricks v4(用 Chrome 打開 https://code.pybricks.com ,EV3 版目前是 Beta)
# 接法:神攝手(學校版)插 1 號孔
# 這個範例會做什麼:模式 1 一次送出 8 個數字:顏色、鮮豔度、亮度、動態、色塊的 X、Y、寬、高。全部顯示在 EV3 螢幕上,對照相機畫面就能看懂每個數字的意思。
# ============================================================

from pybricks.hubs import EV3Brick
from pybricks.iodevices import LUMPDevice
from pybricks.parameters import Port, Color
from pybricks.tools import wait

ev3 = EV3Brick()
sensor = LUMPDevice(Port.S1)       # 神攝手(學校版)插 1 號孔


def read_hue1():
    # 顏色(色相):0 ~ 100,-1=黑白灰
    return sensor.read(1)[0]


def read_sta():
    # 顏色鮮豔度:0 ~ 100
    return sensor.read(1)[1]


def read_val():
    # 亮度:0 ~ 100
    return sensor.read(1)[2]


def read_motion():
    # 畫面動了多少:0 ~ 100
    return sensor.read(1)[3]


def read_x():
    # 色塊左右位置:0 ~ 100(左 → 右),沒找到=0
    return sensor.read(1)[4]


def read_y():
    # 色塊上下位置:0 ~ 75(下 → 上),沒找到=0
    return sensor.read(1)[5]


def read_w():
    # 色塊寬度:0 ~ 100,0=沒找到
    return sensor.read(1)[6]


def read_h():
    # 色塊高度(越近越大):0 ~ 75,0=沒找到
    return sensor.read(1)[7]


# ---------- 程式從這裡開始 ----------
# 清除螢幕
ev3.screen.clear()
# 一直重複
while True:
    # 顏色:紅 0 或 100、黃約 17、綠約 33、藍約 67,-1=黑白灰
    ev3.screen.draw_text(0, 0, "HUE " + str(read_hue1()) + "      ", Color.BLACK, Color.WHITE)
    # 鮮豔度 0~100
    ev3.screen.draw_text(0, 16, "STA " + str(read_sta()) + "      ", Color.BLACK, Color.WHITE)
    # 亮度 0~100
    ev3.screen.draw_text(0, 32, "VAL " + str(read_val()) + "      ", Color.BLACK, Color.WHITE)
    # 畫面動了多少 0~100
    ev3.screen.draw_text(0, 48, "MOTION " + str(read_motion()) + "      ", Color.BLACK, Color.WHITE)
    # 色塊左右位置 0~100
    ev3.screen.draw_text(0, 64, "X " + str(read_x()) + "      ", Color.BLACK, Color.WHITE)
    # 色塊上下位置 0~75
    ev3.screen.draw_text(0, 80, "Y " + str(read_y()) + "      ", Color.BLACK, Color.WHITE)
    # 色塊寬度,0=沒找到
    ev3.screen.draw_text(0, 96, "W " + str(read_w()) + "      ", Color.BLACK, Color.WHITE)
    # 色塊高度,越近越大
    ev3.screen.draw_text(0, 112, "H " + str(read_h()) + "      ", Color.BLACK, Color.WHITE)
    # 等 0.1 秒
    wait(100)
EV3 MicroPython v2.0 code
#!/usr/bin/env pybricks-micropython
# ============================================================
# 神攝手 ESP32CAM 視覺感應器(學校老師創意賽版) EV3 新手範例 01:相機看到了什麼?8 個數字一次看
# 軟體:樂高官方 EV3 MicroPython v2.0(microSD 開機卡+VS Code「LEGO MINDSTORMS EV3 MicroPython」擴充套件)
# 接法:神攝手(學校版)插 1 號孔
# 這個範例會做什麼:模式 1 一次送出 8 個數字:顏色、鮮豔度、亮度、動態、色塊的 X、Y、寬、高。全部顯示在 EV3 螢幕上,對照相機畫面就能看懂每個數字的意思。
# ============================================================

from pybricks.hubs import EV3Brick
from pybricks.iodevices import Ev3devSensor
from pybricks.parameters import Port, Color
from pybricks.tools import wait

ev3 = EV3Brick()
sensor = Ev3devSensor(Port.S1)     # 神攝手(學校版)插 1 號孔


def read_hue1():
    # 顏色(色相):0 ~ 100,-1=黑白灰
    return sensor.read('IR-SEEK')[0]


def read_sta():
    # 顏色鮮豔度:0 ~ 100
    return sensor.read('IR-SEEK')[1]


def read_val():
    # 亮度:0 ~ 100
    return sensor.read('IR-SEEK')[2]


def read_motion():
    # 畫面動了多少:0 ~ 100
    return sensor.read('IR-SEEK')[3]


def read_x():
    # 色塊左右位置:0 ~ 100(左 → 右),沒找到=0
    return sensor.read('IR-SEEK')[4]


def read_y():
    # 色塊上下位置:0 ~ 75(下 → 上),沒找到=0
    return sensor.read('IR-SEEK')[5]


def read_w():
    # 色塊寬度:0 ~ 100,0=沒找到
    return sensor.read('IR-SEEK')[6]


def read_h():
    # 色塊高度(越近越大):0 ~ 75,0=沒找到
    return sensor.read('IR-SEEK')[7]


# ---------- 程式從這裡開始 ----------
# 清除螢幕
ev3.screen.clear()
# 一直重複
while True:
    # 顏色:紅 0 或 100、黃約 17、綠約 33、藍約 67,-1=黑白灰
    ev3.screen.draw_text(0, 0, "HUE " + str(read_hue1()) + "      ", Color.BLACK, Color.WHITE)
    # 鮮豔度 0~100
    ev3.screen.draw_text(0, 16, "STA " + str(read_sta()) + "      ", Color.BLACK, Color.WHITE)
    # 亮度 0~100
    ev3.screen.draw_text(0, 32, "VAL " + str(read_val()) + "      ", Color.BLACK, Color.WHITE)
    # 畫面動了多少 0~100
    ev3.screen.draw_text(0, 48, "MOTION " + str(read_motion()) + "      ", Color.BLACK, Color.WHITE)
    # 色塊左右位置 0~100
    ev3.screen.draw_text(0, 64, "X " + str(read_x()) + "      ", Color.BLACK, Color.WHITE)
    # 色塊上下位置 0~75
    ev3.screen.draw_text(0, 80, "Y " + str(read_y()) + "      ", Color.BLACK, Color.WHITE)
    # 色塊寬度,0=沒找到
    ev3.screen.draw_text(0, 96, "W " + str(read_w()) + "      ", Color.BLACK, Color.WHITE)
    # 色塊高度,越近越大
    ev3.screen.draw_text(0, 112, "H " + str(read_h()) + "      ", Color.BLACK, Color.WHITE)
    # 等 0.1 秒
    wait(100)
clev3r code
' ============================================================
' 神攝手 ESP32CAM 視覺感應器(學校老師創意賽版) EV3 新手範例 01:相機看到了什麼?8 個數字一次看
' 軟體:clev3r
' 接法:神攝手(學校版)插 1 號孔;左輪馬達接 B、右輪馬達接 C
' 這個範例會做什麼:模式 1 一次送出 8 個數字:顏色、鮮豔度、亮度、動態、色塊的 X、Y、寬、高。全部顯示在 EV3 螢幕上,對照相機畫面就能看懂每個數字的意思。
' 讀值:hue1=顏色(色相)(0 ~ 100,-1=黑白灰);sta=顏色鮮豔度(0 ~ 100);val=亮度(0 ~ 100);motion=畫面動了多少(0 ~ 100);x=色塊左右位置(0 ~ 100(左 → 右),沒找到=0);y=色塊上下位置(0 ~ 75(下 → 上),沒找到=0);w=色塊寬度(0 ~ 100,0=沒找到);h=色塊高度(越近越大)(0 ~ 75,0=沒找到)
' ============================================================
folder "prjs" "MBC_esp32cam_ex01"

' 神攝手(學校版)插 1 號孔,使用模式 1
Sensor.SetMode(1, 1)
LCD.Clear()

' 清除螢幕
LCD.Clear()
' 一直重複
While "True"
  ' 顏色:紅 0 或 100、黃約 17、綠約 33、藍約 67,-1=黑白灰
  LCD.Text(1, 0, 0, 1, "HUE " + Sensor.ReadRawValue(1, 0) + "      ")
  ' 鮮豔度 0~100
  LCD.Text(1, 0, 16, 1, "STA " + Sensor.ReadRawValue(1, 1) + "      ")
  ' 亮度 0~100
  LCD.Text(1, 0, 32, 1, "VAL " + Sensor.ReadRawValue(1, 2) + "      ")
  ' 畫面動了多少 0~100
  LCD.Text(1, 0, 48, 1, "MOTION " + Sensor.ReadRawValue(1, 3) + "      ")
  ' 色塊左右位置 0~100
  LCD.Text(1, 0, 64, 1, "X " + Sensor.ReadRawValue(1, 4) + "      ")
  ' 色塊上下位置 0~75
  LCD.Text(1, 0, 80, 1, "Y " + Sensor.ReadRawValue(1, 5) + "      ")
  ' 色塊寬度,0=沒找到
  LCD.Text(1, 0, 96, 1, "W " + Sensor.ReadRawValue(1, 6) + "      ")
  ' 色塊高度,越近越大
  LCD.Text(1, 0, 112, 1, "H " + Sensor.ReadRawValue(1, 7) + "      ")
  ' 等 0.1 秒
  Program.Delay(100)
EndWhile
Step by step:
- Clear the screen
- Repeat forever
- Colour: red 0 or 100, yellow ≈17, green ≈33, blue ≈67, -1 = black/white/grey
- Saturation 0~100
- Brightness 0~100
- How much the picture moved 0~100
- Blob horizontal position 0~100
- Blob vertical position 0~75
- Blob width, 0 = not found
- Blob height, bigger when closer
- Wait 0.1 s
What you should see: Move the ball left and right in front of the lens and X follows; bring it closer and W and H grow; take it away and X, Y, W, H all read 0.
FAQ:
- The camera screen stays on "LEGO Sync..."? The camera only starts when plugged into an EV3 that is already on. Turn the EV3 on first, then plug in the camera.
- X, Y, W, H always read 0? 2:TRACK has not been set up, or the ball colour is outside the tolerance.
Example 2: Traffic-light robot: go on green only
What this example does: Mode 0 reads only the "colour". Drive forward on green, stop on anything else (red).
What you need:
- EV3 brick + Education base robot (left wheel on B, right wheel on C)
- SharpShot (school edition) (EV3 edition)
- One red and one green card
How to connect: SharpShot (school edition) in port 1, mounted at the front with the lens facing forward.Camera setup: short-press the side button for the menu → left/right to "1:COLOR" → confirm → aim the crosshair at the colour to learn, set the position and tolerance in turn → confirm to save.
Download the program (pick your software):
⬇ EV3-G (official software) | ⬇ EV3 Classroom | ⬇ Pybricks v4 | ⬇ EV3 MicroPython v2.0 | ⬇ clev3r
EV3-G (official software) blocks
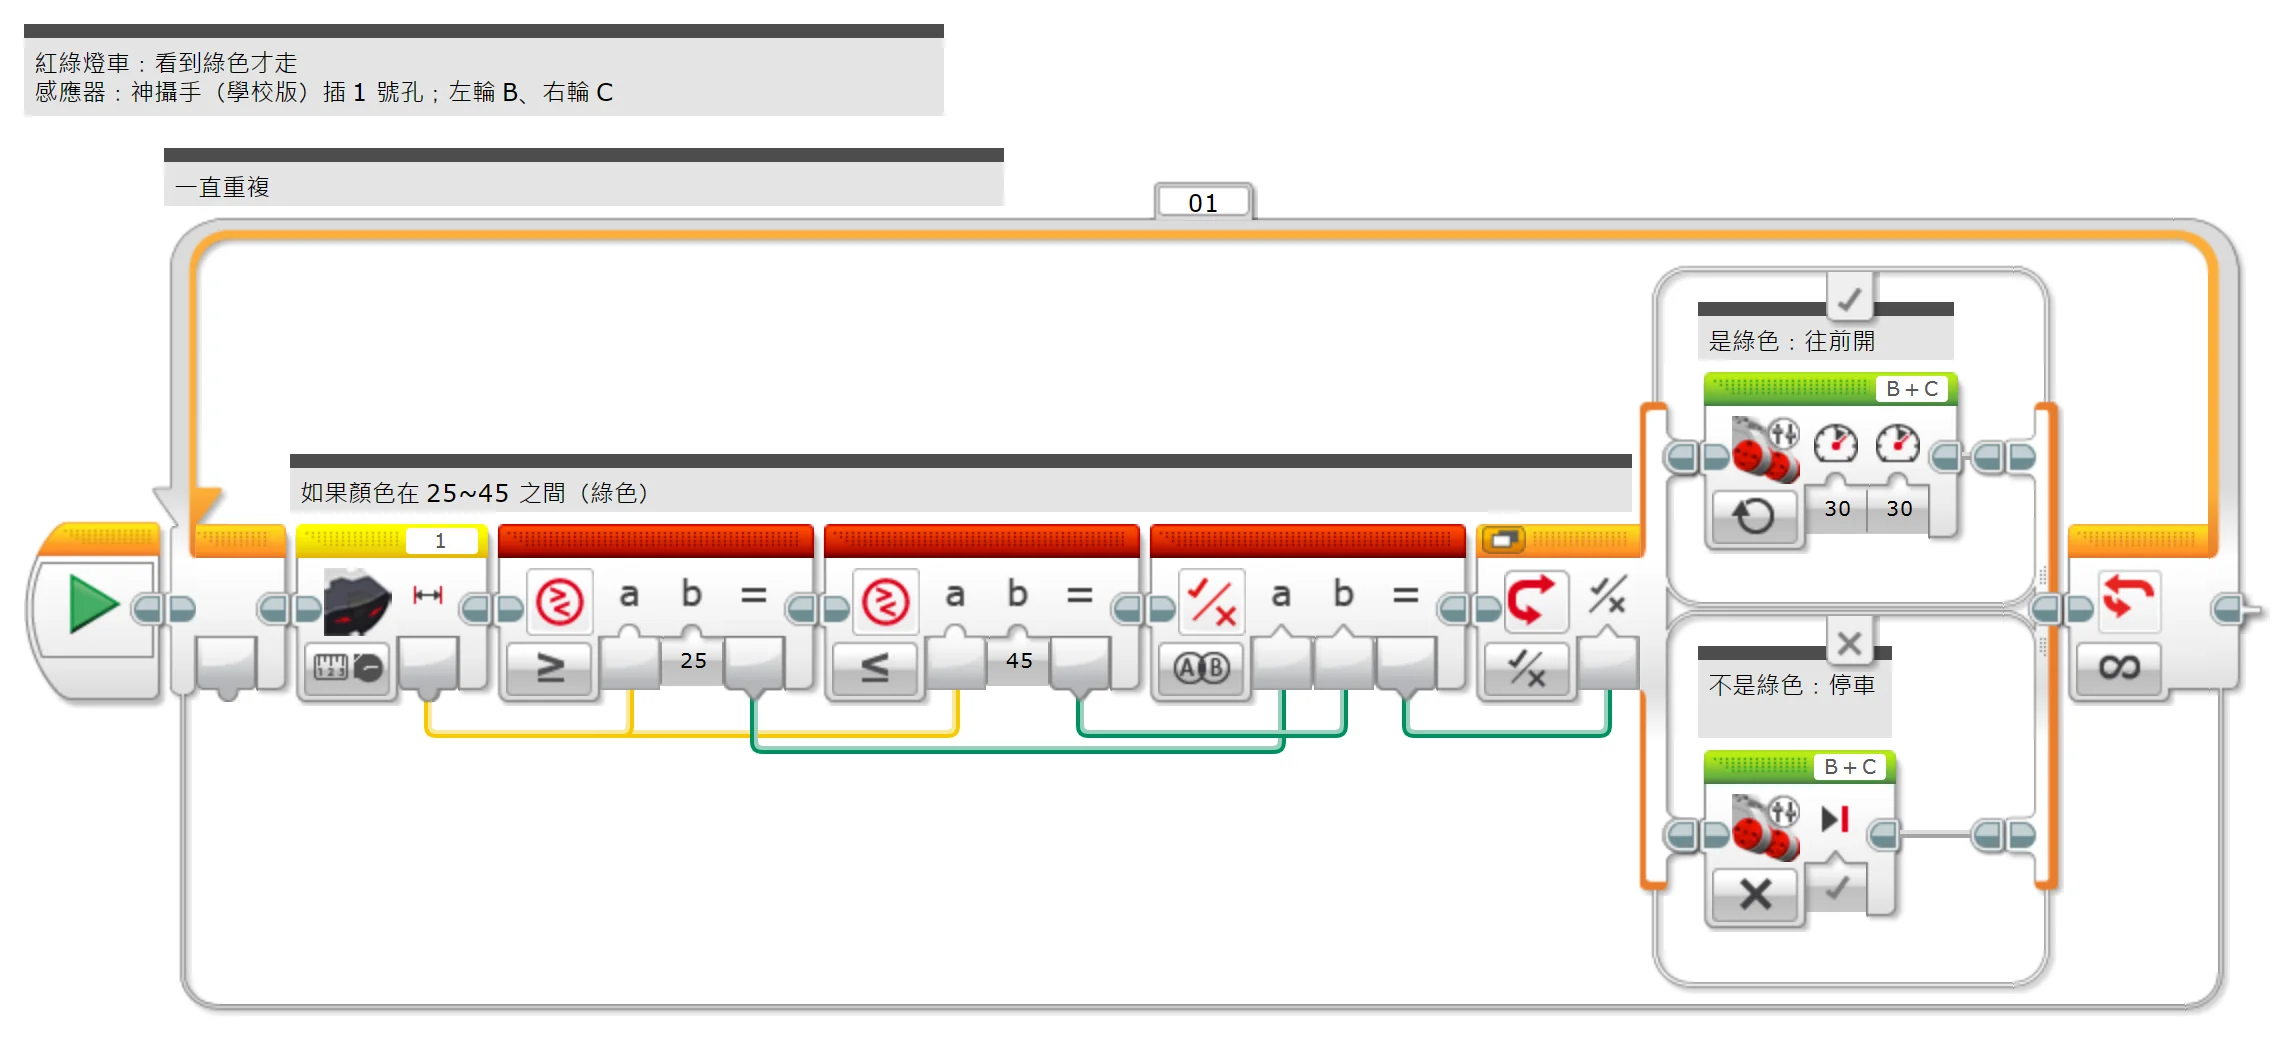
(Too small? Click the picture to open it full size.)
EV3 Classroom blocks
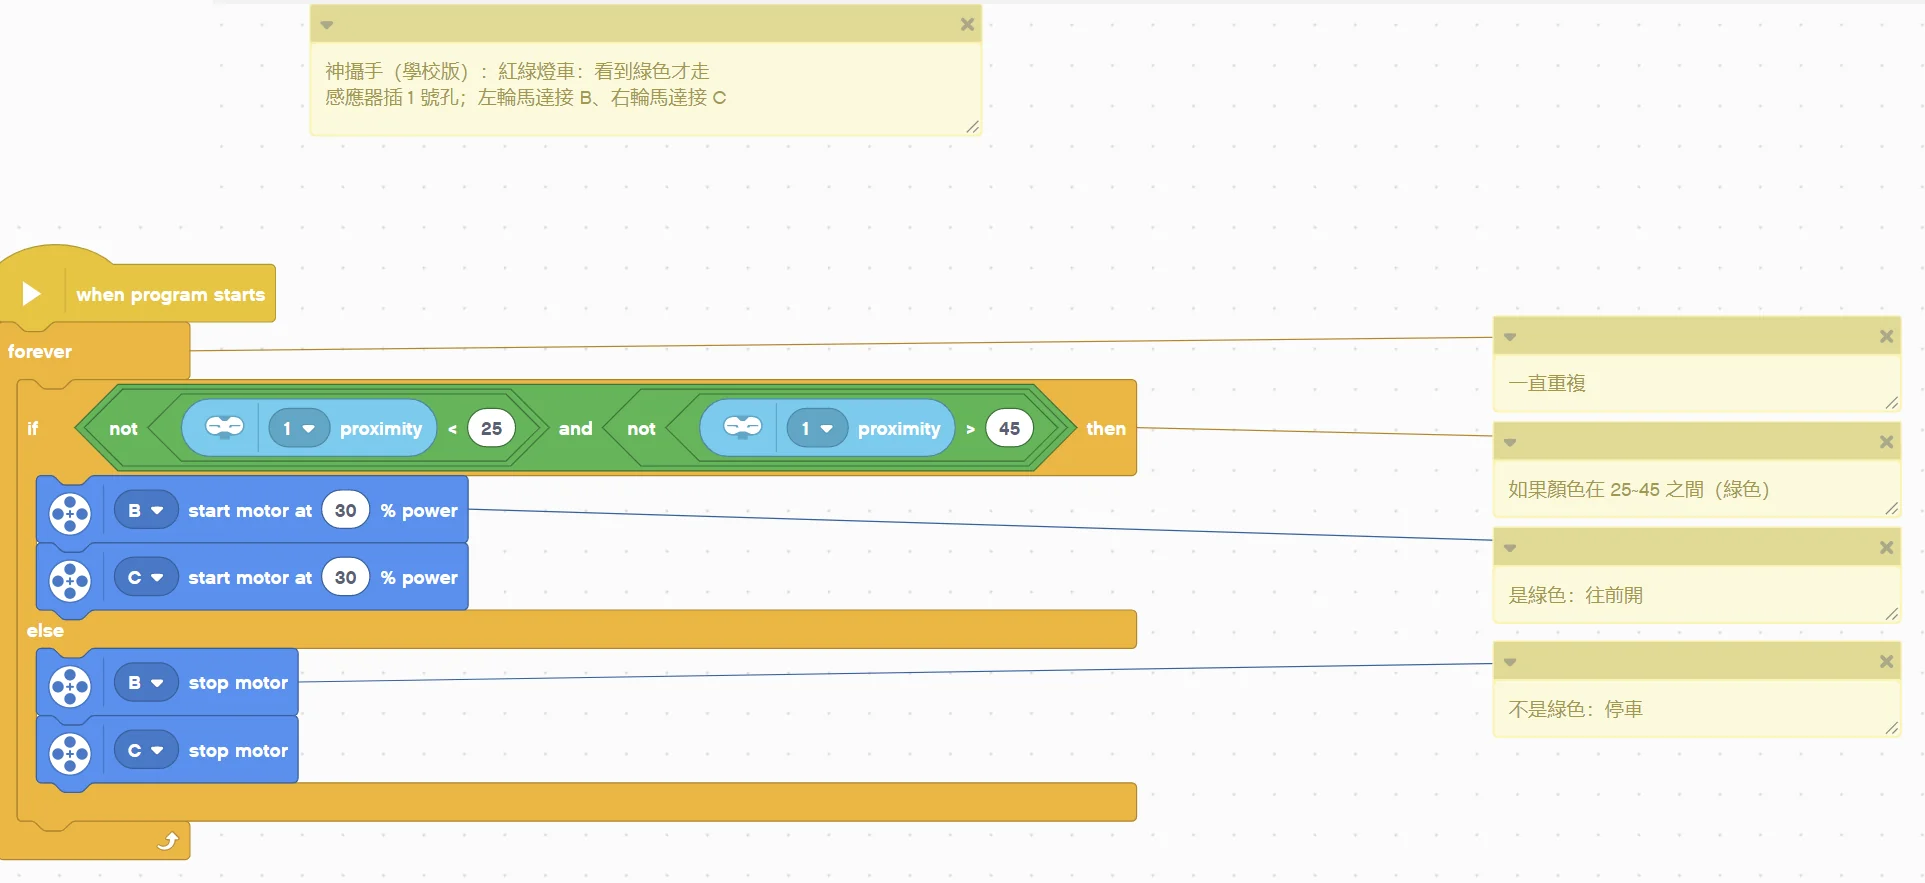
(Too small? Click the picture to open it full size.)
Pybricks v4 code
# ============================================================
# 神攝手 ESP32CAM 視覺感應器(學校老師創意賽版) EV3 新手範例 02:紅綠燈車:看到綠色才走
# 軟體:Pybricks v4(用 Chrome 打開 https://code.pybricks.com ,EV3 版目前是 Beta)
# 接法:神攝手(學校版)插 1 號孔;左輪馬達接 B、右輪馬達接 C
# 這個範例會做什麼:用模式 0 只讀「顏色」。看到綠色就往前開,其他顏色(紅色)就停。
# ============================================================

from pybricks.hubs import EV3Brick
from pybricks.ev3devices import Motor
from pybricks.iodevices import LUMPDevice
from pybricks.parameters import Port
from pybricks.tools import wait

ev3 = EV3Brick()
sensor = LUMPDevice(Port.S1)       # 神攝手(學校版)插 1 號孔
left_motor = Motor(Port.B)        # 左輪
right_motor = Motor(Port.C)       # 右輪


def read_hue():
    # 顏色(色相):0 ~ 100(紅 0 或 100、黃約 17、綠約 33、藍約 67),-1=黑白灰
    return sensor.read(0)[0]


# ---------- 程式從這裡開始 ----------
# 一直重複
while True:
    # 如果顏色在 25~45 之間(綠色)
    if read_hue() >= 25 and read_hue() <= 45:
        # 是綠色:往前開
        left_motor.dc(30)
        right_motor.dc(30)
    else:
        # 不是綠色:停車
        left_motor.brake()
        right_motor.brake()
EV3 MicroPython v2.0 code
#!/usr/bin/env pybricks-micropython
# ============================================================
# 神攝手 ESP32CAM 視覺感應器(學校老師創意賽版) EV3 新手範例 02:紅綠燈車:看到綠色才走
# 軟體:樂高官方 EV3 MicroPython v2.0(microSD 開機卡+VS Code「LEGO MINDSTORMS EV3 MicroPython」擴充套件)
# 接法:神攝手(學校版)插 1 號孔;左輪馬達接 B、右輪馬達接 C
# 這個範例會做什麼:用模式 0 只讀「顏色」。看到綠色就往前開,其他顏色(紅色)就停。
# ============================================================

from pybricks.hubs import EV3Brick
from pybricks.ev3devices import Motor
from pybricks.iodevices import Ev3devSensor
from pybricks.parameters import Port
from pybricks.tools import wait

ev3 = EV3Brick()
sensor = Ev3devSensor(Port.S1)     # 神攝手(學校版)插 1 號孔
left_motor = Motor(Port.B)        # 左輪
right_motor = Motor(Port.C)       # 右輪


def read_hue():
    # 顏色(色相):0 ~ 100(紅 0 或 100、黃約 17、綠約 33、藍約 67),-1=黑白灰
    return sensor.read('IR-PROX')[0]


# ---------- 程式從這裡開始 ----------
# 一直重複
while True:
    # 如果顏色在 25~45 之間(綠色)
    if read_hue() >= 25 and read_hue() <= 45:
        # 是綠色:往前開
        left_motor.dc(30)
        right_motor.dc(30)
    else:
        # 不是綠色:停車
        left_motor.brake()
        right_motor.brake()
clev3r code
' ============================================================
' 神攝手 ESP32CAM 視覺感應器(學校老師創意賽版) EV3 新手範例 02:紅綠燈車:看到綠色才走
' 軟體:clev3r
' 接法:神攝手(學校版)插 1 號孔;左輪馬達接 B、右輪馬達接 C
' 這個範例會做什麼:用模式 0 只讀「顏色」。看到綠色就往前開,其他顏色(紅色)就停。
' 讀值:hue=顏色(色相)(0 ~ 100(紅 0 或 100、黃約 17、綠約 33、藍約 67),-1=黑白灰)
' ============================================================
folder "prjs" "MBC_esp32cam_ex02"

' 神攝手(學校版)插 1 號孔,使用模式 0
Sensor.SetMode(1, 0)
LCD.Clear()

' 一直重複
While "True"
  ' 如果顏色在 25~45 之間(綠色)
  If (Sensor.ReadRawValue(1, 0) >= 25) And (Sensor.ReadRawValue(1, 0) <= 45) Then
    ' 是綠色:往前開
    Motor.StartPower("B", 30)
    Motor.StartPower("C", 30)
  Else
    ' 不是綠色:停車
    Motor.Stop("BC", "True")
  EndIf
EndWhile
Step by step:
- Repeat forever
- If the colour is between 25 and 45 (green)
- Green: drive forward
- Otherwise:
- Not green: stop
- If the colour is between 25 and 45 (green)
What you should see: Hold the green card in front of the lens and the robot drives; swap to the red card and it stops.
FAQ:
- The camera screen stays on "LEGO Sync..."? The camera only starts when plugged into an EV3 that is already on. Turn the EV3 on first, then plug in the camera.
- It does not go on green either? Run example 1 to see the real HUE of your green card, then change 25 and 45 in the program.
Example 3: Burglar alarm: beep when something moves
What this example does: The 4th number of mode 1 is "how much the picture moved". Point the camera at a doorway; when someone walks past the number jumps, and above 20 the EV3 beeps. No camera setup needed.
What you need:
- SharpShot (school edition) (EV3 edition)
- EV3 brick
How to connect: SharpShot (school edition) in port 1, lens pointing at the area to watch, held steady.
Download the program (pick your software):
⬇ EV3-G (official software) | ⬇ EV3 Classroom | ⬇ Pybricks v4 | ⬇ EV3 MicroPython v2.0 | ⬇ clev3r
EV3-G (official software) blocks
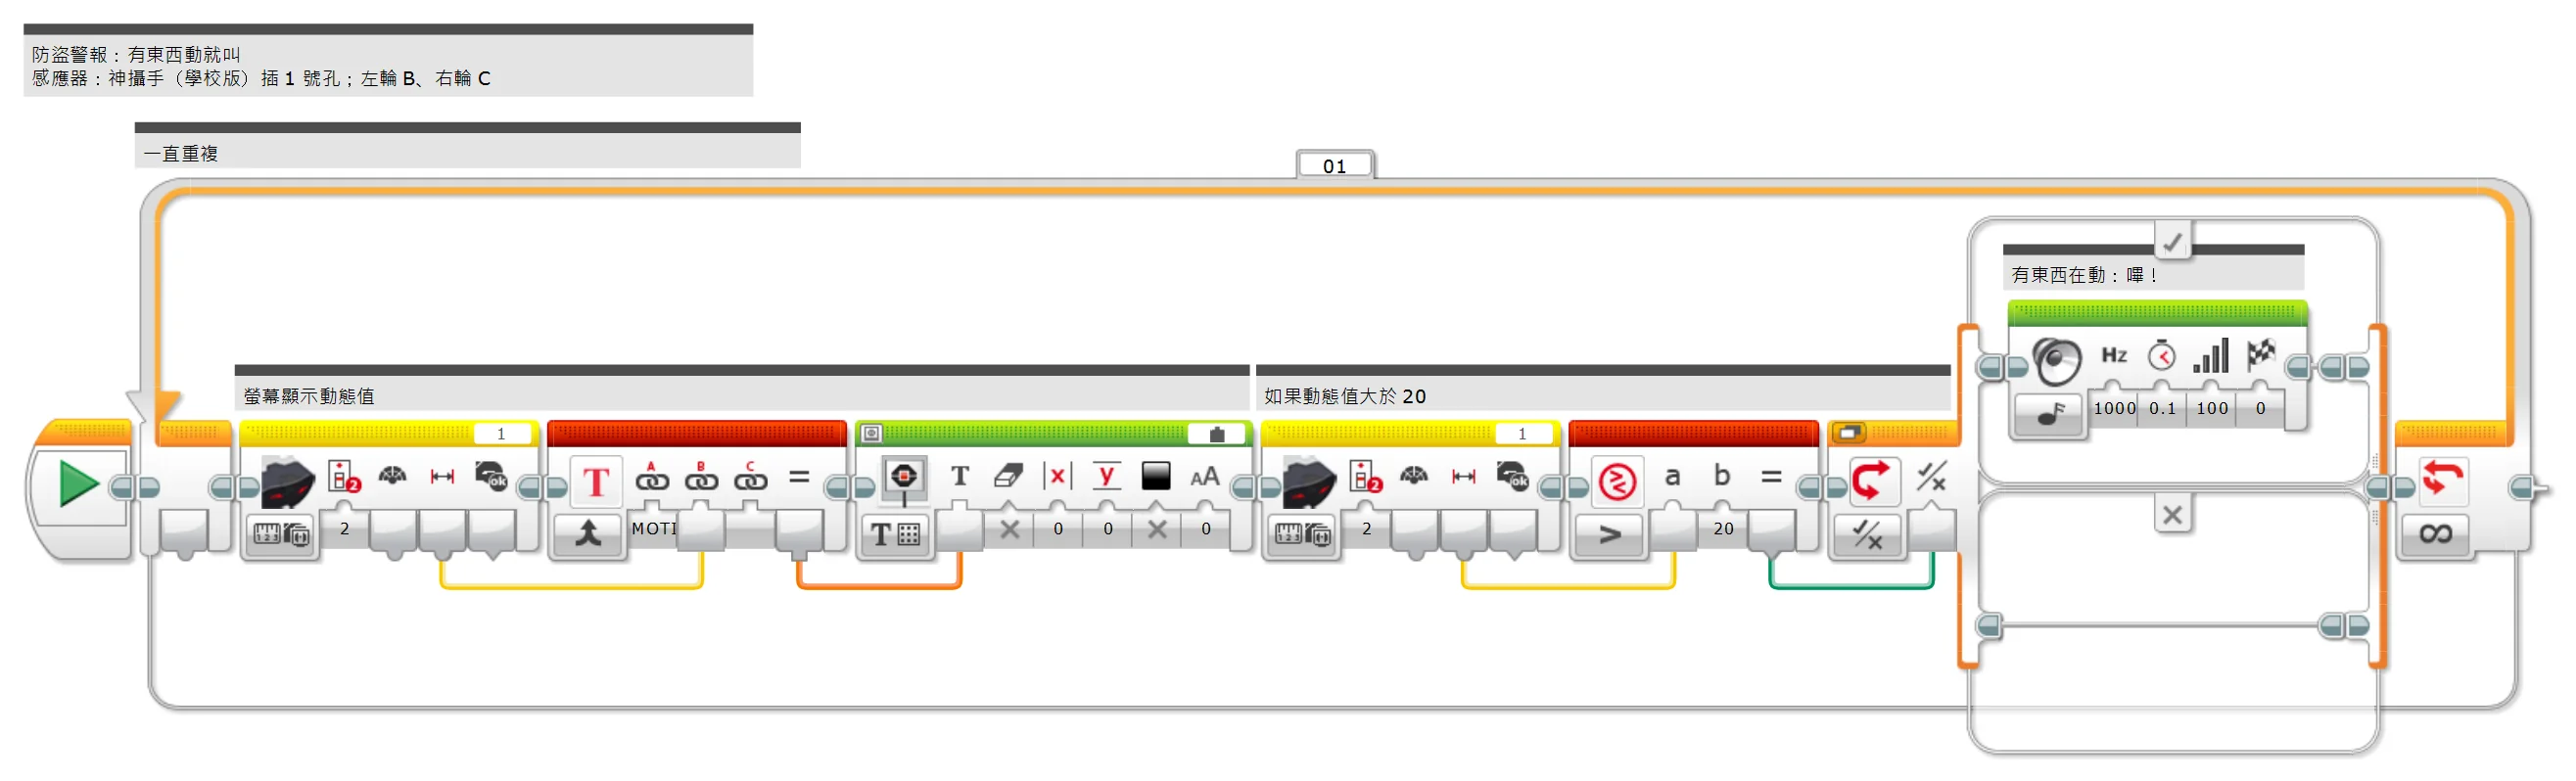
(Too small? Click the picture to open it full size.)
EV3 Classroom blocks
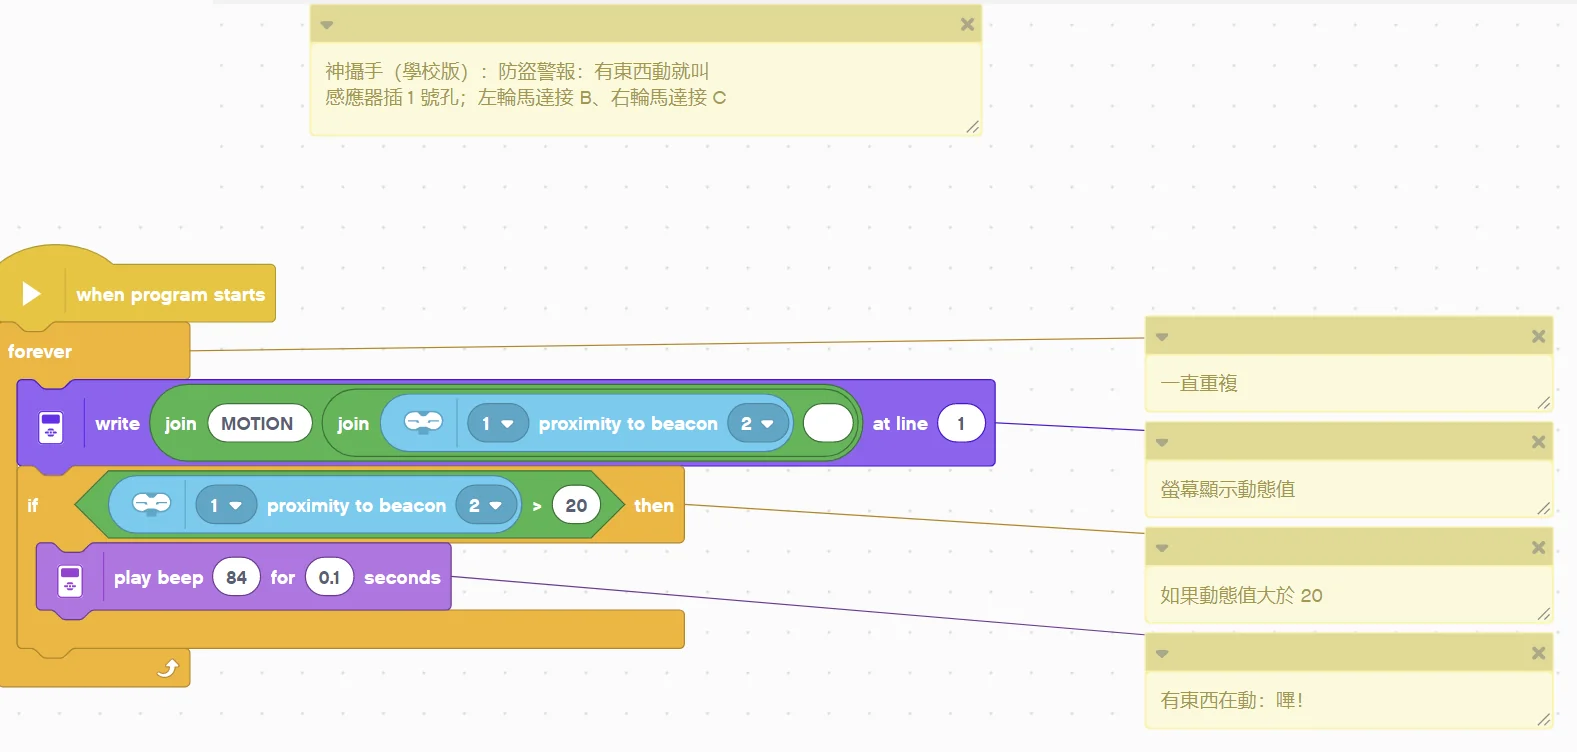
(Too small? Click the picture to open it full size.)
Pybricks v4 code
# ============================================================
# 神攝手 ESP32CAM 視覺感應器(學校老師創意賽版) EV3 新手範例 03:防盜警報:有東西動就叫
# 軟體:Pybricks v4(用 Chrome 打開 https://code.pybricks.com ,EV3 版目前是 Beta)
# 接法:神攝手(學校版)插 1 號孔
# 這個範例會做什麼:模式 1 的第 4 個數字是「畫面動了多少」。相機對著門口,有人經過數字就會變大,超過 20 就嗶嗶叫。這個範例相機不用做任何設定。
# ============================================================

from pybricks.hubs import EV3Brick
from pybricks.iodevices import LUMPDevice
from pybricks.parameters import Port, Color
from pybricks.tools import wait

ev3 = EV3Brick()
sensor = LUMPDevice(Port.S1)       # 神攝手(學校版)插 1 號孔


def read_motion():
    # 畫面動了多少:0 ~ 100
    return sensor.read(1)[3]


# ---------- 程式從這裡開始 ----------
# 一直重複
while True:
    # 螢幕顯示動態值
    ev3.screen.draw_text(0, 0, "MOTION " + str(read_motion()) + "      ", Color.BLACK, Color.WHITE)
    # 如果動態值大於 20
    if read_motion() > 20:
        # 有東西在動:嗶!
        ev3.speaker.beep()
EV3 MicroPython v2.0 code
#!/usr/bin/env pybricks-micropython
# ============================================================
# 神攝手 ESP32CAM 視覺感應器(學校老師創意賽版) EV3 新手範例 03:防盜警報:有東西動就叫
# 軟體:樂高官方 EV3 MicroPython v2.0(microSD 開機卡+VS Code「LEGO MINDSTORMS EV3 MicroPython」擴充套件)
# 接法:神攝手(學校版)插 1 號孔
# 這個範例會做什麼:模式 1 的第 4 個數字是「畫面動了多少」。相機對著門口,有人經過數字就會變大,超過 20 就嗶嗶叫。這個範例相機不用做任何設定。
# ============================================================

from pybricks.hubs import EV3Brick
from pybricks.iodevices import Ev3devSensor
from pybricks.parameters import Port, Color
from pybricks.tools import wait

ev3 = EV3Brick()
sensor = Ev3devSensor(Port.S1)     # 神攝手(學校版)插 1 號孔


def read_motion():
    # 畫面動了多少:0 ~ 100
    return sensor.read('IR-SEEK')[3]


# ---------- 程式從這裡開始 ----------
# 一直重複
while True:
    # 螢幕顯示動態值
    ev3.screen.draw_text(0, 0, "MOTION " + str(read_motion()) + "      ", Color.BLACK, Color.WHITE)
    # 如果動態值大於 20
    if read_motion() > 20:
        # 有東西在動:嗶!
        ev3.speaker.beep()
clev3r code
' ============================================================
' 神攝手 ESP32CAM 視覺感應器(學校老師創意賽版) EV3 新手範例 03:防盜警報:有東西動就叫
' 軟體:clev3r
' 接法:神攝手(學校版)插 1 號孔;左輪馬達接 B、右輪馬達接 C
' 這個範例會做什麼:模式 1 的第 4 個數字是「畫面動了多少」。相機對著門口,有人經過數字就會變大,超過 20 就嗶嗶叫。這個範例相機不用做任何設定。
' 讀值:motion=畫面動了多少(0 ~ 100)
' ============================================================
folder "prjs" "MBC_esp32cam_ex03"

' 神攝手(學校版)插 1 號孔,使用模式 1
Sensor.SetMode(1, 1)
LCD.Clear()

' 一直重複
While "True"
  ' 螢幕顯示動態值
  LCD.Text(1, 0, 0, 1, "MOTION " + Sensor.ReadRawValue(1, 3) + "      ")
  ' 如果動態值大於 20
  If Sensor.ReadRawValue(1, 3) > 20 Then
    ' 有東西在動:嗶!
    Speaker.Tone(50, 1000, 100)
    Speaker.Wait()
  EndIf
EndWhile
Step by step:
- Repeat forever
- Show the motion value on screen
- If the motion value is greater than 20
- Something is moving: beep!
What you should see: Quiet when the picture is still; wave a hand in front of the lens and the EV3 beeps.
FAQ:
- The camera screen stays on "LEGO Sync..."? The camera only starts when plugged into an EV3 that is already on. Turn the EV3 on first, then plug in the camera.
- It beeps even when nobody is there? Flickering lights or a shaking camera. Raise 20 (for example 35).
Example 4: Turn to look at the ball
What this example does: The robot spins on the spot to keep the ball in the middle of the picture: ball on the left means turn left, on the right means turn right, in the middle means stop; no ball means spin to search.
What you need:
- EV3 brick + Education base robot (left wheel on B, right wheel on C)
- SharpShot (school edition) (EV3 edition)
- A brightly coloured ball
How to connect: SharpShot (school edition) in port 1, mounted at the front with the lens facing forward.Camera setup: short-press the side button for the menu → left/right to "2:TRACK" → confirm → aim the crosshair at the ball, set the position, tolerance and minimum area in turn → confirm to save.
Download the program (pick your software):
⬇ EV3-G (official software) | ⬇ EV3 Classroom | ⬇ Pybricks v4 | ⬇ EV3 MicroPython v2.0 | ⬇ clev3r
EV3-G (official software) blocks
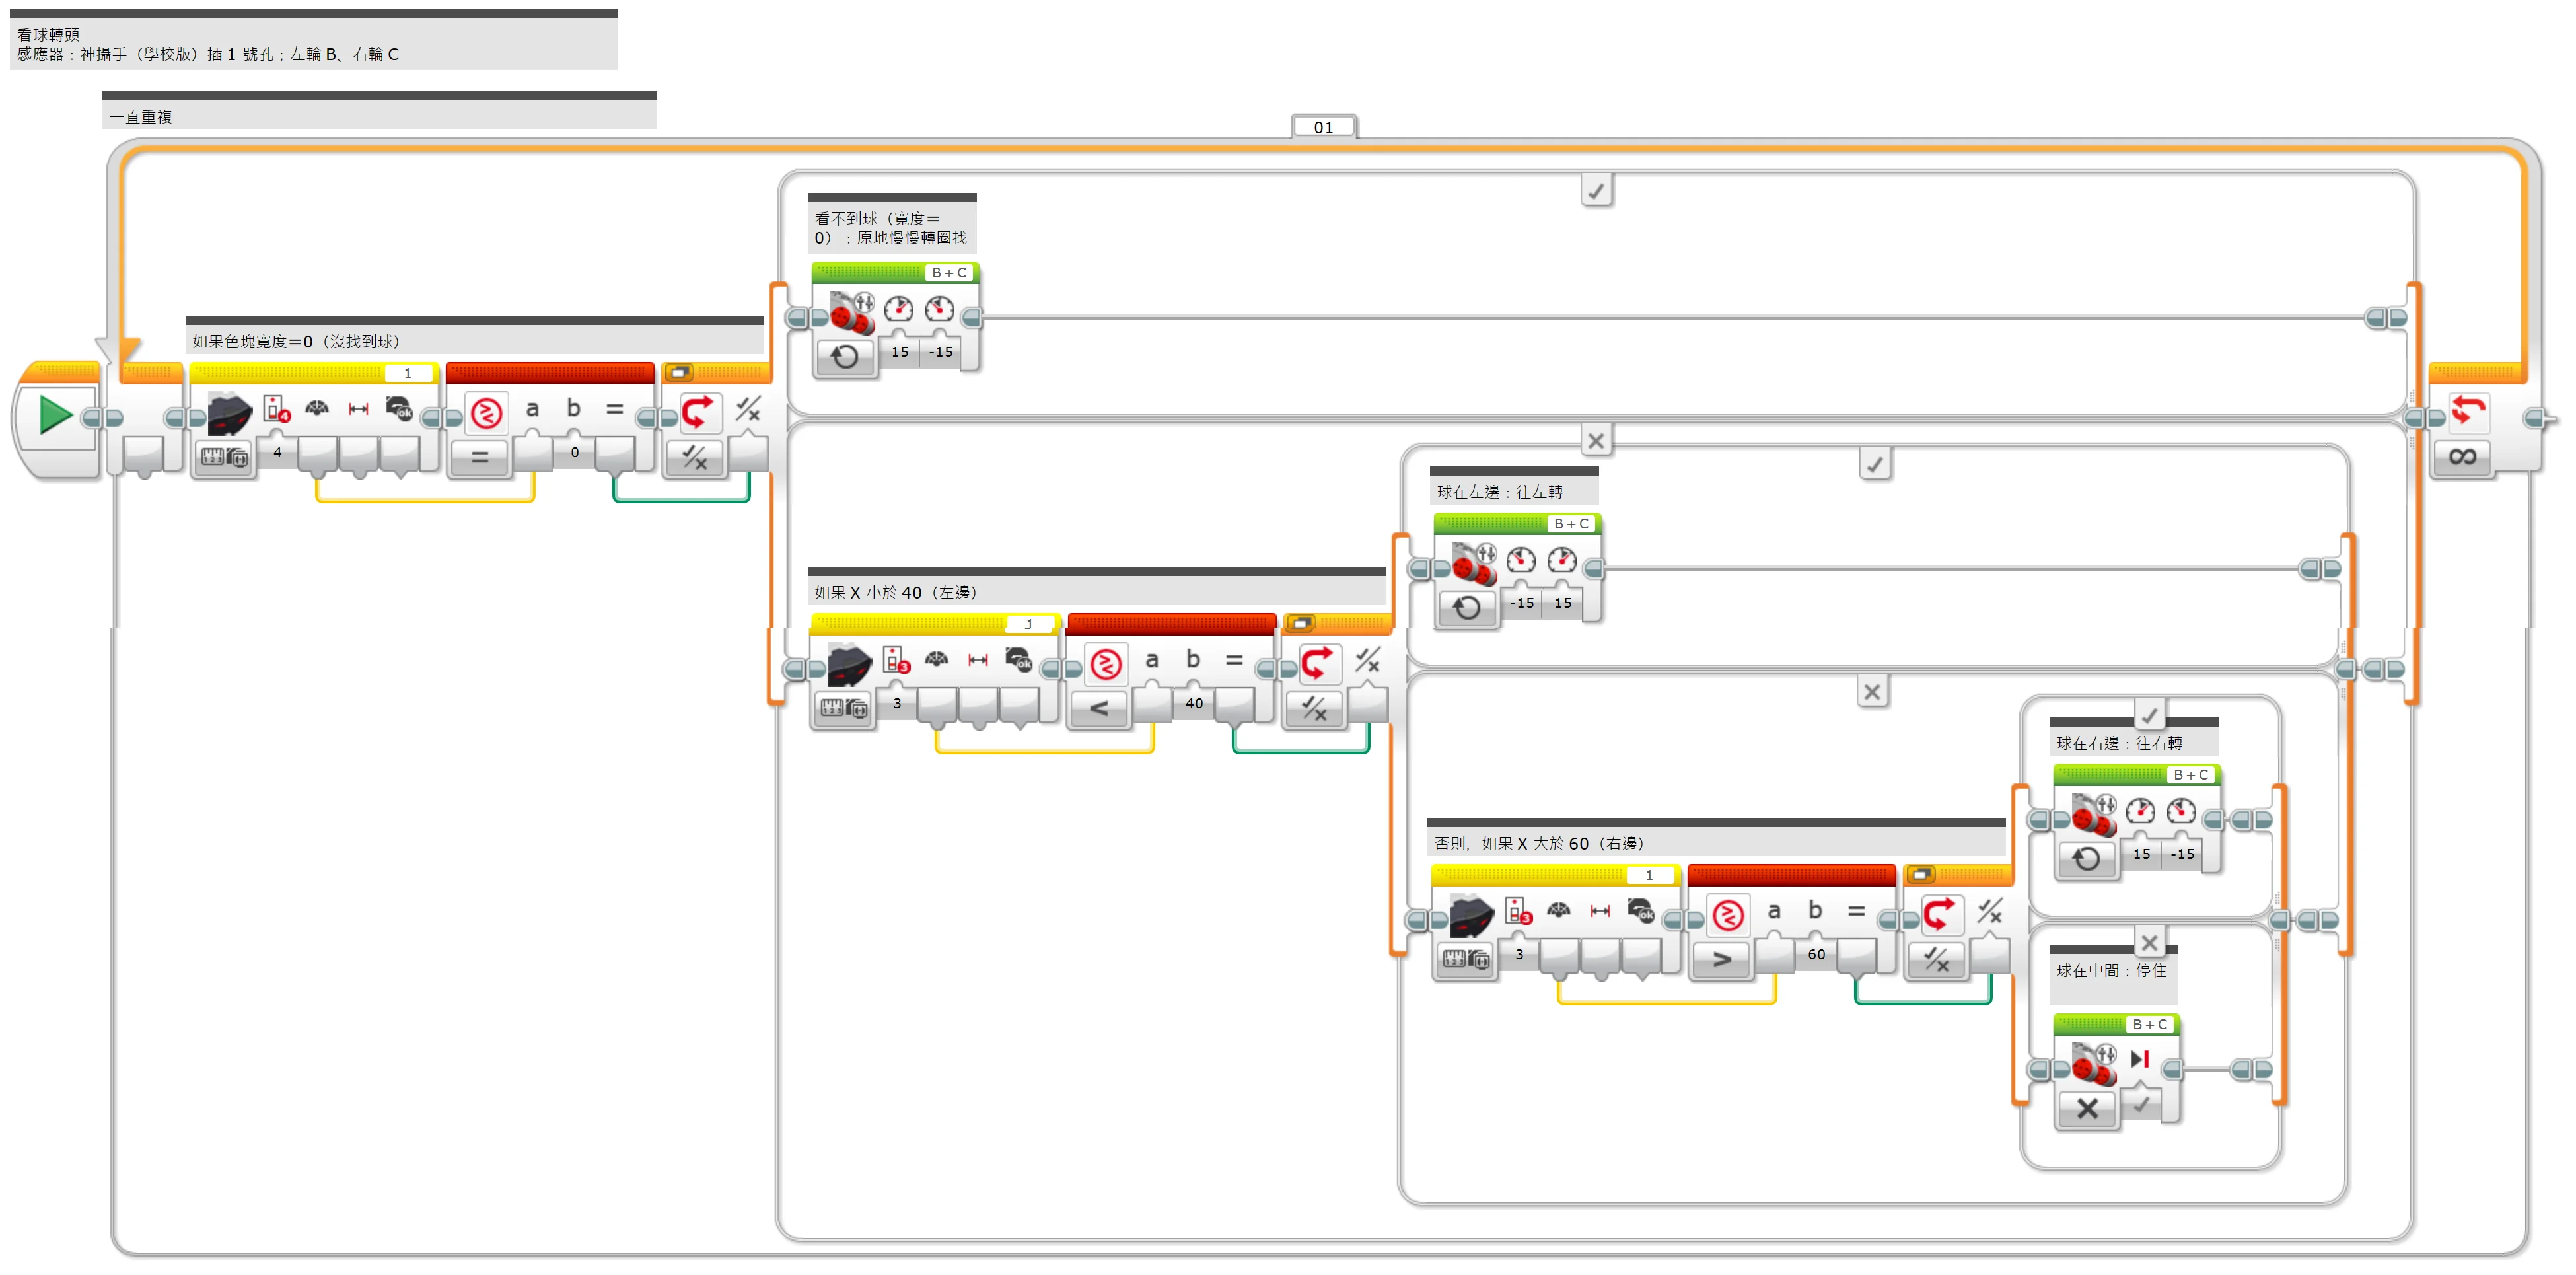
(Too small? Click the picture to open it full size.)
EV3 Classroom blocks
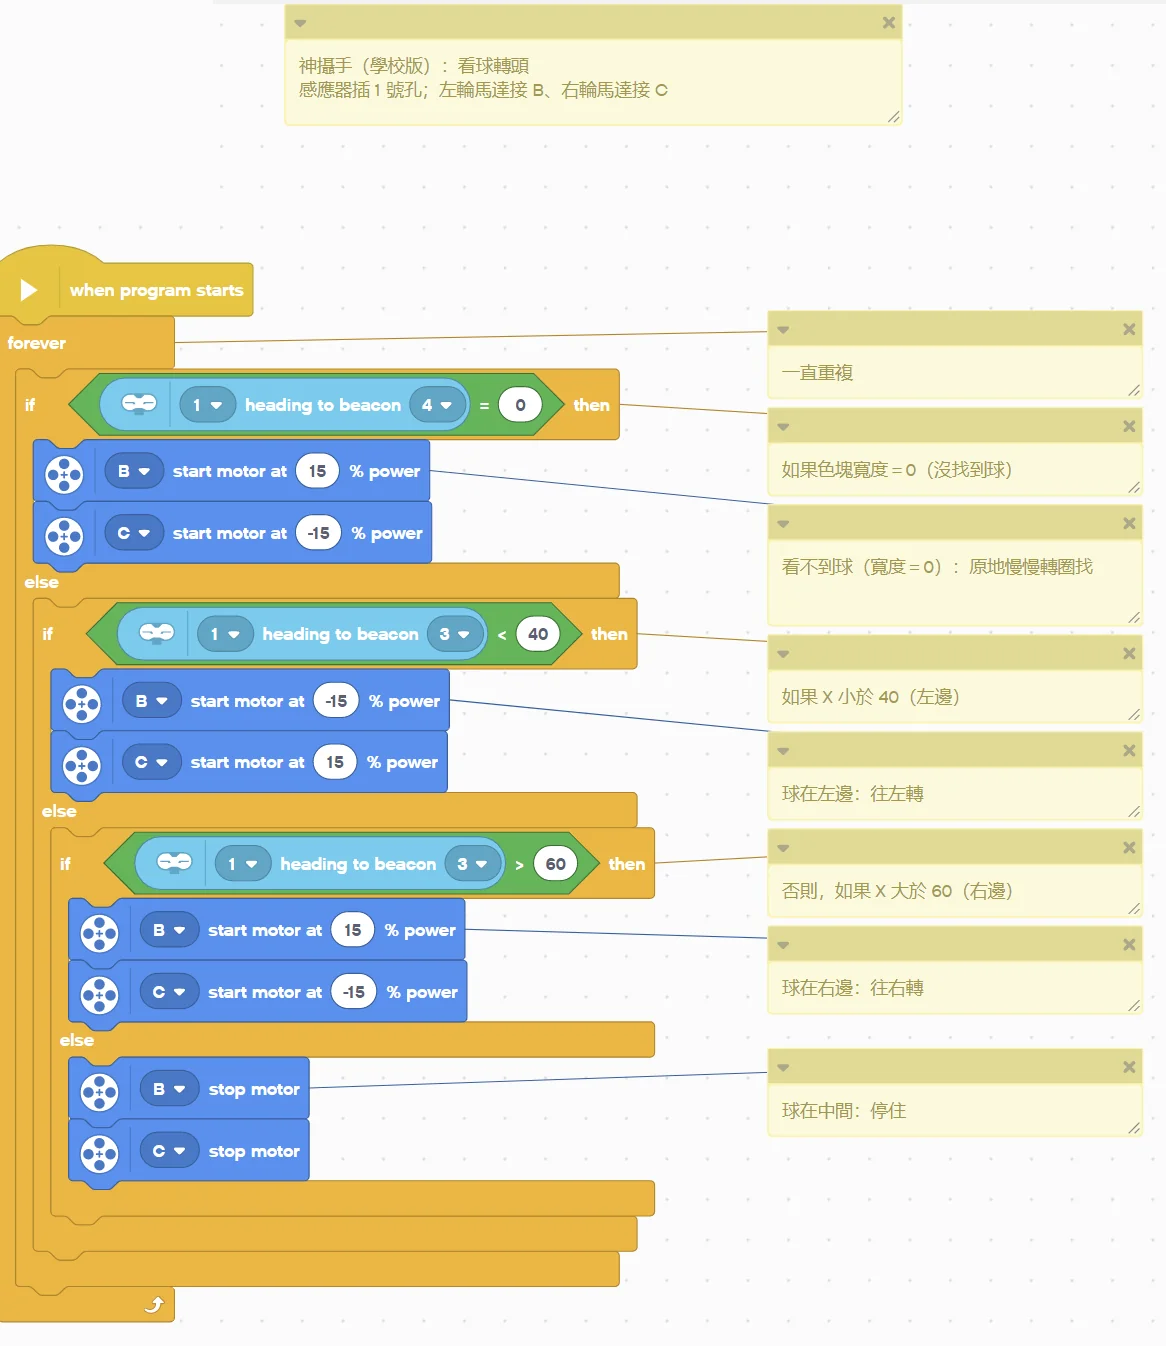
(Too small? Click the picture to open it full size.)
Pybricks v4 code
# ============================================================
# 神攝手 ESP32CAM 視覺感應器(學校老師創意賽版) EV3 新手範例 04:看球轉頭
# 軟體:Pybricks v4(用 Chrome 打開 https://code.pybricks.com ,EV3 版目前是 Beta)
# 接法:神攝手(學校版)插 1 號孔;左輪馬達接 B、右輪馬達接 C
# 這個範例會做什麼:車子原地轉,讓球一直保持在畫面中間:球在左邊就往左轉、在右邊就往右轉、在中間就停;看不到球就原地轉圈找。
# ============================================================

from pybricks.hubs import EV3Brick
from pybricks.ev3devices import Motor
from pybricks.iodevices import LUMPDevice
from pybricks.parameters import Port
from pybricks.tools import wait

ev3 = EV3Brick()
sensor = LUMPDevice(Port.S1)       # 神攝手(學校版)插 1 號孔
left_motor = Motor(Port.B)        # 左輪
right_motor = Motor(Port.C)       # 右輪


def read_w():
    # 色塊寬度:0 ~ 100,0=沒找到
    return sensor.read(1)[6]


def read_x():
    # 色塊左右位置:0 ~ 100(左 → 右),沒找到=0
    return sensor.read(1)[4]


# ---------- 程式從這裡開始 ----------
# 一直重複
while True:
    # 如果色塊寬度=0(沒找到球)
    if read_w() == 0:
        # 看不到球(寬度=0):原地慢慢轉圈找
        left_motor.dc(15)
        right_motor.dc(-15)
    # 如果 X 小於 40(左邊)
    elif read_x() < 40:
        # 球在左邊:往左轉
        left_motor.dc(-15)
        right_motor.dc(15)
    # 否則,如果 X 大於 60(右邊)
    elif read_x() > 60:
        # 球在右邊:往右轉
        left_motor.dc(15)
        right_motor.dc(-15)
    else:
        # 球在中間:停住
        left_motor.brake()
        right_motor.brake()
EV3 MicroPython v2.0 code
#!/usr/bin/env pybricks-micropython
# ============================================================
# 神攝手 ESP32CAM 視覺感應器(學校老師創意賽版) EV3 新手範例 04:看球轉頭
# 軟體:樂高官方 EV3 MicroPython v2.0(microSD 開機卡+VS Code「LEGO MINDSTORMS EV3 MicroPython」擴充套件)
# 接法:神攝手(學校版)插 1 號孔;左輪馬達接 B、右輪馬達接 C
# 這個範例會做什麼:車子原地轉,讓球一直保持在畫面中間:球在左邊就往左轉、在右邊就往右轉、在中間就停;看不到球就原地轉圈找。
# ============================================================

from pybricks.hubs import EV3Brick
from pybricks.ev3devices import Motor
from pybricks.iodevices import Ev3devSensor
from pybricks.parameters import Port
from pybricks.tools import wait

ev3 = EV3Brick()
sensor = Ev3devSensor(Port.S1)     # 神攝手(學校版)插 1 號孔
left_motor = Motor(Port.B)        # 左輪
right_motor = Motor(Port.C)       # 右輪


def read_w():
    # 色塊寬度:0 ~ 100,0=沒找到
    return sensor.read('IR-SEEK')[6]


def read_x():
    # 色塊左右位置:0 ~ 100(左 → 右),沒找到=0
    return sensor.read('IR-SEEK')[4]


# ---------- 程式從這裡開始 ----------
# 一直重複
while True:
    # 如果色塊寬度=0(沒找到球)
    if read_w() == 0:
        # 看不到球(寬度=0):原地慢慢轉圈找
        left_motor.dc(15)
        right_motor.dc(-15)
    # 如果 X 小於 40(左邊)
    elif read_x() < 40:
        # 球在左邊:往左轉
        left_motor.dc(-15)
        right_motor.dc(15)
    # 否則,如果 X 大於 60(右邊)
    elif read_x() > 60:
        # 球在右邊:往右轉
        left_motor.dc(15)
        right_motor.dc(-15)
    else:
        # 球在中間:停住
        left_motor.brake()
        right_motor.brake()
clev3r code
' ============================================================
' 神攝手 ESP32CAM 視覺感應器(學校老師創意賽版) EV3 新手範例 04:看球轉頭
' 軟體:clev3r
' 接法:神攝手(學校版)插 1 號孔;左輪馬達接 B、右輪馬達接 C
' 這個範例會做什麼:車子原地轉,讓球一直保持在畫面中間:球在左邊就往左轉、在右邊就往右轉、在中間就停;看不到球就原地轉圈找。
' 讀值:w=色塊寬度(0 ~ 100,0=沒找到);x=色塊左右位置(0 ~ 100(左 → 右),沒找到=0)
' ============================================================
folder "prjs" "MBC_esp32cam_ex04"

' 神攝手(學校版)插 1 號孔,使用模式 1
Sensor.SetMode(1, 1)
LCD.Clear()

' 一直重複
While "True"
  ' 如果色塊寬度=0(沒找到球)
  If Sensor.ReadRawValue(1, 6) = 0 Then
    ' 看不到球(寬度=0):原地慢慢轉圈找
    Motor.StartPower("B", 15)
    Motor.StartPower("C", -15)
  ' 如果 X 小於 40(左邊)
  ElseIf Sensor.ReadRawValue(1, 4) < 40 Then
    ' 球在左邊:往左轉
    Motor.StartPower("B", -15)
    Motor.StartPower("C", 15)
  ' 否則,如果 X 大於 60(右邊)
  ElseIf Sensor.ReadRawValue(1, 4) > 60 Then
    ' 球在右邊:往右轉
    Motor.StartPower("B", 15)
    Motor.StartPower("C", -15)
  Else
    ' 球在中間:停住
    Motor.Stop("BC", "True")
  EndIf
EndWhile
Step by step:
- Repeat forever
- If the blob width = 0 (ball not found)
- Cannot see the ball (width = 0): spin slowly on the spot to look for it
- Otherwise:
- If X is less than 40 (left)
- Ball on the left: turn left
- Otherwise:
- Otherwise, if X is greater than 60 (right)
- Ball on the right: turn right
- Otherwise:
- Ball in the centre: stop
- Otherwise, if X is greater than 60 (right)
- If X is less than 40 (left)
- If the blob width = 0 (ball not found)
What you should see: Move the ball left and right in front of the robot and its nose follows the ball.
FAQ:
- The camera screen stays on "LEGO Sync..."? The camera only starts when plugged into an EV3 that is already on. Turn the EV3 on first, then plug in the camera.
- Left and right are swapped? Swap -15 and 15 in the two tank steps.
Example 5: Chase the ball: stop when close enough
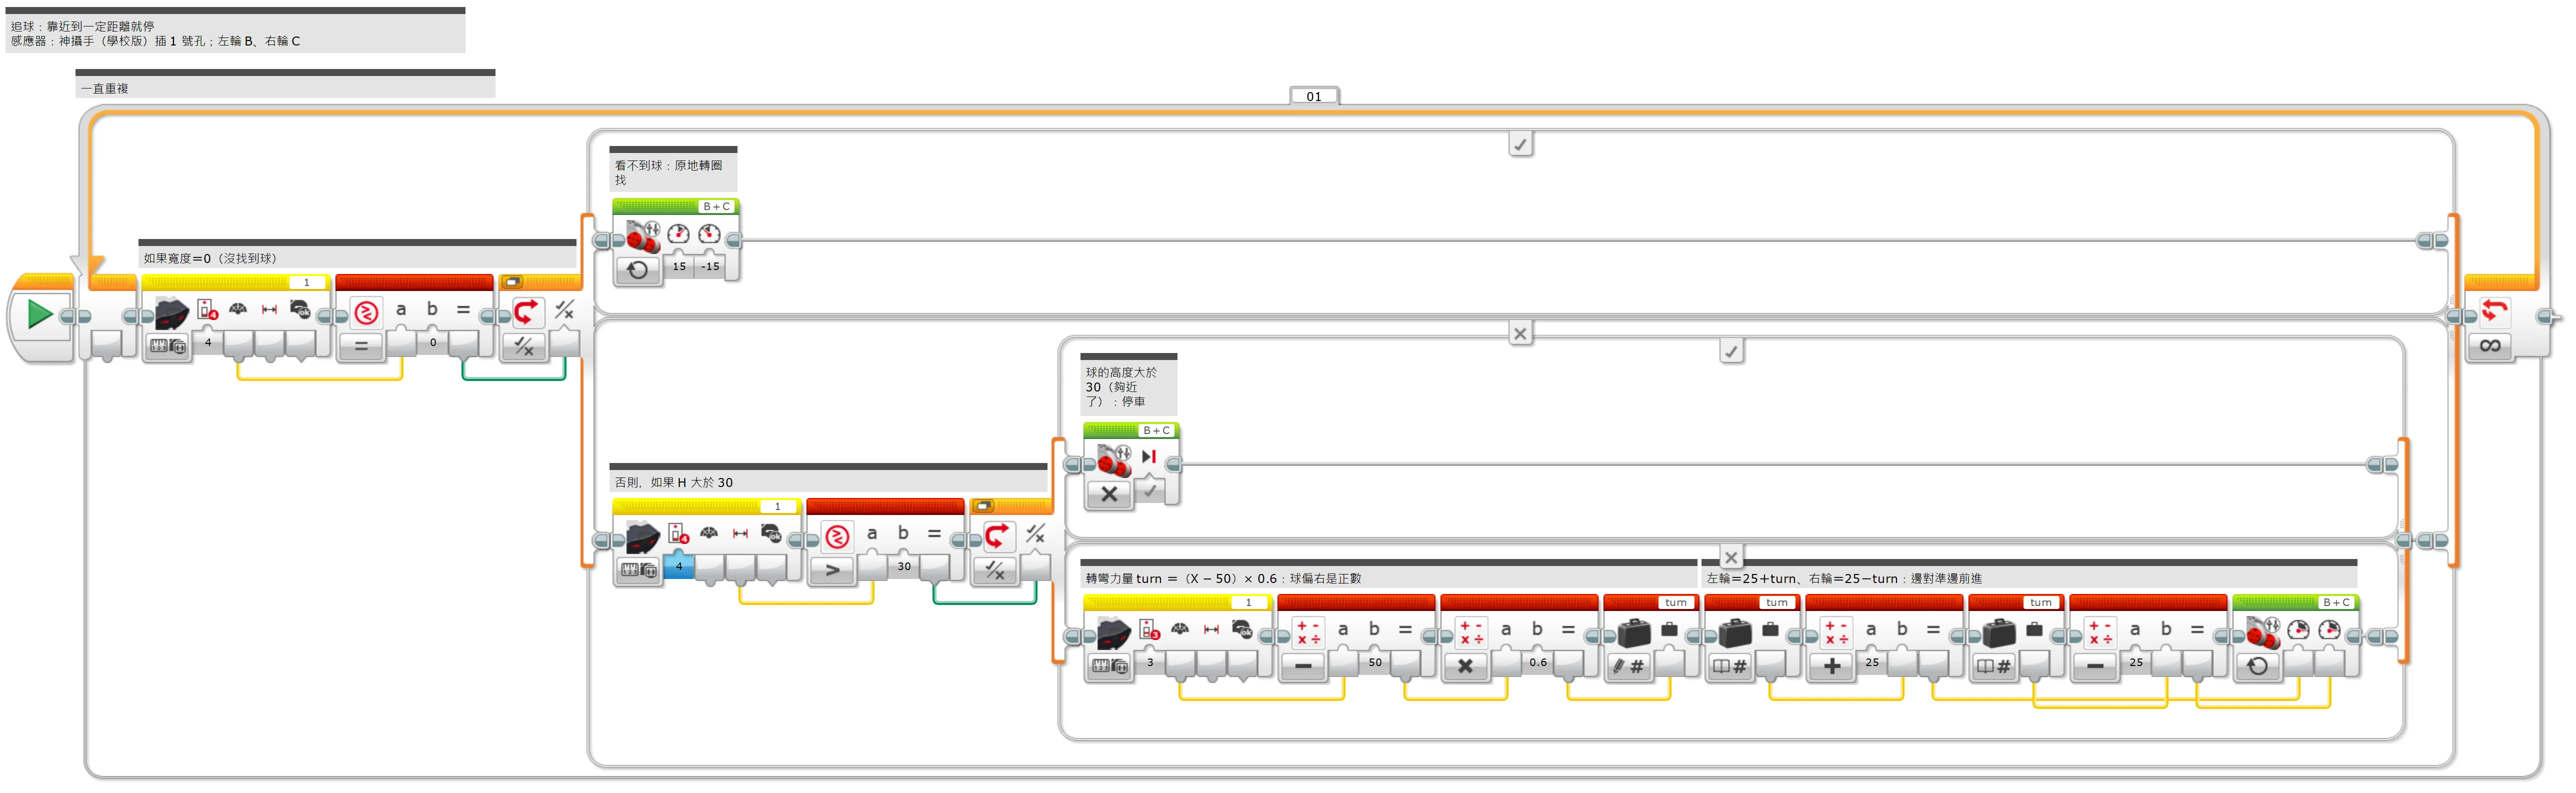
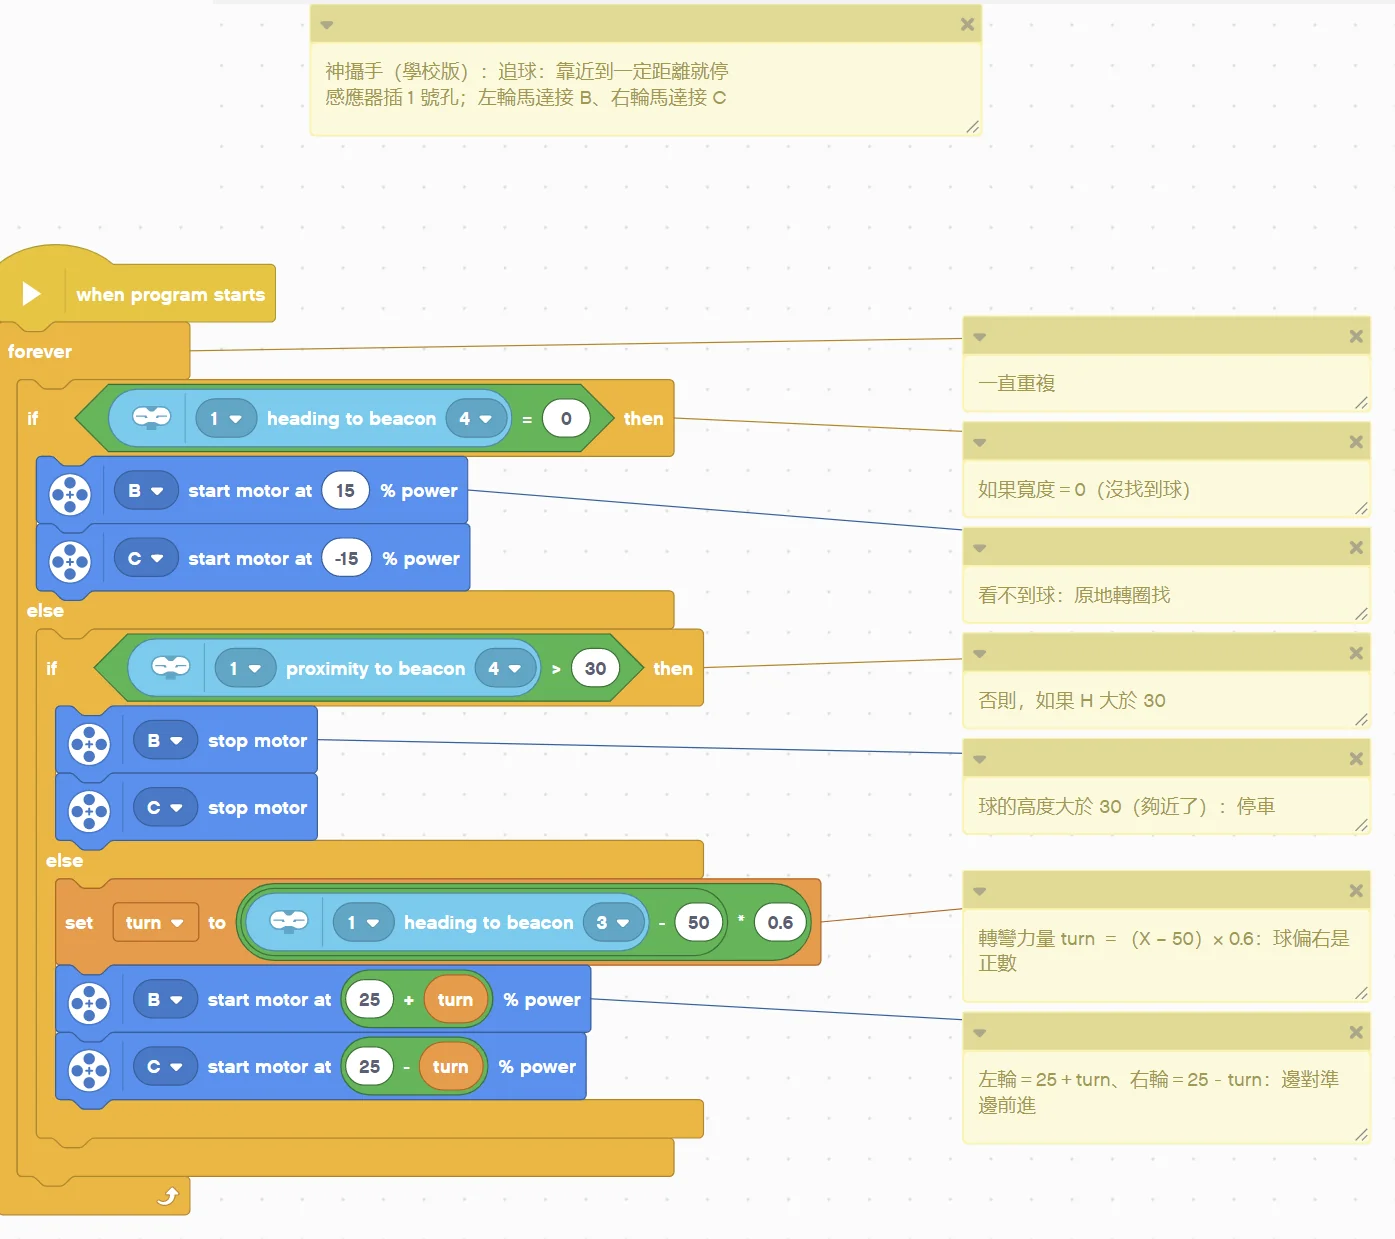
What this example does: Example 4 made to drive: aim at the ball while driving forward, and stop when the ball height H is big enough (close enough).
What you need:
- EV3 brick + Education base robot (left wheel on B, right wheel on C)
- SharpShot (school edition) (EV3 edition)
- A brightly coloured ball
How to connect: SharpShot (school edition) in port 1, mounted at the front with the lens facing forward.Camera setup: short-press the side button for the menu → left/right to "2:TRACK" → confirm → aim the crosshair at the ball, set the position, tolerance and minimum area in turn → confirm to save.
Download the program (pick your software):
⬇ EV3-G (official software) | ⬇ EV3 Classroom | ⬇ Pybricks v4 | ⬇ EV3 MicroPython v2.0 | ⬇ clev3r
EV3-G (official software) blocks
(Too small? Click the picture to open it full size.)
EV3 Classroom blocks
(Too small? Click the picture to open it full size.)
Pybricks v4 code
# ============================================================
# 神攝手 ESP32CAM 視覺感應器(學校老師創意賽版) EV3 新手範例 05:追球:靠近到一定距離就停
# 軟體:Pybricks v4(用 Chrome 打開 https://code.pybricks.com ,EV3 版目前是 Beta)
# 接法:神攝手(學校版)插 1 號孔;左輪馬達接 B、右輪馬達接 C
# 這個範例會做什麼:把範例 4 改成會往前開:一邊對準球一邊前進,球的高度 H 夠大(夠近)就停下來。
# ============================================================

from pybricks.hubs import EV3Brick
from pybricks.ev3devices import Motor
from pybricks.iodevices import LUMPDevice
from pybricks.parameters import Port
from pybricks.tools import wait

ev3 = EV3Brick()
sensor = LUMPDevice(Port.S1)       # 神攝手(學校版)插 1 號孔
left_motor = Motor(Port.B)        # 左輪
right_motor = Motor(Port.C)       # 右輪


def read_w():
    # 色塊寬度:0 ~ 100,0=沒找到
    return sensor.read(1)[6]


def read_h():
    # 色塊高度(越近越大):0 ~ 75,0=沒找到
    return sensor.read(1)[7]


def read_x():
    # 色塊左右位置:0 ~ 100(左 → 右),沒找到=0
    return sensor.read(1)[4]


# ---------- 程式從這裡開始 ----------
# 一直重複
while True:
    # 如果寬度=0(沒找到球)
    if read_w() == 0:
        # 看不到球:原地轉圈找
        left_motor.dc(15)
        right_motor.dc(-15)
    # 否則,如果 H 大於 30
    elif read_h() > 30:
        # 球的高度大於 30(夠近了):停車
        left_motor.brake()
        right_motor.brake()
    else:
        # 轉彎力量 turn =(X − 50)× 0.6:球偏右是正數
        turn = (read_x() - 50) * 0.6
        # 左輪=25+turn、右輪=25-turn:邊對準邊前進
        left_motor.dc(25 + turn)
        right_motor.dc(25 - turn)
EV3 MicroPython v2.0 code
#!/usr/bin/env pybricks-micropython
# ============================================================
# 神攝手 ESP32CAM 視覺感應器(學校老師創意賽版) EV3 新手範例 05:追球:靠近到一定距離就停
# 軟體:樂高官方 EV3 MicroPython v2.0(microSD 開機卡+VS Code「LEGO MINDSTORMS EV3 MicroPython」擴充套件)
# 接法:神攝手(學校版)插 1 號孔;左輪馬達接 B、右輪馬達接 C
# 這個範例會做什麼:把範例 4 改成會往前開:一邊對準球一邊前進,球的高度 H 夠大(夠近)就停下來。
# ============================================================

from pybricks.hubs import EV3Brick
from pybricks.ev3devices import Motor
from pybricks.iodevices import Ev3devSensor
from pybricks.parameters import Port
from pybricks.tools import wait

ev3 = EV3Brick()
sensor = Ev3devSensor(Port.S1)     # 神攝手(學校版)插 1 號孔
left_motor = Motor(Port.B)        # 左輪
right_motor = Motor(Port.C)       # 右輪


def read_w():
    # 色塊寬度:0 ~ 100,0=沒找到
    return sensor.read('IR-SEEK')[6]


def read_h():
    # 色塊高度(越近越大):0 ~ 75,0=沒找到
    return sensor.read('IR-SEEK')[7]


def read_x():
    # 色塊左右位置:0 ~ 100(左 → 右),沒找到=0
    return sensor.read('IR-SEEK')[4]


# ---------- 程式從這裡開始 ----------
# 一直重複
while True:
    # 如果寬度=0(沒找到球)
    if read_w() == 0:
        # 看不到球:原地轉圈找
        left_motor.dc(15)
        right_motor.dc(-15)
    # 否則,如果 H 大於 30
    elif read_h() > 30:
        # 球的高度大於 30(夠近了):停車
        left_motor.brake()
        right_motor.brake()
    else:
        # 轉彎力量 turn =(X − 50)× 0.6:球偏右是正數
        turn = (read_x() - 50) * 0.6
        # 左輪=25+turn、右輪=25-turn:邊對準邊前進
        left_motor.dc(25 + turn)
        right_motor.dc(25 - turn)
clev3r code
' ============================================================
' 神攝手 ESP32CAM 視覺感應器(學校老師創意賽版) EV3 新手範例 05:追球:靠近到一定距離就停
' 軟體:clev3r
' 接法:神攝手(學校版)插 1 號孔;左輪馬達接 B、右輪馬達接 C
' 這個範例會做什麼:把範例 4 改成會往前開:一邊對準球一邊前進,球的高度 H 夠大(夠近)就停下來。
' 讀值:w=色塊寬度(0 ~ 100,0=沒找到);h=色塊高度(越近越大)(0 ~ 75,0=沒找到);x=色塊左右位置(0 ~ 100(左 → 右),沒找到=0)
' ============================================================
folder "prjs" "MBC_esp32cam_ex05"

' 神攝手(學校版)插 1 號孔,使用模式 1
Sensor.SetMode(1, 1)
LCD.Clear()

' 一直重複
While "True"
  ' 如果寬度=0(沒找到球)
  If Sensor.ReadRawValue(1, 6) = 0 Then
    ' 看不到球:原地轉圈找
    Motor.StartPower("B", 15)
    Motor.StartPower("C", -15)
  ' 否則,如果 H 大於 30
  ElseIf Sensor.ReadRawValue(1, 7) > 30 Then
    ' 球的高度大於 30(夠近了):停車
    Motor.Stop("BC", "True")
  Else
    ' 轉彎力量 turn =(X − 50)× 0.6:球偏右是正數
    turn = (Sensor.ReadRawValue(1, 4) - 50) * 0.6
    ' 左輪=25+turn、右輪=25-turn:邊對準邊前進
    Motor.StartPower("B", 25 + turn)
    Motor.StartPower("C", 25 - turn)
  EndIf
EndWhile
Step by step:
- Repeat forever
- If width = 0 (ball not found)
- Cannot see the ball: spin on the spot to look for it
- Otherwise:
- Otherwise, if H is greater than 30
- Ball height greater than 30 (close enough): stop
- Otherwise:
- Steering power turn = (X − 50) × 0.6: positive when the ball is to the right
- Left wheel = 25 + turn, right wheel = 25 − turn: aim at the ball while driving forward
- Otherwise, if H is greater than 30
- If width = 0 (ball not found)
What you should see: Put the ball on the floor: the robot turns to it, drives over and stops in front of it.
FAQ:
- The camera screen stays on "LEGO Sync..."? The camera only starts when plugged into an EV3 that is already on. Turn the EV3 on first, then plug in the camera.
- It stops while still far away? Raise 30.
Still stuck? Leave a message on Contact us with the software you use and a screenshot of your program, and we will help.