
IMU 9-Axis Gyro × EV3 × EV3-G
Interactive tutorialEV3
First time? Try the interactive tutorial in your browser first, then follow the steps below with your hub.
This page covers EV3-G official software (EV3 Lab) only: how to set it up for the IMU 9-Axis Gyro on MINDSTORMS EV3, how to read every value, the commands it supports and examples. Use the switcher above to change product, host or software.
Setup
What you need
- Sensor: IMU 9-Axis Gyro (EV3 edition, RJ12 plug). A SPIKE edition is not recognised on an EV3.
- Brick: LEGO MINDSTORMS EV3.
- Cable: the standard cable in the box, or an original LEGO EV3 cable.
- Software: the official LEGO MINDSTORMS EV3 software (LabVIEW-style interface, usually called EV3-G). The most common choice in school computer labs and WRO teams.
Install the software
- Install the official EV3 software (EV3 Lab) from the LEGO Education download page.
- To open an example: download the
.ev3file → "File → Open Project" → connect the EV3 → "Download and Run" at the bottom right.
Make the software see the sensor
No extension and no driver needed. On the EV3 the sensor emulates an original LEGO sensor (most products show up as an "Infrared Sensor"); use the built-in sensor blocks and pick the right mode.
- The infrared sensor has three modes, Proximity, Beacon and Remote; the product puts different data in different modes. See the readings below.
- Some products come with MBC My Blocks. They are already inside the example projects; open an example and they are there.
Important
Do not switch modes in the middle of a program. Every time the EV3 switches a sensor mode (for example from Proximity to Remote) it stalls for about 1 s, which can make a fast robot lose control. Pick one mode at the start and use it for the whole run.
Wiring
- Plug the sensor into EV3 port 1 with the cable (any of 1~4 works; choose the same port in the blocks).
- Turn the EV3 on first, then plug in the sensor.
- Latch up, push the plug in gently; do not force it.
Note
On the EV3 the IMU shows up as a "Gyro Sensor" (not an infrared sensor); read it with the original gyro sensor blocks.
Tested (2026-11-02, stock EV3 firmware + EV3-G): the Angle block and the Reset block both work. In the "Angle and Rate" block, the rate is the magnetometer heading (relative, not degrees per second); for turning speed, subtract two Angle readings.
First test
- Download the
.ev3of example 1 on this page, open it and press "Download and Run". - If the number on the EV3 screen changes with what is in front of the sensor, everything is connected.
FAQ
- The number never changes? Unplug the sensor and plug it back in (the EV3 must be on first).
- The EV3 shows an "Infrared Sensor"? That is normal: read the values with the infrared sensor blocks.
- Some examples have no EV3-G version? Examples marked "Pybricks / EV3 MicroPython / clev3r only" use a mode the EV3-G blocks cannot read.
- The program hiccups now and then? It switches sensor modes; each switch costs about 1 s. Use one mode only.
Reading values
The EV3 sees a stock LEGO sensor, so read it with the stock sensor block.
gyro 3D heading headingGyro3D
| Range | Meaning |
|---|---|
-32768~32767 ° |
heading from the 3D quaternion, degrees, 0 at boot/zero, accumulates past 360 (wraps at ±32767, ~91 turns) |
| Value | Block | Decode | Mode |
|---|---|---|---|
| gyro 3D heading | Gyro Sensor → Angle | the value | mode 0 |
fused heading headingFused
| Range | Meaning |
|---|---|
-32768~32767 ° |
3D gyro heading slowly corrected by the magnetometer, degrees, relative to the zero point; may exceed 360 |
| Value | Block | Decode | Mode |
|---|---|---|---|
| fused heading | Gyro Sensor → Rate | the value | mode 1 |
gyro 1D heading headingGyro1D
| Range | Meaning |
|---|---|
-32768~32767 ° |
heading integrated about the yaw axis only, degrees, 0 at boot/zero; may exceed 360 |
| Value | Block | Decode | Mode |
|---|---|---|---|
| gyro 1D heading | Gyro Sensor → Angle and Rate (angle) | the value | mode 3 |
magnetic heading headingMag
| Range | Meaning |
|---|---|
-32768~32767 ° |
tilt-compensated magnetometer heading, degrees, relative to the zero point |
| Value | Block | Decode | Mode |
|---|---|---|---|
| magnetic heading | Gyro Sensor → Angle and Rate (rate) | the value | mode 3 |
Not readable here:yaw rate, pitch angle, pitch rate, magnetometer trust, magnetic disturbance, face up, gyro axis 1~3, accel axis 1~3, mag axis 1~3, command status. Use Pybricks / clev3r for these.
Commands
The EV3 port is read-only, so this software cannot send commands: calibrate with the button on the sensor and change settings over Arduino I2C, mBlock or micro:bit.
Examples
Example 1: See how far the robot has turned
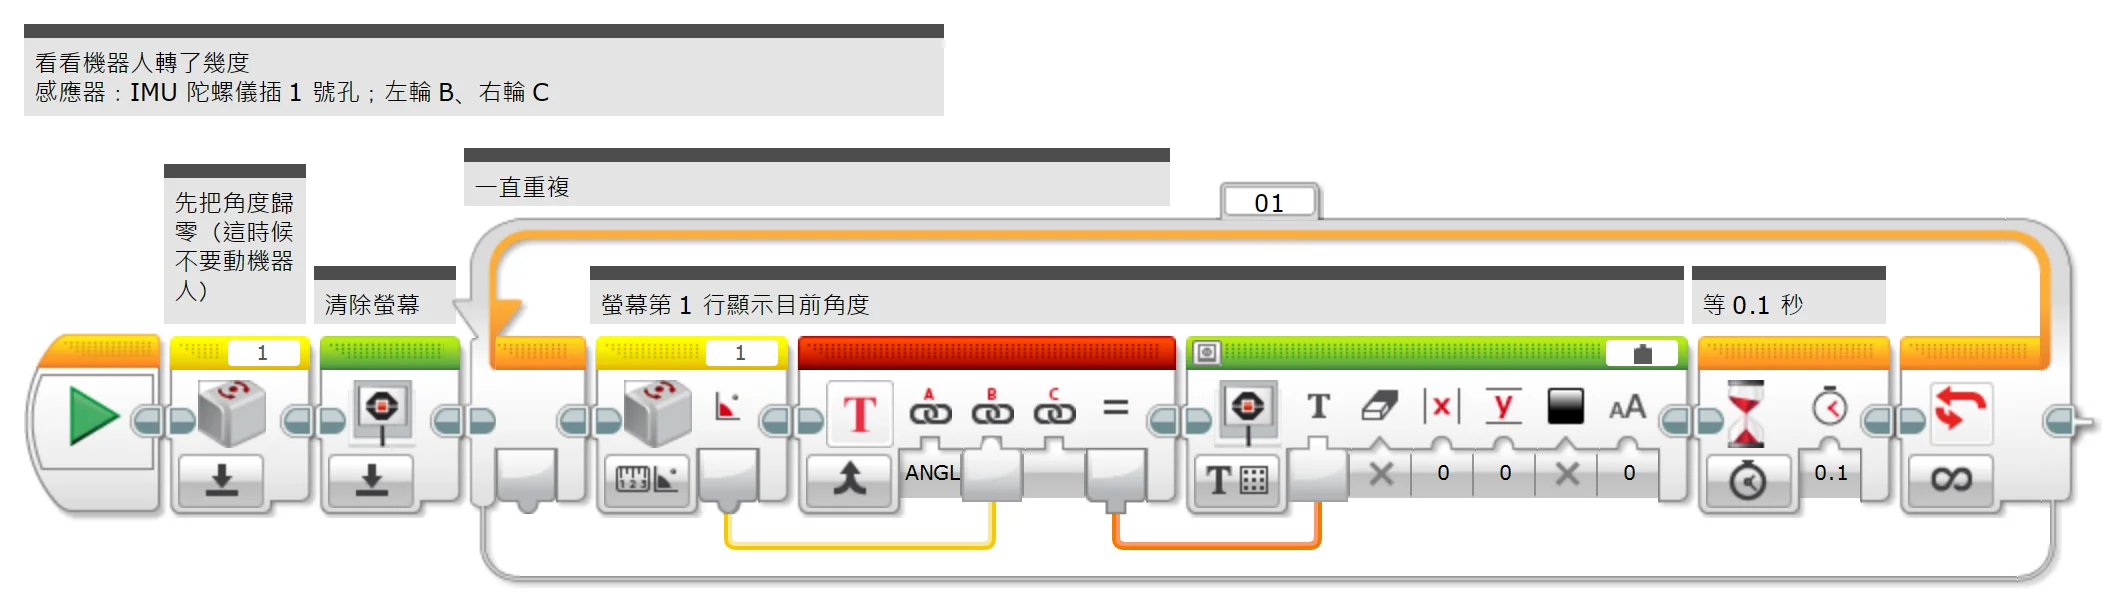
What this example does: The angle is reset to 0 when the program starts; turn the robot by hand and the screen shows how many degrees it has turned.
What you need:
- IMU gyro (EV3 edition)
- EV3 brick
How to connect: IMU gyro in port 1, mounted flat and firmly on the robot (no wobble). The robot must be still when the program starts.
Download the program (pick your software):
EV3-G (official software) blocks
(Too small? Click the picture to open it full size.)
Step by step:
- Reset the angle to 0 first (do not move the robot now)
- Clear the screen
- Repeat forever
- Screen row 1 shows the current angle
- Wait 0.1 s
What you should see: One full turn is about 360; turning the other way goes negative. Turn back to where you started and the number returns to about 0.
FAQ:
- The robot is still but the angle slowly drifts? The robot must be completely still at power-on or reset. Put it down, unplug the sensor and plug it back in, then try again.
- The angle changes the opposite way to what the example says? The sensor may be mounted upside down. Examples 2 and 3 use the absolute value so they are not affected; for examples 4 and 5 swap "+" and "−" in the program.
Example 2: Turn right 90 degrees on the spot
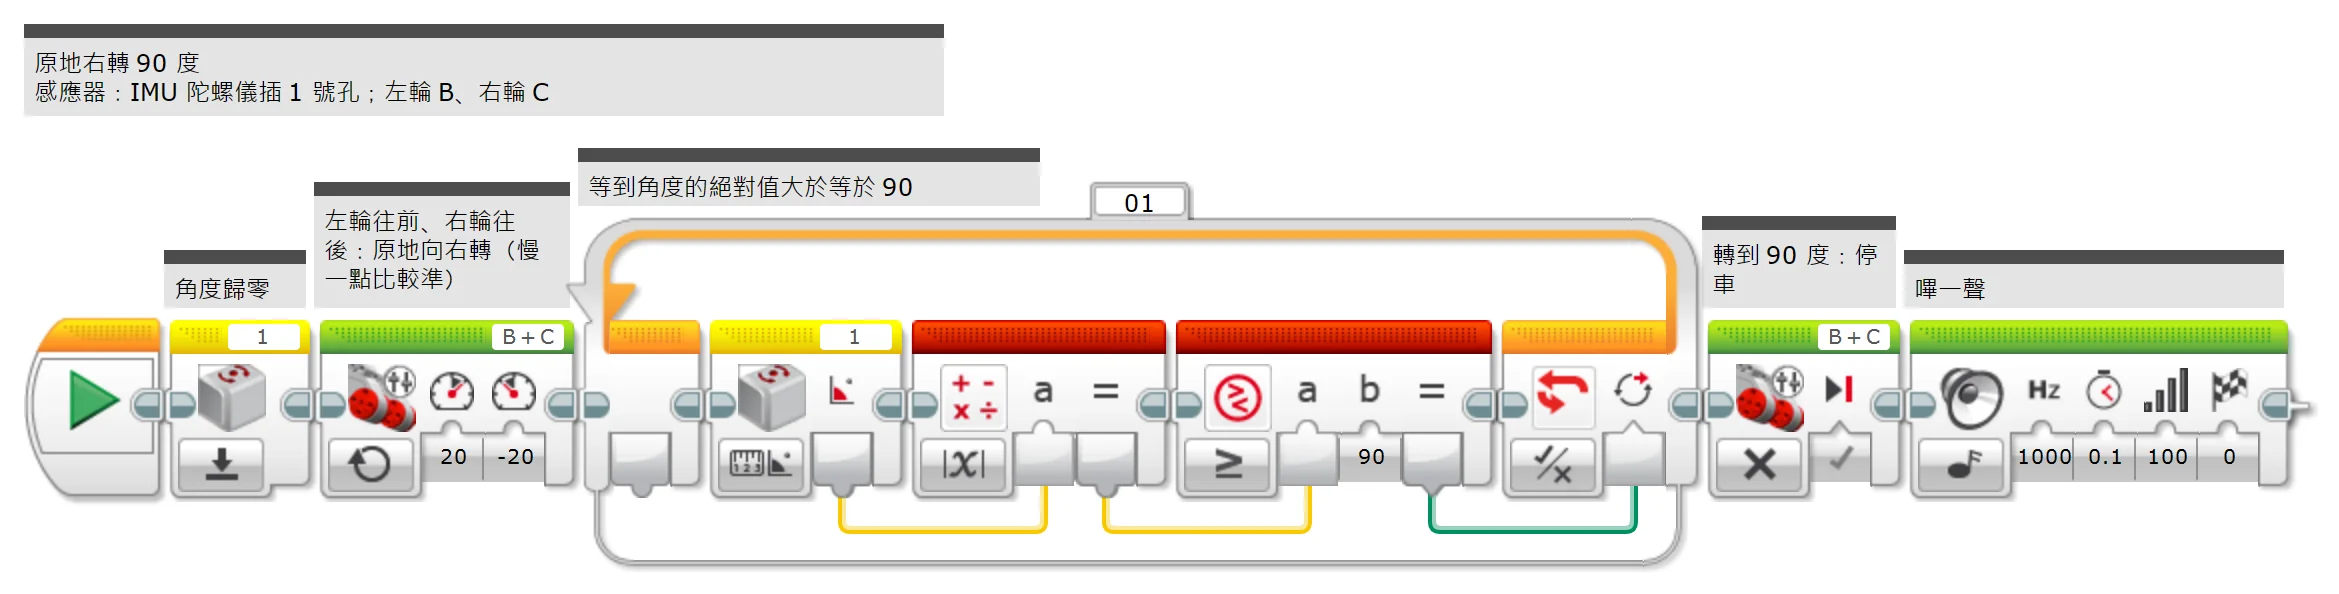
What this example does: Turning with the gyro is much more accurate than "turn for N seconds": keep turning until the angle reaches 90, then stop.
What you need:
- EV3 brick + Education base robot (left wheel on B, right wheel on C)
- IMU gyro (EV3 edition)
How to connect: IMU gyro in port 1, mounted flat and firmly on the robot (no wobble). The robot must be still when the program starts.
Download the program (pick your software):
EV3-G (official software) blocks
(Too small? Click the picture to open it full size.)
Step by step:
- Reset the angle to 0
- Left wheel forward, right wheel backward: spin right on the spot (slower is more accurate)
- Wait until the absolute value of the angle is 90 or more
- Reached 90 degrees: stop
- Beep
What you should see: The robot spins right about 90 degrees, stops and beeps.
FAQ:
- It always overshoots by a few degrees? The robot needs a moment to stop. Try 85 instead of 90, or lower the turning speed 20.
- The robot is still but the angle slowly drifts? The robot must be completely still at power-on or reset. Put it down, unplug the sensor and plug it back in, then try again.
- The angle changes the opposite way to what the example says? The sensor may be mounted upside down. Examples 2 and 3 use the absolute value so they are not affected; for examples 4 and 5 swap "+" and "−" in the program.
Example 3: Drive a square
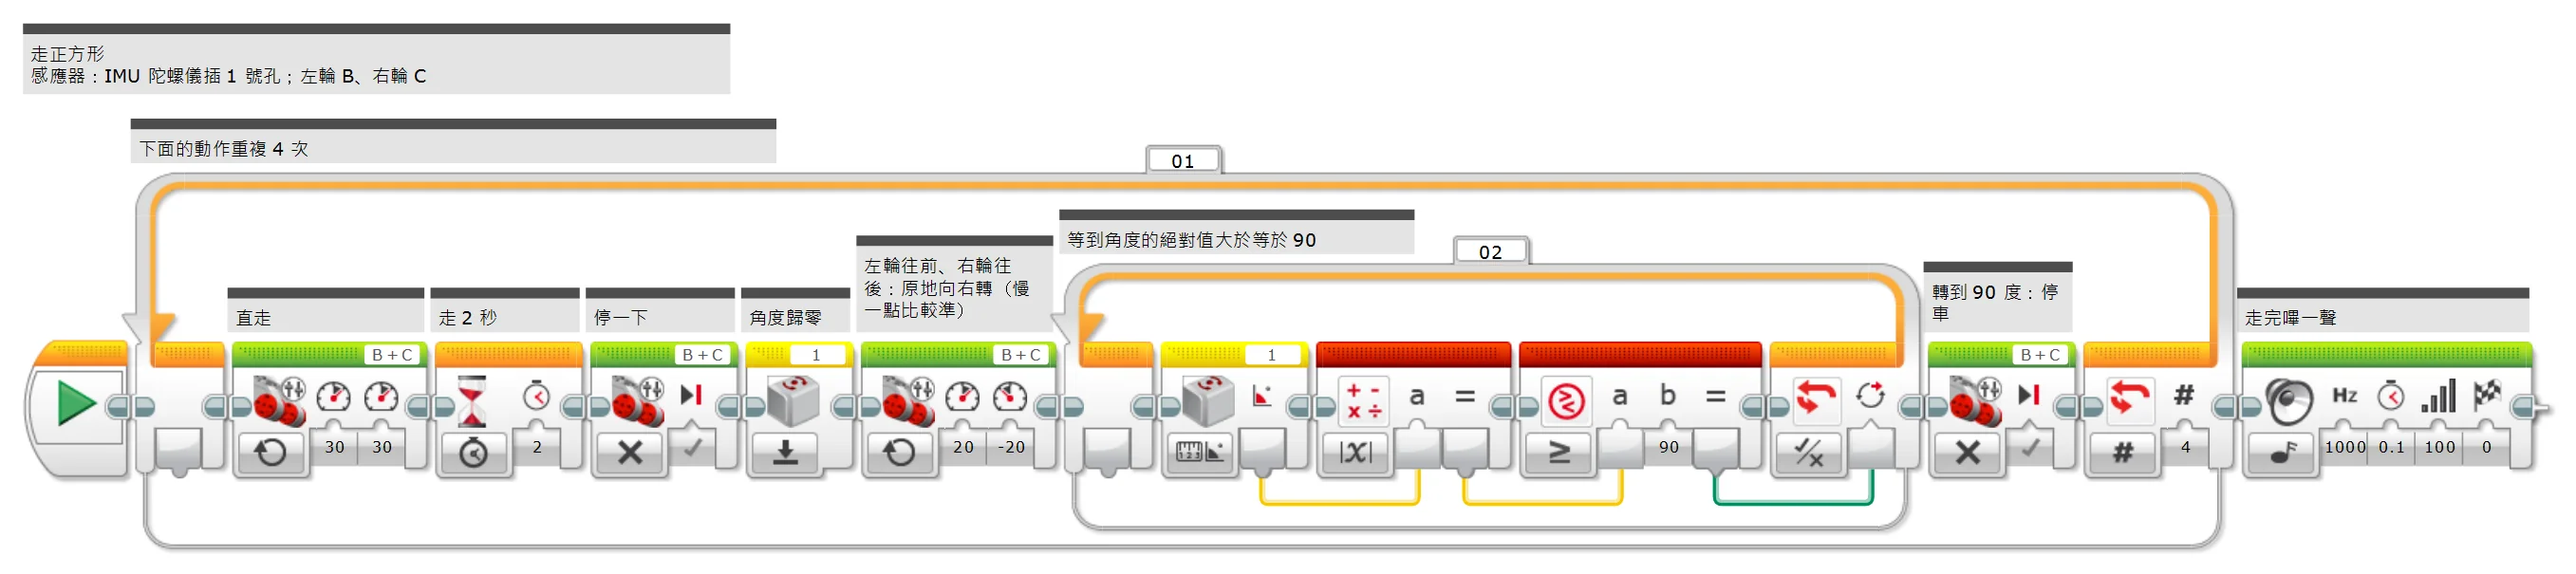
What this example does: Repeat "drive straight 2 s + turn right 90 degrees" 4 times and you get a square.
What you need:
- EV3 brick + Education base robot (left wheel on B, right wheel on C)
- IMU gyro (EV3 edition)
How to connect: IMU gyro in port 1, mounted flat and firmly on the robot (no wobble). The robot must be still when the program starts.
Download the program (pick your software):
EV3-G (official software) blocks
(Too small? Click the picture to open it full size.)
Step by step:
- Repeat the steps below 4 times
- Go straight
- Drive for 2 s
- Stop for a moment
- Reset the angle to 0
- Left wheel forward, right wheel backward: spin right on the spot (slower is more accurate)
- Wait until the absolute value of the angle is 90 or more
- Reached 90 degrees: stop
- Beep when done
What you should see: The robot drives a square and ends up near where it started.
FAQ:
- The robot is still but the angle slowly drifts? The robot must be completely still at power-on or reset. Put it down, unplug the sensor and plug it back in, then try again.
- The angle changes the opposite way to what the example says? The sensor may be mounted upside down. Examples 2 and 3 use the absolute value so they are not affected; for examples 4 and 5 swap "+" and "−" in the program.
Example 4: Drive straight with automatic correction
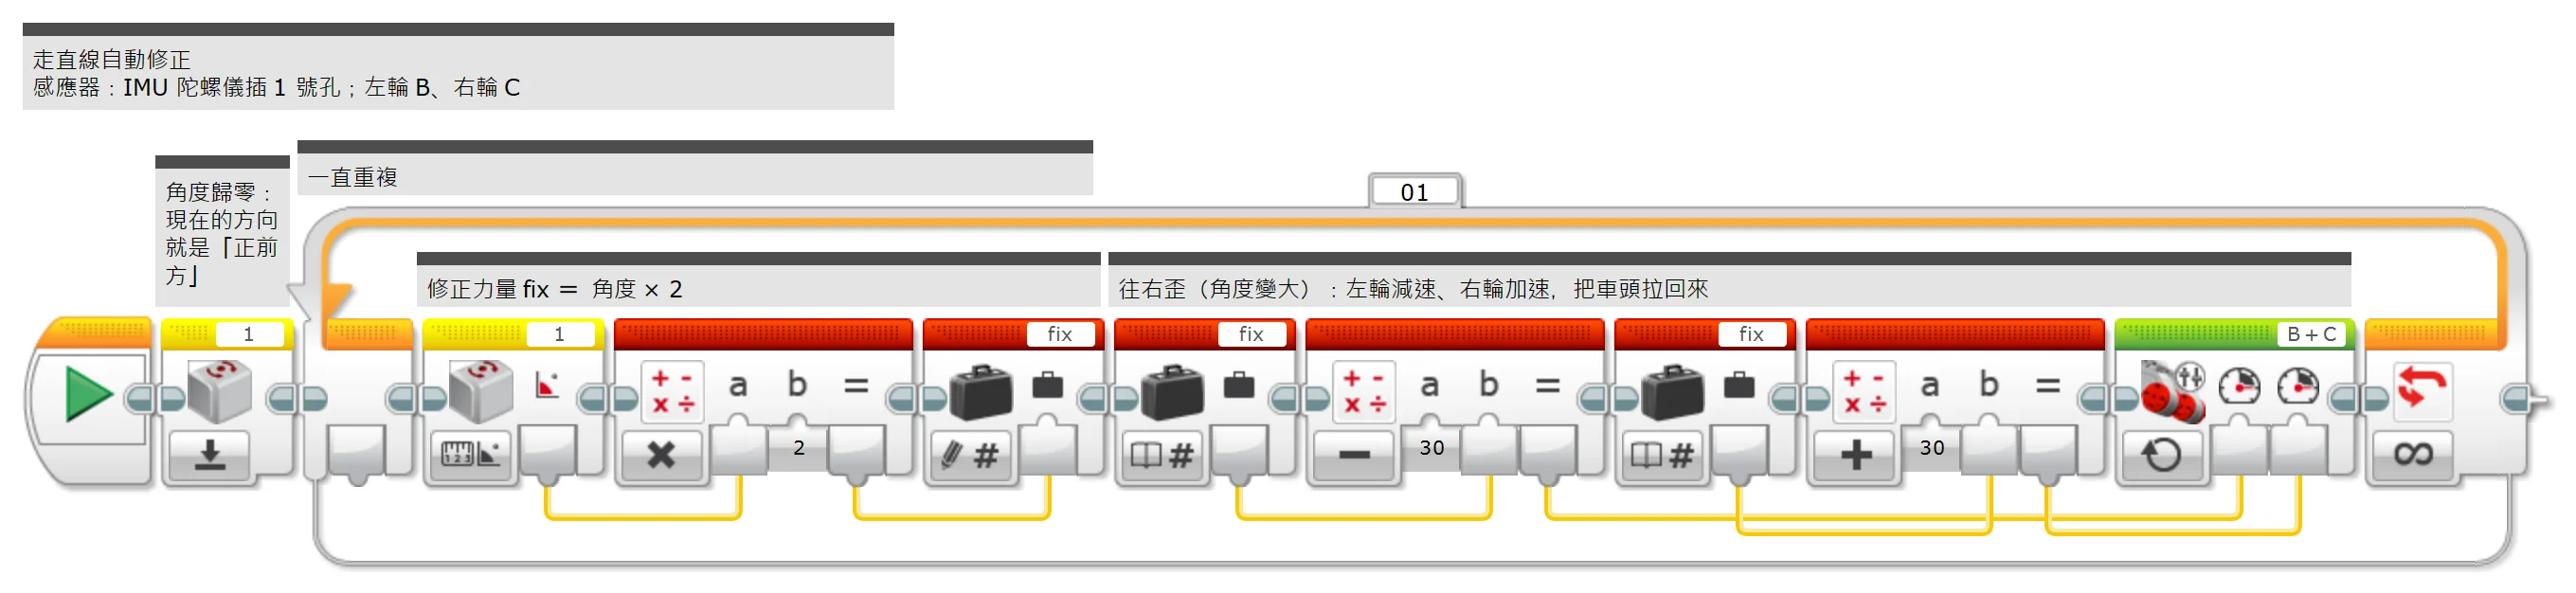
What this example does: Two wheels are never exactly the same speed, so a robot drifts when driving straight. Use the gyro to see how many degrees it drifted and steer back the other way, and the robot drives really straight.
What you need:
- EV3 brick + Education base robot (left wheel on B, right wheel on C)
- IMU gyro (EV3 edition)
How to connect: IMU gyro in port 1, mounted flat and firmly on the robot (no wobble). The robot must be still when the program starts.
Download the program (pick your software):
EV3-G (official software) blocks
(Too small? Click the picture to open it full size.)
Step by step:
- Reset the angle: the current heading is "straight ahead"
- Repeat forever
- Correction fix = angle × 2
- Drifting right (angle grows): slow the left wheel, speed up the right wheel to pull the nose back
What you should see: The robot drives straight; push its nose off course by hand and it turns back to the original heading and carries on.
FAQ:
- It drifts more and more, or even spins? The correction is the wrong way round: swap "30 − fix" and "30 + fix".
- The robot is still but the angle slowly drifts? The robot must be completely still at power-on or reset. Put it down, unplug the sensor and plug it back in, then try again.
- The angle changes the opposite way to what the example says? The sensor may be mounted upside down. Examples 2 and 3 use the absolute value so they are not affected; for examples 4 and 5 swap "+" and "−" in the program.
Example 5: Compass that will not give up: turns itself back to the original heading
What this example does: The robot sits still. Turn it away by hand and it turns itself back to the original heading. This is the basic "turn back to straight ahead" used in competitions.
What you need:
- EV3 brick + Education base robot (left wheel on B, right wheel on C)
- IMU gyro (EV3 edition)
How to connect: IMU gyro in port 1, mounted flat and firmly on the robot (no wobble). The robot must be still when the program starts.
Download the program (pick your software):
EV3-G (official software) blocks
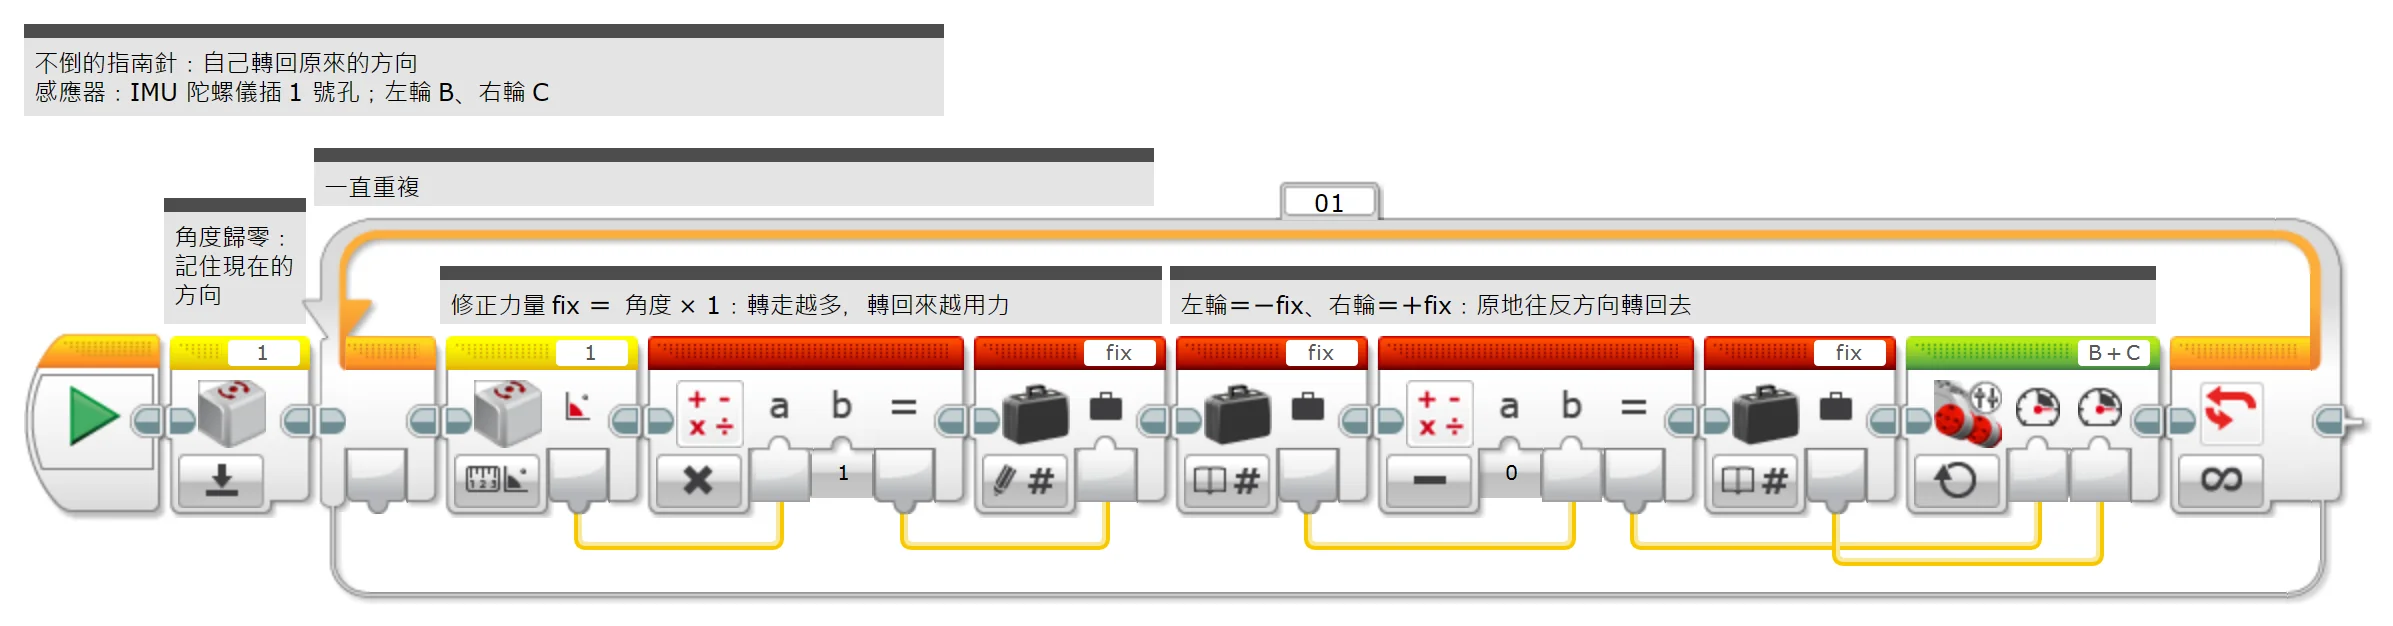
(Too small? Click the picture to open it full size.)
Step by step:
- Reset the angle: remember the current heading
- Repeat forever
- Correction fix = angle × 1: the further it is turned away, the harder it turns back
- Left wheel = −fix, right wheel = +fix: spin back the other way on the spot
What you should see: Turn the robot away by hand; let go and it turns back to the original heading and stops.
FAQ:
- It keeps spinning and never stops? The direction is reversed: swap "−fix" and "+fix".
- It shakes around the target? Lower × 1 (for example × 0.6).
- The robot is still but the angle slowly drifts? The robot must be completely still at power-on or reset. Put it down, unplug the sensor and plug it back in, then try again.
- The angle changes the opposite way to what the example says? The sensor may be mounted upside down. Examples 2 and 3 use the absolute value so they are not affected; for examples 4 and 5 swap "+" and "−" in the program.
Note
These examples have no version for this software: Example 6: Pitch angle: slow down on a slope; Example 7: Warn when turning too fast; Example 8: Turn to a set heading (absolute angle); Example 9: Turn another 90 degrees from where you are (relative angle)
More questions
- The EV3 shows an infrared sensor? Expected: the sensor emulates a LEGO sensor so the stock blocks can read it.
- A short freeze when switching modes? The EV3 needs about 1 s per mode change. Stick to one mode during a run.
Still stuck? Contact us with your software and a screenshot of the program.
Downloads
Sources
- Host and software list:
_build/guides.json - Values and commands:
_build/protocol/imu.json(single source of truth) - Setup:
_build/guides/software/ev3-ev3g.en.md、_build/guides/product/imu/ev3-ev3g.en.md - Examples:
sensors/imu/ev3-examples.md