
Controller PS4/PS5 × EV3 × EV3-G
Interactive tutorialEV3
First time? Try the interactive tutorial in your browser first, then follow the steps below with your hub.
This page covers EV3-G official software (EV3 Lab) only: how to set it up for the Controller PS4/PS5 on MINDSTORMS EV3, how to read every value, the commands it supports and examples. Use the switcher above to change product, host or software.
Setup
What you need
- Sensor: Controller PS4/PS5 (EV3 edition, RJ12 plug). A SPIKE edition is not recognised on an EV3.
- Brick: LEGO MINDSTORMS EV3.
- Cable: the standard cable in the box, or an original LEGO EV3 cable.
- Software: the official LEGO MINDSTORMS EV3 software (LabVIEW-style interface, usually called EV3-G). The most common choice in school computer labs and WRO teams.
Install the software
- Install the official EV3 software (EV3 Lab) from the LEGO Education download page.
- To open an example: download the
.ev3file → "File → Open Project" → connect the EV3 → "Download and Run" at the bottom right.
Make the software see the sensor
No extension and no driver needed. On the EV3 the sensor emulates an original LEGO sensor (most products show up as an "Infrared Sensor"); use the built-in sensor blocks and pick the right mode.
- The infrared sensor has three modes, Proximity, Beacon and Remote; the product puts different data in different modes. See the readings below.
- Some products come with MBC My Blocks. They are already inside the example projects; open an example and they are there.
Important
Do not switch modes in the middle of a program. Every time the EV3 switches a sensor mode (for example from Proximity to Remote) it stalls for about 1 s, which can make a fast robot lose control. Pick one mode at the start and use it for the whole run.
Wiring
- Plug the sensor into EV3 port 1 with the cable (any of 1~4 works; choose the same port in the blocks).
- Turn the EV3 on first, then plug in the sensor.
- Latch up, push the plug in gently; do not force it.
Pair the gamepad (first use or new gamepad)
- Connect the receiver and turn the controller on. Do not hold the receiver's button while plugging it in (that enters flashing mode and the receiver does nothing; release the button, unplug and replug).
- First use: a receiver that remembers no gamepad opens a 30-second pairing window at power-on (green LED blinking fast). To change gamepads, or if the 30 seconds are over: press the receiver's button (Reset) once; it forgets the old gamepad and opens 30 seconds again.
- Within those 30 seconds put the gamepad in pairing mode until its light bar flashes fast: PS4 hold SHARE + PS; PS5 hold Create + PS.
- Once connected, the receiver remembers this gamepad and will not connect to anyone else's. From then on, just press the gamepad's PS button after power-on.
| Receiver green LED | Meaning |
|---|---|
| Blinking fast | Waiting for a gamepad to pair |
| Steady on | No gamepad connected (press the PS button to reconnect) |
| Off | Gamepad connected |
Tip
At a competition, pair at your own table so no other team's gamepad is in pairing mode during the 30 seconds. Paired the wrong one? Press Reset and pair again.
First test
- Download the
.ev3of example 1 on this page, open it and press "Download and Run". - If the number on the EV3 screen changes with what is in front of the sensor, everything is connected.
FAQ
- The number never changes? Unplug the sensor and plug it back in (the EV3 must be on first).
- The EV3 shows an "Infrared Sensor"? That is normal: read the values with the infrared sensor blocks.
- Some examples have no EV3-G version? Examples marked "Pybricks / EV3 MicroPython / clev3r only" use a mode the EV3-G blocks cannot read.
- The program hiccups now and then? It switches sensor modes; each switch costs about 1 s. Use one mode only.
Reading values
The EV3 sees a stock LEGO sensor, so read it with the stock sensor block.
D-pad dpad
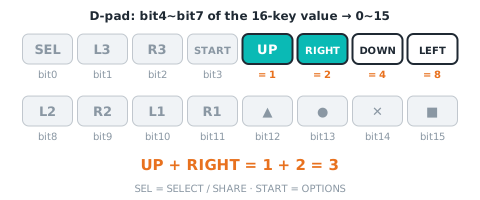
| Range | Meaning |
|---|---|
0~15 bit |
up 1, right 2, down 4, left 8, added when pressed together (0~15) |
| Value | Block | Decode | Mode |
|---|---|---|---|
| D-pad | Infrared Sensor → Proximity | the value | mode 0 |
shape buttons shapeKeys
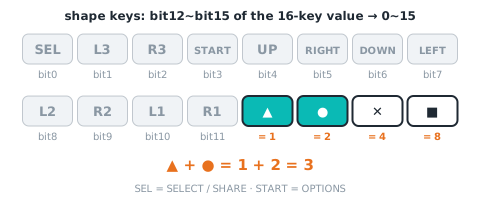
| Range | Meaning |
|---|---|
0~15 bit |
triangle 1, circle 2, cross 4, square 8, added when pressed together (0~15) |
| Value | Block | Decode | Mode |
|---|---|---|---|
| shape buttons | Infrared Sensor → Beacon heading, channel 2 | the value | mode 1 |
shoulder buttons shoulderKeys
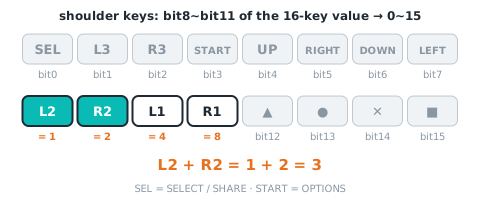
| Range | Meaning |
|---|---|
0~15 bit |
L2 1, R2 2, L1 4, R1 8, added when pressed together (0~15) |
| Value | Block | Decode | Mode |
|---|---|---|---|
| shoulder buttons | Infrared Sensor → Beacon heading, channel 3 | the value | mode 1 |
function buttons funcKeys
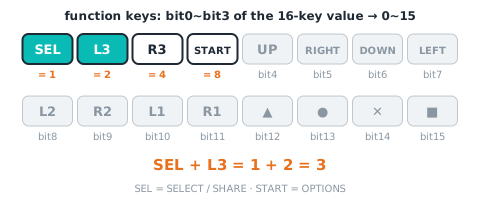
| Range | Meaning |
|---|---|
0~15 bit |
SELECT(SHARE) 1, L3 2, R3 4, START(OPTIONS) 8, added when pressed together (0~15) |
| Value | Block | Decode | Mode |
|---|---|---|---|
| function buttons | Infrared Sensor → Beacon heading, channel 4 | the value | mode 1 |
stick axis 1~4 stick
| Range | Meaning |
|---|---|
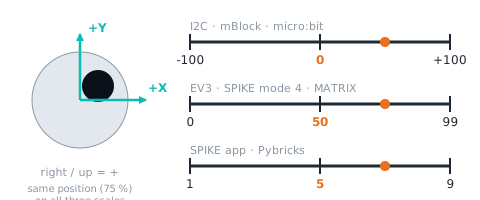
-100~+100 (EV3 mode 1, mode 2, mode 4 give a scaled value: 0~99 (50 = centre)) |
10 LX, 11 LY, 12 RX, 13 RY: −100 to +100, 0 = centre, right/up positive; 0 when not connected |
| Value | Block | Decode | Mode |
|---|---|---|---|
| LX | Infrared Sensor → Beacon proximity, channel 1 | the value: 0~99 (50 = centre) | mode 1 |
| LY | Infrared Sensor → Beacon proximity, channel 2 | the value: 0~99 (50 = centre) | mode 1 |
| RX | Infrared Sensor → Beacon proximity, channel 3 | the value: 0~99 (50 = centre) | mode 1 |
| RY | Infrared Sensor → Beacon proximity, channel 4 | the value: 0~99 (50 = centre) | mode 1 |
Not readable here:16 buttons, connected, battery, L2 analog, R2 analog, system buttons, gamepad type. Use Pybricks / clev3r for these.
Commands
The EV3 port is read-only, so this software cannot send commands: calibrate with the button on the sensor and change settings over Arduino I2C, mBlock or micro:bit.
Examples
Example 1: Button tester: see the number of every button
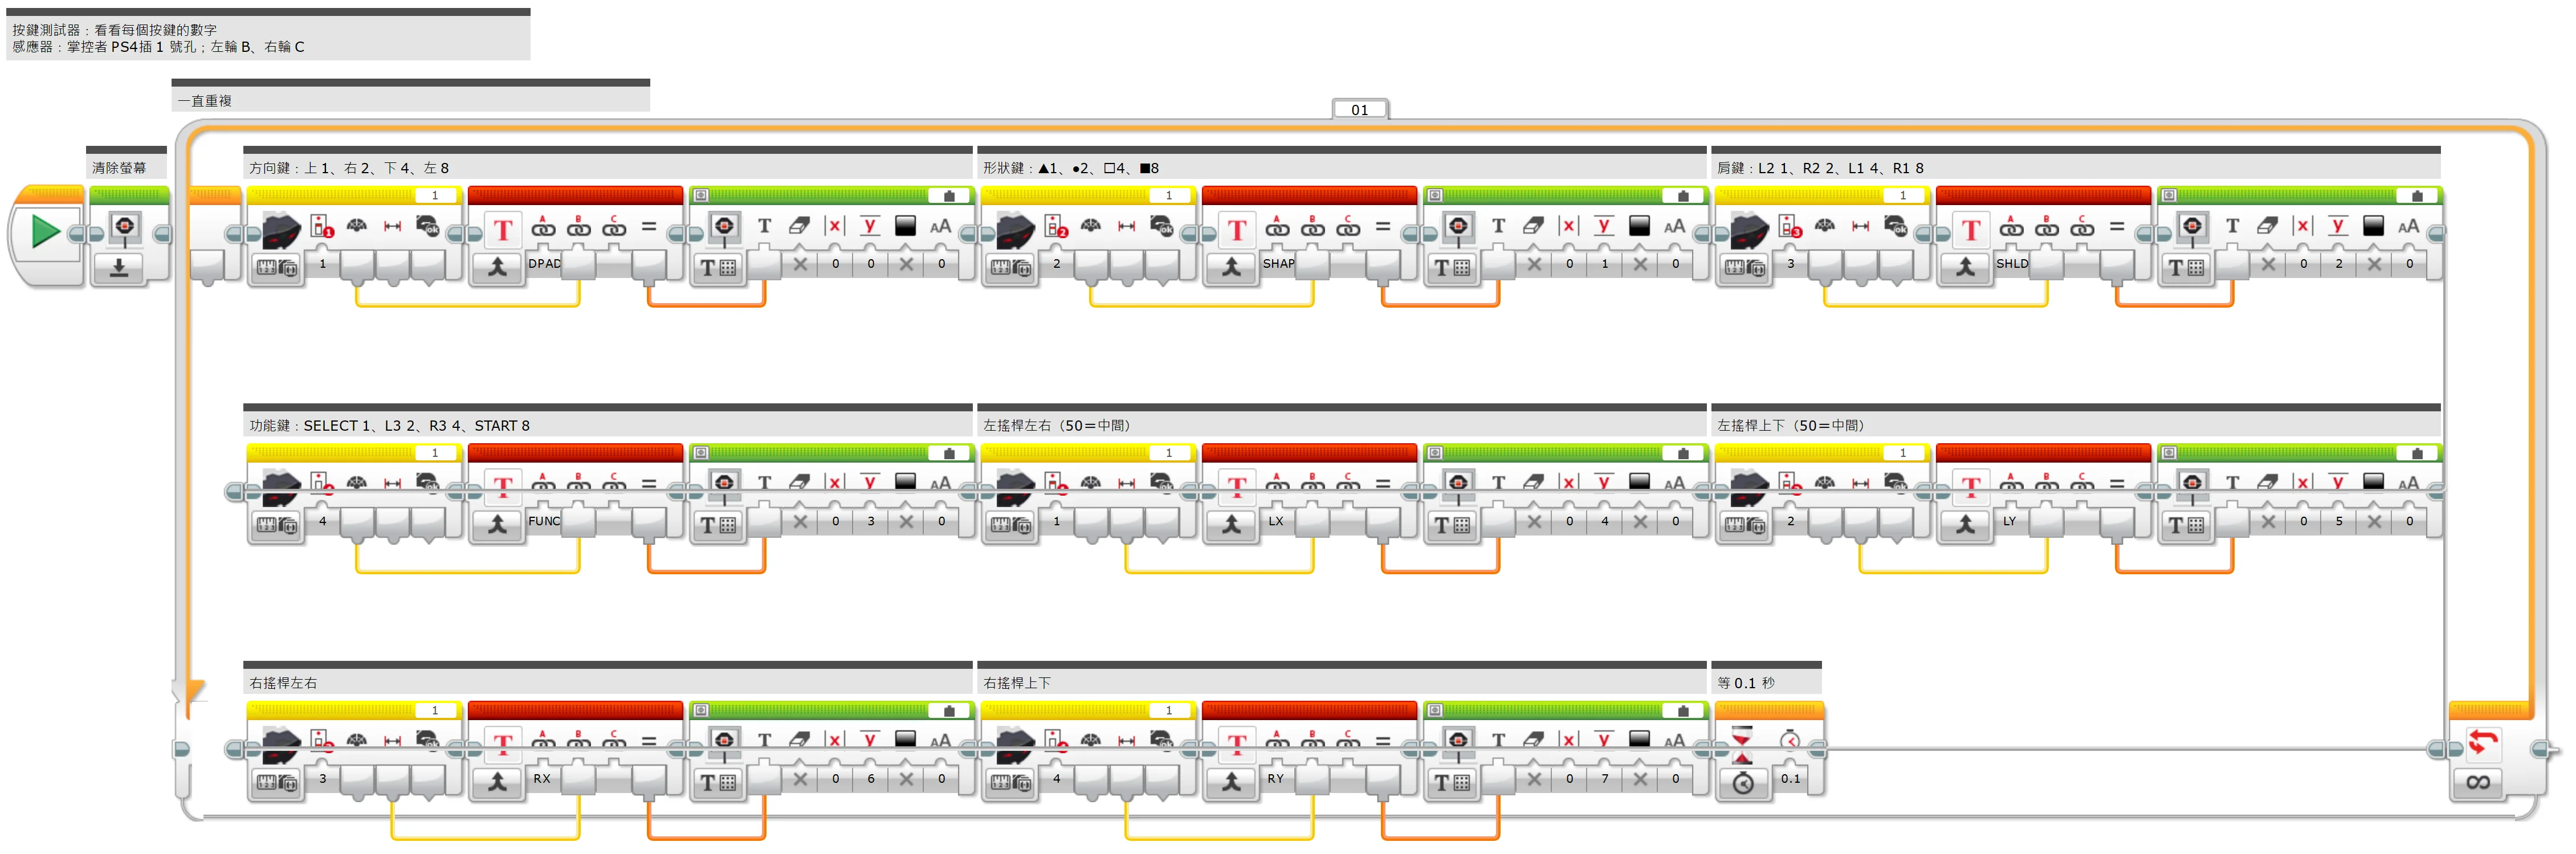
What this example does: Mode 1 sends 8 numbers at once: 4 button groups and 4 stick values. This example shows them all on the screen; press and push everything and you will know each value.
What you need:
- Controller PS4 Bluetooth receiver (EV3 edition) + gamepad
- EV3 brick
How to connect: Bluetooth receiver in port 1. The first time, pair the PS4/PS5 gamepad as described on the product page; afterwards pressing the PS button connects automatically.
Download the program (pick your software):
EV3-G (official software) blocks
(Too small? Click the picture to open it full size.)
Step by step:
- Clear the screen
- Repeat forever
- D-pad: up 1, right 2, down 4, left 8
- Shape buttons: ▲1, ●2, ✕4, ■8
- Shoulder buttons: L2 1, R2 2, L1 4, R1 8
- Function buttons: SELECT 1, L3 2, R3 4, START 8
- Left stick left/right (50 = centre)
- Left stick up/down (50 = centre)
- Right stick left/right
- Right stick up/down
- Wait 0.1 s
What you should see: With nothing pressed the buttons read 0 and the sticks 50. Pressing two buttons adds the numbers, for example up + right = 3.
FAQ:
- The buttons do nothing? Run example 1 first to see if the numbers change. If not, the gamepad is not connected: power-cycle the gamepad, or turn the EV3 on before plugging in the receiver.
- The robot keeps creeping after you release the stick? The stick centre is not always exactly 50: lower the × 2 in the program, or add a rule "treat 45~55 as 50".
Example 2: Drive with the D-pad
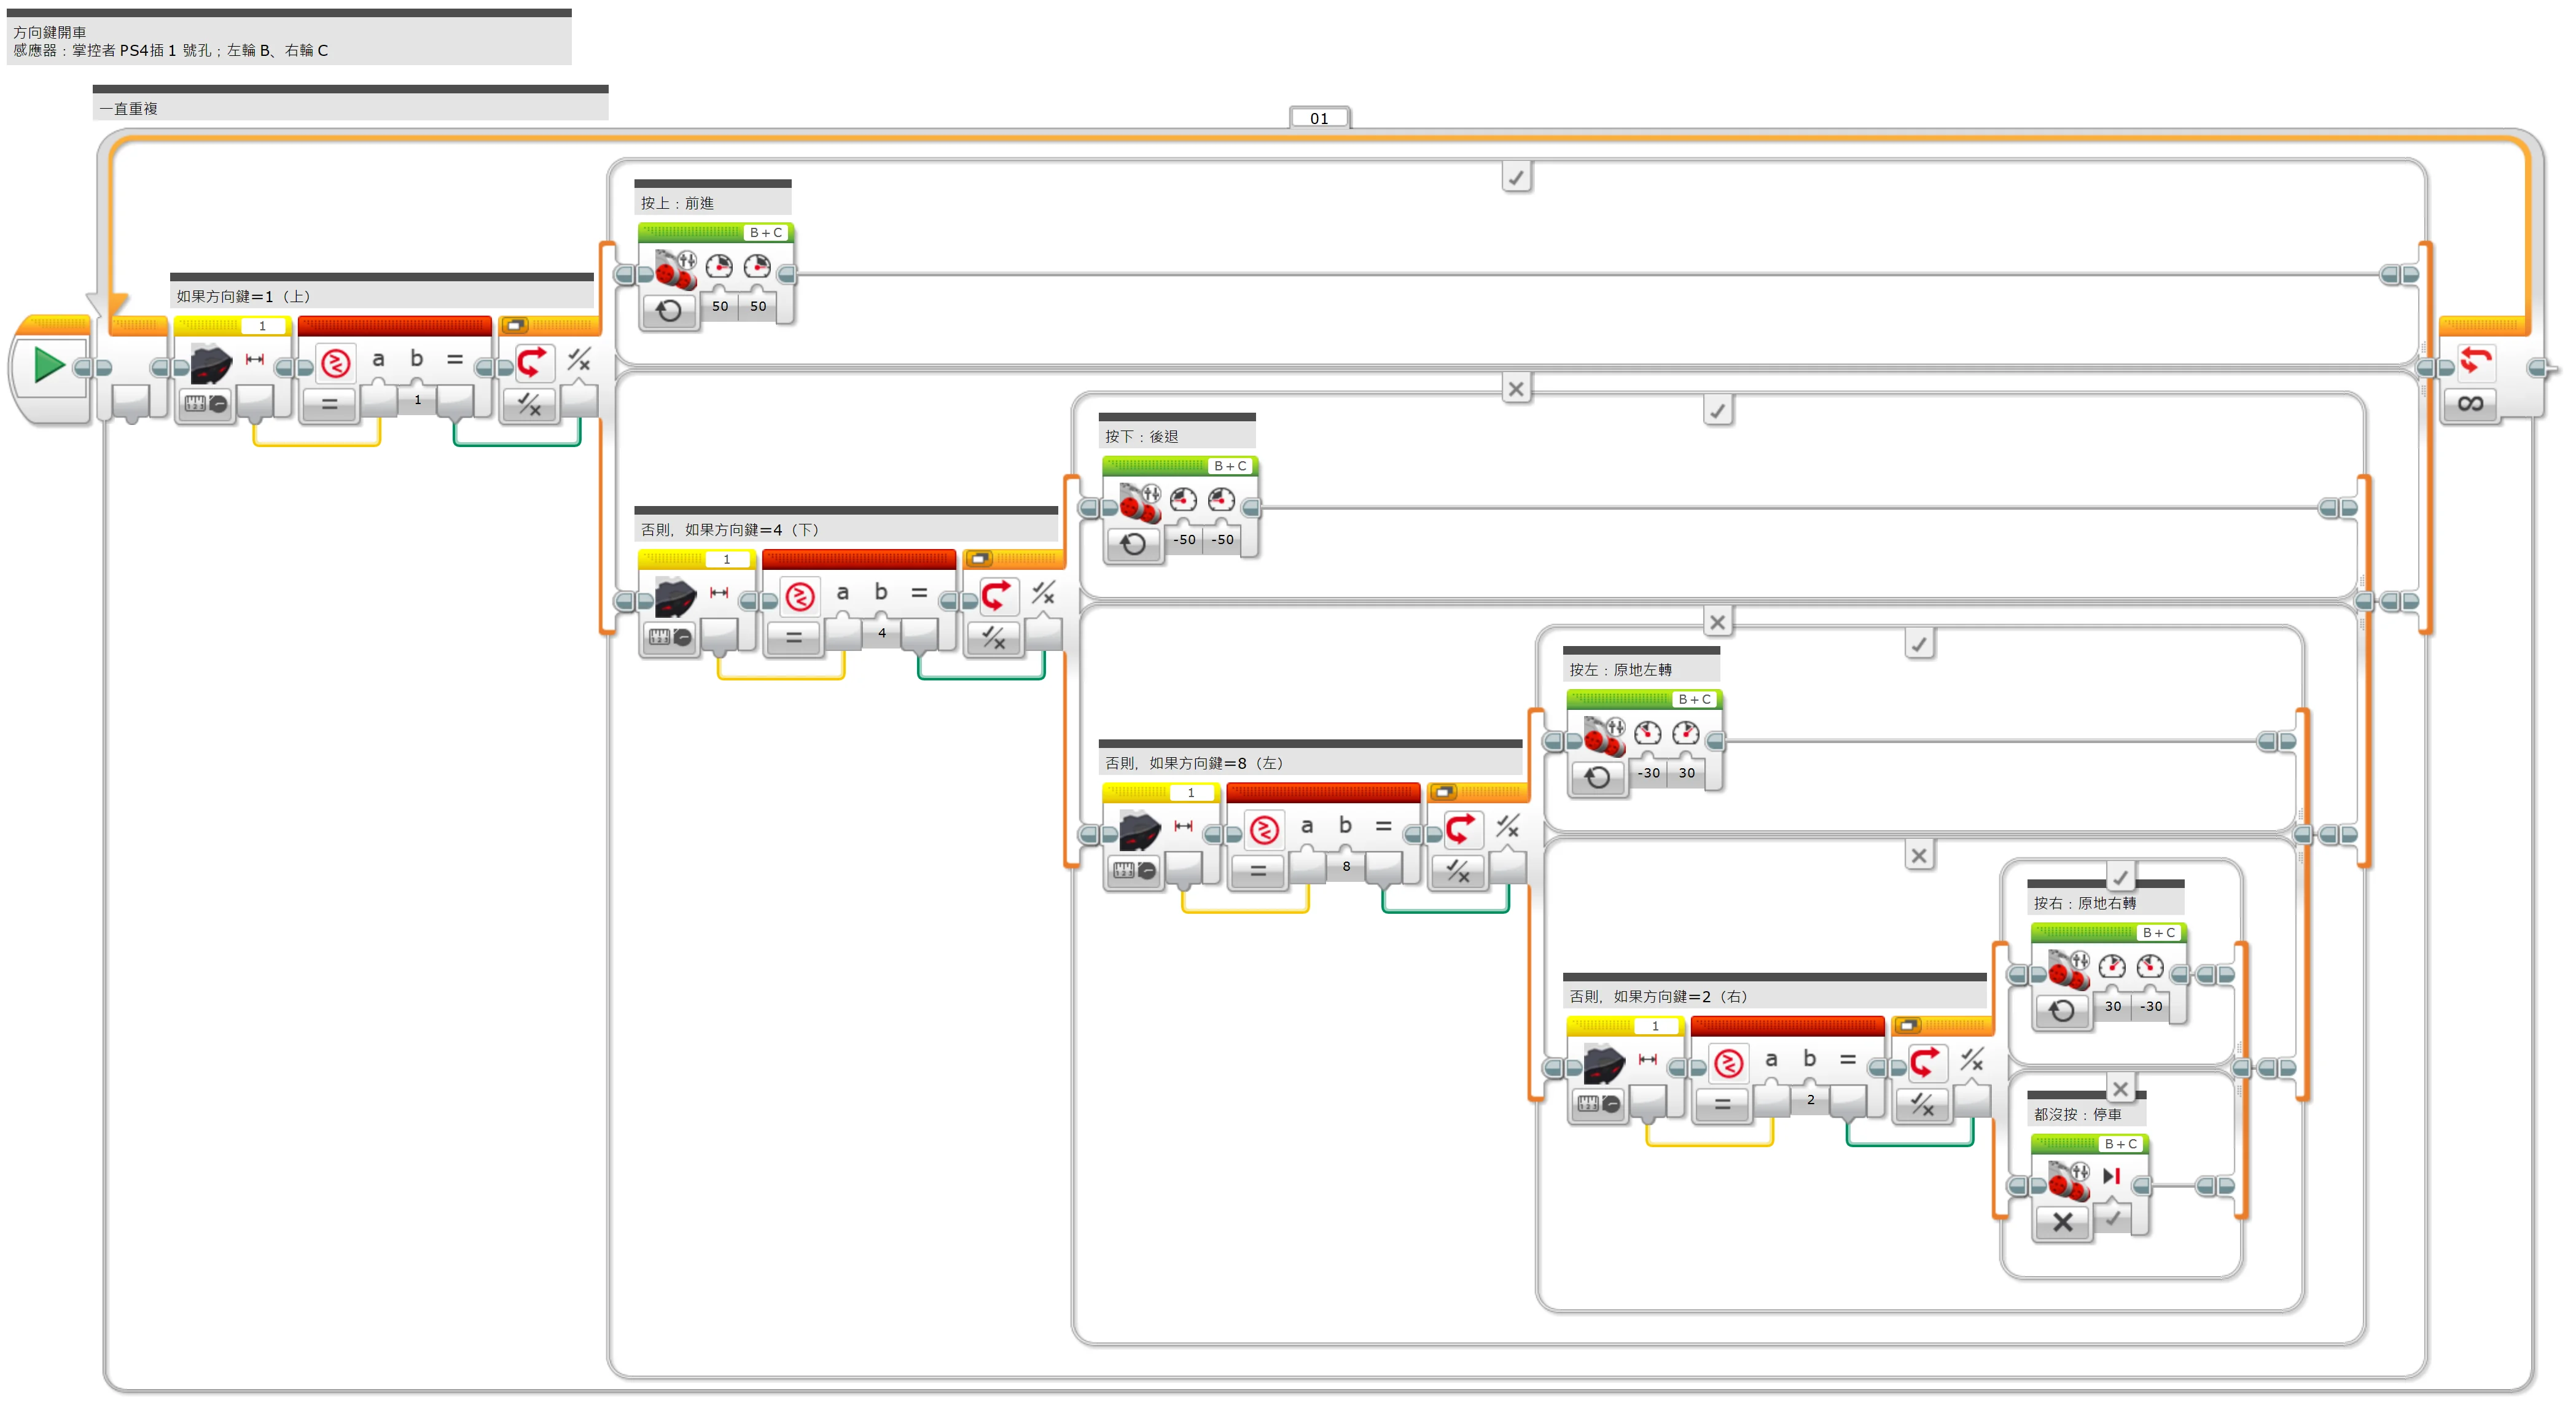
What this example does: Mode 0 reads only the D-pad: up = forward, down = backward, left/right = spin on the spot, release = stop.
What you need:
- EV3 brick + Education base robot (left wheel on B, right wheel on C)
- Controller PS4 Bluetooth receiver (EV3 edition) + gamepad
How to connect: Bluetooth receiver in port 1. The first time, pair the PS4/PS5 gamepad as described on the product page; afterwards pressing the PS button connects automatically.
Download the program (pick your software):
EV3-G (official software) blocks
(Too small? Click the picture to open it full size.)
Step by step:
- Repeat forever
- If D-pad = 1 (up)
- Up pressed: forward
- Otherwise:
- Otherwise, if D-pad = 4 (down)
- Down pressed: backward
- Otherwise:
- Otherwise, if D-pad = 8 (left)
- Left pressed: spin left
- Otherwise:
- Otherwise, if D-pad = 2 (right)
- Right pressed: spin right
- Otherwise:
- Nothing pressed: stop
- Otherwise, if D-pad = 2 (right)
- Otherwise, if D-pad = 8 (left)
- Otherwise, if D-pad = 4 (down)
- If D-pad = 1 (up)
What you should see: Hold a D-pad button and the robot moves; release it and the robot stops.
FAQ:
- The buttons do nothing? Run example 1 first to see if the numbers change. If not, the gamepad is not connected: power-cycle the gamepad, or turn the EV3 on before plugging in the receiver.
- The robot keeps creeping after you release the stick? The stick centre is not always exactly 50: lower the × 2 in the program, or add a rule "treat 45~55 as 50".
Example 3: Left stick controls one motor speed
What this example does: A stick reads 099 with 50 in the middle. Subtract 50 and multiply by 2 to get the -100+100 a motor wants: push further to go faster, push down to reverse.
What you need:
- EV3 brick
- One large motor on B
- Controller PS4 Bluetooth receiver (EV3 edition) + gamepad
How to connect: Bluetooth receiver in port 1. The first time, pair the PS4/PS5 gamepad as described on the product page; afterwards pressing the PS button connects automatically.
Download the program (pick your software):
EV3-G (official software) blocks

(Too small? Click the picture to open it full size.)
Step by step:
- Repeat forever
- Power = (left stick up/down − 50) × 2
- Motor B runs with power
- Show the current power on screen
What you should see: Push the left stick up and motor B runs forward, faster the further you push; push down to reverse; release to stop, the screen shows about 0.
FAQ:
- The buttons do nothing? Run example 1 first to see if the numbers change. If not, the gamepad is not connected: power-cycle the gamepad, or turn the EV3 on before plugging in the receiver.
- The robot keeps creeping after you release the stick? The stick centre is not always exactly 50: lower the × 2 in the program, or add a rule "treat 45~55 as 50".
Example 4: Two-stick tank drive
What this example does: Left stick drives the left wheel, right stick drives the right wheel, like a tank: push both forward to go forward, one forward and one back to spin.
What you need:
- EV3 brick + Education base robot (left wheel on B, right wheel on C)
- Controller PS4 Bluetooth receiver (EV3 edition) + gamepad
How to connect: Bluetooth receiver in port 1. The first time, pair the PS4/PS5 gamepad as described on the product page; afterwards pressing the PS button connects automatically.
Download the program (pick your software):
EV3-G (official software) blocks

(Too small? Click the picture to open it full size.)
Step by step:
- Repeat forever
- Left wheel power = (left stick up/down − 50) × 2
- Right wheel power = (right stick up/down − 50) × 2
- Each wheel runs with its own power
What you should see: Push both sticks forward and the robot drives forward; left forward and right back and it spins right.
FAQ:
- The buttons do nothing? Run example 1 first to see if the numbers change. If not, the gamepad is not connected: power-cycle the gamepad, or turn the EV3 on before plugging in the receiver.
- The robot keeps creeping after you release the stick? The stick centre is not always exactly 50: lower the × 2 in the program, or add a rule "treat 45~55 as 50".
Example 5: ✕ to grab, ● to release: control a gripper
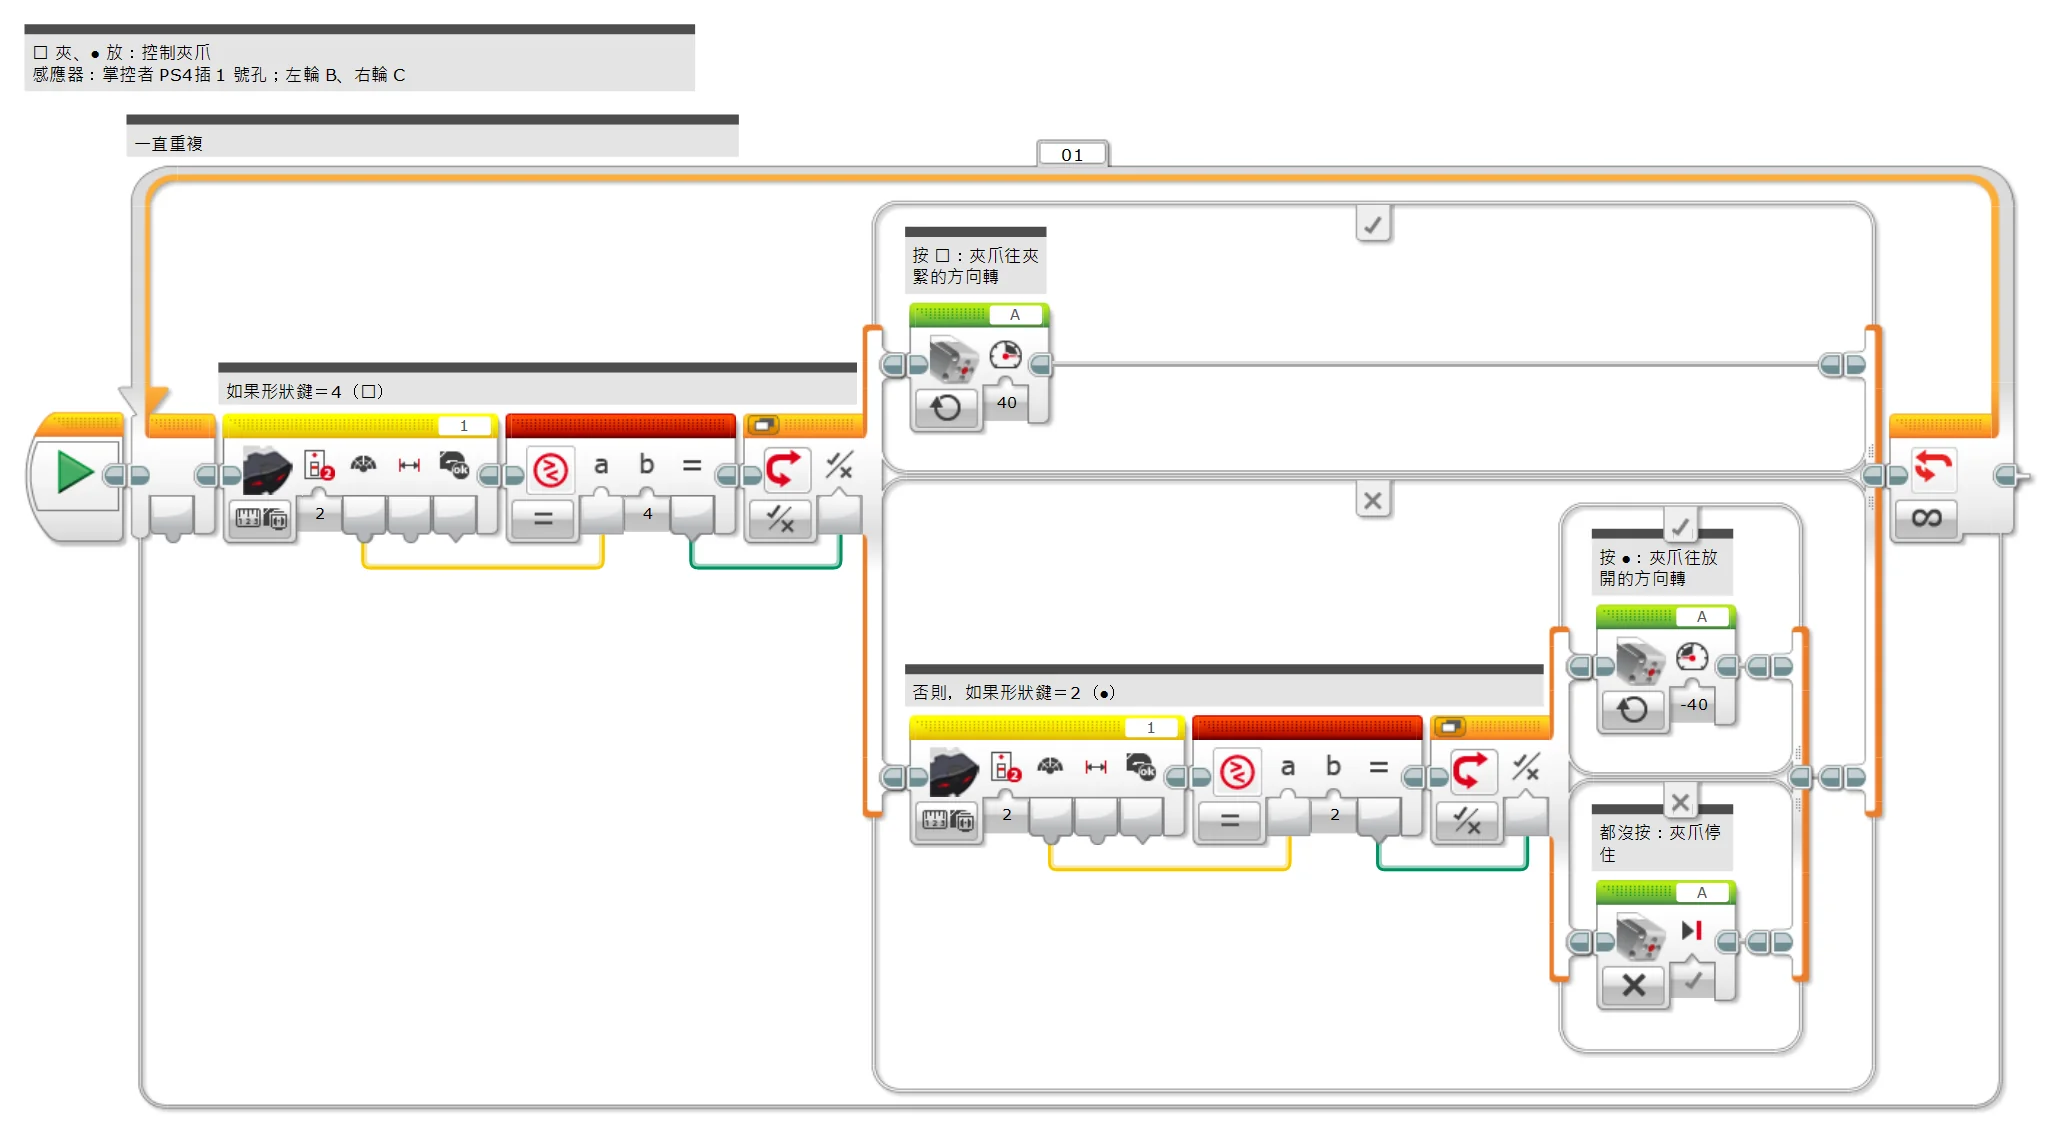
What this example does: Use the shape buttons to control a medium motor (gripper) on port A: ✕ closes, ● opens, nothing pressed stops.
What you need:
- EV3 brick
- Medium motor on A (built as a gripper)
- Controller PS4 Bluetooth receiver (EV3 edition) + gamepad
How to connect: Bluetooth receiver in port 1. The first time, pair the PS4/PS5 gamepad as described on the product page; afterwards pressing the PS button connects automatically.
Download the program (pick your software):
EV3-G (official software) blocks
(Too small? Click the picture to open it full size.)
Step by step:
- Repeat forever
- If shape buttons = 4 (✕)
- ✕ pressed: gripper turns to close
- Otherwise:
- Otherwise, if shape buttons = 2 (●)
- ● pressed: gripper turns to open
- Otherwise:
- Nothing pressed: gripper stops
- Otherwise, if shape buttons = 2 (●)
- If shape buttons = 4 (✕)
What you should see: Hold ✕ and the gripper closes, hold ● and it opens, release and it stops.
FAQ:
- Close and open are swapped? Swap 40 and -40.
- The buttons do nothing? Run example 1 first to see if the numbers change. If not, the gamepad is not connected: power-cycle the gamepad, or turn the EV3 on before plugging in the receiver.
- The robot keeps creeping after you release the stick? The stick centre is not always exactly 50: lower the × 2 in the program, or add a rule "treat 45~55 as 50".
Note
These examples have no version for this software: Example 6: Start only when the gamepad is connected
More questions
- The EV3 shows an infrared sensor? Expected: the sensor emulates a LEGO sensor so the stock blocks can read it.
- A short freeze when switching modes? The EV3 needs about 1 s per mode change. Stick to one mode during a run.
Still stuck? Contact us with your software and a screenshot of the program.
Downloads
Sources
- Host and software list:
_build/guides.json - Values and commands:
_build/protocol/ps4.json(single source of truth) - Setup:
_build/guides/software/ev3-ev3g.en.md、_build/guides/product/ps4/ev3-ev3g.en.md - Examples:
sensors/ps4/ev3-examples.md