
Controller PS4/PS5 × MATRIX × MATRIXblock stock blocks
Interactive tutorialMATRIX
First time? Try the interactive tutorial in your browser first, then follow the steps below with your hub.
This page covers MATRIXblock stock colour-sensor blocks (0x22) only: how to set it up for the Controller PS4/PS5 on MATRIX Mini R4, how to read every value, the commands it supports and examples. Use the switcher above to change product, host or software.
Which edition and how to connect
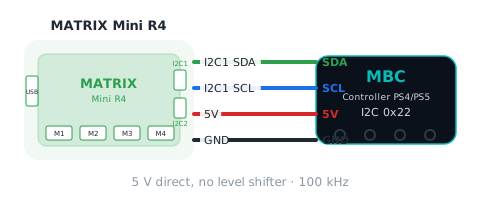
Get the MATRIX edition and connect it with the stock MATRIX 4-pin cable to I2C1 or I2C2 of the Mini R4 (address 0x22); pick that port in the block.
Setup
What you need
- Sensor: Controller PS4/PS5 (MATRIX edition).
- Controller: MATRIX Mini R4.
- Cable: the stock MATRIX 4-pin sensor cable.
- Software: MATRIXblock (the stock MATRIX block software). This method needs no extra library.
Install the software
- Install MATRIXblock (default folder
C:\matrixblock-r4\).
Make the software see the sensor
The Mini R4 sees the sensor as a stock colour sensor (I2C address 0x22); read it with the built-in blocks, no extension needed:
- The "colour sensor → R / G / B / C / M / Y / K" blocks each read one
0 ~ 255number. The firmware packs the product data into these seven slots; see the readings below for what each slot means. - MATRIXblock's Arduino mode works too:
MiniR4.I2C1.MXColor.getColor(R).
Warning
Do not use the H / S / V or colour ID blocks: the controller computes those from R, G, B itself, so they mean nothing for MBC products. MATRIX removed the grey-level and colour-number blocks, so only these seven slots are usable.
Wiring
- Connect the stock MATRIX 4-pin sensor cable to the Mini R4 I2C1 or I2C2 port.
- Choose that port in the blocks (for example
I2C1). - 5 V direct, no level shifter needed.
Pair the gamepad (first use or new gamepad)
- Connect the receiver and turn the controller on. Do not hold the receiver's button while plugging it in (that enters flashing mode and the receiver does nothing; release the button, unplug and replug).
- First use: a receiver that remembers no gamepad opens a 30-second pairing window at power-on (green LED blinking fast). To change gamepads, or if the 30 seconds are over: press the receiver's button (Reset) once; it forgets the old gamepad and opens 30 seconds again.
- Within those 30 seconds put the gamepad in pairing mode until its light bar flashes fast: PS4 hold SHARE + PS; PS5 hold Create + PS.
- Once connected, the receiver remembers this gamepad and will not connect to anyone else's. From then on, just press the gamepad's PS button after power-on.
| Receiver green LED | Meaning |
|---|---|
| Blinking fast | Waiting for a gamepad to pair |
| Steady on | No gamepad connected (press the PS button to reconnect) |
| Off | Gamepad connected |
Tip
At a competition, pair at your own table so no other team's gamepad is in pairing mode during the 30 seconds. Paired the wrong one? Press Reset and pair again.
First test
- Show the number from the "colour sensor → R" block.
- If the number changes with what is in front of the sensor, everything is connected.
FAQ
- The numbers make no sense? Make sure you use the seven slots R / G / B / C / M / Y / K, not the H / S / V or colour ID blocks.
Reading values
Use the stock MATRIXblock colour-sensor R / G / B / C / M / Y / K blocks (not H / S / V or colour ID); the Arduino-mode line is shown too.
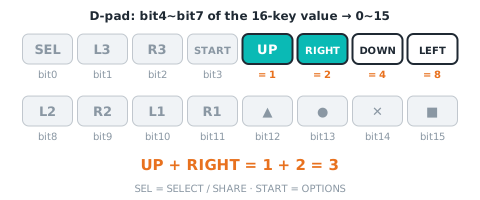
D-pad dpad
| Range | Meaning |
|---|---|
0~15 bit |
up 1, right 2, down 4, left 8, added when pressed together (0~15) |
Block "colour sensor → R"
int dpad = MiniR4.I2C1.MXColor.getColor(R); // D-padshoulder buttons shoulderKeys
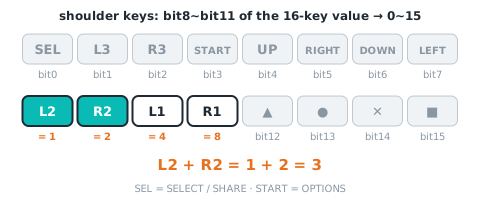
| Range | Meaning |
|---|---|
0~15 bit |
L2 1, R2 2, L1 4, R1 8, added when pressed together (0~15) |
Block "colour sensor → G"
int shoulderKeys = MiniR4.I2C1.MXColor.getColor(G); // shoulder buttonsconnected connected
| Range | Meaning |
|---|---|
0~1 |
1 = gamepad connected and data seen within 300 ms, 0 = not connected (buttons 0, sticks centred while disconnected) |
Block "colour sensor → K"
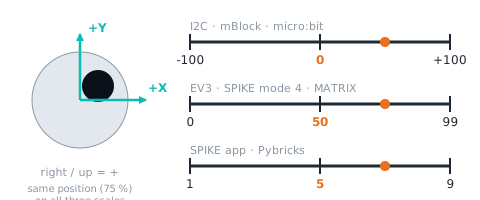
int connected = MiniR4.I2C1.MXColor.getColor(K); // connectedstick axis 1~4 stick
| Range | Meaning |
|---|---|
-100~+100 |
10 LX, 11 LY, 12 RX, 13 RY: −100 to +100, 0 = centre, right/up positive; 0 when not connected |
Blocks "colour sensor → BY": B C M Y = LX LY RX RY,099,50 = 中間
int raw = MiniR4.I2C1.MXColor.getColor(B); // group 1Not readable here:16 buttons, shape buttons, function buttons, battery, L2 analog, R2 analog, system buttons, gamepad type. Use Arduino / mBlock / micro:bit for these.
Commands
This software cannot send commands; use Arduino I2C, mBlock or micro:bit if you need them.
Examples
There is no full example program for this software yet. Each item under “Reading values” and “Commands” above comes with code you can use as is; put them together in order, or contact us for a full example.
More questions
Still stuck? Contact us with your software and a screenshot of the program.
Downloads
Sources
- Host and software list:
_build/guides.json - Values and commands:
_build/protocol/ps4.json(single source of truth) - Setup:
_build/guides/software/matrix-matrixblock.en.md、_build/guides/product/ps4/matrix-matrixblock.en.md