
SharpShot Vision (ESP32CAM) × EV3 × EV3 Classroom
Interactive tutorialEV3
First time? Try the interactive tutorial in your browser first, then follow the steps below with your hub.
School editionEV3 Classroom
WRO editionEV3 Classroom
This page covers EV3 Classroom (Scratch blocks) only: how to set it up for the SharpShot Vision (ESP32CAM) on MINDSTORMS EV3, how to read every value, the commands it supports and examples. Use the switcher above to change product, host or software.
Setup
What you need
- Sensor: SharpShot Vision (ESP32CAM) (EV3 edition, RJ12 plug). A SPIKE edition is not recognised on an EV3.
- Brick: LEGO MINDSTORMS EV3.
- Cable: the standard cable in the box, or an original LEGO EV3 cable.
- Software: LEGO MINDSTORMS EV3 Classroom (Scratch-style blocks, the same as SPIKE). The easiest start for first-time EV3 users.
Install the software
- Install EV3 Classroom from the LEGO Education download page.
- To open an example: download the
.lmspfile → "Open" on the EV3 Classroom home screen → connect the EV3 → "Download and Run" at the bottom right.
Make the software see the sensor
No extension and no driver needed. On the EV3 the sensor emulates an original LEGO sensor (most products show up as an "Infrared Sensor"); use the built-in sensor blocks.
- Classroom blocks look like Scratch, but the modes are exactly the same as in the official EV3 software: Proximity / Beacon / Remote, with the same ranges. See the readings below.
- Some products come with MBC My Blocks. They are already inside the example projects; open an example and they are there.
Important
Do not switch modes in the middle of a program. Every time the EV3 switches a sensor mode it stalls for about 1 s. Pick one mode at the start and use it for the whole run.
Wiring
- Plug the sensor into EV3 port 1 with the cable (any of 1~4 works; choose the same port in the blocks).
- Turn the EV3 on first, then plug in the sensor.
- Latch up, push the plug in gently.
Set the colour on the sensor first
All SharpShot settings are made on the colour screen and buttons on the back of the sensor; no computer needed:
- The sensor only starts when plugged into a hub that is already on (the screen first shows "LEGO Sync..."); once the camera image appears it is ready.
- Short-press the side button to open the settings menu; left / right to choose, OK to enter. In the menu, hold the side button for 1 s to clear that colour set.
- Colour settings and camera parameters (brightness, contrast, saturation, exposure, white balance, flip, mirror) are saved automatically and used at the next power-on.
Two EV3 firmwares
| Firmware | Shows up on the EV3 as | Software that works |
|---|---|---|
| School teacher creative-contest edition (colour pick + blob tracking + motion) | Infrared sensor | EV3-G, EV3 Classroom, Pybricks, clev3r |
| WRO 2026 edition (HUE12, 12 colour spots) | Third-party sensor (type 95) | EV3-G (MBC My Blocks), clev3r, Pybricks; EV3 Classroom cannot read it |
Warning
EV3 Classroom cannot read the WRO edition (HUE12): on the EV3 it is a third-party sensor (type 95). Use EV3-G (MBC My Blocks), clev3r or Pybricks instead.
First test
- Download the
.lmspof example 1 on this page, open it, connect the EV3 and press "Download and Run". - If the number on the EV3 screen changes with what is in front of the sensor, everything is connected.
FAQ
- The number never changes? Unplug the sensor and plug it back in (the EV3 must be on first).
- Some examples have no Classroom version? Examples marked "Pybricks / EV3 MicroPython / clev3r only" use a mode the Classroom blocks cannot read.
- The program hiccups now and then? It switches sensor modes; each switch costs about 1 s. Use one mode only.
Reading values (School edition)
The EV3 sees a stock LEGO sensor; read it with the stock Classroom sensor blocks.
hue hue
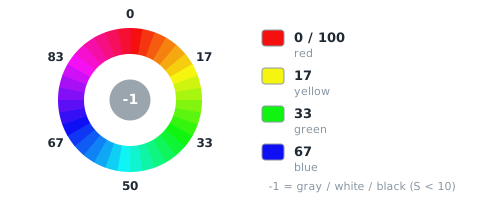
| Range | Meaning |
|---|---|
-1~100 |
hue of sample point S1, 0 |
| Value | Block | Decode | Mode |
|---|---|---|---|
| hue | Infrared Sensor → Proximity | the value | mode 0 |
saturation saturation
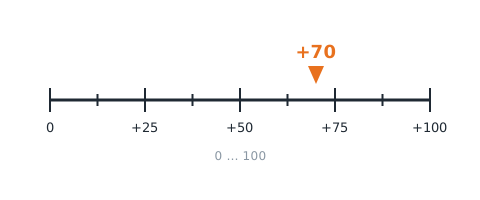
| Range | Meaning |
|---|---|
0~100 |
saturation of sample point S1, 0~100 |
| Value | Block | Decode | Mode |
|---|---|---|---|
| saturation | Infrared Sensor → Beacon proximity, channel 1 | the value | mode 1 |
brightness value
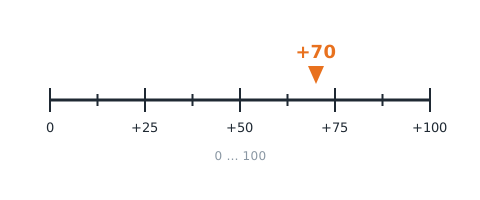
| Range | Meaning |
|---|---|
0~100 |
brightness (HSV value) of sample point S1, 0~100 |
| Value | Block | Decode | Mode |
|---|---|---|---|
| brightness | Infrared Sensor → Beacon heading, channel 2 | the value | mode 1 |
motion motion
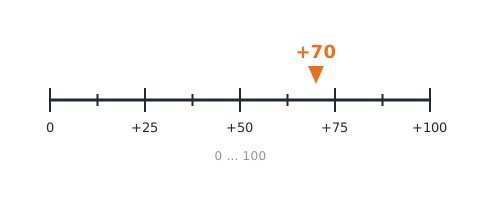
| Range | Meaning |
|---|---|
0~100 |
whole-frame motion 0~100 (more change = larger) |
| Value | Block | Decode | Mode |
|---|---|---|---|
| motion | Infrared Sensor → Beacon proximity, channel 2 | the value | mode 1 |
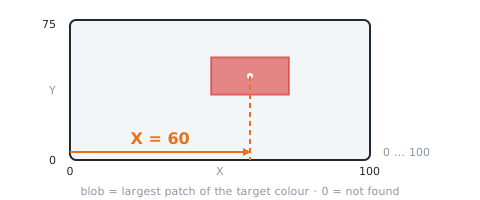
blob X blobX
| Range | Meaning |
|---|---|
0~100 |
blob centre X 0~100, left = 0; 0 when not found |
| Value | Block | Decode | Mode |
|---|---|---|---|
| blob X | Infrared Sensor → Beacon heading, channel 3 | the value | mode 1 |
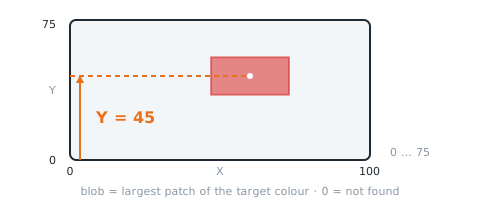
blob Y blobY
| Range | Meaning |
|---|---|
0~75 |
blob centre Y 0~75, bottom = 0, top = 75; 0 when not found |
| Value | Block | Decode | Mode |
|---|---|---|---|
| blob Y | Infrared Sensor → Beacon proximity, channel 3 | the value | mode 1 |
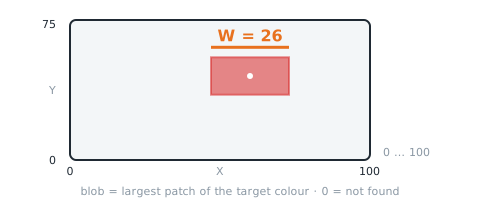
blob width blobW
| Range | Meaning |
|---|---|
0~100 |
blob width W 0~100; 0 = not found |
| Value | Block | Decode | Mode |
|---|---|---|---|
| blob width | Infrared Sensor → Beacon heading, channel 4 | the value | mode 1 |
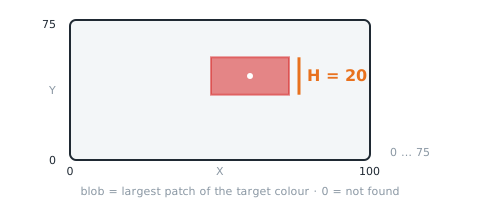
blob height blobH
| Range | Meaning |
|---|---|
0~75 |
blob height H 0~75; 0 when not found |
| Value | Block | Decode | Mode |
|---|---|---|---|
| blob height | Infrared Sensor → Beacon proximity, channel 4 | the value | mode 1 |
Not readable here:blob area, blob found. Use Arduino / mBlock / micro:bit for these.
Reading values (WRO edition)
The EV3 sees a stock LEGO sensor; read it with the stock Classroom sensor blocks.
spot 1~12 colour code spotColor
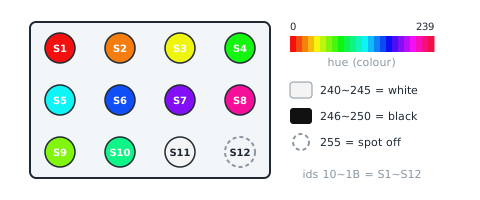
| Range | Meaning |
|---|---|
0~255 |
10 |
This product does not emulate a stock LEGO sensor, so stock blocks cannot read it; use the MBC custom block included with the examples (see setup above).
spot 1~12 vividness spotVivid
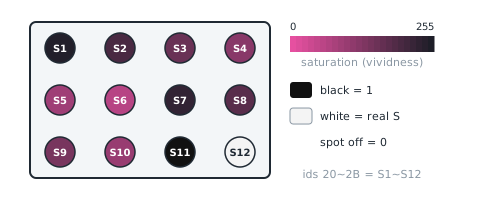
| Range | Meaning |
|---|---|
0~255 |
20 |
This product does not emulate a stock LEGO sensor, so stock blocks cannot read it; use the MBC custom block included with the examples (see setup above).
Examples (School edition)
Example 1: What does the camera see? All 8 numbers at once
What this example does: Mode 1 sends 8 numbers at once: colour, saturation, brightness, motion, and the X, Y, width and height of the colour blob. Show them all on the EV3 screen and compare with the camera picture to understand each one.
What you need:
- SharpShot (school edition) (EV3 edition)
- EV3 brick
How to connect: SharpShot (school edition) in port 1. Camera setup: short-press the side button for the menu → left/right to "2:TRACK" → confirm → aim the crosshair at the ball, set the position, tolerance and minimum area in turn → confirm to save.
Download the program (pick your software):
EV3 Classroom blocks
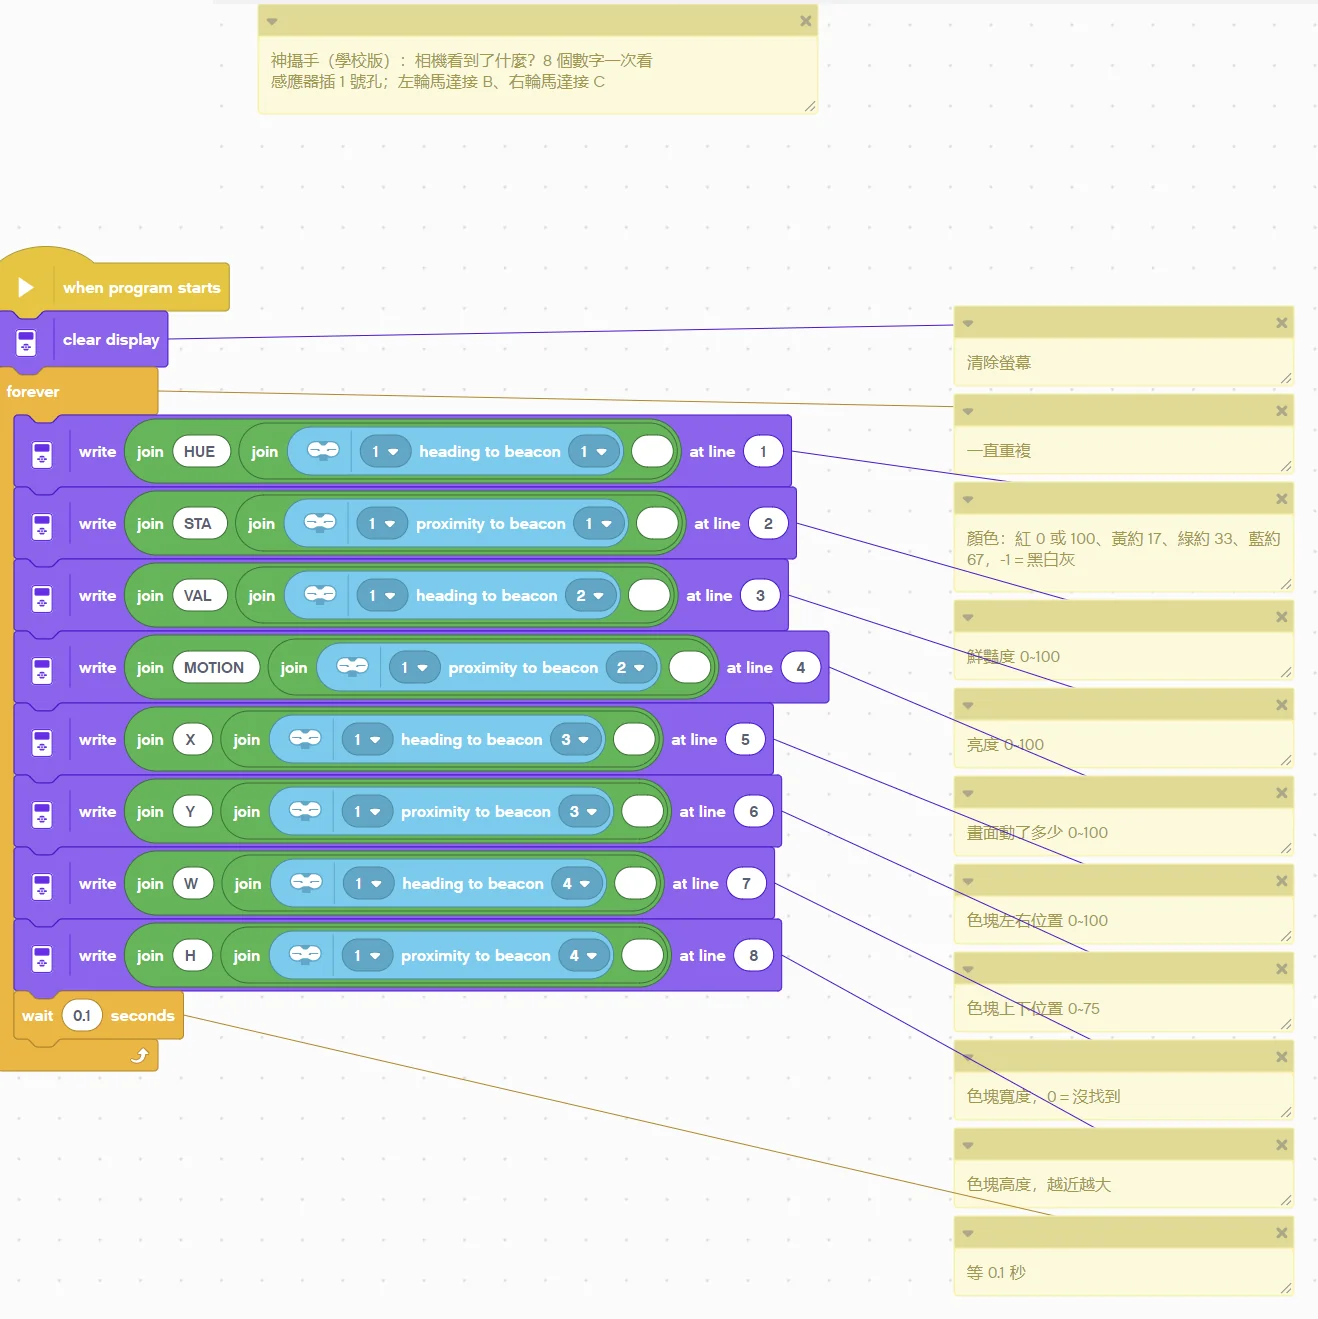
(Too small? Click the picture to open it full size.)
Step by step:
- Clear the screen
- Repeat forever
- Colour: red 0 or 100, yellow ≈17, green ≈33, blue ≈67, -1 = black/white/grey
- Saturation 0~100
- Brightness 0~100
- How much the picture moved 0~100
- Blob horizontal position 0~100
- Blob vertical position 0~75
- Blob width, 0 = not found
- Blob height, bigger when closer
- Wait 0.1 s
What you should see: Move the ball left and right in front of the lens and X follows; bring it closer and W and H grow; take it away and X, Y, W, H all read 0.
FAQ:
- The camera screen stays on "LEGO Sync..."? The camera only starts when plugged into an EV3 that is already on. Turn the EV3 on first, then plug in the camera.
- X, Y, W, H always read 0? 2:TRACK has not been set up, or the ball colour is outside the tolerance.
Example 2: Traffic-light robot: go on green only
What this example does: Mode 0 reads only the "colour". Drive forward on green, stop on anything else (red).
What you need:
- EV3 brick + Education base robot (left wheel on B, right wheel on C)
- SharpShot (school edition) (EV3 edition)
- One red and one green card
How to connect: SharpShot (school edition) in port 1, mounted at the front with the lens facing forward.Camera setup: short-press the side button for the menu → left/right to "1:COLOR" → confirm → aim the crosshair at the colour to learn, set the position and tolerance in turn → confirm to save.
Download the program (pick your software):
EV3 Classroom blocks
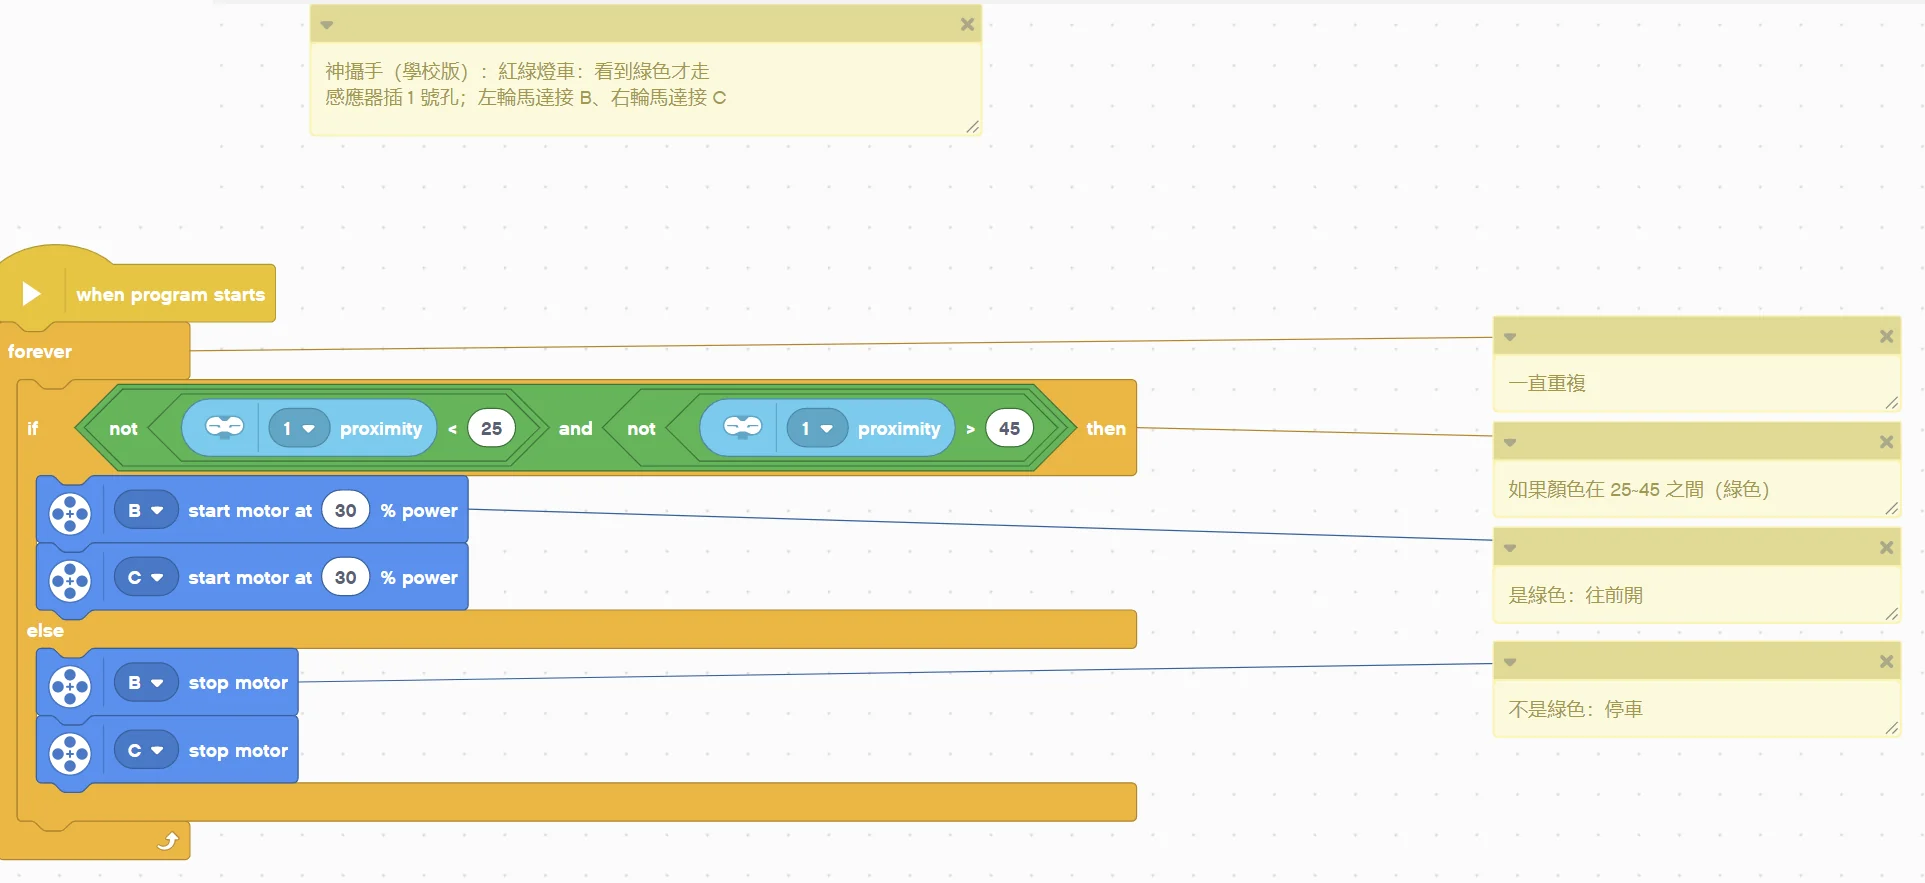
(Too small? Click the picture to open it full size.)
Step by step:
- Repeat forever
- If the colour is between 25 and 45 (green)
- Green: drive forward
- Otherwise:
- Not green: stop
- If the colour is between 25 and 45 (green)
What you should see: Hold the green card in front of the lens and the robot drives; swap to the red card and it stops.
FAQ:
- The camera screen stays on "LEGO Sync..."? The camera only starts when plugged into an EV3 that is already on. Turn the EV3 on first, then plug in the camera.
- It does not go on green either? Run example 1 to see the real HUE of your green card, then change 25 and 45 in the program.
Example 3: Burglar alarm: beep when something moves
What this example does: The 4th number of mode 1 is "how much the picture moved". Point the camera at a doorway; when someone walks past the number jumps, and above 20 the EV3 beeps. No camera setup needed.
What you need:
- SharpShot (school edition) (EV3 edition)
- EV3 brick
How to connect: SharpShot (school edition) in port 1, lens pointing at the area to watch, held steady.
Download the program (pick your software):
EV3 Classroom blocks
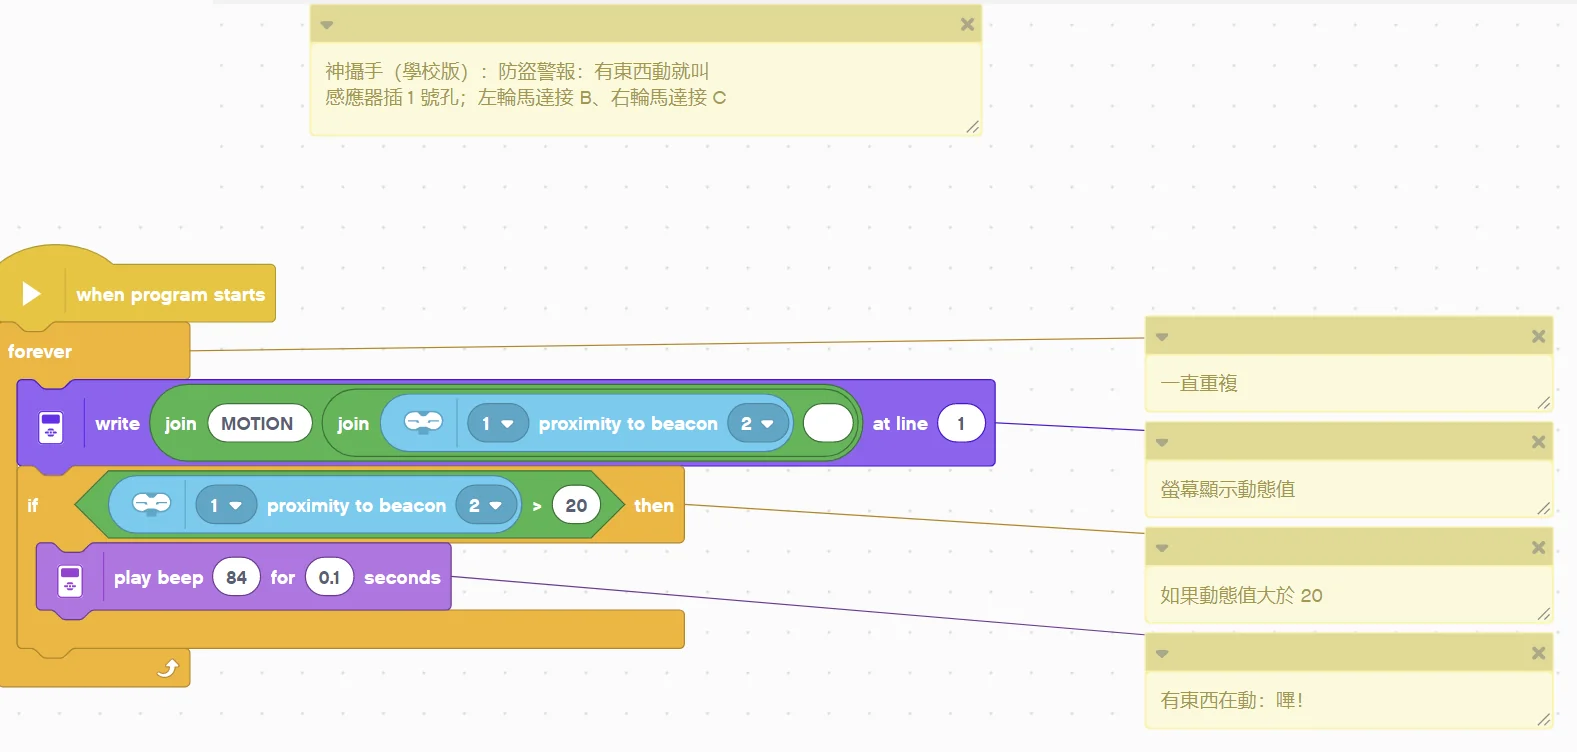
(Too small? Click the picture to open it full size.)
Step by step:
- Repeat forever
- Show the motion value on screen
- If the motion value is greater than 20
- Something is moving: beep!
What you should see: Quiet when the picture is still; wave a hand in front of the lens and the EV3 beeps.
FAQ:
- The camera screen stays on "LEGO Sync..."? The camera only starts when plugged into an EV3 that is already on. Turn the EV3 on first, then plug in the camera.
- It beeps even when nobody is there? Flickering lights or a shaking camera. Raise 20 (for example 35).
Example 4: Turn to look at the ball
What this example does: The robot spins on the spot to keep the ball in the middle of the picture: ball on the left means turn left, on the right means turn right, in the middle means stop; no ball means spin to search.
What you need:
- EV3 brick + Education base robot (left wheel on B, right wheel on C)
- SharpShot (school edition) (EV3 edition)
- A brightly coloured ball
How to connect: SharpShot (school edition) in port 1, mounted at the front with the lens facing forward.Camera setup: short-press the side button for the menu → left/right to "2:TRACK" → confirm → aim the crosshair at the ball, set the position, tolerance and minimum area in turn → confirm to save.
Download the program (pick your software):
EV3 Classroom blocks
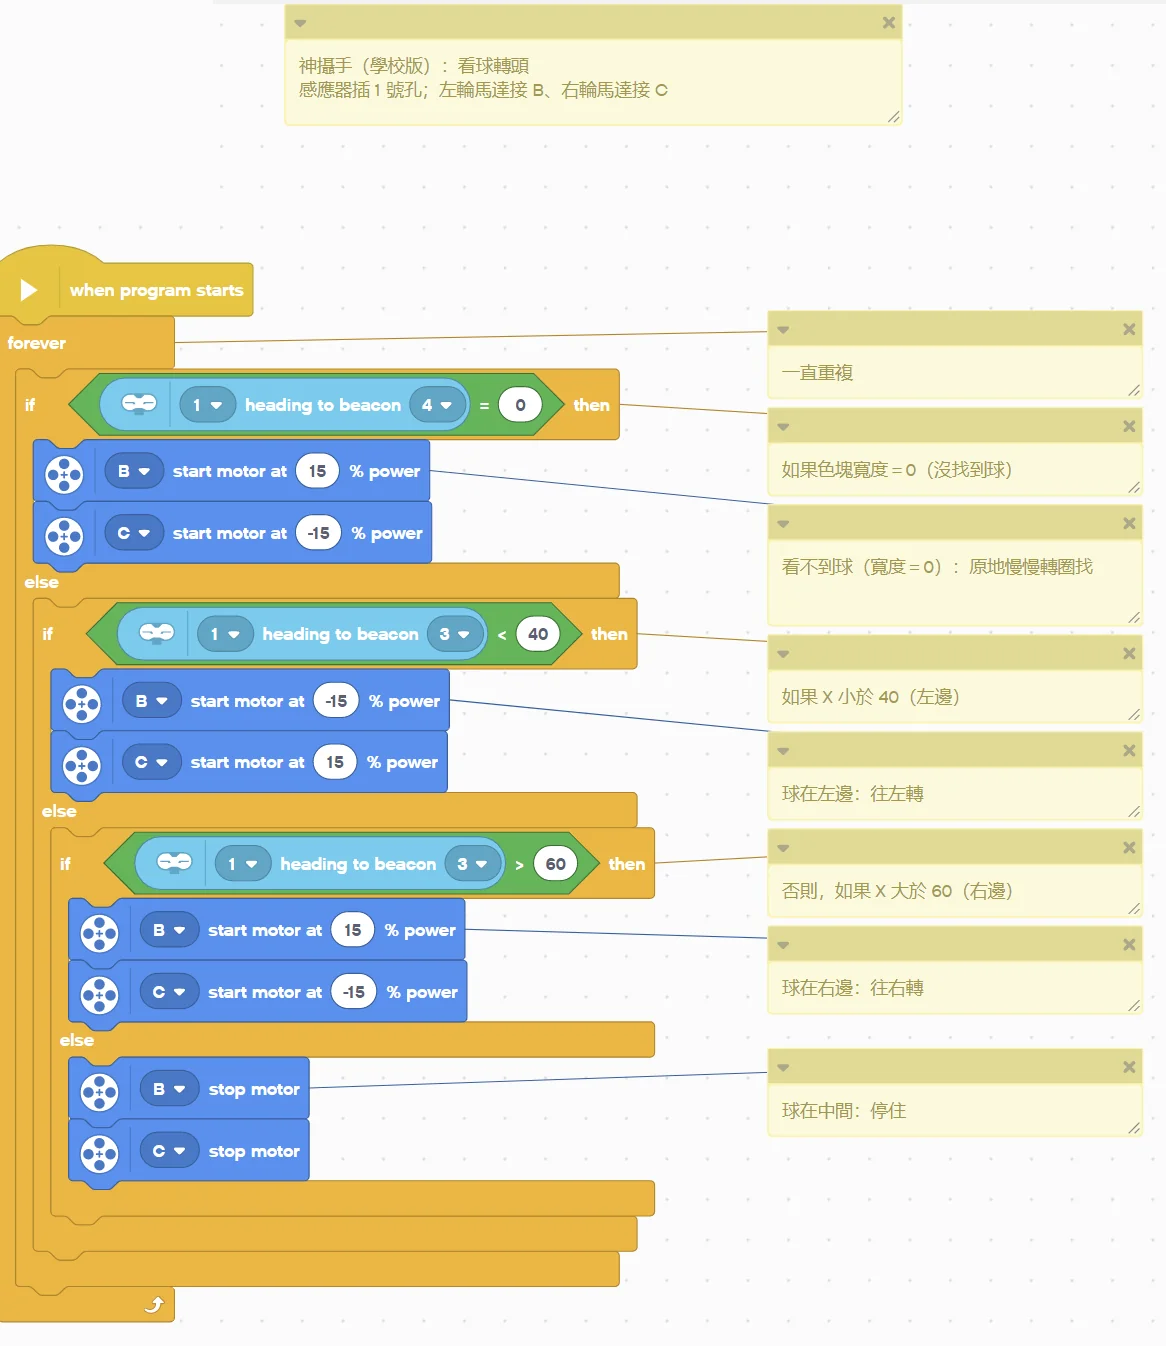
(Too small? Click the picture to open it full size.)
Step by step:
- Repeat forever
- If the blob width = 0 (ball not found)
- Cannot see the ball (width = 0): spin slowly on the spot to look for it
- Otherwise:
- If X is less than 40 (left)
- Ball on the left: turn left
- Otherwise:
- Otherwise, if X is greater than 60 (right)
- Ball on the right: turn right
- Otherwise:
- Ball in the centre: stop
- Otherwise, if X is greater than 60 (right)
- If X is less than 40 (left)
- If the blob width = 0 (ball not found)
What you should see: Move the ball left and right in front of the robot and its nose follows the ball.
FAQ:
- The camera screen stays on "LEGO Sync..."? The camera only starts when plugged into an EV3 that is already on. Turn the EV3 on first, then plug in the camera.
- Left and right are swapped? Swap -15 and 15 in the two tank steps.
Example 5: Chase the ball: stop when close enough
What this example does: Example 4 made to drive: aim at the ball while driving forward, and stop when the ball height H is big enough (close enough).
What you need:
- EV3 brick + Education base robot (left wheel on B, right wheel on C)
- SharpShot (school edition) (EV3 edition)
- A brightly coloured ball
How to connect: SharpShot (school edition) in port 1, mounted at the front with the lens facing forward.Camera setup: short-press the side button for the menu → left/right to "2:TRACK" → confirm → aim the crosshair at the ball, set the position, tolerance and minimum area in turn → confirm to save.
Download the program (pick your software):
EV3 Classroom blocks
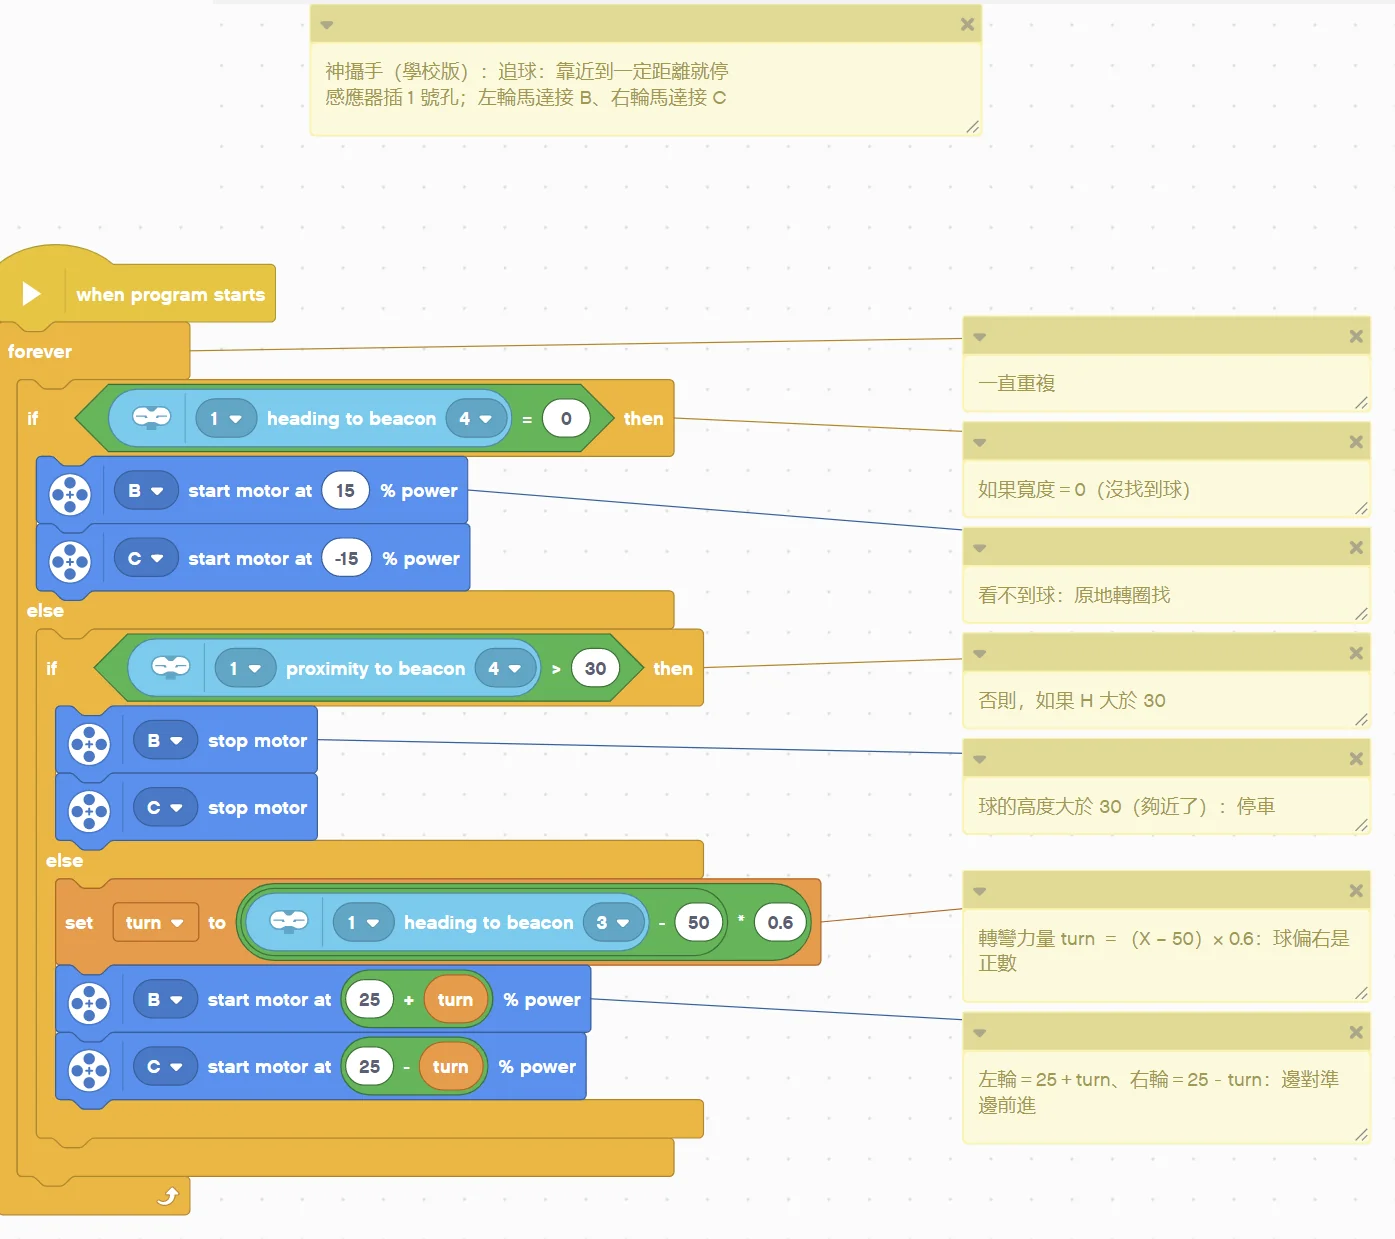
(Too small? Click the picture to open it full size.)
Step by step:
- Repeat forever
- If width = 0 (ball not found)
- Cannot see the ball: spin on the spot to look for it
- Otherwise:
- Otherwise, if H is greater than 30
- Ball height greater than 30 (close enough): stop
- Otherwise:
- Steering power turn = (X − 50) × 0.6: positive when the ball is to the right
- Left wheel = 25 + turn, right wheel = 25 − turn: aim at the ball while driving forward
- Otherwise, if H is greater than 30
- If width = 0 (ball not found)
What you should see: Put the ball on the floor: the robot turns to it, drives over and stops in front of it.
FAQ:
- The camera screen stays on "LEGO Sync..."? The camera only starts when plugged into an EV3 that is already on. Turn the EV3 on first, then plug in the camera.
- It stops while still far away? Raise 30.
Still stuck? Leave a message on Contact us with the software you use and a screenshot of your program, and we will help.
Examples (WRO edition)
Note
These examples have no version for this software: Example 1: What colour does spot S1 see?; Example 2: Colour announcer: show the colour name on screen; Example 3: Traffic pillar: stop on red, go on green; Example 4: Stop at the black line; Example 5: Three spots left, middle, right: where is the red?
More questions
- The EV3 shows an infrared sensor? Expected: the sensor emulates a LEGO sensor so the stock blocks can read it.
- A short freeze when switching modes? The EV3 needs about 1 s per mode change. Stick to one mode during a run.
Still stuck? Contact us with your software and a screenshot of the program.
Downloads
Sources
- Host and software list:
_build/guides.json - Values and commands:
_build/protocol/cam_school.json、_build/protocol/cam_wro.json(single source of truth) - Setup:
_build/guides/software/ev3-classroom.en.md、_build/guides/product/esp32cam/ev3-classroom.en.md - Examples:
sensors/esp32cam/ev3-examples(-wro).md