
SharpShot Vision (ESP32CAM) × micro:bit × MakeCode
Interactive tutorialmicro:bit
First time? Try the interactive tutorial in your browser first, then follow the steps below with your hub.
School editionMakeCode
WRO editionMakeCode
This page covers MakeCode (blocks / JavaScript) only: how to set it up for the SharpShot Vision (ESP32CAM) on BBC micro:bit V1 / V2, how to read every value, the commands it supports and examples. Use the switcher above to change product, host or software.
Which edition and how to connect
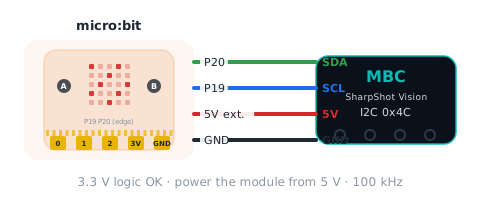
Get the Universal I2C edition and connect it to the I2C header of a micro:bit breakout (SDA = P20, SCL = P19), factory address 0x4C. It must use an external 5 V supply (ESP32 camera + screen + lights), not the micro:bit 3V pin; share the supply GND with the micro:bit.
Setup
What you need
- Sensor: SharpShot Vision (ESP32CAM) (Universal I2C edition). SPIKE and EV3 editions run different firmware and cannot be read by a micro:bit.
- Board: BBC micro:bit V1 or V2, plus a breakout board or crocodile-clip adapter to reach P19 / P20.
- Software: MakeCode for micro:bit in the browser (makecode.microbit.org, blocks / JavaScript); the offline app (Windows / Mac) also works, but adding an extension the first time needs internet.
- Extension: pxt-mbc-sensors v2 (MIT, nothing to download, just paste the URL).
Important
Bench test pending: extension v2.0.5 compiles in MakeCode (V1 + V2) but has not yet been checked block by block on real hardware. Block names follow the GitHub release.
Install the software
- Open makecode.microbit.org → New Project.
- Traditional Chinese block names are included: switch the editor language (gearwheel → Language) if you prefer.
Make the software see the sensor
- Click Advanced → Extensions at the bottom of the toolbox (also in the gearwheel menu).
- Paste
https://github.com/contactmbcrobot/pxt-mbc-sensorsinto the search box and press Enter. - Click the mbc-sensors card. An "MBC Sensors" category appears with six groups: Line, Distance, Gamepad, IMU, Camera and Device.
- To use an example: switch to JavaScript at the top right → paste the example → download the
.hexand drag it onto the MICROBIT drive.
Tip
No approval, no download: teachers just hand the URL to students. To pin a version, paste
https://github.com/contactmbcrobot/pxt-mbc-sensors#v2.0.5.
Wiring
The micro:bit I2C pins are fixed: P19 = SCL, P20 = SDA (on the edge connector, so you need a breakout board or clip adapter). On the MBC 4-pin sensor cable TX goes to SCL and RX to SDA, exactly as when wiring to an Arduino.
| Sensor | micro:bit | Note |
|---|---|---|
| SCL (TX) | P19 | I2C clock |
| SDA (RX) | P20 | I2C data |
| VCC | 3V or external 5 V | power-hungry products must not draw from the micro:bit 3V pin |
| GND | GND | with external power, share GND with the micro:bit |
- 3V pin current: V1 about 90 mA, V2 about 190 mA; on batteries the rail can drop to just over 2 V. Ranger 8-way, Controller PS4 / PS5 and the SharpShot must use external 5 V; other products can try 3V first, with external 5 V recommended on batteries.
- Logic level: MBC product I2C lines are 3.3 V, compatible with the micro:bit without a level shifter.
- This product's factory address is
0x4C; products with different addresses can share the same P19 / P20 bus.
Set the colour on the sensor first
All SharpShot settings are made on the colour screen and buttons on the back of the sensor, no computer needed: short-press the side button to open the settings menu, left / right to choose, OK to enter. Colour settings and camera parameters are saved automatically and used at the next power-on.
Important
The SharpShot must use external 5 V power (ESP32 camera + screen + flash light); it cannot run from the micro:bit 3V pin. Share GND between the external supply and the micro:bit.
Note
The SharpShot's I2C uses SDA = IO3, SCL = IO1 (fixed 2026-10-21); once I2C is connected the USB serial monitor is gone. Hardware confirmed, bench test pending.
First test
- Check the wiring first with the "Device → wait for device at 0x4C ready" or "device at 0x4C is ready" block.
- Download the
.hexof example 1 on this page to the micro:bit. - If the number on the LEDs changes with what is in front of the sensor, everything is connected.
FAQ
- Values are always 0? With no device connected the reporter blocks return 0 (the internal −32768 is filtered), every yes / no block returns false, and nothing throws. Check in order: wiring (SDA = P20, SCL = P19) → external power on → "device at … is ready" is true.
- On a V1, the compass and accelerometer stop working too? On V1 the external I2C bus is shared with the onboard accelerometer, so a sensor holding SDA low also kills them. V2 has a separate external bus.
- Works on and off? STM32 products (Pathfinder, Ranger, PS2, IMU) clock-stretch, and the nRF52 on the V2 has a known clock-stretching issue (errata 219), so V1 and V2 both need a bench test. ESP32 products (PS4, SharpShot) do not stretch; the extension already waits 2 ms after writing the value id.
- Two products of the same kind? They share an address: first change one with "Device → change device at … to address …" (applied after reboot), then tell the extension with that product's "use address" block.
Reading values (School edition)
After adding pxt-mbc-sensors, find the blocks in the MBC Sensors category; the JavaScript form is shown too, address 0x4C.
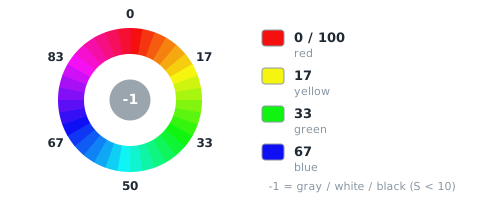
hue hue
| Range | Meaning |
|---|---|
-1~100 |
hue of sample point S1, 0 |
(camera colour [hue v] :: #00A4E4)
let hue = mbc.camColor(MbcCamColor.Hue) // hue:-1~100Related block "camera colour is black / white / grey"
let camIsGrey = mbc.camIsGrey()Returns 0 when the sensor does not answer; check with "device at … is ready" first.
saturation saturation
| Range | Meaning |
|---|---|
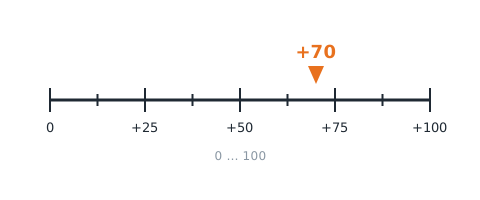
0~100 |
saturation of sample point S1, 0~100 |
(camera colour [saturation v] :: #00A4E4)
let saturation = mbc.camColor(MbcCamColor.Saturation) // saturation:0~100Returns 0 when the sensor does not answer; check with "device at … is ready" first.
brightness value
| Range | Meaning |
|---|---|
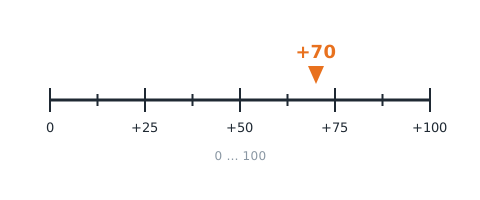
0~100 |
brightness (HSV value) of sample point S1, 0~100 |
(camera colour [brightness v] :: #00A4E4)
let value = mbc.camColor(MbcCamColor.Brightness) // brightness:0~100Returns 0 when the sensor does not answer; check with "device at … is ready" first.
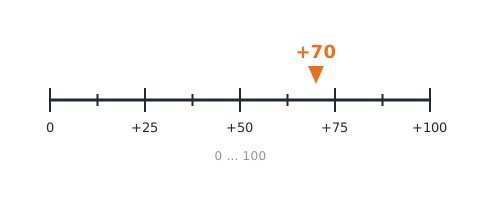
motion motion
| Range | Meaning |
|---|---|
0~100 |
whole-frame motion 0~100 (more change = larger) |
(camera motion :: #00A4E4)
let motion = mbc.camMotion() // motion:0~100Returns 0 when the sensor does not answer; check with "device at … is ready" first.
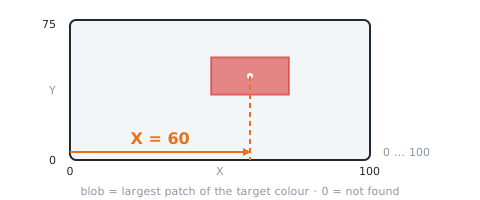
blob X blobX
| Range | Meaning |
|---|---|
0~100 |
blob centre X 0~100, left = 0; 0 when not found |
(camera blob [X v] :: #00A4E4)
let blobX = mbc.camBlob(MbcCamBlob.X) // blob X:0~100Returns 0 when the sensor does not answer; check with "device at … is ready" first.
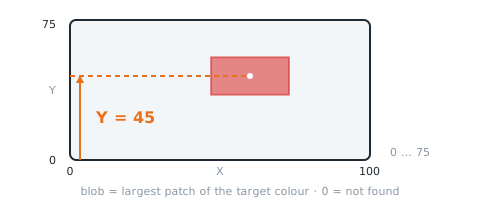
blob Y blobY
| Range | Meaning |
|---|---|
0~75 |
blob centre Y 0~75, bottom = 0, top = 75; 0 when not found |
(camera blob [Y v] :: #00A4E4)
let blobY = mbc.camBlob(MbcCamBlob.Y) // blob Y:0~75Returns 0 when the sensor does not answer; check with "device at … is ready" first.
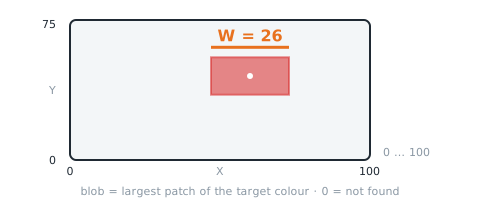
blob width blobW
| Range | Meaning |
|---|---|
0~100 |
blob width W 0~100; 0 = not found |
(camera blob [width v] :: #00A4E4)
let blobW = mbc.camBlob(MbcCamBlob.Width) // blob width:0~100Returns 0 when the sensor does not answer; check with "device at … is ready" first.
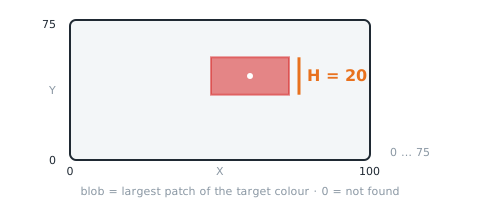
blob height blobH
| Range | Meaning |
|---|---|
0~75 |
blob height H 0~75; 0 when not found |
(camera blob [height v] :: #00A4E4)
let blobH = mbc.camBlob(MbcCamBlob.Height) // blob height:0~75Returns 0 when the sensor does not answer; check with "device at … is ready" first.
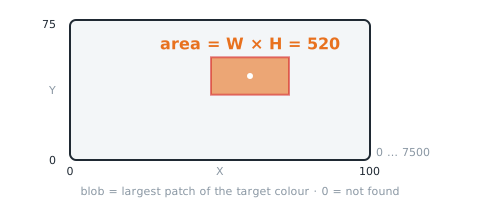
blob area blobArea
| Range | Meaning |
|---|---|
0~7500 |
W×H (0~7500); 0 when not found |
(camera blob [area v] :: #00A4E4)
let blobArea = mbc.camBlob(MbcCamBlob.Area) // blob area:0~7500Returns 0 when the sensor does not answer; check with "device at … is ready" first.
blob found found
| Range | Meaning |
|---|---|
0~1 |
1 = a blob of the target colour is in view (W > 0), 0 = none |
let found = mbc.camFound() // blob found:0~1Related block "on camera blob [found]"
mbc.onCamBlob(MbcCamEvent.Found, function () {
})
Returns false when the sensor does not answer.
Reading values (WRO edition)
After adding pxt-mbc-sensors, find the blocks in the MBC Sensors category; the JavaScript form is shown too, address 0x4C.
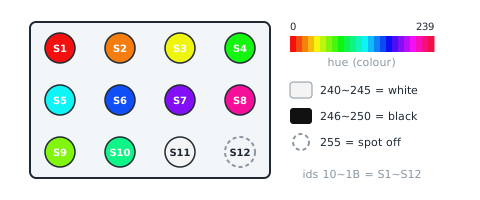
spot 1~12 colour code spotColor
| Range | Meaning |
|---|---|
0~255 |
10 |
(camera spot (1) colour code :: #00A4E4)
let spotColor = mbc.camSpotColor(1) // spot 1~12 colour code:0~255 (N = 1~12)Related block "camera spot [1~12] is [colour]"
let camSpotIs = mbc.camSpotIs(1, MbcCamSpotKind.Colour)Returns 0 when the sensor does not answer; check with "device at … is ready" first.
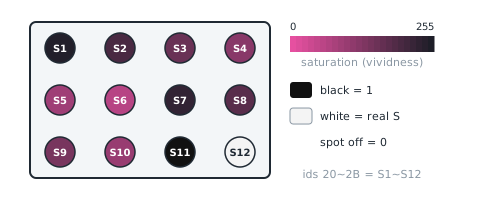
spot 1~12 vividness spotVivid
| Range | Meaning |
|---|---|
0~255 |
20 |
(camera spot (1) vividness :: #00A4E4)
let spotVivid = mbc.camSpotVivid(1) // spot 1~12 vividness:0~255 (N = 1~12)Returns 0 when the sensor does not answer; check with "device at … is ready" first.
Examples (School edition)
This page is for people who have never written code. The 6 examples start with "show a value on the LEDs" and build up to "drive a car". Everything is written for the MakeCode web editor with the MBC extension pxt-mbc-sensors v2: switch to JavaScript, paste an example and it runs; switch back to Blocks to see which blocks it becomes.
Important
- Extension pxt-mbc-sensors v2 has not been verified on hardware yet. Every example on this page compiles with the MakeCode CLI (once for V1, once for V2); value directions, ready times and power are still to be confirmed on a real board, see "to be tested" in the hardware checklist below.
- Use the Universal I2C edition of the product. The SPIKE and EV3 editions have different firmware and cannot be read by a micro:bit.
Tip
Examples 1–5 are for the school edition (hue / blob / motion), example 6 for the WRO edition (HUE12, 12 colour spots). Which colour to watch or which blob to track can only be set with the buttons on the camera (not from code): examples 1 and 2 need "Setting 1: COLOR", examples 3–5 need "Setting 2: TRACK"; steps on the product page.
Software
| Editor | micro:bit V1 | micro:bit V2 | How |
|---|---|---|---|
| MakeCode web editor (makecode.microbit.org, Blocks / JavaScript) | ✔ (less memory, but every example here fits) | ✔ | New Project → gear → Extensions → paste https://github.com/contactmbcrobot/pxt-mbc-sensors → switch to JavaScript (top) → paste the example → Download the .hex and drag it onto the MICROBIT drive |
| MakeCode offline app (Windows / Mac) | ✔ | ✔ | Same; adding the extension the first time needs internet |
| Python Editor (MicroPython) | — | — | no MBC module yet |
- Sound: V2 has a built-in speaker; a V1 needs a buzzer or headphones on P0.
- Servos / motors: the examples use
pins.servoWritePin: one 9 g servo (SG90) on P1; for driving, two continuous-rotation servos (e.g. FS90R), left wheel P1, right wheel P2. Always power servos from an external 4.8–6 V battery pack whose − is joined to the micro:bit GND (common ground); never drive servos from the micro:bit 3V pin. - Block names: with the editor language set to English the blocks read as in the tables below; the tables also give the JavaScript call.
Before you start: hardware checklist (to be tested)
The micro:bit is a 3.3 V board. Each check must pass before an MBC product is connected; "to be tested" marks items extension v2 has not yet confirmed on real hardware.
| Check | This product | Status |
|---|---|---|
| Voltage | MBC products use 3.3 V I2C levels: connect straight to P19 / P20, no level shifter | ✔ |
| Power | the ESP32 camera peaks above 300 mA: external 5 V is required (power bank or a 2 A adapter), never the micro:bit 3V pin | to be tested |
| I2C pull-ups | the micro:bit already has 4.7 kΩ; if the product also has pull-ups, check the low level stays ≤ 0.3×VDD | to be tested |
| Clock stretching | the ESP32 cannot stretch the clock: the extension waits 2 ms after writing the id before reading, nothing to do yourself | to be tested |
| Address clash | factory address 0x4C (school and WRO editions alike); the I2C pins are IO3 (SDA) / IO1 (SCL), so the camera USB serial monitor is unavailable while I2C is connected | — |
| Ready time | the camera is ready (F3 b0) about 3 s after power-on; power the camera first, then the micro:bit. The I2C interface was decided on 2026-10-21: hardware confirmed, bench test pending | to be tested |
If you read nothing: check the wiring (SDA = P20, SCL = P19) → the external power → whether the "device at … is ready" block (Device group, advanced) returns true.
Wiring (the same for every example)
| Sensor | micro:bit |
|---|---|
| SDA | P20 |
| SCL | P19 |
| VCC | external 5 V (required) |
| GND | GND (the servo battery − goes here too) |
The values used on this page
Hue 0..100: red 0 (100 is red too), yellow ≈ 17, green ≈ 33, cyan ≈ 50, blue ≈ 67, magenta ≈ 83; −1 = black, white or grey. Blob X 0..100 (left 0, right 100), Y 0..75 (bottom 0, top 75), area = width × height (0..7500, 0 = not found).
| Block | JavaScript | Range | Meaning | Used in |
|---|---|---|---|---|
| camera colour hue / saturation / brightness | mbc.camColor(MbcCamColor.Hue) |
−1~100 / 0~100 | the colour at the sampling point in the picture centre | 1, 2 |
| camera colour is black / white / grey | mbc.camIsGrey() |
true / false | hue = −1 | 1, 2 |
| camera blob is found | mbc.camFound() |
true / false | a blob of the target colour is in the picture | 3, 4, 5 |
| camera blob X / Y / width / height / area | mbc.camBlob(MbcCamBlob.X) |
0~100 / 0~75 / 0~7500 | blob position and size | 3, 4, 5 |
| on camera blob found / lost | mbc.onCamBlob(MbcCamEvent.Found, ...) |
事件 | runs once when the blob appears or disappears | 5 |
| camera motion | mbc.camMotion() |
0~100 | how much the whole picture changed since the last frame | 5 |
| camera spot n colour code (WRO) | mbc.camSpotColor(1) |
0~255 | 0..239 colour, 240..245 white, 246..250 black, 255 = spot off | 6 |
| camera spot n is colour / white / black / off (WRO) | mbc.camSpotIs(1, MbcCamSpotKind.Colour) |
true / false | the colour code sorted into four kinds | 6 |
| camera spot n vividness (WRO) | mbc.camSpotVivid(1) |
0~255 | saturation; black = 1, spot off = 0 | 6 |
| wait for device at … ready | mbc.waitReady(mbc.ADDR_CAM, 5000) |
true / false | waits up to 5 s, true once the camera is up (Advanced → Device) | 1, 6 |
Example 1: What colour is it
What this example does: An LED bar shows the hue at the centre of the picture: red almost empty (0), green a third, blue two thirds; black / white / grey shows a small square. Press A to show the hue number, B the saturation.
What you need
- micro:bit V1 or V2 + USB cable
- Vision Sensor ESP32CAM school edition (I2C wires on IO3 / IO1) + external 5 V
- red, green and blue bricks or paper
- the camera with "Setting 1: COLOR" done
Wiring: As in the wiring table above: camera IO3 (SDA) → P20, IO1 (SCL) → P19, 5V → external 5 V, GND → GND (the external supply − must also go to micro:bit GND).
Download: ex01_show_hue.ts (right-click, save) → MakeCode New Project → gear → Extensions → paste https://github.com/contactmbcrobot/pxt-mbc-sensors → switch to JavaScript (top) → select all, delete, paste the file → Download and drag the .hex onto the MICROBIT drive.
Code
// Vision sensor ESP32CAM (school edition) × micro:bit example 1: what colour is it (hue bar)
// What it does: the LED bar shows the hue at the centre of the picture (red 0 → yellow 17 → green 33 → blue 67 → red 100); black / white / grey shows a small square. Press A to show the hue number, B the saturation.
// Wiring: camera SDA (IO3) → P20, SCL (IO1) → P19, VCC → external 5 V (the ESP32 draws too much for the micro:bit 3V pin), GND → GND (common ground).
// Setup: do 'Setting 1: COLOR' on the camera first (see the product page). MakeCode new project → Extensions → paste https://github.com/contactmbcrobot/pxt-mbc-sensors → switch to JavaScript, paste this whole file → download to the micro:bit.
// You see: a tick at power-on (camera found); a red brick → bar almost empty (0); green → 1/3 lit; blue → 2/3 lit; white paper → a small square.

let busy = false

if (mbc.waitReady(mbc.ADDR_CAM, 5000)) {                  // the camera takes about 3 s to boot
    basic.showIcon(IconNames.Yes)
} else {
    basic.showIcon(IconNames.No)                          // no answer: check P19 / P20 and the external power; power the camera before the micro:bit
}

basic.forever(function () {
    if (busy) {
        basic.pause(100)
        return
    }
    if (mbc.camIsGrey()) {                                // hue −1: black, white or grey
        basic.showIcon(IconNames.SmallSquare, 0)
    } else {
        led.plotBarGraph(mbc.camColor(MbcCamColor.Hue), 100)   // 0..100
    }
    basic.pause(100)
})

input.onButtonPressed(Button.A, function () {
    busy = true
    basic.showNumber(mbc.camColor(MbcCamColor.Hue))
    busy = false
})
input.onButtonPressed(Button.B, function () {
    busy = true
    basic.showNumber(mbc.camColor(MbcCamColor.Saturation))   // 0..100, higher = more vivid
    busy = false
})
Step by step
mbc.waitReady(mbc.ADDR_CAM, 5000): the camera boots in about 3 s; tick once it answers.forever:mbc.camIsGrey()(hue −1) → small square.- Otherwise
led.plotBarGraph(mbc.camColor(Hue), 100): hue 0..100 as a bar. - A: show the hue; B: the saturation (0..100, higher = more vivid).
busypauses the bar meanwhile.
What you should see
- A tick about 3 s after power-on.
- Red brick: bar almost empty, A shows 0–5 or 95–100.
- Green: about a third; blue: about two thirds.
- White paper: small square, A shows −1.
FAQ
- Hue is always 0? → "Setting 1: COLOR" has not been done; 0 is easy to mistake for red. Set the sampling point on the camera.
- An X at power-on? → The camera has no power or is still booting: power it first, wait for the picture, then press reset on the micro:bit.
- The camera picture is upside down? → Turn V-Flip ON in the camera lens menu (see the product page).
- An X right at power-on (sensor not found)? → Check SDA = P20 and SCL = P19 are not swapped, that the external power is on, and with crocodile clips that no clip touches the neighbouring pad.
- All zeros in the simulator? → Normal. The MakeCode simulator has no real I2C, every read is 0; download to the micro:bit to see real values.
- No sound on a V1? → The V1 has no speaker; connect a buzzer or headphones between P0 and GND.
Example 2: Beep when the chosen colour is seen
What this example does: The LEDs show the colour to look for (R red, Y yellow, G green, B blue); when the picture centre shows it → heart + beep. A / B select the next / previous colour. Teaches how to compare hues on a circle.
What you need
- Everything from example 1 plus a yellow brick
- On a V1 also a buzzer or headphones on P0
Wiring: Same as example 1.
Download: ex02_color_alarm.ts (right-click, save) → MakeCode New Project → gear → Extensions → paste https://github.com/contactmbcrobot/pxt-mbc-sensors → switch to JavaScript (top) → select all, delete, paste the file → Download and drag the .hex onto the MICROBIT drive.
Code
// Vision sensor ESP32CAM (school edition) × micro:bit example 2: beep when the chosen colour is seen
// What it does: the LEDs show the colour to look for (R red, Y yellow, G green, B blue); when the picture centre shows it → heart + beep. A / B select the next / previous colour.
// Wiring: camera SDA → P20, SCL → P19, VCC → external 5 V, GND → GND (common ground). On a V1 connect a buzzer or headphones to P0 for sound (V2 has a speaker).
// Setup: camera with 'Setting 1: COLOR' done; red, yellow, green and blue bricks.
// You see: the LEDs show R; a red brick in front → heart + beep; a green brick → nothing; press A → Y, now only the yellow brick triggers it.

const NAMES = ["R", "Y", "G", "B"]
const HUES = [0, 17, 33, 67]                              // hues of red, yellow, green, blue (0..100)
const TOL = 8                                             // within 8 counts as the same colour
let sel = 0

// hue is a circle: 0 and 100 are both red, so a difference over 50 wraps the other way
function sameHue(h: number, target: number): boolean {
    let d = Math.abs(h - target)
    if (d > 50) {
        d = 100 - d
    }
    return d <= TOL
}

input.onButtonPressed(Button.A, function () {
    sel = (sel + 1) % 4
})
input.onButtonPressed(Button.B, function () {
    sel = (sel + 3) % 4
})

basic.forever(function () {
    let h = mbc.camColor(MbcCamColor.Hue)                 // −1 = black / white / grey
    if (!mbc.camIsGrey() && sameHue(h, HUES[sel])) {
        basic.showIcon(IconNames.Heart, 0)
        music.playTone(Note.E, 150)
    } else {
        basic.showString(NAMES[sel])                      // a single letter shows without scrolling
    }
    basic.pause(100)
})
Step by step
NAMES/HUES: letters and hues of the four colours (red 0, yellow 17, green 33, blue 67);sel= which one is selected.sameHue(h, target):d = |h − target|; if over 50 thend = 100 − d(0 and 100 are both red, so go round the other way); within 8 counts as the same colour.forever:h = hue; not grey andsameHue→ heart +Note.E; otherwisebasic.showString(NAMES[sel])(a single letter does not scroll).- A:
sel = (sel + 1) % 4; B:(sel + 3) % 4, i.e. one step back.
What you should see
- Screen shows R: a red brick in front → heart + beep; a green one → nothing.
- Press A → Y: now only the yellow brick triggers it.
- Press A until B (blue): a blue brick triggers, a cyan one may not (too far off).
FAQ
- Yellow is not recognised? → Warm or cool lighting shifts the hue. Press A to read the real number and put it into
HUESinstead of 17. - It beeps all the time? → The background happens to be that colour (a wooden desk is close to yellow). Change
TOLfrom 8 to 5.
Example 3: Camera pan servo tracks the blob
What this example does: The camera sits on a servo: blob on the left of the picture → the servo turns left until the blob is back in the middle; no blob → puzzled face, servo holds. Press A to centre.
What you need
- Everything from example 1
- one 9 g servo (SG90) with the camera fixed to its arm
- a 4.8–6 V battery pack and jumper wires
- the camera with "Setting 2: TRACK" done (a tracking box on screen)
Wiring: Camera as in example 1 (external 5 V). Servo orange (signal) → P1, red → external 4.8–6 V battery +, brown → battery −, and run a second wire from battery − to micro:bit GND (common ground). The camera is fixed to the servo arm.
Download: ex03_pan_servo.ts (right-click, save) → MakeCode New Project → gear → Extensions → paste https://github.com/contactmbcrobot/pxt-mbc-sensors → switch to JavaScript (top) → select all, delete, paste the file → Download and drag the .hex onto the MICROBIT drive.
Code
// Vision sensor ESP32CAM (school edition) × micro:bit example 3: camera pan servo tracks the blob
// What it does: the camera sits on a servo: blob on the left of the picture → servo turns left until the blob is back in the middle; no blob → puzzled face, servo holds. Press A to centre.
// Wiring: camera SDA → P20, SCL → P19, VCC → external 5 V, GND → GND. Servo orange (signal) → P1, red → external 4.8–6 V battery +, brown → battery − joined to micro:bit GND.
// Setup: camera with 'Setting 2: TRACK' done (the tracking box follows the blob); a 9 g servo (SG90) with the camera fixed to its arm.
// You see: move the blob slowly left and the servo follows so the blob stays centred; take the blob away → puzzled face.

const CENTRE = 50                                         // blob X 0..100, 50 = picture centre
const DEAD = 8                                            // hold still within 8 of centre
let angle = 90

basic.forever(function () {
    if (mbc.camFound()) {                                 // a blob of the target colour is found
        let err = mbc.camBlob(MbcCamBlob.X) - CENTRE      // positive = blob on the right
        if (Math.abs(err) > DEAD) {
            angle = Math.constrain(angle - err / 10, 0, 180)   // blob on the right → smaller angle = turn right (swap − for + if mounted mirrored)
            basic.showArrow(err > 0 ? ArrowNames.East : ArrowNames.West, 0)
        } else {
            basic.showIcon(IconNames.Target, 0)           // locked on
        }
        pins.servoWritePin(AnalogPin.P1, Math.round(angle))
    } else {
        basic.showIcon(IconNames.Confused, 0)
    }
    basic.pause(40)
})

input.onButtonPressed(Button.A, function () {
    angle = 90
    pins.servoWritePin(AnalogPin.P1, 90)
})
Step by step
CENTRE = 50(middle of blob X),DEAD = 8(hold still within 8 of centre),angle = 90.forever:mbc.camFound()→err = blob X − 50, positive = blob on the right.|err| > 8:angle = angle − err / 10(blob on the right → smaller angle = turn right; swap − for + if mounted mirrored), clamped to 0..180 withMath.constrain, arrow shows the direction; centred → target icon.pins.servoWritePin(AnalogPin.P1, Math.round(angle)).- No blob → puzzled face. A: back to 90°.
What you should see
- Blob in the middle: target icon, servo still.
- Move the blob slowly left: left arrow, the servo follows and stops once the blob is centred.
- Take the blob away: puzzled face.
FAQ
- The servo runs away (wrong direction)? → Change
angle − err / 10toangle + err / 10. - It oscillates? → Change
/ 10to/ 20(track slower), orDEADto 12. - The tracking box jumps to other objects? → TOL_HUE is too wide or MIN AREA too small in the camera settings; adjust them on the camera.
Example 4: Car chases the blob
What this example does: Blob on the right of the picture → turn right; blob small (far) → forward; big (near) → back; not seen → stop. A = start, B = stop. Uses the area as a distance.
What you need
- A two-wheel car: two continuous-rotation servos (e.g. FS90R) as wheels plus a caster
- the camera fixed at the front facing forward (external 5 V)
- a 4.8–6 V battery pack
- a ball or brick of the target colour; the camera with "Setting 2: TRACK" done
Wiring: Camera as in example 1 (external 5 V), mounted at the front facing forward. Left continuous-rotation servo signal → P1, right → P2; both servo red wires to the 4.8–6 V battery pack +, brown to battery −, and battery − also to micro:bit GND.
Download: ex04_follow_blob.ts (right-click, save) → MakeCode New Project → gear → Extensions → paste https://github.com/contactmbcrobot/pxt-mbc-sensors → switch to JavaScript (top) → select all, delete, paste the file → Download and drag the .hex onto the MICROBIT drive.
Code
// Vision sensor ESP32CAM (school edition) × micro:bit example 4: car chases the blob
// What it does: blob on the right of the picture → turn right; blob small (far) → forward; big (near) → back; not seen → stop. A = start, B = stop.
// Wiring: camera SDA → P20, SCL → P19, VCC → external 5 V, GND → GND. Left continuous-rotation servo signal → P1, right → P2; servos on a 4.8–6 V battery pack whose − is joined to micro:bit GND.
// Setup: a two-wheel car with the camera facing forward; camera with 'Setting 2: TRACK' done; a ball or brick of the target colour.
// You see: after A put the ball in front: move it back and the car chases, bring it close and the car reverses, move it sideways and the car turns; take it away → stop, puzzled face.

const FAR_AREA = 800                                      // area below this = too far → forward (tune for your ball)
const NEAR_AREA = 2500                                    // area above this = too close → back
let running = false

// left servo P1, right servo P2 (continuous rotation); left / right = −100..100, positive = forward
function drive(left: number, right: number): void {
    left = Math.constrain(left, -100, 100)
    right = Math.constrain(right, -100, 100)
    pins.servoWritePin(AnalogPin.P1, Math.round(90 + left * 0.9))    // 90 = stop, 180 = full forward, 0 = full reverse
    pins.servoWritePin(AnalogPin.P2, Math.round(90 - right * 0.9))   // the right servo is mounted mirrored, so subtract
}

input.onButtonPressed(Button.A, function () {
    running = true
    basic.showIcon(IconNames.Happy, 0)
})
input.onButtonPressed(Button.B, function () {
    running = false
    drive(0, 0)
    basic.showIcon(IconNames.No, 0)
})

basic.forever(function () {
    if (!running) {
        basic.pause(100)
        return
    }
    if (!mbc.camFound()) {
        drive(0, 0)
        basic.showIcon(IconNames.Confused, 0)
    } else {
        let x = mbc.camBlob(MbcCamBlob.X)                 // 0 (left) .. 100 (right)
        let area = mbc.camBlob(MbcCamBlob.Area)           // width × height, 0..7500: bigger = nearer
        let turn = Math.constrain((x - 50), -40, 40)      // blob on the right → positive → left faster = turn right
        let speed = 0
        if (area < FAR_AREA) {
            speed = 50                                    // too far: forward
        } else if (area > NEAR_AREA) {
            speed = -40                                   // too close: back
        }
        drive(speed + turn, speed - turn)
        if (turn > 10) {
            basic.showArrow(ArrowNames.East, 0)
        } else if (turn < -10) {
            basic.showArrow(ArrowNames.West, 0)
        } else if (speed > 0) {
            basic.showArrow(ArrowNames.North, 0)
        } else if (speed < 0) {
            basic.showArrow(ArrowNames.South, 0)
        } else {
            basic.showIcon(IconNames.Target, 0)           // distance just right
        }
    }
    basic.pause(40)
})
Step by step
FAR_AREA = 800,NEAR_AREA = 2500: an area (width × height) below 800 is too far, above 2500 too close; tune for your ball.function drive(left, right): left wheel P1, right wheel P2. A starts, B stops.forever:!mbc.camFound()→ stop, puzzled face.x = blob X,area = blob area;turn = x − 50(limited to ±40): blob on the right → positive → left wheel faster = turn right.speed: too far 50, too close −40, just right 0;drive(speed + turn, speed − turn). An arrow or the target icon shows what it is doing.
What you should see
- Press A, ball 30 cm ahead: the car drives forward; ball at 10 cm: reverses; somewhere between: stops, target icon.
- Ball to the right: turns right after it.
- Ball removed: stop, puzzled face.
FAQ
- It neither advances nor reverses? → The area sits between 800 and 2500. Read the A (area) value on the camera screen and adjust the two limits.
- It turns the wrong way? → Change
drive(speed + turn, speed − turn)todrive(speed − turn, speed + turn). - The picture blurs and the tracking box vanishes when moving? → Change the speed 50 to 35, or lower MIN AREA on the camera.
Example 5: Motion alarm + tracking turret (all together)
What this example does: Movement in the picture (motion > 30) → alarm and the count goes up (at most once per 2 s); when a blob is found the servo turns toward it (as in example 3); blob found / lost shows a tick / X through events. A resets, B toggles the alarm.
What you need
- The turret from example 3 (camera on the servo)
- On a V1 also a buzzer or headphones on P0
Wiring: Same as example 3.
Download: ex05_motion_guard.ts (right-click, save) → MakeCode New Project → gear → Extensions → paste https://github.com/contactmbcrobot/pxt-mbc-sensors → switch to JavaScript (top) → select all, delete, paste the file → Download and drag the .hex onto the MICROBIT drive.
Code
// Vision sensor ESP32CAM (school edition) × micro:bit example 5: motion alarm + tracking turret (all together)
// What it does: movement in the picture (motion > 30) → alarm and the count goes up (at most once per 2 s); when a blob is found the servo turns toward it (as in example 3); blob found / lost shows a tick / X. A resets, B toggles the alarm.
// Wiring: camera SDA → P20, SCL → P19, VCC → external 5 V, GND → GND. Servo signal → P1, servo on its own 4.8–6 V supply, common ground. On a V1 put a buzzer on P0 for sound.
// Setup: camera with 'Setting 2: TRACK' done; camera fixed to the servo arm.
// You see: someone walks past → beep, number +1; bring a target-colour brick in → tick and the servo follows it; press B → M (muted).

const MOTION_LEVEL = 30                                   // motion 0..100, above this counts as movement
let armed = true
let alarms = 0
let lastAlarm = -5000
let angle = 90

mbc.onCamBlob(MbcCamEvent.Found, function () {            // blob appears
    basic.showIcon(IconNames.Yes, 0)
})
mbc.onCamBlob(MbcCamEvent.Lost, function () {             // blob disappears
    basic.showIcon(IconNames.No, 0)
})

input.onButtonPressed(Button.A, function () {
    alarms = 0
    basic.showNumber(0)
})
input.onButtonPressed(Button.B, function () {
    armed = !armed
    basic.showString(armed ? "S" : "M")                   // S = alarm on, M = muted
})

basic.forever(function () {
    let m = mbc.camMotion()                               // whole-picture motion 0..100
    if (armed && m > MOTION_LEVEL && control.millis() - lastAlarm > 2000) {
        alarms += 1
        lastAlarm = control.millis()
        music.playTone(Note.A, 300)                       // the servo twitches during the beep; normal (shared PWM period)
        basic.showNumber(alarms)
    }
    if (mbc.camFound()) {                                 // blob present: the turret follows it
        let err = mbc.camBlob(MbcCamBlob.X) - 50
        if (Math.abs(err) > 8) {
            angle = Math.constrain(angle - err / 10, 0, 180)
        }
        pins.servoWritePin(AnalogPin.P1, Math.round(angle))
    }
    basic.pause(50)
})
Step by step
MOTION_LEVEL = 30,armed = true,alarms,lastAlarm.mbc.onCamBlob(Found, ...)→ tick;Lost→ X.- A:
alarms = 0; B: fliparmed, show S / M. forever:m = mbc.camMotion(); ifarmedandm > 30and more than 2 s since the last alarm →alarms + 1,Note.Afor 0.3 s, show the count.mbc.camFound()→ computeerr, updateangleand move the servo as in example 3.
What you should see
- Someone walks past: beep, shows 1; again: 2.
- Bring a target-colour brick in: tick, the servo follows it; remove it: X.
- Press B: M, no more beeps but tracking continues.
FAQ
- The servo twitches during the beep? → Normal: the micro:bit PWM channels share one period, so the buzzer disturbs the servo pulse. Replace
music.playTonewith LED flashing if it bothers you. - The servo moving triggers the alarm? → The camera turns with the servo, so the picture moves. Ignore motion while tracking: add
!mbc.camFound() &&in front ofarmed && .... - Alarms all the time? → Change
MOTION_LEVELto 50, or the lighting flickers (fluorescent tubes).
Example 6: All 12 colour spots at a glance (WRO edition HUE12)
What this example does: WRO edition only: the top 3 LED rows = spots S1..S12 (4 per row), colour bright, white dim, black or off dark; the dot on row 5 = the selected spot. Press A to select the next spot, B to show its colour code and vividness.
What you need
- micro:bit V1 or V2 + USB cable
- Vision Sensor ESP32CAM WRO edition (HUE12) + external 5 V
- a WRO mat or a few colour, white and black bricks
- the 12 spot positions set on the camera first
Wiring: Same as example 1.
Download: ex06_wro_spots.ts (right-click, save) → MakeCode New Project → gear → Extensions → paste https://github.com/contactmbcrobot/pxt-mbc-sensors → switch to JavaScript (top) → select all, delete, paste the file → Download and drag the .hex onto the MICROBIT drive.
Code
// Vision sensor ESP32CAM (WRO edition, HUE12) × micro:bit example 6: all 12 colour spots at a glance
// What it does: the top 3 LED rows = spots S1..S12 (4 per row): colour → bright, white → dim, black or off → dark. The dot on row 5 = the selected spot. Press A to select the next spot, B to show its colour code and vividness.
// Wiring: camera SDA (IO3) → P20, SCL (IO1) → P19, VCC → external 5 V, GND → GND (common ground).
// Setup: on the WRO edition camera set the 12 spot positions first (see the product page).
// You see: spots over coloured bricks bright, over white dim, over black dark; press B for the colour code: 0..239 colour (red ≈ 0, yellow ≈ 40, green ≈ 80, blue ≈ 160), 240..245 white, 246..250 black, 255 = spot off.

let sel = 1                                               // selected spot 1..12
let busy = false

if (mbc.waitReady(mbc.ADDR_CAM, 5000)) {
    basic.showIcon(IconNames.Yes)
} else {
    basic.showIcon(IconNames.No)
}

basic.forever(function () {
    if (busy) {
        basic.pause(100)
        return
    }
    basic.clearScreen()
    for (let n = 1; n <= 12; n++) {
        let x = (n - 1) % 4                               // 4 per row
        let y = Math.idiv(n - 1, 4)                       // rows 0..2
        if (mbc.camSpotIs(n, MbcCamSpotKind.Colour)) {    // code 0..239
            led.plotBrightness(x, y, 255)
        } else if (mbc.camSpotIs(n, MbcCamSpotKind.White)) {   // 240..245
            led.plotBrightness(x, y, 40)
        }
    }
    led.plot((sel - 1) % 4, 4)                            // row 5: column of the selected spot
    basic.pause(100)
})

input.onButtonPressed(Button.A, function () {
    sel = sel % 12 + 1                                    // 1 → 2 → … → 12 → 1
    busy = true
    basic.showString("S" + sel)
    busy = false
})
input.onButtonPressed(Button.B, function () {
    busy = true
    basic.showNumber(mbc.camSpotColor(sel))               // colour code 0..255
    basic.showString("V")
    basic.showNumber(mbc.camSpotVivid(sel))               // vividness 0..255
    busy = false
})
Step by step
sel = 1: the selected spot.waitReadyticks.forever: clear,for n = 1..12:x = (n − 1) % 4,y = (n − 1) ÷ 4(integer divisionMath.idiv) → rows 0..2, 4 per row.mbc.camSpotIs(n, Colour)(code 0..239) →led.plotBrightness(x, y, 255)full;White(240..245) → 40 dim; black / off → not drawn.led.plot((sel − 1) % 4, 4): row 5 marks the column of the selected spot.- A:
sel = sel % 12 + 1cycles 1..12 and shows S plus the number; B: showscamSpotColor(sel), V,camSpotVivid(sel).
What you should see
- A spot over a coloured brick: full brightness; white: dim; black: dark; spot off: dark.
- Press A: S2, S3 …; the row-5 dot moves along.
- Press B: e.g. 40 (yellow), V, 180.
FAQ
- Everything dark? → None of the 12 spots is enabled (code 255); set the spot positions on the camera.
- The codes differ from the SPIKE page? → I2C gives a 0..255 colour code (colour 0..239); the SPIKE modes use another scaling; see the Reference for the mapping.
Next steps
- Every block, value and hardware note: Vision Sensor ESP32CAM × micro:bit
- What each value id means: Reference
- Extension source and issues: https://github.com/contactmbcrobot/pxt-mbc-sensors
More questions
- Cannot find the MBC blocks? In MakeCode Extensions, paste https://github.com/contactmbcrobot/pxt-mbc-sensors.
Still stuck? Contact us with your software and a screenshot of the program.
Downloads
- MakeCode extension pxt-mbc-sensors (paste this URL in MakeCode Extensions)
- Download centre (libraries, firmware, catalogue for every product)
Sources
- Host and software list:
_build/guides.json - Values and commands:
_build/protocol/cam_school.json、_build/protocol/cam_wro.json(single source of truth) - Setup:
_build/guides/software/microbit-makecode.en.md、_build/guides/product/esp32cam/microbit-makecode.en.md - Examples:
sensors/esp32cam/microbit-examples(-wro).md