
SharpShot Vision (ESP32CAM) × SPIKE × Pybricks
Interactive tutorialSPIKE
First time? Try the interactive tutorial in your browser first, then follow the steps below with your hub.
School editionMicroPython (Pybricks)Pybricks blocksPybricks built-in blocks (no library)
WRO editionMicroPython (Pybricks)Pybricks blocks
This page covers Pybricks (Python) only: how to set it up for the SharpShot Vision (ESP32CAM) on SPIKE Prime / Robot Inventor, how to read every value, the commands it supports and examples. Use the switcher above to change product, host or software.
Setup
What you need
- Sensor: SharpShot Vision (ESP32CAM) (SPIKE edition).
- Hub: SPIKE Prime or Robot Inventor.
- Computer: Chrome. Open code.pybricks.com and start writing; nothing to install.
- Hub firmware: must be switched to Pybricks firmware v4.1 first (the stable code.pybricks.com is v4.1.1; v4.1.0 from the MBC SPIKE Blocks website works too). Every example on this site is written for v4.1.
- Library:
MBC_cam_school_Lib.py(only needed for the "import the library" method). For a new program of your own, import justMBC_sensors.py: one file for every MBC sensor.
Note
The Pybricks 3.6.1 libraries and examples are no longer updated (the 2026 SPIKE Prime hubs cannot run 3.6.1 either). For hubs that have not been upgraded, the old files are under "Legacy (no longer updated)" on the Downloads page.
Install the software
- Open code.pybricks.com in Chrome.
- Switch the hub to Pybricks firmware. The easiest way is the MBC SPIKE Blocks website: top menu "SPIKE Hub → Install/Update Pybricks firmware", about 3 minutes.
- To go back to the official LEGO App later, switch back to the original LEGO firmware with the SPIKE App.
Make the software see the sensor
Pybricks can read the sensor two ways; pick one:
- Built-in commands (no library): read the sensor with Pybricks' own sensor commands. No extra file, quickest to start.
- Import the library: download MBC_cam_school_Lib.py to get more data, such as the high-resolution position and every channel.
To import the library:
- In code.pybricks.com, click "Import a file" in the file panel on the left.
- Import both the example file and
MBC_cam_school_Lib.py, so they are in the same project list. - Open the example and press ▶ to run.
Important
New projects: use
MBC_sensors.py. Old projects: just replace the one file they already use.MBC_sensors.pyis one file for every MBC sensor (the EXP6 and Servo6 expander libraries are separate downloads); writefrom MBC_sensors import MBC_LINE8, with the same class names as in the old files. The old file names (such asMBC_cam_school_Lib.pyused by the examples on this page) are kept for existing programs: swap in the new file with the same name and the program needs no changes. But every old-name file is the whole shared library, so importing 3 or more of them in one program goes over the SPIKE program slot limit of about 51 KB; to mix several sensors, import onlyMBC_sensors.py.
Tip
The file name must match the name in the program's
importexactly, or you will get anImportError. The library files on this site have no version suffix, so you do not need to rename them.
Tip
Most libraries take a
multitaskargument when you create the object:Falseis normal mode, one line after another;Trueis multitask mode, where every call needsawaitin front so the robot can do several things at once.
Wiring
- Plug the sensor into hub port C with the cable (any of A~F works).
- Use the same port in the program: built-in commands use
Port.APort.F; a library'sportargument is usually16for A~F. - Latch up, push the plug in gently.
Set the colour on the sensor first
All SharpShot settings are made on the colour screen and buttons on the back of the sensor; no computer needed:
- The sensor only starts when plugged into a hub that is already on (the screen first shows "LEGO Sync..."); once the camera image appears it is ready.
- Short-press the side button to open the settings menu; left / right to choose, OK to enter. In the menu, hold the side button for 1 s to clear that colour set.
- Colour settings and camera parameters (brightness, contrast, saturation, exposure, white balance, flip, mirror) are saved automatically and used at the next power-on.
WRO edition (HUE12)
The hub needs Pybricks firmware v4.1 (the stable code.pybricks.com is v4.1.1; v4.1.0 from the MBC Blocks website's "SPIKE Hub → Install/Update Pybricks firmware" works too). With Pybricks, import MBC_hue12_Lib.py (school edition: MBC_cam_school_Lib.py); for a new program of your own, import just MBC_sensors.py (classes MBC_HUE12 / MBC_CAM_SCHOOL).
Important
On Pybricks 4.1 or later, install the MBC library (
MBC_sensors.pyor the product library above, mode 9). With only the built-in ColorSensor, 4.1'sambient()keeps one decimal, so the ones digit of the school edition's blob Y coordinate is lost, andreflection()carries one decimal that must be made whole first. The legacy SharpShot gets no firmware change.
First test
- Turn on the hub and connect it in code.pybricks.com.
- Import and open example 1 on this page, then press ▶.
- If the numbers printed in the console change with what is in front of the sensor, everything is connected.
FAQ
ImportError? The library was not imported into the same project, or its file name differs from theimportname. Rename it toMBC_cam_school_Lib.pyand import it again.- The example does not run, or a command is unknown? The hub firmware is too old: the examples on this site are written for Pybricks v4.1, so update the hub to v4.1 first. 3.6.1 is no longer updated; the old files are on the Downloads page.
- What happens if the sensor cable comes out? The program keeps running: the library returns the last value it read and prints one notice in the console (in Chinese and English:
MBC: Port C 讀不到感應器,先回傳上一次的值 / no sensor, using the last value); if the sensor was never connected it returnsNone. To check in your program, call the object'ssensor_ok():Trueif the last read worked,Falseif not (addawaitin multitask mode). Once you plug it back in the library keeps reading; if the sensor was missing from the start and you use multitask mode, run the program again. - An example marked "Pybricks only" shows strange numbers? It uses a new mode in sensor firmware from 2026-10 on; older firmware returns different numbers.
- The official App cannot connect any more? The hub now runs Pybricks firmware: switch back to the original LEGO firmware with the SPIKE App.
Reading values (School edition)
Code assumes the sensor is on port A. For the MBC library form, import the library .py into Pybricks too.
hue hue
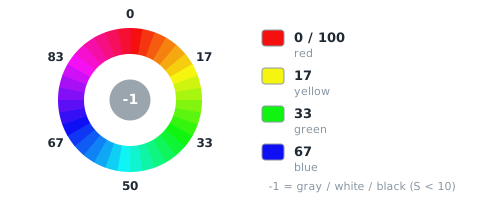
| Range | Meaning |
|---|---|
-1~100 |
hue of sample point S1, 0 |
from pybricks.iodevices import PUPDevice
from pybricks.parameters import Port

dev = PUPDevice(Port.A)   # sensor on port A

w = dev.read(9)[0]
hue = (w & 0xFF)   # hue(lo byte)
MBC library
from pybricks.parameters import Port
from MBC_cam_school_Lib import MBC_CAM_SCHOOL

cam = MBC_CAM_SCHOOL(Port.A)
hue = cam.hue()
mode 0 (edu) byte 0 🔒; mode 0 (toy) byte 1 🔒; mode 5 v[0] 🔒; mode 9 v[0] lo 🔒. Note: −1 = 0xFF; 0~10(÷10); raw = (色相×256 ± 128)/25 ≈ 色相×10.24,v[0]=v[1]=v[2];Pybricks reflection() ÷10.24 還原
saturation saturation
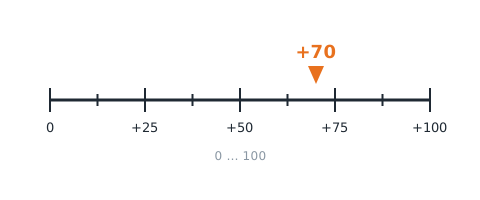
| Range | Meaning |
|---|---|
0~100 |
saturation of sample point S1, 0~100 |
from pybricks.iodevices import PUPDevice
from pybricks.parameters import Port

dev = PUPDevice(Port.A)   # sensor on port A

w = dev.read(9)[0]
saturation = ((w >> 8) & 0xFF)   # saturation(hi byte)
MBC library
from pybricks.parameters import Port
from MBC_cam_school_Lib import MBC_CAM_SCHOOL

cam = MBC_CAM_SCHOOL(Port.A)
saturation = cam.saturation()
mode 9 v[0] hi 🔒
brightness value
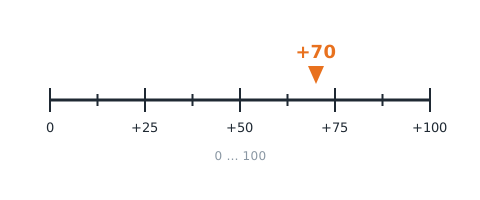
| Range | Meaning |
|---|---|
0~100 |
brightness (HSV value) of sample point S1, 0~100 |
from pybricks.iodevices import PUPDevice
from pybricks.parameters import Port

dev = PUPDevice(Port.A)   # sensor on port A

w = dev.read(9)[1]
value = (w & 0xFF)   # brightness(lo byte)
MBC library
from pybricks.parameters import Port
from MBC_cam_school_Lib import MBC_CAM_SCHOOL

cam = MBC_CAM_SCHOOL(Port.A)
value = cam.brightness()
mode 9 v[1] lo 🔒
motion motion
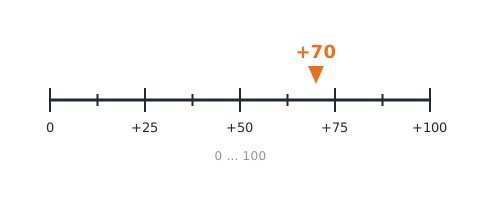
| Range | Meaning |
|---|---|
0~100 |
whole-frame motion 0~100 (more change = larger) |
from pybricks.iodevices import PUPDevice
from pybricks.parameters import Port

dev = PUPDevice(Port.A)   # sensor on port A

w = dev.read(9)[1]
motion = ((w >> 8) & 0xFF)   # motion(hi byte)
MBC library
from pybricks.parameters import Port
from MBC_cam_school_Lib import MBC_CAM_SCHOOL

cam = MBC_CAM_SCHOOL(Port.A)
motion = cam.motion()
mode 0 (edu) byte 1 🔒; mode 0 (toy) byte 0 🔒; mode 9 v[1] hi 🔒
blob X blobX
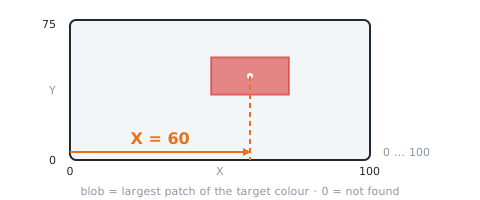
| Range | Meaning |
|---|---|
0~100 |
blob centre X 0~100, left = 0; 0 when not found |
from pybricks.iodevices import PUPDevice
from pybricks.parameters import Port

dev = PUPDevice(Port.A)   # sensor on port A

w = dev.read(9)[2]
blobX = (w & 0xFF)   # blob X(lo byte)
MBC library
from pybricks.parameters import Port
from MBC_cam_school_Lib import MBC_CAM_SCHOOL

cam = MBC_CAM_SCHOOL(Port.A)
blobX = cam.blob_x()
mode 0 (edu) byte 2 🔒; mode 0 (toy) byte 2 🔒; mode 6 v[0]; mode 7 v[2] 🔒; mode 9 v[2] lo 🔒. Note: byte 3 = 0; ×4 查表編碼(10-bit); #67 改:模式 6 = [X, Y, 面積](3×int16); X×100+Y → Pybricks ambient() 顯示 X.Y. From Pybricks 4.1 ambient() keeps only one decimal, so the ones digit of this value is lost: install the MBC library (mode 9) instead
blob Y blobY
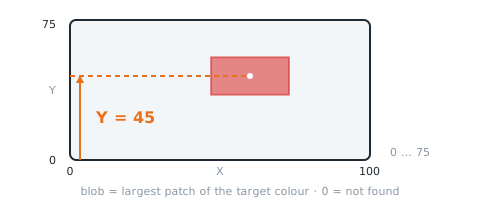
| Range | Meaning |
|---|---|
0~75 |
blob centre Y 0~75, bottom = 0, top = 75; 0 when not found |
from pybricks.iodevices import PUPDevice
from pybricks.parameters import Port

dev = PUPDevice(Port.A)   # sensor on port A

w = dev.read(9)[2]
blobY = ((w >> 8) & 0xFF)   # blob Y(hi byte)
MBC library
from pybricks.parameters import Port
from MBC_cam_school_Lib import MBC_CAM_SCHOOL

cam = MBC_CAM_SCHOOL(Port.A)
blobY = cam.blob_y()
mode 0 (edu) byte 4 🔒; mode 0 (toy) byte 4 🔒; mode 6 v[1]; mode 7 v[2] 🔒; mode 9 v[2] hi 🔒. Note: byte 5 = 0; ×4 查表編碼; X×100+Y 的個位/十位. From Pybricks 4.1 ambient() keeps only one decimal, so the ones digit of this value is lost: install the MBC library (mode 9) instead
blob width blobW
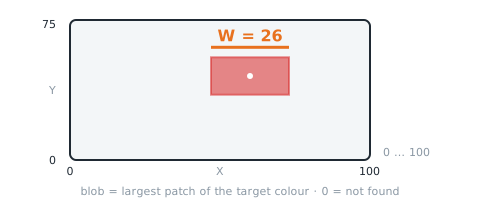
| Range | Meaning |
|---|---|
0~100 |
blob width W 0~100; 0 = not found |
from pybricks.iodevices import PUPDevice
from pybricks.parameters import Port

dev = PUPDevice(Port.A)   # sensor on port A

w = dev.read(9)[3]
blobW = (w & 0xFF)   # blob width(lo byte)
MBC library
from pybricks.parameters import Port
from MBC_cam_school_Lib import MBC_CAM_SCHOOL

cam = MBC_CAM_SCHOOL(Port.A)
blobW = cam.blob_w()
mode 9 v[3] lo 🔒
blob height blobH
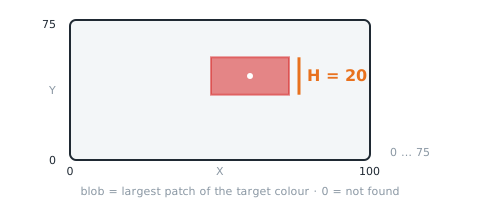
| Range | Meaning |
|---|---|
0~75 |
blob height H 0~75; 0 when not found |
from pybricks.iodevices import PUPDevice
from pybricks.parameters import Port

dev = PUPDevice(Port.A)   # sensor on port A

w = dev.read(9)[3]
blobH = ((w >> 8) & 0xFF)   # blob height(hi byte)
MBC library
from pybricks.parameters import Port
from MBC_cam_school_Lib import MBC_CAM_SCHOOL

cam = MBC_CAM_SCHOOL(Port.A)
blobH = cam.blob_h()
mode 9 v[3] hi 🔒
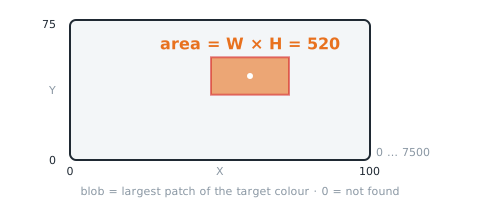
blob area blobArea
| Range | Meaning |
|---|---|
0~7500 |
W×H (0~7500); 0 when not found |
from pybricks.iodevices import PUPDevice
from pybricks.parameters import Port

dev = PUPDevice(Port.A)   # sensor on port A

blobArea = dev.read(9)[4]   # blob area
MBC library
from pybricks.parameters import Port
from MBC_cam_school_Lib import MBC_CAM_SCHOOL

cam = MBC_CAM_SCHOOL(Port.A)
blobArea = cam.area()
mode 0 (edu) byte 6 🔒; mode 0 (toy) byte 6 🔒; mode 6 v[2]; mode 9 v[4] 🔒. Note: 鎖住:這裡是 map(像素面積, 0~5000, 0~100),不是 W×H;byte 7 = 0; 同上 0~100 再 ×4 查表編碼; W×H; #67 新增:byte 8~9 = W×H(原本 0);其餘 byte 不動
Not readable here:blob found. Use Arduino / mBlock / micro:bit for these.
Reading values (WRO edition)
Code assumes the sensor is on port A. For the MBC library form, import the library .py into Pybricks too.
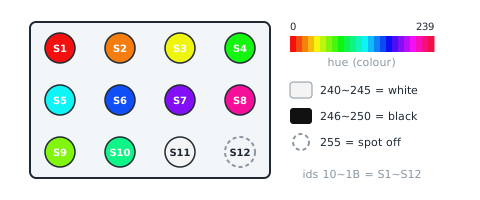
spot 1~12 colour code spotColor
| Range | Meaning |
|---|---|
0~255 |
10 |
from pybricks.iodevices import PUPDevice
from pybricks.parameters import Port

dev = PUPDevice(Port.A)   # sensor on port A

spotColor = dev.read(0)[0]   # spot 1~12 colour code
MBC library
from pybricks.parameters import Port
from MBC_hue12_Lib import HUE12Sensor

cam = HUE12Sensor(Port.A)
cam.update()   # refresh once per loop
spotColor = cam.get_slot(1)[1]   # list, channel 1 = [0]
mode 0 (edu) byte 0 🔒. Note: 同 EV3:Pybricks read(0) 得 8 個 int32,每個拆 3 byte(積木網站 MBC_HUE12 設定檔);玩具版不送;鎖住
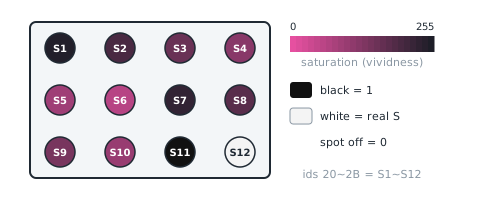
spot 1~12 vividness spotVivid
| Range | Meaning |
|---|---|
0~255 |
20 |
from pybricks.iodevices import PUPDevice
from pybricks.parameters import Port

dev = PUPDevice(Port.A)   # sensor on port A

spotVivid = dev.read(0)[1]   # spot 1~12 vividness
MBC library
from pybricks.parameters import Port
from MBC_hue12_Lib import HUE12Sensor

cam = HUE12Sensor(Port.A)
cam.update()   # refresh once per loop
spotVivid = cam.get_slot(1)[2]   # list, channel 1 = [0]
mode 0 (edu) byte 1 🔒. Note: 同 EV3;鎖住
Examples (School edition)
Example 1: What color do you see?
What this example does: The hub display keeps showing the "hue" number the SharpShot sees. Put bricks of different colors at the spot you chose in "Setup 1" and the number changes.
What you need
- 1 SPIKE hub
- 1 SharpShot (with "Setup 1: COLOR" done)
- One red, one green, one blue and one white brick
How to connect: SharpShot on port C.
Download the program
| Pybricks |
|---|
| ex01_show_hue.py + library |
Pybricks code
# 神攝手(學校版)範例 1:看到什麼顏色(主機螢幕顯示色相)
# 接線:神攝手 → C 埠
from pybricks.hubs import PrimeHub
from pybricks.parameters import Port
from pybricks.tools import wait
from MBC_cam_school_Lib import MBC_CAM_SCHOOL

hub = PrimeHub()
cam = MBC_CAM_SCHOOL(Port.C)      # 神攝手插在 C 孔

while True:
    hue = cam.hue()               # 色相:0~100(紅 0/100、綠約 33、藍約 67);-1 = 黑白灰
    print(hue)                    # 電腦畫面印出來(比較快看到)
    hub.display.text(str(hue))    # 主機螢幕一個字一個字顯示
    wait(500)                     # 等 0.5 秒再讀下一次
Step by step through the program
- Repeat forever: the blocks inside keep running until you press stop.
- Read the hue: the official App uses the "color" block and puts it into the variable "hue" (a variable = a box with a name that holds one number); the MBC Blocks website uses "SharpShot school edition C hue"; Pybricks uses
cam.hue(). - Show it on the display: the number scrolls across one character at a time. The MBC Blocks website and Pybricks also print it on the computer screen, which is quicker to read.
- Wait 0.5 seconds before reading again.
What you should see
- Red brick: about 0 to 5 or 95 to 100.
- Green brick: about 30; blue brick: about 65 (the lighting is different in every room, so the numbers vary a little).
- White paper, black brick: -1 (no color).
Common problems
- It reads 0 no matter what I put there? → "Setup 1: COLOR" has not been done yet.
- The number keeps jumping around? → Classroom lights flicker, and pale colors jump the most; use a brighter, more saturated brick, or move it closer.
- The number changed after moving to another room? → Different lighting; do "Setup 1" again.
Example 2: Beep when you see red
What this example does: When the SharpShot sees red, the light in the middle of the hub turns red and the hub beeps; for any other color the light turns off.
What you need: Same as example 1.
How to connect: SharpShot on port C.
Download the program
| Pybricks |
|---|
| ex02_red_beep.py + library |
Pybricks code
# 神攝手(學校版)範例 2:看到紅色就亮紅燈、嗶一聲
# 接線:神攝手 → C 埠
from pybricks.hubs import PrimeHub
from pybricks.parameters import Color, Port
from pybricks.tools import wait
from MBC_cam_school_Lib import MBC_CAM_SCHOOL

hub = PrimeHub()
cam = MBC_CAM_SCHOOL(Port.C)

while True:
    hue = cam.hue()
    if 0 <= hue <= 5 or hue >= 95:    # 紅色在色相的兩端:0 附近和 100 附近都是紅
        hub.light.on(Color.RED)
        hub.speaker.beep(880, 100)    # 頻率 880 Hz,響 0.1 秒
    else:                             # 其他顏色,或 -1(黑白灰)
        hub.light.off()
    wait(100)
Step by step through the program
- Read the hue into a variable.
- If hue is between 0 and 5, or hue ≥ 95 (the official App writes it as "> 94", same meaning) → red light, beep. Red sits at both the start and the end of the hue scale, so you have to check both ends.
- Else (any other color, or -1 for no color) → light off.
- Wait 0.1 seconds and check again.
What you should see: Put the red brick at the setup spot → red light + continuous beeping; swap in green or white paper → light off, no sound.
Common problems
- It beeps all the time even with nothing there? → Hue is 0, which means "Setup 1: COLOR" has not been done (hue is 0 before setup, same as red).
- Orange beeps too? → Orange hue is very close to red (about 4 to 10); make the "5" smaller, for example 3.
- My red brick reads 7 and does not beep? → Use example 1 to see what your red reads, then change the "5" to that number plus a little.
- How do I pick the light color in the official App? → Click the color dot on the "set Power Button light to" block.
Example 3: Which side is the blob on?
What this example does: The hub display uses an arrow to tell you where the blob is in the picture: on the left → ⬅, on the right → ➡, in the middle → ⬆, not found → ✕.
What you need: Same as example 1; the sensor must have "Setup 2: TRACK" done first.
How to connect: SharpShot on port C.
Download the program
| Pybricks |
|---|
| ex03_blob_arrow.py + library |
Pybricks code
# 神攝手(學校版)範例 3:色塊在哪一邊(主機螢幕顯示箭頭)
# 接線:神攝手 → C 埠
from pybricks.hubs import PrimeHub
from pybricks.parameters import Icon, Port
from pybricks.tools import wait
from MBC_cam_school_Lib import MBC_CAM_SCHOOL

hub = PrimeHub()
cam = MBC_CAM_SCHOOL(Port.C)

while True:
    x = cam.blob_x()                      # 色塊 X:左 0 ~ 右 98,中間約 50
    if not cam.found():                   # 沒找到色塊(這時 X 是 0,不能拿來判斷)
        hub.display.icon(Icon.FALSE)      # 顯示 ✕
    elif x < 35:
        hub.display.icon(Icon.ARROW_LEFT)
    elif x > 65:
        hub.display.icon(Icon.ARROW_RIGHT)
    else:                                 # 35 ~ 65 都算中間
        hub.display.icon(Icon.ARROW_UP)
    wait(100)
Step by step through the program
- Read blob X, then read "was it found": the official App checks "is raw blue (area) 0"; the MBC Blocks website checks "blob width = 0"; Pybricks uses
cam.found(). - If not found → show ✕ (X is 0 at this point and cannot be used for the decision, so this check comes first).
- Else, if X < 35 → left arrow.
- Else, if X > 65 → right arrow.
- Otherwise (35 to 65) → up arrow, meaning it is in the middle.
What you should see: Hold the colored block in front of the lens and move it slowly from left to right; the arrow goes ⬅ → ⬆ → ➡. Take the block away and it becomes ✕.
Common problems
- Left and right arrows are swapped? → The camera is mounted the opposite way from the picture. In the camera menu toggle
H-Mirroronce (then checkV-Flip, see the warning above). - An arrow shows even when the blob is gone? → Something of the same color in the background is being tracked: go back to "Setup 2", lower
TOL_HUEand raiseMIN AREA. - Why is the middle 35 to 65 and not just 50? → Leaving a band that "counts as the middle" keeps the arrow from flickering.
Example 4: Turn to follow the blob
What this example does: The robot turns in place to keep the blob in the center of the camera picture. Blob on the left → turn left; on the right → turn right; lined up (or nothing in view) → stop.
What you need
- Everything from example 3, plus
- A two-wheel car (two motors as wheels) with the SharpShot mounted at the front, lens facing forward
- A colored block that you have done "Setup 2: TRACK" on
How to connect
- SharpShot on port C
- Left wheel motor on E, right wheel motor on F
Download the program
| Pybricks |
|---|
| ex04_turn_to_blob.py + library |
Pybricks code
# 神攝手(學校版)範例 4:轉頭追色塊(色塊在左就往左轉、在右就往右轉、在中間就停)
# 接線:神攝手 → C 埠;左輪馬達 → E 埠;右輪馬達 → F 埠
from pybricks.parameters import Direction, Port
from pybricks.pupdevices import Motor
from pybricks.robotics import DriveBase
from pybricks.tools import wait
from MBC_cam_school_Lib import MBC_CAM_SCHOOL

cam = MBC_CAM_SCHOOL(Port.C)
left = Motor(Port.E, Direction.COUNTERCLOCKWISE)       # 左輪:反過來裝,所以設成逆時針才是往前
right = Motor(Port.F)                                  # 右輪
robot = DriveBase(left, right, wheel_diameter=56, axle_track=112)   # 輪子直徑 56 mm、兩輪距離 112 mm

while True:
    x = cam.blob_x()
    if not cam.found():           # 沒看到色塊 → 停下來
        robot.stop()
    elif x < 40:                  # 色塊在左邊 → 原地左轉(速度 0,每秒轉 60 度)
        robot.drive(0, -60)
    elif x > 60:                  # 色塊在右邊 → 原地右轉
        robot.drive(0, 60)
    else:                         # 色塊在中間 → 已經對準,停
        robot.stop()
    wait(50)
Step by step through the program
- Tell the hub where the wheels are: the official App uses "set movement motors to E+F"; the MBC Blocks website and Pybricks use "drive base: left wheel E, right wheel F".
- Set the speed: 20% in the official App; the other two use "60 degrees per second". Turning too fast blurs the camera picture, so turn slowly.
- If no blob found → stop.
- Else if X < 40 (blob on the left) → turn left in place (official App: steer -100).
- Else if X > 60 (blob on the right) → turn right in place (official App: steer 100).
- Else (40 to 60, lined up) → stop.
What you should see: Hold the block in front of the car and walk slowly to the left; the car turns to follow. Stop, and the car stops facing the block.
Common problems
- Blob on the left but the car turns right and keeps turning away? → Left and right are swapped: flip the sign of both turn numbers (official App: -100 and 100; the other two: -60 and 60), or toggle
H-Mirroras described in example 3. - It keeps wobbling left and right? → Turning too fast. Lower the speed in the official App (for example 15%); in the other two change 60 to 40. You can also widen the "middle" band (change 40/60 to 35/65).
- The car turns in place in a strange way? → The motors are mounted the opposite way from the standard LEGO car. Official App: mount the motors the way the LEGO "standard driving base" does; MBC Blocks website: in the "drive base" block switch the "forward" direction of both wheels to the other option; Pybricks: change the left wheel to
Direction.CLOCKWISEand the right wheel toMotor(Port.F, Direction.COUNTERCLOCKWISE).
Example 5: Motion-detection alarm
What this example does: Use the hub as a "security guard" that stays still. When something moves in front of the camera (someone walks past, a hand waves), the hub turns on the red light, beeps, and shows on the display how many times it has happened; when nothing moves, the light is green.
What you need: SPIKE hub, SharpShot (no color setup needed for this example).
How to connect: SharpShot on port C, camera pointed at a doorway or a desk, the whole thing sitting still and steady.
Download the program
| Pybricks |
|---|
| ex05_motion_alarm.py + library |
Pybricks code
# 神攝手(學校版)範例 5:動態偵測警報(有東西在鏡頭前動,就亮紅燈、嗶一聲、記一次)
# 接線:神攝手 → C 埠。機器人要放著不動!
from pybricks.hubs import PrimeHub
from pybricks.parameters import Color, Port
from pybricks.tools import wait
from MBC_cam_school_Lib import MBC_CAM_SCHOOL

hub = PrimeHub()
cam = MBC_CAM_SCHOOL(Port.C)
count = 0                             # 警報響了幾次

while True:
    if cam.motion() > 20:             # 動態值:畫面變化越大數字越大(0~100)
        hub.light.on(Color.RED)
        hub.speaker.beep(880, 200)
        count = count + 1
        hub.display.number(count)     # 螢幕顯示第幾次
        print(count)
        wait(1000)                    # 等 1 秒,同一個動作不要重複算
    else:
        hub.light.on(Color.GREEN)     # 沒動靜:綠燈
    wait(100)
Step by step through the program
- Set "count" to 0 at the start (a variable that remembers how many times the alarm has gone off).
- Read the motion value: the official App uses "reflected light"; the MBC Blocks website uses "SharpShot school edition C motion value"; Pybricks uses
cam.motion(). - If motion value > 20 → red light, beep, add 1 to count, show count on the display, then wait 1 second (so one movement is not counted several times).
- Else → green light.
- Wait 0.1 seconds and check again.
What you should see: Wave a hand in front of the camera → red light + beep + display shows 1; wave again → 2… Keep your hands still and the light stays green.
Common problems
- It keeps going off with nobody moving? → "20" is too small. First print
cam.motion()in Pybricks, or watch theMnumber on the sensor screen, to see what it reads when nothing is moving, then set the threshold a bit above that. Flickering classroom lights and trees moving outside the window both push the number up. - Waving does nothing? → The threshold is too high; make it smaller (for example 10), or move your hand closer to the lens.
- Can I put it on a moving car? → No. When the car itself is moving, the whole picture keeps changing and the motion value stays high. The motion value is only meaningful when the robot is standing still.
Example 6 (advanced): Blob area: stop when close
Note
This example is Pybricks only. The "blob area" it uses is a number only available in sensor firmware from 2026-10 onward (two extra bytes in mode 9); the blocks in the official LEGO App and the current blocks on the MBC Blocks website cannot read it. The code itself is the example, so there are no screenshots.
What this example does: The robot drives toward a blob of the color you set up; the blob gets bigger in the picture the closer it is. Once the area reaches 1500 or more, the car stops and shows a green light. No blob in view → stop, red light; still driving → yellow light, and if the blob drifts left or right the car corrects its direction on the way.
What you need: Same as example 4 (the car plus a colored brick or box).
How to connect: SharpShot on port C, mounted at the front of the car; left wheel motor on E, right wheel motor on F. First set the 2:TRACK color on the sensor as described in "Before you start".
Download the program
| Pybricks |
|---|
| ex06_area_stop.py + library |
Pybricks code
# 神攝手(學校版)範例 6(進階):色塊面積:往色塊開過去,色塊在畫面裡變得夠大(夠近)就停
# 接線:神攝手 → C 埠(裝在車頭);左輪馬達 → E 埠;右輪馬達 → F 埠。先在感應器上設定 2:TRACK 的顏色
# 只有 Pybricks 版:面積是感應器韌體 2026-10 以後才有的數字,官方 App 和積木網站的積木讀不到
from pybricks.hubs import PrimeHub
from pybricks.parameters import Color, Direction, Port
from pybricks.tools import wait
from MBC_cam_school_Lib import MBC_CAM_SCHOOL
from pybricks.pupdevices import Motor
from pybricks.robotics import DriveBase

hub = PrimeHub()
cam = MBC_CAM_SCHOOL(Port.C)
left = Motor(Port.E, Direction.COUNTERCLOCKWISE)
right = Motor(Port.F)
robot = DriveBase(left, right, wheel_diameter=56, axle_track=112)

while True:
    area = cam.area()                 # 色塊面積 = 寬 × 高(0~7500);沒找到是 0。越近越大
    x = cam.blob_x()                  # 色塊左右位置 0~98,50 = 中間
    if area == 0:                     # 沒看到色塊 → 停
        robot.stop()
        hub.light.on(Color.RED)
    elif area >= 1500:                # 夠大了 = 夠近了 → 停、綠燈
        robot.stop()
        hub.light.on(Color.GREEN)
    else:                             # 還小 = 還遠 → 往色塊開過去,偏左偏右順便修正
        robot.drive(80, (x - 50) * 2)
        hub.light.on(Color.YELLOW)
    print('面積', area, ' X', x)
    wait(50)
Step by step through the program
cam.area(): blob area = width × height (0 to 7500), 0 when nothing is found. It reads mode 9, the same as X and Y in examples 3 and 4, so no mode switch is needed.- If area = 0 → nothing in view → stop, red light.
- Else, if area ≥ 1500 → close enough → stop, green light.
- Otherwise → drive forward (80 mm per second) with steering = (X − 50) × 2, so the car steers toward whichever side the blob is on (same idea as example 4).
- The library also has
cam.blob_xya()(gets [X, Y, area] in one call, reading mode 6) pluscam.device_id()andcam.firmware_version().
What you should see: Put a red brick 50 cm away: yellow light, the car drives toward the brick; the area grows as it gets closer, and it stops at roughly 15 cm with a green light. Take the brick away: red light.
Common problems
- It stops while still far away / only stops after bumping into it? → "1500" depends on the size of your brick: print
cam.area()in Pybricks, read the area at the distance where you want it to stop, and use that number. - Area is always 0 but example 3 can see X? → The sensor firmware is too old (before 2026-10) and has no area; please update the firmware. On old firmware you can compute "width × height" yourself for now:
cam.blob_w() * cam.blob_h(). - Left/right correction is backwards? → The motors are mounted the wrong way around; swap them as described in the example 4 common problems.
Examples (WRO edition)
Example 1: Read the hue at point 1
What this example does: The hub display keeps showing the hue seen at point 1; the computer screen also prints the hue and saturation.
What you need
- 1 SPIKE hub
- 1 HUE12 (with point 1 set)
- One red, one green, one blue, one white and one black brick
How to connect: HUE12 on port C.
Download the program
| Pybricks |
|---|
| ex01_show_slot1.py + library |
Pybricks code
# 神攝手 WRO 版(HUE12)範例 1:讀第 1 格的色相(顯示在主機螢幕)
# 接線:HUE12 → C 埠
from pybricks.hubs import PrimeHub
from pybricks.parameters import Port
from pybricks.tools import wait
from MBC_hue12_Lib import HUE12Sensor

hub = PrimeHub()
cam = HUE12Sensor(Port.C)               # HUE12 插在 C 孔

while True:
    cam.update()                        # 讀一次最新資料
    name, hue, sat = cam.get_slot(1)    # 第 1 格:顏色名稱、色相、飽和度
    print(name, hue, sat)               # 電腦畫面印出,例如 Red 5 200
    hub.display.text(str(hue))          # 主機螢幕一個字一個字顯示色相
    wait(500)
Step by step through the program
- Read the data: the official App and Pybricks call
cam.update()first (reads the latest values of all 12 points once), then take point 1; the MBC Blocks website uses the "SharpShot HUE12 C point 1 hue" block directly. - Show it: the hub display scrolls the hue one character at a time, and the computer screen prints it too.
- Wait 0.5 seconds before reading again.
- The big block at the top of the official App program is the "HUE12 reader helper" (the official App cannot import other files, so every program has to carry it). Copy it as is; nothing to change.
What you should see: Red brick 0 to 9 or 230 to 239; green about 80; white paper 240 to 245; black 246 to 250; 255 if the point is not set.
Common problems
- Always 255? → Point 1 is not set, or the sensor is still in the menu (go back to
RUN MODE). - Pybricks always shows 255 and the number after
Connected to ID:is not 95? → The hub's Pybricks firmware is too old; update to v4.0.0b5 or newer.
Example 2: Is point 1 red?
What this example does: Point 1 sees red → the light in the middle of the hub turns red and the hub beeps; any other color → light off.
What you need: Same as example 1. How to connect: HUE12 on port C.
Download the program
| Pybricks |
|---|
| ex02_is_red.py + library |
Pybricks code
# 神攝手 WRO 版(HUE12)範例 2:第 1 格是紅色就亮紅燈、嗶一聲
# 接線:HUE12 → C 埠
from pybricks.hubs import PrimeHub
from pybricks.parameters import Color, Port
from pybricks.tools import wait
from MBC_hue12_Lib import HUE12Sensor

hub = PrimeHub()
cam = HUE12Sensor(Port.C)

while True:
    cam.update()
    name, hue, sat = cam.get_slot(1)
    if hue < 10 or 230 <= hue < 240:      # 紅色在色相的兩端:0~9 和 230~239(240 以上是白、黑、沒設定)
        hub.light.on(Color.RED)
        hub.speaker.beep(880, 100)
    else:
        hub.light.off()
    wait(200)
Step by step through the program
- Read the hue at point 1.
- If hue < 10, or hue is between 230 and 239 → red: red light, beep.
- Else → light off.
- Wait 0.2 seconds and check again.
What you should see: Put the red brick at point 1 → red light + beep; swap in another color → light off.
Common problems
- Orange beeps too? → Orange is about 10 to 30; make the "10" smaller (for example 6).
- Is there a simpler way in Pybricks? → Yes:
if name == "Red":; the library does the check for you (same range as above).
Example 3: How many of the 12 points see a color?
What this example does: Checks the 12 points one by one, counts how many see a color (not white, black or unset), and shows the count on the hub display.
What you need: Same as example 1, with several points set (for example points 1 to 4 in a row), plus a few colored bricks.
How to connect: HUE12 on port C.
Download the program
| Pybricks |
|---|
| ex03_count_colors.py + library |
Pybricks code
# 神攝手 WRO 版(HUE12)範例 3:12 格裡有幾格看到顏色(彩色)
# 接線:HUE12 → C 埠
from pybricks.hubs import PrimeHub
from pybricks.parameters import Port
from pybricks.tools import wait
from MBC_hue12_Lib import HUE12Sensor

hub = PrimeHub()
cam = HUE12Sensor(Port.C)

while True:
    cam.update()
    count = 0                                   # 先歸零
    for slot in range(1, 13):                   # 第 1 格到第 12 格,一格一格檢查
        name, hue, sat = cam.get_slot(slot)
        if hue < 240:                           # 小於 240 = 彩色(240 以上是白、黑、沒設定)
            count = count + 1
    print(count)
    hub.display.number(count)                   # 主機螢幕顯示有幾格是彩色(0~12)
    wait(500)
Step by step through the program
- Set "color count" to 0 first.
- Repeat 12 times, checking one point each time: the official App and Pybricks use
for slot in range(1, 13)(slot goes 1, 2, … 12 in turn); the MBC Blocks website uses a variable "point number" that starts at 1 and adds 1 after each pass. - If this point's hue < 240 (a color) → add 1 to color count.
- After all 12 points → show color count on the display.
What you should see: 2 colored bricks on 4 points → shows 2; add one more → 3. White paper and black bricks do not count.
Common problems
- The count is higher than the number of bricks I placed? → Some points are seeing a colored background (for example a colored line on the field); clear those points (hold the side button for 1 second in the menu).
- Why 240 as the cutoff? → 240 and above is white (240 to 245), black (246 to 250) and not set (255), none of which is a color.
Example 4: Turn by color
What this example does: Point 1 sees red → turn right in place; sees green → turn left in place; anything else → stop.
What you need
- Everything from example 1, plus a two-wheel car (two motors as wheels) with the HUE12 mounted at the front, lens facing forward
- A red object and a green object
How to connect: HUE12 on port C; left wheel motor on E, right wheel motor on F.
Download the program
| Pybricks |
|---|
| ex04_turn_by_color.py + library |
Pybricks code
# 神攝手 WRO 版(HUE12)範例 4:依顏色轉向(紅色右轉、綠色左轉、其他停)
# 接線:HUE12 → C 埠;左輪馬達 → E 埠;右輪馬達 → F 埠
from pybricks.parameters import Direction, Port
from pybricks.pupdevices import Motor
from pybricks.robotics import DriveBase
from pybricks.tools import wait
from MBC_hue12_Lib import HUE12Sensor

cam = HUE12Sensor(Port.C)
left = Motor(Port.E, Direction.COUNTERCLOCKWISE)       # 左輪:反過來裝,所以設成逆時針才是往前
right = Motor(Port.F)
robot = DriveBase(left, right, wheel_diameter=56, axle_track=112)

while True:
    cam.update()
    name, hue, sat = cam.get_slot(1)
    if hue < 10 or 230 <= hue < 240:      # 紅色 → 原地右轉(每秒 60 度)
        robot.drive(0, 60)
    elif 60 <= hue <= 110:                # 綠色 → 原地左轉
        robot.drive(0, -60)
    else:                                 # 其他顏色、白、黑、沒設定 → 停
        robot.stop()
    wait(50)
Step by step through the program
- Tell the hub where the wheels are: the official App uses
motor_pair.pair(…, port.E, port.F); the MBC Blocks website and Pybricks use "drive base: left wheel E, right wheel F". - Read the hue at point 1.
- If red → turn right in place (official App: steering 100, wheels at 200 degrees per second; the other two: the car body turns at 60 degrees per second).
- Else if green (hue 60 to 110) → turn left in place.
- Else → stop.
What you should see: Put the red object in front of the car → the car turns right until it no longer sees red, then stops; green object → turns left.
Common problems
- No reaction to green? → Use example 1 to see what your green reads, and change "60 to 110" to a range that includes it.
- It turns the wrong way? → The motors are mounted the opposite way from the standard LEGO car. Official App: swap 100 and -100; MBC Blocks website: in the "drive base" block switch the "forward" direction of both wheels to the other option; Pybricks: change the left wheel to
Direction.CLOCKWISEand the right wheel toMotor(Port.F, Direction.COUNTERCLOCKWISE).
Example 5: Look at the object's color and decide which side to go around (a common WRO pattern)
What this example does: The car drives forward slowly. A red object ahead → go around it on the right; a green object → go around it on the left; then keep going forward. Many WRO tasks use "look at the color to decide which side to take" (for example the red/green traffic-sign posts in the Future Engineers category); this is the most basic way to write it.
What you need: Same as example 4, with a few red and green objects on the field (at least 40 cm apart).
How to connect: HUE12 on port C (point 1 set straight ahead of the car, about 15 cm away, at floor height); left wheel motor on E, right wheel motor on F.
Download the program
| Pybricks |
|---|
| ex05_wro_bypass.py + library |
Pybricks code
# 神攝手 WRO 版(HUE12)範例 5:看前面物塊的顏色,決定從哪一邊繞過
#   紅色 → 從右邊繞、綠色 → 從左邊繞、沒看到 → 直走
# 接線:HUE12 → C 埠(第 1 格對準車子正前方);左輪馬達 → E 埠;右輪馬達 → F 埠
from pybricks.hubs import PrimeHub
from pybricks.parameters import Direction, Port
from pybricks.pupdevices import Motor
from pybricks.robotics import DriveBase
from pybricks.tools import wait
from MBC_hue12_Lib import HUE12Sensor

hub = PrimeHub()
cam = HUE12Sensor(Port.C)
left = Motor(Port.E, Direction.COUNTERCLOCKWISE)
right = Motor(Port.F)
robot = DriveBase(left, right, wheel_diameter=56, axle_track=112)

while True:
    cam.update()
    name, hue, sat = cam.get_slot(1)
    if hue < 10 or 230 <= hue < 240:      # 紅色物塊 → 從右邊繞過
        hub.display.char("R")
        robot.turn(45)                    # 右轉 45 度(正數右轉)
        robot.straight(150)               # 直走 150 mm
        robot.turn(-45)                   # 左轉 45 度,車頭轉回原來的方向
    elif 60 <= hue <= 110:                # 綠色物塊 → 從左邊繞過
        hub.display.char("G")
        robot.turn(-45)
        robot.straight(150)
        robot.turn(45)
    else:                                 # 沒看到物塊 → 每秒 100 mm 往前
        robot.drive(100, 0)
    wait(20)
Step by step through the program
- Read the hue at point 1.
- If red → show R on the display → turn right 45 degrees → drive straight 15 cm → turn left 45 degrees (the car faces its original direction again).
- Else if green → show G on the display → do the same with left and right swapped.
- Else (no object in view) → drive straight slowly.
- The MBC Blocks website and Pybricks use "turn N degrees" and "drive N mm" and work it out for you; the official App version here uses "drive for N milliseconds" (
go(100, 450)= turn right for 0.45 seconds), so you have to tune the angle by trial.
What you should see: The car drives forward, swerves right around a red object, swerves left around a green object, and keeps going once it is past.
Common problems
- It turns back before it is past the object and hits it? → Make the straight distance longer (150 → 200; official App 1500 → 2000).
- The official App turns the wrong angle? → Change the 450 in
go(100, 450)andgo(-100, 450): a bigger number turns farther. Battery level also makes a difference, so for competitions we recommend Pybricks or the MBC Blocks website. - It keeps going around the same object? → After going around, the camera sees the same object again. Set point 1 lower (closer to the front of the car), or make the turn angle bigger.
More questions
- The hub does not detect the sensor? Unplug and replug, wait 2 s, try another port. The official app shows it as a colour sensor — that is expected.
- Can I use the official app and Pybricks on the same hub? One firmware at a time: Pybricks and the MBC Blocks website need Pybricks firmware, the official app needs LEGO firmware; you can switch back any time with the SPIKE app.
Still stuck? Contact us with your software and a screenshot of the program.
Downloads
- Pybricks library MBC_cam_school_Lib.py
- Pybricks library MBC_hue12_Lib.py
- Shared library (for new projects, one file for every MBC sensor) MBC_sensors.py
- Download centre (libraries, firmware, catalogue for every product)
Sources
- Host and software list:
_build/guides.json - Values and commands:
_build/protocol/cam_school.json、_build/protocol/cam_wro.json(single source of truth) - Setup:
_build/guides/software/spike-pybricks.en.md、_build/guides/product/esp32cam/spike-pybricks.en.md - Examples:
sensors/esp32cam/spike-examples(-wro).md